Introduction
Like many nerds my age, I played D&D back in the early 80s. I started with the Basic and Expert rules, playing with my brother and sister. Somebody had to be the Dungeon Master (DM) and that ended up being me because I liked systems of logical rules, enjoyed imaginative thinking, and was fascinated by this unusual game.
A year or two later we were still playing. I had gotten more into the game which meant moving up to the “Advanced” rules called AD&D, which became the original canon as the popularity of other rules faded away. I saved up my allowance and bought the “holy trinity” of rulebooks: the Players Handbook, Dungeon Masters Guide, and Monster Manual, which were published in the late 1970s. And I invited some friends to play. In 7th through 9th grade the school librarian let us use the private conference room during lunch, which we did at least a couple times per week.
This was before computers were in common use. My family had a TRS-80 which I used and learned to program, but most families did not have a computer and kids still wrote homework and essays by hand. We played D&D old-school with paper and pencil. One of the challenges was keeping track of characters with all their attributes, equipment, etc. which was constantly changing as they adventured. I always wanted to write software to track characters, but the complexity of the data and relationships made this difficult. Rainbow magazine published a variety of programs every month (given as code listings to be typed in!), which once included a D&D character app, but it was over-simplified and unable to handle all the aspects of a character.
Later when I learned relational databases I thought they would be ideal for storing D&D characters. Yet even then, the relationships would be difficult to model. It’s not only 1:M and M:M, but also hierarchical, and relationships that are conditional based on several other attributes, with plenty of exceptions.
In the 1990s I wrote an app in C++ that ran in OS/2 using Borland OWL. It was an exercise in learning OO programming and using several Design Patterns. But I only got this app about 90% complete, since my D&D gaming was already tapering off.
Fast forward a couple of decades to late 2008 and D&D play had faded from my life. It is time consuming (especially for DMs, which was always my role) and after college it got replaced by so many other things that were happening in life, and also with my friends – jobs, marriages, kids, travel, etc. Meanwhile, Java 1.5 had been released which included Generics, a major improvement to its data modeling, followed by 1.6 which had major performance improvements. In order to bone up on this new tech, I decided to finally write the D&D character app that I always wanted. And to use these capabilities to make it fully capture all aspects. I still had over 100 characters (as paper character sheets) from old campaigns and the test would be whether I could fully store them in the app, with all their details and quirks.
Precis: the App
The app is in my public GitHub, open source under the very permissive MIT license. Anyone can download, build and run it using any version of Java 1.6 or later, on any computer (Linux, Mac or Windows). The app GUI is Java Swing. This gives it a vintage 1990s look but makes it functional and easy to program. I found Swing to be well designed and better than other GUI systems I learned in the past, including Microsoft Windows programming (with all those WM_ messages), MFC and Borland OWL.
The app not only stores characters that you create, but also generates characters. Auto-generation creates the character essentials and leaves it to you to fill in details. These essentials are a moving target as I occasionally enhance the program, but include:
- Ability scores (generated by rolling 4d6 for each and taking the 3 highest)
- Auto-generating all ability score adjustments.
- Choosing the best class based on ability scores.
- Choosing race consistent with class.
- Choosing alignment consistent with class.
- Auto-generating all class & race abilities & languages.
- Randomly assigning gender, name, height, weight, etc.
- Auto-generating starting wealth based on class.
- Equipping the character randomly yet based on class, including armor & weapons.
The app also prints characters using a simple 2-column format. It uses the Java print service which abstracts the printer and works on any printer, on any operating system.
Much of what the app does is based on data config text files. This includes ability score adjustments, saving throws by class and level, default equipment lists (for auto-generated characters), and spell usage by class and level. Thus, some of the app behavior can be changed simply by editing these text files.
App Usage Details
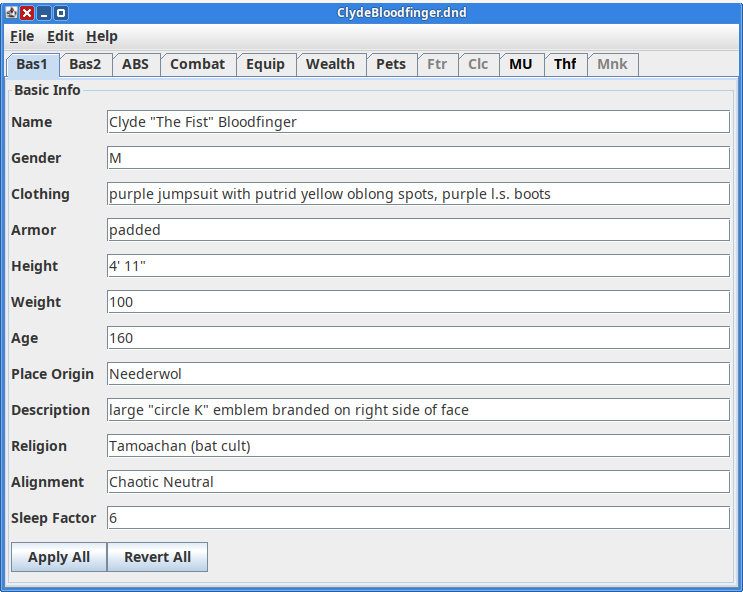
The app is self-explanatory, a simple UI of tabbed panels. Yet it has some capabilities that require explanation.
The GUI layout is dynamic. As you resize the app, GUI elements may shrink, grow or move. If you find layout errors (such as text fields that are truncated), this is usually a limitation of Java Swing dynamic layout and resizing the app fixes them (grab a window corner and drag it).
All entry fields accept strings. While any text is accepted, some fields (such as ability scores and hit points) expect integers. If they are not integers, the app will still function but it won’t be able to automatically set adjustments.
Command Line Parameters
A typical app invocation looks like this:
java -jar DnD.jar
This assumes that an appropriate version of Java is in the path and you are in the app’s bin directory which contains its config files.
All of the parameters below can be combined.
Font Size
Java Swing was originally designed 20 years ago when a 1600×1200 monitor was considered high resolution. Consequently, the font size and overall GUI may be too small for modern monitors. To accommodate this, the app has a command-line parameter to adjust the font size, which also adjusts the rest of the GUI.
For example, to adjust the font 2 points larger than normal:
java -jar DnD.jar -font +2
File to Open
If you want the app to open a character file when it starts, use the -file parameter:
java -jar DnD.jar -file CHARACTERFILE
Disk Format
The app stores characters on disk using a compact binary format. A typical 1-5 level character takes about 2 kB of storage – more for higher level and multi-classed characters, but there is no arbitrary limit to the size. The first data it writes is a storage version number, for future compatibility. If I ever change the data format, this will enable future versions of the app to recognize and load characters stored in older formats.
The app remembers the last directory used to save or load a character. This is convenient, since when loading a file you only have to navigate through directories once. This also applies when you load a character on app startup.
Apply / Revert
The app uses a Model-View design. The Apply and Revert buttons transfer data between the model and view. For example, if you change the character’s name, it doesn’t apply until you click the Apply button. If you click the Revert button, it restores the UI to the state of the model, which reverses all changes you made since you last clicked Apply.
Apply and Revert buttons have different scopes. On each panel they pertain only to that panel. To do this globally, use the app menu: Edit|Apply All, Edit|Revert All.
Lists are an exception to this behavior. Changes made to lists take effect immediately.
Red Buttons
Red buttons indicate actions that might change or override user-entered data. They are used to automatically set adjustments for ability scores and classes.
For example, suppose a character earns 750 XP on a campaign. Enter 750 into the XPoints field and click the red Add XP Points button. The app will add any XP bonuses (for example, 10% bonus makes it 825), add the XP to the character’s total, and if it bumps him up a level, the app will change the level and apply relevant adjustments (new hit points, saving throws, spells, powers, etc.).
Equipment
Character equipment is modeled using a Composite design pattern. It is a tree that can be nested to any depth, indicating which items are contained within other items. Moving, copying or deleting any item affects all other items it contains.
The GUI is a drag and drop panel. Any item can be dragged and dropped anywhere else. This can also be used to reorder items at any level. The item and everything it contains comes with it. If you hold down the CTRL key while dragging, it makes a copy instead of moving it.
Class Info
The app has a panel for each of the 5 basic classes: Fighter, Cleric, Magic User, Thief, Monk. Each panel has a checkbox indicating whether it applies to the character. If it is not checked, the tab for the panel is greyed out (yet not disabled, so you can still click it). If a character already has a certain class, toggling the checkbox to disable does not delete it, but only flags it. If you disable it by mistake, simply check it again to enable it and no data will be lost – so long as you didn’t save the character or make other changes while it was disabled.
Class data starts as a zero-level placeholder. It does not become real until you set the level to some value 1 or more. Data for placeholder classes is not saved or printed, so if you enable a class for a character but you don’t set the level, that class data will not be saved or printed.
Each class has a name, which by default is the name of the Java class used to model it. You can (optionally) set this name to anything you want. If the name you use happens to be a subclass of that class, this subclass will be used in the data model. Subclass names include:
- Ranger (subclass of Fighter)
- Paladin (subclass of Fighter)
- Druid (subclass of Cleric)
- Illusionist (and MagicUser are both subclasses of MUBase)
- Assassin (not yet implemented)
With these subclasses, the model handles a total of 9 character classes – and various combinations. Multiple class tabs can be enabled and each operates independently. For example, Fighter-MagicUser or Thief-Illusionist. However, each character can have only one of each base class, so Fighter-Ranger or Cleric-Druid is not possible (nor would it make sense).
When you give your own user-defined name for a class, your name does not have to match any of these. In this case the base class is used. For example, you could name a Cleric as “Shaman” and it would be modeled as a Cleric.
When first adding a class to a character:
- Click on the class tab
- Click the Enabled checkbox
- Enter a name (optional – if you want a subclass or custom name)
- Click the Reset/Init button (needed only if you are using a custom name)
- Enter a level of 1 or more
- Unless you are creating a multi-class character, in which case see below
- Click the Level button
When you take that last step, if the level you entered is different from what was there before, it will change data on this tab, as well as on other tabs. For example, it will assign hit points and saving throws which you will see on the Combat tab. These changes apply directly to the model and cannot be reverted (which is why the buttons labels are red).
Multi-Class Characters
Multi-class characters are supported, including auto-generation of hit points and save throws. To create a multi-class character:
- For each class tab:
- Click on the tab
- Click the Enabled checkbox
- Optional: enter a custom name and click the Reset/Init button
- After all classes have been enabled, apply all (menu Edit|Apply All)
- Visit each class tab
- Enter a level of 1 or more
- Click the Level button
Hit points for multi-class characters are computed as follows: for each class, for each level, determine the hit points, add any constitution bonuses, then divide by the total number of classes. Round this number to the nearest integer (it may go up or down, depending on the fraction).
Each save throw for a multi-class character is the best (lowest) across all classes (per level of each individual class) for that category.
Class Abilities
Every class has certain abilities, which are stored in this list in the upper left of the panel. Some may be auto-generated by the app, others may be user-defined. The prefix “AG: ” (for auto-generated) is used to differentiate them. Any item that has this prefix is auto-generated. The app may remove or change it. Yet when the app manipulates this list, it ignores all items not having this prefix. This way, the app preserves any user-defined items in the list.
Spell Use
The app tracks how many spells can be cast daily by class and level. For Clerics and Druids, it also applies Wisdom bonuses. The casting of spells is different from the availability of spells. Clerics may pray or meditate for more spells than they can cast each day, and Magic Users and Illusionists may memorize more spells than they can cast.
The casting of spells is stored in the upper Class Abilities list and the app automatically sets it.
The availability of spells is stored in the lower Spells list left for users to define.
The app configures spell use based on the class name and reverts to the default. For example, suppose the character has Cleric enabled yet named “Shaman”. The app doesn’t have a spell use config for that name, but the class is of type Cleric, so it will default to Cleric spell usage. The user can override default spell usage in the app (don’t use the AG: prefix), or he can create a data file called spells.Shaman.dat to define how he wants Shaman spells to be allocated by level. If this file exists, the app will use it to allocate spell usage for Shamans.
Paladins and Rangers gain spells only at higher levels (8th and above). Because Rangers gain two kinds of spells, Druid and MagicUser, they have 2 config files: spells.Ranger.Druid.dat and spells.Ranger.MagicUser.dat.
Printing
To print a character, use File|Print from the menu. A print dialog will appear, showing all available printers (both local and network). I recommend setting all 4 margins to 0.25 inch before printing.
Caveats and Limitations
Assassins are not handled. They have been rare in my games (at least as player characters) so I deferred them to last and haven’t gotten around to it.
Paladins have some Cleric abilities that aren’t included in the special abilities. For example starting at level 3 they are able to turn the undead. To handle this, when a Paladin reaches 3rd level, enable the Cleric tab and set it to 1st level. This will auto-assign the turn probabilities. Delete the auto-generated spell usage on the Cleric tab and leave the spell availability list blank. At 9th level and above, spell usage will appear in the Paladin special abilities. For spell availability, use the Spells list on the Cleric tab.
Rangers gain both Cleric and Magic User spells at 8th and 9th level respectively. Their spell usage will appear automatically under Ranger special abilities. When this happens (at the appropriate level), enable the Cleric and MagicUser tabs to track spell usage. Leave the levels set to 1 and delete the auto-generated spell usage on these tabs.
Note that having more than 1 class enabled will enable multi-class computation of save throws and hit points. The save throws should be correct for high level Paladins and Rangers having low level Cleric and MagicUser enabled, because each is the best across all classes by level. But having the Cleric (and possibly MagicUser) classes enabled will generate hit points as if this were a multi-classed character, which will be incorrect. So before any level changes, record the hit points, then make the level changes, then override the auto-generated hit points.