Introduction
Truing bicycle wheels is based on 4 basic operations that anyone can learn in 10 minutes. From there, it is only a matter of practice to become proficient.
Overview
Here’s the bottom half of a bike wheel viewed from directly ahead looking back, or directly behind looking forward.
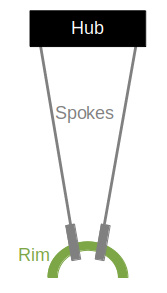 Each spoke has a nipple that passes through the rim. The nipple is a nut threaded to the end of the spoke, which can be viewed as a long thin bolt. The nipple has a screw head on the outside of the wheel (under the tire where you can’t see it), and a square head that emerges at the opposite side of the rim inside the wheel. Normally, you adjust the nipple by using a spoke wrench (a kind of square-head socket) from the inside of the rim.
When you tighten the nipple it shortens the spoke, increasing tension. This tension pulls in 2 directions: to the side of the hub where the spoke attaches, and toward the hub reducing the radius of the rim.
When you loosen the nipple the opposite happens.
Spokes and their nipples use a standard right-handed thread. But this is from the perspective of 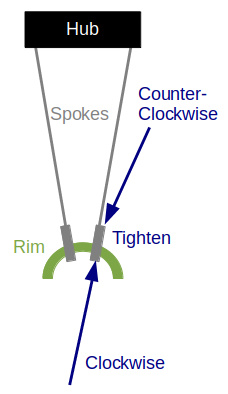 being outside the rim “above” the nipple looking “in” to the wheel. When truing wheels, the usual perspective is the opposite: with your head to the side of the rim looking down at the inside of the rim. Thus when truing wheels, the spoke appears to be a left-hand thread. This is show in the diagram.
Spokes are usually adjusted in pairs. With 2 spokes and each moving tighter or looser, we have 4 situations to describe.
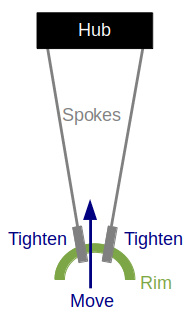
Move Right
This diagram shows how to shift the rim to the right by adjusting adjacent spokes.
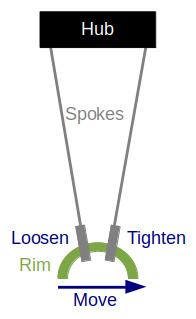 Always ensure to loosen one spoke and tighten the other. Turn each spoke nipple the same amount in opposite directions. If you don’t do this, your adjustment will also shift the rim up or down, creating a bump or flat spot.
Of course, if the rim also has a bump or flat spot at the same point you need to shift it right, then you can tighten one side or loosen the other, but not both.
Pro tip: always loosen first, then tighten. This avoids excess tension in the wheel and makes the adjustments easier. And it helps avoid stripping the spoke nipples when they are tight.
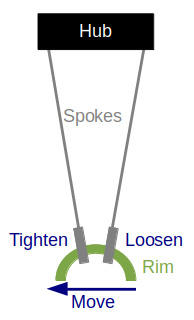
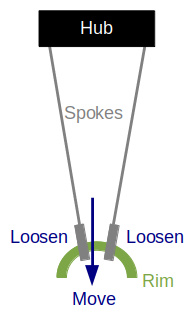
Move Left
This diagram is the opposite of move right. The same text applies in reverse. ‘Nuff said!
Move Up
 Here we’re talking about when the wheel isn’t round. A flat spot is a section with smaller radius than the rest of the wheel – pressed “in”. A bump is a section with a larger radius than the rest of the wheel, pressed “out”.
Moving up is how to correct a bump. It’s simple: tighten both adjacent spokes. This applies more tension pulling the rim inward against the bump. It doesn’t shift the rim left or right because the tension is equal on both sides.
Move Down
 Move down is the 4th and last operation. You guessed it: loosen both adjacent spokes. This reduces the tension, allowing the rim to move outward. You may intuitively grasp that while the other 3 operations apply tension to force the rim in the direction you want, this operation does not. If so, your intuition is correct.
Spokes can only apply force in tension, not in compression (they can pull things together but they can’t push them apart). So “move down” is different from the other 3 operations. It is a passive operation – it reduces tension, freeing the rim to move outward, but it doesn’t apply any force to actually move it there. This leads to another important topic.
Wheel Tension and Stress
Before working on any wheel, and periodically as you make adjustments, you should grab a pair of spokes on opposite sides with each of your hands, squeeze them together tightly so the spokes bend, and release them. Then rotate the wheel and do the same with the next 4 spokes. And again until you go all the way around the wheel. A typical 28 spoke wheel will take 7 squeezes.
As you squeeze a pair spokes on opposite sides, you pull the rim inward at that point which exerts stress all around the wheel. Now this relates to the 4th operation “move down” – after you loosen a pair of spokes, squeezing every other pair around the wheel exerts forces to push the rim outward, and the point where you loosened the spokes is where the rim will “take out the slack” and bulge out just a bit as allowed by the spokes you loosened. Thus, after performing a “move down” operation, you need to tension the wheel in order for the change you made to take effect.
Another way to stress the wheel and equalize spoke tensions is to lay it on its side on a hard floor (take care to protect the axle end cap and rim from being scratched), lean over the wheel with your hands on opposite sides of the rim, and your knees holding the rim nearest your body down on the ground 90* apart from each of your hands. The wheel is touching the floor at the axle (its center) and at the rim under your knees. Now apply your full body weight to your hands as if you were trying to fold the rim in half. You can even gently bounce your full body weight on the rim. Then rotate the rim 45* and do it again, etc. 7 more times all the way around the wheel. Now flip the wheel over and repeat all the way around.
This applies forces to the rim to move it into a shape that matches and equalizes the spoke tensions. If you don’t do this, your spoke adjustments will tend to over-adjust the wheel, then the wheel will have pent-up stress that will redistribute when it is ridden. So after the first ride the wheel will be out of true or round again and need another adjustment.
Adjust – How Much?
No wheel is perfect. When you spin the wheel checking for left-right (trueness) and up-down (roundness), you will always find something. Once you get variations down to a millimeter or so (it doesn’t even have to be that good) they’re essentially perfect since that’s not enough to make any difference through the flexibility of the tire. And as the bike is ridden, stresses are distributed through the rim and spokes, which can shift things a bit. All perfectly normal.
Generally speaking, truing (side to side) spoke nipple adjustments are 1/8 to 1/4 turn on each spoke and rounding (up-down) adjustments are twice as much, or 1/4 to 1/2 turn. Of course, this is just guidance and how much you adjust depends on the wheel.
Adjust – Exactly Where?
Suppose you find a left-right or up-down “burble” in a rim that you will correct with one of the above 4 operations. Exactly which spokes should you adjust? Some burbles are small and span only a couple of spokes. Others might run for 1/4 or 1/2 of the wheel circumference. Remember that the rim has some rigidity of its own, so if a single spoke is too tight or loose, it will affect a section of the rim several spokes long. So don’t adjust spokes all the way along the burble, but only the innermost spokes. For example, if the burble visually spans 6 spokes, don’t adjust all 6, but only the middle 2 to 4.
For simplicity, the above 4 operations were explained in terms of symmetric spoke pairs on opposite sides of the rim. But your adjustments don’t have to span an even number of spokes. For example, consider a left-burble 5 spokes long that you need to pull to the right. You need to adjust the inner 3 spokes of the burble: 1 center spoke on the left, and the 2 spokes next to it (one fore, one aft) on the right. In this case loosen the middle spoke by 1/4 turn and tighten the other 2 spokes by 1/8 turn each. This will keep the rim’s up-down unchanged as you shift it right.
Spoke Tension – How Tight?
Wheels are not, and should not be, perfectly rigid. They are slightly elastic which makes them stronger. Spokes apply forces in tension but not in compression. The weight of the bike & rider is a force applied at the axle pulling down on the spokes at the top half of the wheel. Intuitively, the bike is hanging from the upper spokes. Thus as the wheel rotates, each spoke sees higher tension as it rotates through the top and lower tension as it rotates through the bottom.
Stiffness and strength are related, but not the same thing. When you start out with very low spoke tensions, tightening them increases both stiffness and strength. Spoke tensions too low / loose is obviously bad. We want nice tight spokes.
One of the factors determining the lifetime of a spoke is the difference in tension between max (spoke at top position) and min (spoke at bottom position) as the wheel rotates. The tighter the spokes, the less difference between this max & min. Put differently, looser spokes experience greater changes in tension forces with each wheel rotation, which increases stress on the spoke. Perhaps counter-intuitively, a spoke that is too loose / low tension can fail earlier due to greater tension differences as it rotates around the wheel.
So tighter is better – up to a point. Past that point, getting spokes too tight makes tension so high that it can make the wheel weaker even if it feels stiffer. Spokes that are too tight are likely to stick / freeze in place and strip the nipple when you try to turn it. The high tension can stress crack rims at the spoke holes (especially carbon rims). It can shear off the heads of spoke nipples. And it can make wheels suddenly break under load instead of flexing.
A 5th Operation: Dish
OK so I lied. Or at least I oversimplified. There’s another wheel adjustment operation called “dish”.
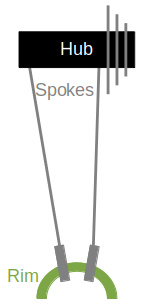 Wheels must be centered to the axle. But that doesn’t mean they are centered between the spoke attachment points on the hub, because many hubs are asymmetric. Rear wheels have a cassette on the drive side. Front wheels with a disc brake have the disc on one side. With these hubs, the spokes on one side attach closer to the end of the axle than on the other side.
To the left we depict a typical rear hub with the drive side cassette on the right. As you may guess intuitively, the spokes on the drive side that are close to perpendicular to the hub, have much higher tension. Normally, these drive side spokes are also shorter. When you squeeze the spokes you can feel the difference in tension.
To change the dish of a wheel, loosen or tighten all the spokes on one side by equal amounts. This will shift the entire rim left or right without changing its trueness or roundness. If you loosen one side and tighten the other, do it in that order – loosen first – in order to make it easier and avoid over-tightening the spokes.
Tools & Equipment
A truing stand is nice, but basic wheel adjustments don’t require one. If you do use a truing stand, don’t waste your time with a cheap one; you’re better off doing the work with the wheel mounted in the bike. The Park TS-2 (with variants like TS-2.2) is one of the best, a classic that most bike shops have used for more than 40 years. Also get a high quality spoke wrench because otherwise you’ll strip and destroy the nipples on high tension wheels. Replacing a stripped spoke nipple is a real PITA, better to not strip it in the first place.
Conclusion
Most wheel work involves adjusting true and roundness as wheels get stressed during riding. This is easy to learn. As you gain experience you’ll do it with increasing precision & speed, and develop a feel for proper spoke tensions. Mastering this prepares one for moving on to more advanced tasks like wheel building and more serious repairs.
Spokes (and matching nipples) come in different widths or thicknesses. 14 gauge or 2.0 mm, and 15 gauge or 1.8 mm are the most common. A 14g spoke nipple might seem to fit a 15g spoke. The threads will mesh but they’ll be loose, so don’t let that happen.
Also, nipples can be aluminum or brass. Brass nipples are stronger and essential for carbon rims since aluminum reacts with carbon via redox (reduction-oxidation), gradually corroding the spoke nipples until they break. It might take a few years, but it will happen. There are methods to slow down or mitigate this, but they are just kludges – no matter what you do it’s going to happen eventually and the only way to truly prevent it is to use brass. So I always use brass nipples, period. Not only for carbon rims, but also for tandems and mountain bikes, since you need the strength. Yet this means the only application for aluminum spoke nipples is road bikes with alloy (metal, not carbon) wheels. In this case, what’s the point? You only save a few grams, and if the rim is metal it’s not a lightweight wheel to begin with. Might as well use brass all the time. Aluminum spoke nipples are a weight-weenie marketing exercise to publish wheel weights a few grams lighter, at the expense of durability and longevity.