All posts by Mike Clements

Audio Phase: Shift versus Inversion

It is said that a 180* phase shift is the same as a polarity inversion. That is, it flips a wave to its mirror-image across the time axis. If we imagine a simple sin or cos wave, we see that this is true. 180* is half a wavelength, slide it that distance either forward or back, and you get the same wave with polarity inverted. Another consequence of this lies in audio room tuning. If the distance between 2 walls is half a wavelength of a particular frequency, the wave reflecting from the wall, being inverted polarity, cancels the wave arriving which causes a dip or null at that frequency. Those same walls will also boost waves at twice that frequency because that same distance between the walls is their full wavelength, so the reflected wave is in phase with the arriving one.

But this doesn’t work with a general musical waveform. No amount of sliding it left (back) or right (forward) in time will invert its polarity. Intuitively, we see that a musical wave is not symmetric or repeating like a sin or cos wave. The musical waveform is much more complex, containing hundreds of frequencies all superimposed. Any distance we slide it left or right represents a phase shift at only 1 particular frequency. Alternately, sliding it left or right can be seen as a phase shift at all frequencies, but a different phase angle for each, since the distance it shifted is a different number of wavelengths for each frequency it contains. As in the above example, it boosts some frequencies and cuts others. This is what happens in a comb filter.

Since every frequency has a different wavelength, it’s hard to imagine how a phase shift of the same angle at all frequencies could even be possible. It is possible, but to do it we need to expand into another dimension and use complex numbers. That computation creates a new waveform that is the polarity inverted version of the original. You can find explanations of this all over the internet, for example here: https://www.audiosciencereview.com/forum/index.php?threads/analytical-analysis-polarity-vs-phase.29331/

Because of this, when speaking of music and audio I prefer the term “polarity inversion” to “180* phase shift”. Even though they can be equivalent, the former is concise while the latter is somewhat ambiguous since one must also specify at what frequencies the phase shift is applied.

Email Send, IP Addresses, Blacklisting

About a month ago emails that we sent were bouncing, being rejected by the destination servers saying one of the IP address where it came from was blacklisted. I host this site and our email through Hostgator, using their SMTP server to send email. So my first guess was that the Hostgator SMTP server was blacklisted. It’s plausible, as it’s shared by many customers, some of whom may be spammers. But the IP address from the email bounce message didn’t match that server. Turns out it was the IP address that Comcast assigned to my home router. So Comcast assigned me a blacklisted IP address! Perhaps Comcast shares that IP with other customers and one of them has been spamming.

However, email sent from my GMail SMTP was not bouncing. Looking at the email headers, GMail’s SMTP does not forward the IP address of the client who sends it; it sends its own. So one possible solution would be to get the Hostgator SMTP to stop forwarding my IP address, but instead use its own, or even use my own IP address for this domain, mclements.net. I contacted Hostgator support and they said they could not configure the SMTP server to do this.

In the meantime, as a temporary workaround I configured my email send to use the GMail SMTP and CC my other email. It’s clumsy but works.

My next option was to change my Comcast IP address. I called support and they confirmed that Comcast uses DHCP, so getting a new IP address should be as simple as turning off my modem & router, then turning them back on. I knew it wasn’t that simple because I had done that and the IP address never changed. The DHCP has a lease with a time duration. You need to disconnect long enough for that to expire before getting a new IP address. I left them off overnight and still got the same IP address.

DHCP servers often (though not always) use the client MAC address as a hash when providing IP addresses. If you can change the MAC address of the router that connects to your cable modem you are likely to get a new IP address. I dug into my router menus and found a config option to do exactly this: you can enter any MAC address you want, or have it copy the one from the PC you are using to connect to the router. When setting MAC addresses manually like this, one must be careful because the MAC address is not just a random number. The first several hex codes are assigned to manufacturer and device type. You should ensure that what you enter is a valid MAC address.

In short, this worked. After changing my router’s MAC, Comcast issued a different IP address that was not blacklisted, and now my email is not bouncing. Since these IP addresses belong to Comcast, I called to let them know the old IP address was blacklisted so they can deal with it.

Summary of steps:

  1. Configure your router to use a different MAC address
  2. Turn off the cable modem and router
  3. Turn on the cable modem and let it boot up and sync
  4. Turn on the router

After step (4) it may take longer than usual to get an internet connection. When the router negotiates with Comcast for a connection, if its MAC address is different and Comcast assigns a new IP address, the process can take longer.

Bikes: Electronic Shifting

In late 2001 I bought a new road bike, a Fezzari Empire. One of the reasons I bought it at that time is because that was the last year that Shimano offered its best components (Ultegra and Dura Ace) with mechanical shifting. Since then, they are only available with electronic. SRAM has also gone to the “dark side”.

Why don’t I like electronic shifting? Everyone else seems to love it. They say it works perfectly. Perhaps it does (when it’s not failing due to dead batteries) but mechanical shifting works perfectly too. It’s been perfected over decades and it is simpler, cheaper, lower maintenance, more reliable and durable.

My reasons include:

Electronic shifting has batteries that can die on a ride. To be safe, you need to add a spare battery to your ride kit. These batteries also must be charged periodically, and replaced when they wear out.

Mechanical shifting, once adjusted properly, works perfectly for several years and thousands of miles without needing adjustment or maintenance (other than periodic cleaning, which electronic shifting also requires).

Electronic shifting is less durable and reliable. Consider a multi-day stage ride. Electronic shifting requires you to bring extra batteries or find a way to charge them. It’s extra hassle with no corresponding benefit. Lachlan Morton, who won the Tour Divide in 2023, had electronic shifting. The batteries were a hassle during the ride (charging and replacing), and later it failed, forcing him to jerry-rig his derailleur with a spare spoke.

Electronic shifting is also considerably more expensive.

Electronic shifting has no real benefit to justify the expense and hassle. It’s not lighter, nor more efficient, nor faster, and it’s actually less durable and reliable.

Getting philosophical, electronic shifting contradicts the classic purity of what a bicycle should be: a simple, elegant, purely mechanical machine. No batteries, no electronics, no software. The only power source should be the person riding it.

In short, electronic shifting is a complex, expensive, fragile solution to a problem that doesn’t exist.

So why do so many riders like it? It’s high tech, more expensive making it more exclusive, and the latest trendy shiny object. Pros use it, which can make sense since their bike only has to last 1 day, they don’t care how much it costs or how long it will last. But for those of us who aren’t GC contenders in the Tour de France, I’m surprised so many cyclists drink the kool-aid and can’t see that the Emperor has no clothes. And bike companies love it because they can charge you 3 times the price for the equipment, lock you into their “ecosystem”, get a new revenue stream selling batteries, and every few years forcefully deprecate old systems forcing people to upgrade.

No thanks, I have mechanical, the shifting is sublime, it’s simple and user-serviceable, and it will last me the next several decades until (God forbid) I’m too old to ride bikes anymore.

Tubeless Tires: MTB Yes, Road No

MTB: Yes

Tubeless tires are great for mountain bikes. They address the 2 biggest limitations of the tube+tire technology that had been used for more than 50 years: traction and puncture resistance. On MTB trails with tubed tires, you must run high enough pressures to avoid pinch flats. And those pressures are high enough to greatly reduce traction. For example, on typical 26″ x 2.3″ tires you would typically need 50 PSI to avoid flats, which makes the tire almost as hard as the rocks you’re riding over. And that only avoids pinch flats. You would still get flats from thorns or sharp rocks.

With tubeless tires you can run about half the pressures, 25-30 PSI, on those same size tires. This is a vast improvement in traction. And despite these lower pressures, the tires are even more flat resistant than before. It really is the best of both worlds.

Tubeless has its drawbacks. It makes tire mounting messy, more labor intensive, and requires a compressor. It also requires more maintenance, as the fluid must be replaced every few months. And once or twice a year you also need to completely remove the tire from the rim to clean out all the old dried up sealant.

But when mountain biking, the benefits are are well worth these hassles.

Road: No

None of these benefits apply with road bikes. With their skinnier tires, the ideal pressures for rolling resistance, traction and comfort are already high enough that you would run the same pressures whether tubeless or not. On road bikes, pinch flats with tubes are not an issue and flats are much less common.

Yes, tubeless is more puncture resistant. But road riders don’t get punctures nearly as often as MTB riders used to. And when those punctures happen on the road, the tubeless sealant doesn’t handle them as effectively as it does with MTB tires. Several times over the years I’ve stopped to help road riders with tubeless tires fix flats when their sealant just sprayed everywhere making a mess instead of sealing the leak. They didn’t have a spare tube because they thought tubeless tires were “flat-proof”.

On my road bike I use latex inner tubes and Conti GP5000 tires. I ride it at least 5,000 miles per year, usually more. If I switched to tubeless:

  • My wheels would not be any lighter.
  • My wheels would not be any faster.
  • My tire pressures would not change.
  • I would still have to carry a spare inner tube with me.
  • If I did get a flat on a ride, it would be more of a hassle than just swapping an inner tube.
  • I would spend more time (not less) maintaining my tires because I would have to clean out & replace the sealant more often than I get flats today.
  • That maintenance would also take longer and be messier, due to dealing with sealant and a compressor.

In short, road bikes don’t need either of the 2 key benefits that tubeless tires provide, so all it does is create hassle and mess.

Tascam DA3000

The Tascam DA-3000 is a professional rack mount digital recorder. For years I owned a prior model, the SS-R1. It provided years of reliable service and I used it to archive nearly 1,000 vinyl LPs. The DA-3000 improves upon the SS-R1 in a few important ways:

  • Better AD converters: Burr Brown PCM4202
  • Better DA converters: Burr Brown PCM1795
  • Supports higher data rates: 24 bit, up to 192 kHz PCM and DSD 128 (5.6 MHz)
  • Direct AD-DA mode
  • Lower distortion and noise

It also retains many of the most important features of the SS-R1

  • Records to SD and CF media (no internal hard drive)
  • No fans – dead silent
  • The flexibility of many connections
    • Analog unbalanced RCA input and output
    • Analog balanced XLR input and output
    • SPDIF coax input and output
    • AES/EBU input and output
    • Internal or external clocks
  • Professional build quality, durability and reliability

Tascam no longer makes the DA-3000 so I bought mine used from eBay. In using it I’ve discovered some interesting quirks.

Date/Time Clock

The SS-R1 had a clock that had to be set every time you powered it on. Even when plugged in, it would forget the date & time when turned off. The DA-3000 fixed this – at least supposedly. But every time I powered mine up, I had to set the clock.

The problem was that the DA-3000 uses a rechargeable button cell battery to remember the clock when turned off. And it uses a tiny one that is soldered to the board. After a year or two, this battery dies and is not easy to replace (you must disassemble the unit, remove the board and solder). I contacted Tascam support and they said they no longer provide this service. It was annoying enough I decided to do my own permanent fix, better than what they would do at the factory.

Rather than simply replace that soldered-in battery, I installed a small battery cage for a CR2032 battery, which has the same voltage but is more than twice the size and capacity. Instead of soldering a new battery onto the board, I soldered the battery cage lead wires. Here’s what it looks like now:

I put an ML2032 battery into the cage (the rechargeable version of a CR2032). Not only will it last much longer than the tiny OEM battery, when it dies I can now replace it in 10 minutes easily without any soldering. This is how the DA-3000 should have been built from the factory.

DA-AD Mode

This mode stands for “Digital-Analog, Analog-Digital”. In this mode, the DA-3000 doesn’t record, but merely activates its DA and AD converters. You select which analog & digital inputs & outputs it uses. The DA converter has a slightly warm, soft voicing free of glare. Very nice. I can find no explanation for this in measurements, as its frequency response and distortion measure clean.

DA-AD mode does not auto-detect the sample rate. You must select the sample rate in the menus. If the sample rate you select does not match the digital input, the DA-3000 will still produce analog output but it is distorted. By this I mean high frequencies rolled off with elevated harmonic distortion.

Frequency response in DA-AD mode with sample rate mismatch, compared to sample rate match.

Distortion in DA-AD mode with sample rate mismatch:

For comparison, here’s distortion when you manually set the rate to match the input:

This distortion is measured after the DA3000 DA conversion and the SSR1 AD conversions. The distortion when you don’t manually set the sample rate to match the input is not documented in the manual, and Tascam support did not respond to my inquiry about this. So just know about this and set it!

Sample Rate Sensitivity

The popular S/PDIF digital format (whether coax or toslink) is a “push” protocol. The source device sends data to the downstream target using the source’s clock. The target device has no way to tell the source to slow down or speed up. No two clocks ever agree exactly, so the target device has to adapt to the source device sample rate. In contrast, audio over USB is a “pull” protocol. The downstream target device runs off its own clock, requesting data from the source as needed. No need to synchronize clocks or adapt sample rates.

Lest anyone disregard S/PDIF clock sync as a problem “solved in the real world”, consider that well engineered DACs use TCXO for their clock, which are temperature compensated crystal oscillators. These are typically accurate to roughly 1 ppm, which at CD quality 44.1 kHz makes a clock drift of 1 sample every 22.6 seconds. So the issue is real – with S/PDIF, the downstream device must adapt to the upstream clock. Buffering can’t entirely solve this, because it can only solve variations around an identical center frequency. Put differently, no two devices will ever agree on the center frequency, one will always be slightly slower than the other, which means any buffer you use will eventually under/over flow. With S/PDIF the downstream device must not only buffer the data, but also adapt its clock to the source rate.

The Tascam DA-3000 specs say it can sync to any input digital sample rate within a range +/- 100 ppm. This should be plenty, about 100x greater than the drift expected from a well engineered DAC. However, in my setup I have a toslink-coax converter between my Corda Soul (preamp/DAC) and the DA-3000. This converter causes quite a bit of jitter, so much that the DA-3000 occasionally loses sync. For example, a REW frequency sweep played through the Soul and captured on the DA-3000 looks like this:

That capture was at 88.2 kHz sampling, but it happens at all sample rates. My Topping E70 DAC handles this jitter just fine and is super clean, because it has a setting called DPLL that controls how much sample rate variance it can accept and adapt to. I had to bump it up a couple of notches to handle the switchbox.

Fortunately, the DA-3000 can do the same thing, even though one method for doing it is undocumented. When recording, enable SRC which is Sample Rate Conversion. This won’t actually convert the sample rate, because you’ll still manually set the DA-3000 sample rate to match the digital input. But when SRC is enabled, the DA-3000 accommodates and adapts to a wider range of jitter.

A better, cleaner method is to change the DA3000 clock setting from “Internal” to “DIN”. This tells the DA3000 to use the digital input as its own reference clock.

When you do either of these, distortion in the REW sweep is super clean like it should be:

AD Converter HF Noise

Another quirk of the DA-3000 is super high frequency noise in its AD converter. The noise is at 100 kHz, so you won’t see it at sample rates of 96k and lower since it’s above the Nyquist frequency. But at 176.4 and 192 kHz, it is there and looks like this:

So, if you are recording from analog inputs, don’t use 176.4 or 192 kHz. Use 88.2 or 96 kHz instead. The sound quality will be better! This is not an issue if you are recording digital inputs – that is just a bit perfect copy.

Analog Output Level

Normally, a recorder’s analog output level isn’t that important. But when using the DA-3000 in AD-DA mode, it becomes so. You need to match the input voltage sensitivity of the downstream preamp. The DA-3000 has a setting called “Reference Level” that sets this. Indirectly, this sets the analog output voltage for digital peak levels. The range is -9 dB which is +15 dBu (quiet) to -20 dB which is +24 dBu (loud). In Volts RMS this ranges from 4.36 to 12.28. The first is the consumer audio standard, the second is the professional standard.

Most consumer preamps have voltage sensitivity for their balanced analog inputs that expects peak levels around 4 V. Higher voltages can cause them to clip or distort. So you would set the DA3000 to -9 dB.

The Corda Soul has an internal switch to set its analog input voltage sensitivity. The default setting is for professional audio, expecting 12 Volts (low gain). Flick the switch to the other position and it changes to consumer, expecting 4 Volts (high gain). With the Soul set to low gain, the DA3000 setting that matches the output level of the Soul’s internal DAC is -16 to -18: -16 is about 0.5 dB quieter and -18 is about 1.5 dB louder.

Conclusion

The Tascam DA-3000 is a wonderful recorder. It is incredibly flexible, easy to use, with SOTA transparent sound quality and professional build quality. It has many other features not described here, since I’ve focused on its quirks. I’ve wanted one for years and I am so happy I finally found it!

Like any piece of gear, it has a few quirks as seen above. But none of these are serious problems, they all have workarounds.

Electronic Gyro Drift Correction

Introduction

A magnetic compass is still a required navigation instrument in airplanes. The most common type is called a “whisky compass”, mounted at the top center of the panel. The compass is tilted toward the pilot to make it easier to read. Yet this also makes it accurate only in straight and level flight. When turning, the compass’ balance masses and tilt make its reading lead or lag the airplane’s actual heading.

Most airplanes also have a directional gyro. The gyro’s rotational inertia keeps it in a stable position as the airplane rotates around it. This means it reads accurately when turning. But gyros slowly drift over time. This means during straight and level flight, the pilot must occasionally check the gyro and manually set it to the compass heading. How often is occasionally? Depends on the gyro. For gyros that are entirely independent having no external correction, it’s about every 15 minutes. And this is true whether it is mechanical or electronic.

Gyro Drift

Gyro drift is caused by two factors: the rotation of the Earth, and friction (for mechanical) or noise/errors (for electronic).

The Earth rotates through 360* every 24 hours, which is 15* per hour. The gyro is immobile in space independent of the Earth’s rotation. Thus as the Earth rotates, the gyro “moves” relative to the Earth, and since the Earth is our frame of reference, this causes the gyro to drift. The relative motion of the Earth can make a theoretically perfect gyro drift up to 15* per hour from the pilot’s frame of reference.

Bearing friction and electronic noise are more intuitively obvious causes of gyro drift. With electronic gyros we have the advantage of being able to apply software corrections. Electronic gyros are based on accelerometer sensors, which means the sensor readings must be mathematically integrated to get position. Integration cumulatively amplifies small sensor errors. For example, even if the sensor’s readings consistently average the correct value over time, each individual reading will be slightly more or less. And these accumulate over time into increasing errors.

Drift Correction

One form of drift correction is when the pilot sets the gyro to match the compass heading. Immediately after this we can assume the gyro’s heading is correct. If we store each of these changes, we have a history of how much the gyro has been drifting and can use that to auto-correct and reduce drift.

Correcting this automatically applies only to electronic gyros, since we need a software algorithm to compute and apply this.

Bias and Variance

Errors and noise fall into two categories: bias and variance. Bias refers to anything systematic or predictable, variance is the unpredictable random portion of the errors. We can detect and correct for bias but not for variance. We must be careful, because misinterpreting variance as bias can increase errors rather than reduce them.

The basic idea is that after each pilot correction, we compute the rate of drift of the correction and continue to apply that to the gyro going forward. For example, if the most recent correction was +10* and it was made 15 minutes after the prior correction, the correction is +0.667* per minute, so we automatically apply that to the gyro going forward.

However, it’s not quite that simple so the idea needs refinement.

For example, suppose the drift that the pilot is correcting reverses direction each time. In this case, if we correct as above, we would actually amplify rather than reduce the drift, making things worse rather than better.

The problem is that errors are a mix of bias and variance, yet our idea only works to reduce bias, not variance. One simple way to differentiate bias from variance is to look at whether recent user corrections all go in the same direction. When this happens, there is a simple linear component to the gyro errors: it’s consistently drifting in the same direction, whether clockwise or counter (this is not the only form of bias, but it’s the simplest and easiest to detect). Yet even a blind squirrel sometimes finds a nut, and random errors will sometimes also go in the same direction. When you flip a coin, you will sometimes get heads several times in a row.

Consider that with variance (completely random errors), each pilot correction is 50% likely to be in either direction, like flipping a coin. If you flip a coin twice, you get 2 heads or 2 tails half the time. Similarly, with pure variance and no bias, about half the time each pilot correction will be in the same direction as the prior correction. Three consecutive corrections in the same direction would happen about 25% of the time. Conversely, we can say that in this case the error is 75% likely to have some bias.

So we should not apply our automatic correction unless the most recent N pilot corrections were all in the same direction, and N should be at least 3. Also, we should shrink the auto-corrected rate accordingly. For example when N=3 the error is 75% likely to have some bias, but it will always have some variance too. So let’s assume that 75% of the error is bias and shrink the correction applied going forward to 75% of the pilot-entered value. In the above example, the +0.667* per minute becomes 0.5* per minute.

Oscillation and Damping

At this point we have a simple algorithm that should improve the gyro accuracy. Yet we can improve it further without adding complexity. The idea is that our method to discern bias from variance is always imperfect, and if we get it wrong it makes things worse, not better. It is better not to correct errors, than to make them worse. Put differently, if we are too aggressive with error correction we can make things worse, while if we are too passive or conservative, it still improves things just not as much.

So, we will apply a damping factor to our corrections, shrinking them just a bit. Pick a constant scaling factor between 0.0 and 1.0 and apply that to the correction. For example, suppose we pick 0.85 or 85% and N=3. With the above example, suppose the last 3 pilot corrections were all in the same direction, and the most recent one was +10*, and it was made 15 minutes after the prior one.:

  • The raw error being corrected is 10* / 15 minutes = 0.667* / minute.
  • Because N=3 we are 75% confident there is bias in this error, so shrink it to 75% of its value.
  • Apply our damping factor of 85%.
  • This makes the auto-correction factor 0.667 * .75 * .85 = 0.425* / minute
  • Apply this rate correction automatically going forward

Overall, we end up with a single pilot correction rate that is maintained in cumulative fashion. For example, in the last step above we don’t just set it to 0.425* / minute, but we add 0.425* / minute to whatever the existing value is. And repeat every time the pilot sets the gyro, so the value changes over time, adapting to varying conditions during flight.

Conclusion

This practical example is over-simplified but it illustrates the basic concepts involved regarding bias vs. variance in errors, how to differentiate them and make corrections, and how to increase our confidence that our attempt to reduce errors doesn’t unintentionally make them worse.

LineageOS – Open Source Android

Summary

Android is essentially a Linux distro. It is a mobile device oriented UI / desktop running on a version of Linux. However, it’s not really open source. Every phone manufacturer writes binary drivers to get it to run on their hardware, and they don’t contribute those to the community. And mobile carriers pile their own add-ons on top of this. So by the time the Android phone gets into the hands of the user, it is loaded with proprietary software and bloat-ware.

For example Samsung modifies Android with “TouchWiz” which significantly changes the UI. And Motorola pre-installs the Facebook app – users can “uninstall” it, but it reinstalls itself every time the phone boots. Some people might like these changes, but I think most, like me, would prefer the pure unadulterated open source Android without bloat-ware or crapplets to burn down the battery and hog the storage.

Another issue with Android is that most manufacturers only support a given model of phone for a year or two. After that, no more updates, which means the phone is condemned to planned obsolescence.

In some cases we can avoid these issues, keep our phones for years while running the latest version of open source Android without bloat-ware. If that sounds interesting, read on.

Unlocking or Jailbreaking

The term “unlocked” has 3 different meanings:

  • Carrier unlocked: you can use the phone on any carrier’s network, so long as you have the right SIM card, and the phone’s modem & radio supports the right frequencies & protocols (GSM vs. CDMA). Many phones are carrier locked when new. When buying a new phone, when it says “unlocked” it means carrier unlocked.
  • Bootloader unlocked: just about all phones are shipped with a locked bootloader. This means you cannot replace the operating system. You can only install factory supported updates using the phone’s settings menu.
  • Rooted: the phone allows the user and apps to take on “superuser” or admin privileges. This means the phone can be used as a little computer without any restrictions – direct access to the filesystem etc.

“Jailbreaking” refers to rooting Apple phones while “unlocking” is a more general term.

Carrier: Every carrier is required by law to give mobile phone users a code to carrier-unlock their phone, so long as the phone is fully paid for. Most make this process as difficult as they can in order to discourage users from doing it. But, the process is accessible to non-technical users. Essentially, they send you a long code that you enter into one of the phone’s settings menus.

Bootloader: There is no law that I know of requiring manufacturers to allow users to unlock their phone’s bootloader. Some (like Motorola) officially support this, others (like Samsung) support it only unofficially, and others do not support it at all. In the latter case, hackers often (but not always) figure out how to crack it. When you unlock the phone’s bootloader, the warranty becomes void. Of course, that’s a nothing sandwich if the phone is already out of warranty.

Rooting: This enables you to use the phone for things you can’t do otherwise. For example, direct access to the full filesystem, even system partitions, enables full backups just like a computer, and makes possible amazing customizations. However, some security apps (for example banking and 2FA) detect whether a phone is rooted and refuse to run. So don’t root unless you really need to, and take measures to handle these cases.

Booting to Recovery

Recovery is disk partition on the phone that has a mini-OS that runs as root and enables you do make changes that aren’t possible when it’s booted normally. This includes changing the partition table, wiping the system partition, loading the operating system, etc. The two most common ways to boot to recovery are:

  • A button chord: power off the phone, then power it on while holding down other buttons. Exactly which buttons varies by manufacturer. For example, with Motorola press and hold the volume down button while powering on.
  • Android tools: Android, being open source, has a full set of developer tools that are freely available to everyone. Install the Android toolkit on your computer (Linux, PC or Mac), connect your phone via USB, and control it from the computer using tools like adb and fastboot.

Every phone comes with a factory supplied recovery, but it is not intended to load custom operating systems. Two of the most popular custom recoveries are TWRP (on Samsung) and boot.img (on Motorola).

Partition Table

The partition table determines how much disk space is allocated for recovery, for the operating system, and left over for user storage. Running a newer version Android or different recovery sometimes requires more space, which means changing the partition table.

Google Apps

Google Apps includes the Google Play App Store, Contacts, Calendar and several other apps that are not part of the Android operating system, but run with special privileges other apps don’t have. These apps cannot be installed from the Play Store but are installed while booted to recovery, just after installing the operating system.

These apps are not strictly required to use the device, but without them you won’t have the Google Play store or other important functions. They are required if you want your device to work like the normal Android that everyone is familiar with.

Compiled ready to install packages of these free open source versions of Google Apps are published in two popular places: OpenGapps and MindTheGapps.

The Process

So, how does one actually do this?

  1. Find out exactly what kind of device you have, including the specific model number. For example, not just a Motorola G7 Power but model XT1955-5, because there are several different versions having different processors, radios and modems.
  2. Ensure your device is fully functional with the OEM ROM, go to settings and install all updates to ensure it has the most recent version.
  3. Ensure to actually use the features from the OEM ROM, to ensure your device is properly registered on the carrier network. For example, on T-Mobile make phone calls & texts over WiFi.
  4. Back up any data on your device that you want to keep, because the install will wipe the entire device.
  5. Find a ROM that is supported on your device. You can get an officially supported ROM, like those at lineageos. Or you can find an unofficial ROM at places like xdaforums, where individual developers create and support them. An unofficial ROM could be LineageOS or many other versions of Android.
  6. Unlock the bootloader on your device. How to do this will vary from one device to another so you’ll have to do some homework.
  7. Follow the ROM installation instructions. This typically includes these steps:
    1. Boot to the OEM recovery
    2. Flash a new recovery
    3. Boot to the new recovery
    4. Update the partition table
    5. Install the new ROM
    6. Install Google Apps
  8. Boot the device into LineageOS.

Twin Engine Airplanes

It’s common perception that twin engine airplanes are safer. Any for obvious reasons! Who wouldn’t want an extra engine? Yet the details give a more nuanced perspective.

With passenger jets, twin engines are definitely safer – no doubt about it. But with piston engine small aircraft (e.g. light twins), the safety record is more mixed. It boils down to 3 basic reasons:

  1. Having two engines doubles the likelihood of an engine failure.
  2. When one engine fails, the other produces differential thrust requiring immediate corrective action from the pilot to avoid loss of control.
  3. The single-engine performance of some piston twins is so marginal we sometimes say, “the remaining engine always has enough power to get you to the scene of the crash”.

Many people don’t really consider the first point, but when pointed out, it’s so obvious it doesn’t require further discussion.

Regarding point 2: engine failure in any airplane is an emergency, no matter how many engines it has. Yet with a single engine, the immediate pilot actions are pretty simple: keep the nose down so you don’t stall, and pitch for ideal glide speed. The engine is centered, so when it dies the airplane remains inherently stable and will keep gliding even hands-off. With twin engines, when one engine dies the other produces differential thrust that skews the airplane sideways and will flip it over if not corrected. This differential thrust is a double-whammy: the dead engine’s prop creates drag, pulling that side back, while the operating engine produces thrust, pulling the opposite side forward. Not only must the pilot keep the nose down to avoid stalling, but he must also apply heavy opposite rudder (not aileron) and feather the dead engine’s propeller to keep the airplane flying straight. If the pilot fails to do these actions quickly – within seconds – or does them incorrectly, the differential thrust can cause an uncontrollable spiral or spin.

Regarding point 3: one of the reasons people fly twins is for the superior payload and performance. You can carry heavier loads, and fly faster and higher. Yet if you are actually using that performance, you may operating in a way that cannot be supported by a single engine. So when one engine fails, even if you apply the correct inputs to keep flying, you may not be able to maintain level flight even with the good engine at full power.

Overall, the incident/accident statistics for light twins in general aviation is no better than single engine airplanes. Given this, why are big commercial jets always multi-engine for safety? Commercial aviation mitigates these factors:

  1. They use turbine engines, which are more reliable than pistons.
  2. The pilots are better trained, more frequently, and follow more strict operational limits set by both the FAA and their airline.
  3. The engines have much greater power than pistons, capable of maintaining level flight at high altitudes for extended periods of time, even when the airplane is at max weight.

In summary, light twin aircraft can be safer, or more dangerous, depending on the airplane, the pilot, and the mission or how the flight is operated. Pilots considering light twins should consider these limitations, how the airlines mitigate them, and incorporate that into their flying. For example:

  1. Maintain the aircraft above & beyond required minimums.
  2. Train yourself well beyond the required minimums, stay current.
  3. Don’t load to max weight, and fly missions that give you a healthy safety margin below the aircraft’s max performance.

Even then, in my opinion light twins are not safer and the higher performance is not worth the expense and hassles of the higher cost of fuel, maintenance, insurance and training. Speed is proportional to power cubed and drag is proportional to speed squared, so all else equal a twin burns 59% more fuel to go 26% faster.

Here’s where those figures come from:

  • The cube root of 2 is 1.26, so twice the power is 1.26 times as fast.
  • Drag is proportional to the square of speed, and 1.26 squared is 1.59.
  • Fuel consumption is proportional to drag.

Topping E70 DAC Review

Introduction

After I had to return my 2nd piece of Chi-Fi equipment due to poor build quality and support, I said I was done with Chi-Fi and would stick to other manufacturers. However, after Amir reviewed the Topping E70 on ASR, I couldn’t resist. A fully balanced DAC among the best and cleanest he has ever measured, for $350 would be too good to be true.

My Corda Soul is a DAC, preamp, headphone amp, and DSP processor. Of these functions, most are SOTA quality except for its DAC. It uses dual WM8741 chips which were great for 2007, but DAC technology has improved.

The topping E70 is a line level DAC and nothing more. That is:

  • DAC using ESS 9028 Pro chips
  • Analog outputs: both balanced/XLR and single ended/RCA
  • Inputs: SPDIF (coax and toslink), USB, and Bluetooth
  • Internal power supply
  • Digital volume control
  • Display showing sample rate and output level
  • High build quality with a metal case
  • Excellent measured performance, among the best at ASR

Setup

I measured the E70 and the Soul using my Tascam DA3000, which has excellent DA and AD converters. Better than my Juli@ sound card, but not as good as an APx555. This would later lead to a surprise due to misleading measurements…

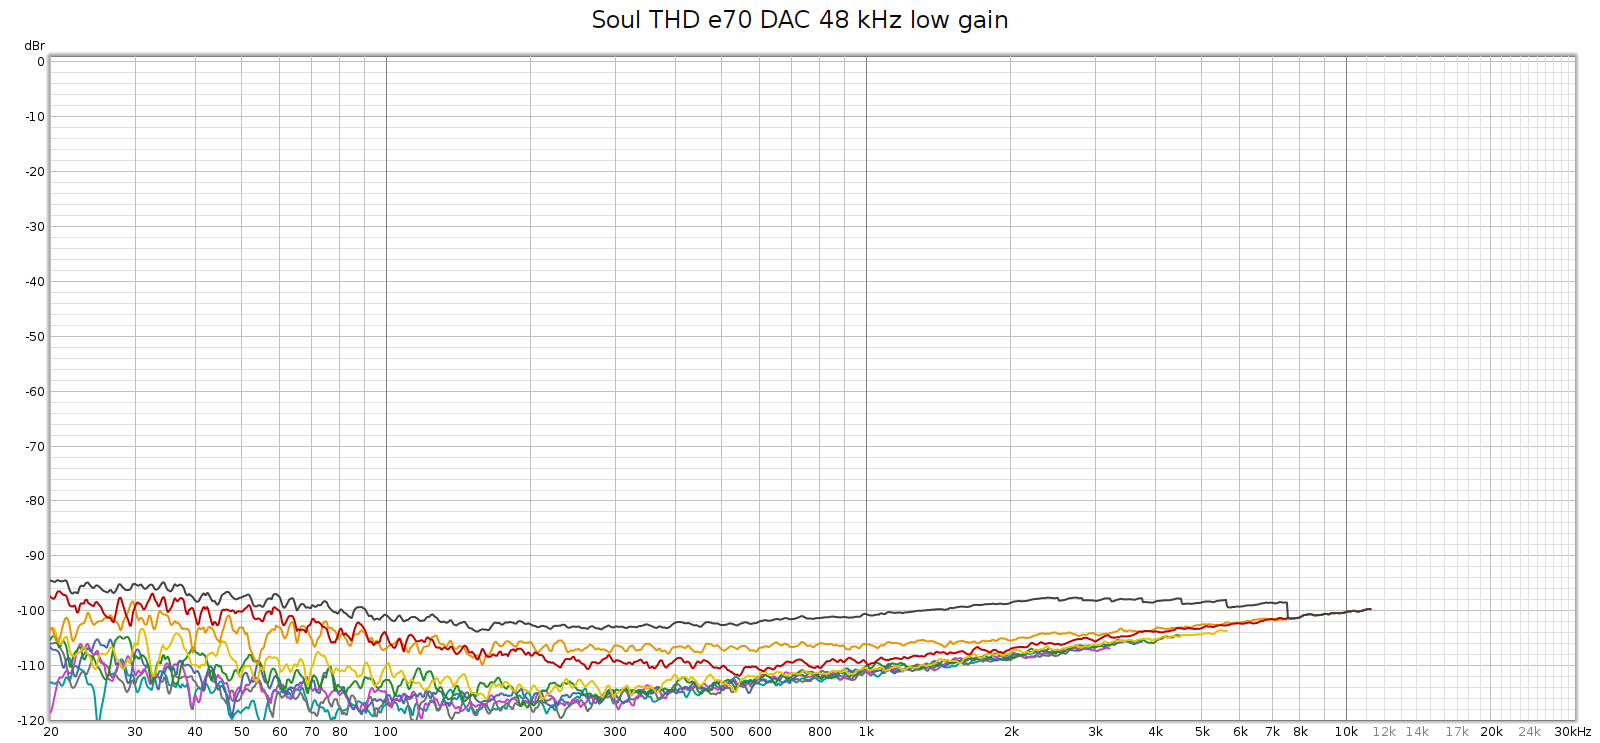
The Corda Soul distortion profile has always looked like this (Room EQ Wizard Sweep at 48 kHz):

You can see above that noise is excellent (too low to be measured) and distortion is generally good at -100 dB, but 3rd harmonic is not so good, rising to -70 dB in the upper mids.

I never knew where exactly this 3H hump came from: the Soul’s digital stage, analog stage, or DA conversion. I recently discovered that it comes from DA conversion. More on that here. I set up the Soul to use the E70 as an external DA converter (it can do that!) and here is how it measured:

So ends the story, right? That’s what I thought, until I measured it at 192 kHz.

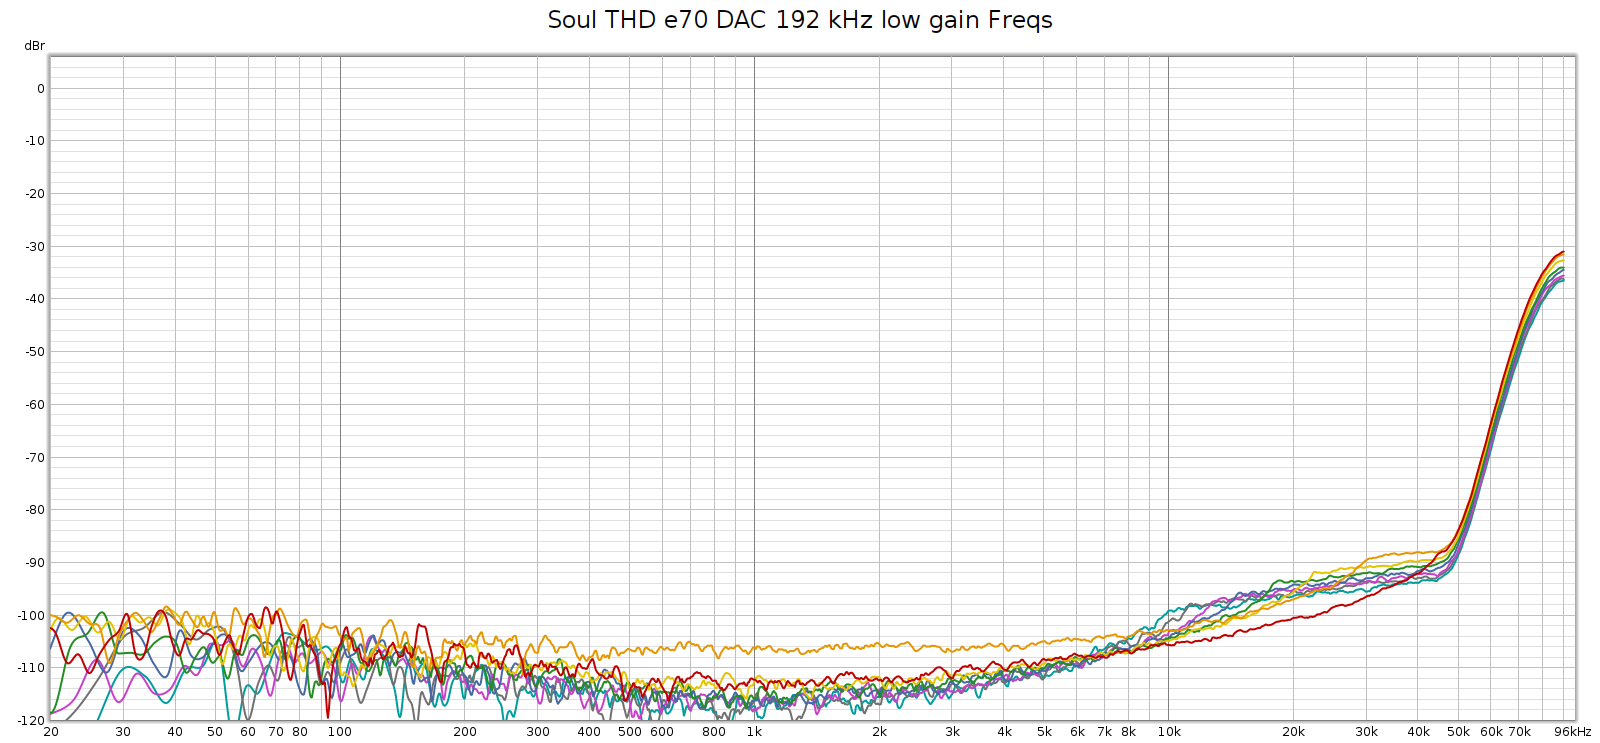
High Frequency Noise

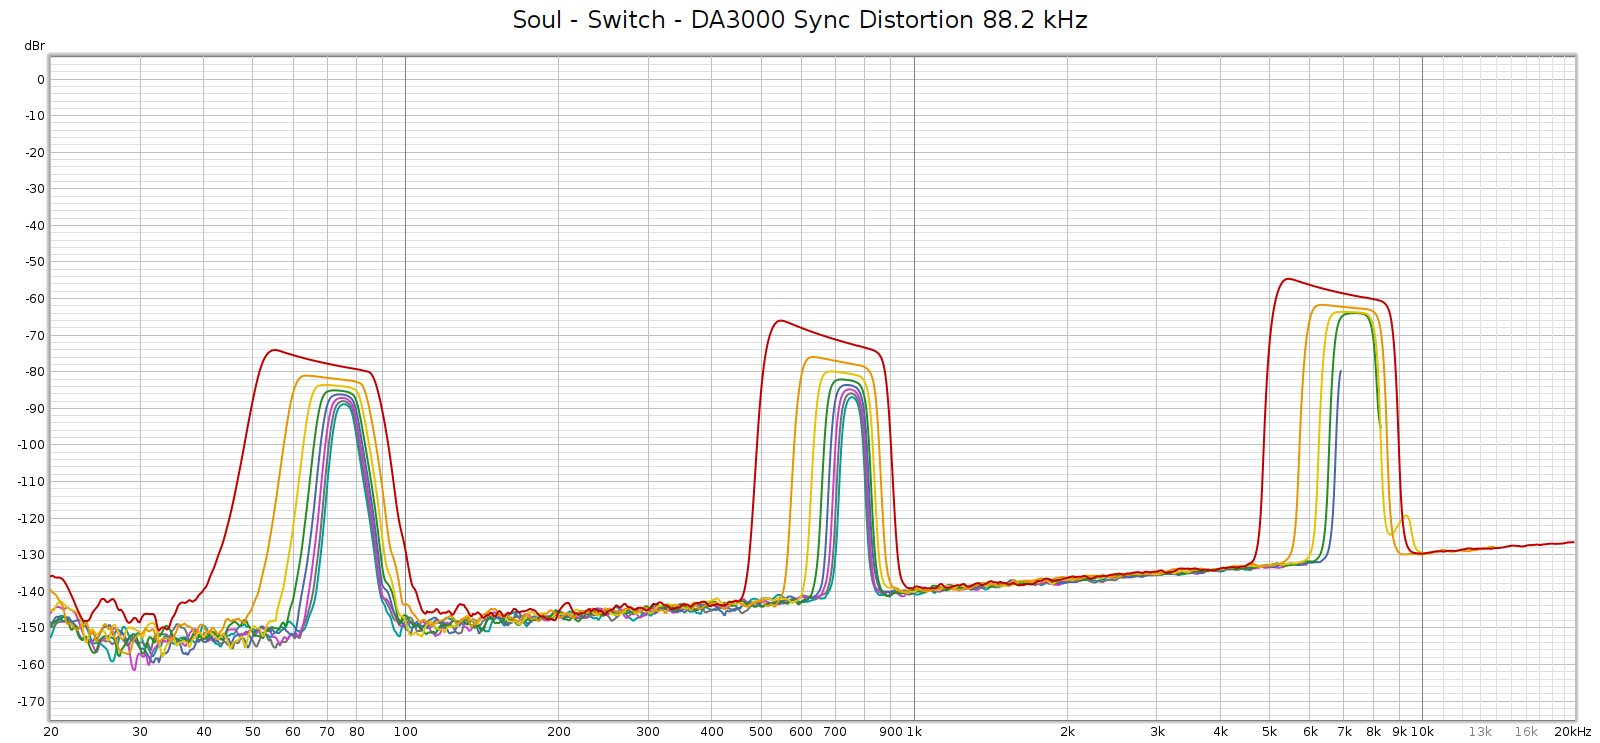
The Soul always had a noisier sweep at 192 kHz, like this:

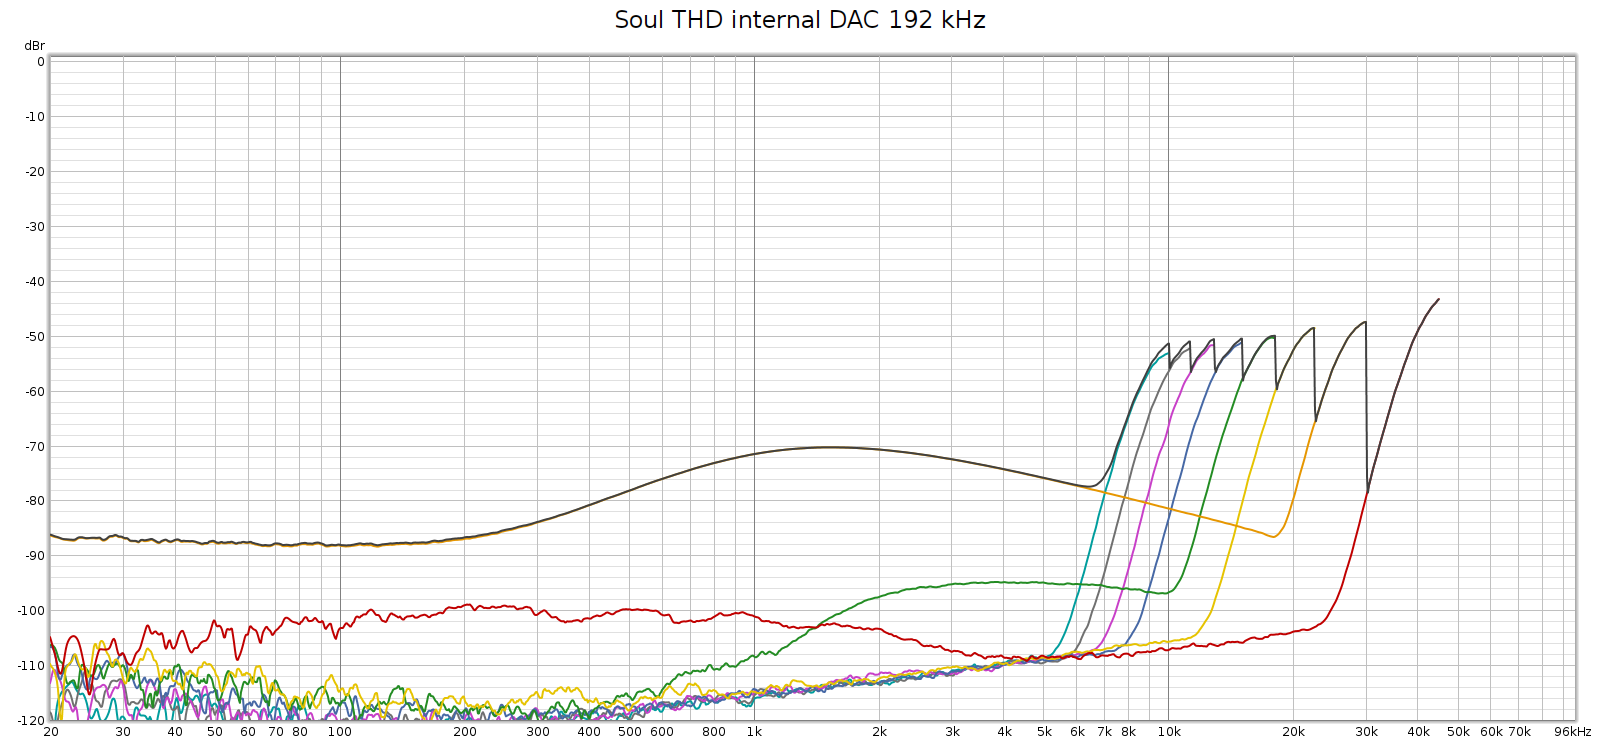
Each of those distortion plots peaks at the same frequency:

  • 2H (red) at 45 kH, and 2 * 45 = 90
  • 3H (orange) at 30 kH, and 3 * 30 = 90
  • 4H (yellow) at 22.5 kHz, and 4 * 22.5  = 90
  • etc.

So the plot is misleading. What’s actually happening is that there is HF noise at 90 khz, and the plot is interpreting it as if it were harmonics of lower frequencies – in other words, harmonic distortion. Thus, I assumed this was due to high frequency noise from its switching power supplies not being properly suppressed.

Here’s a different perspective on that same plot, plotting harmonics at their native frequency, which makes the above interpretation obvious:

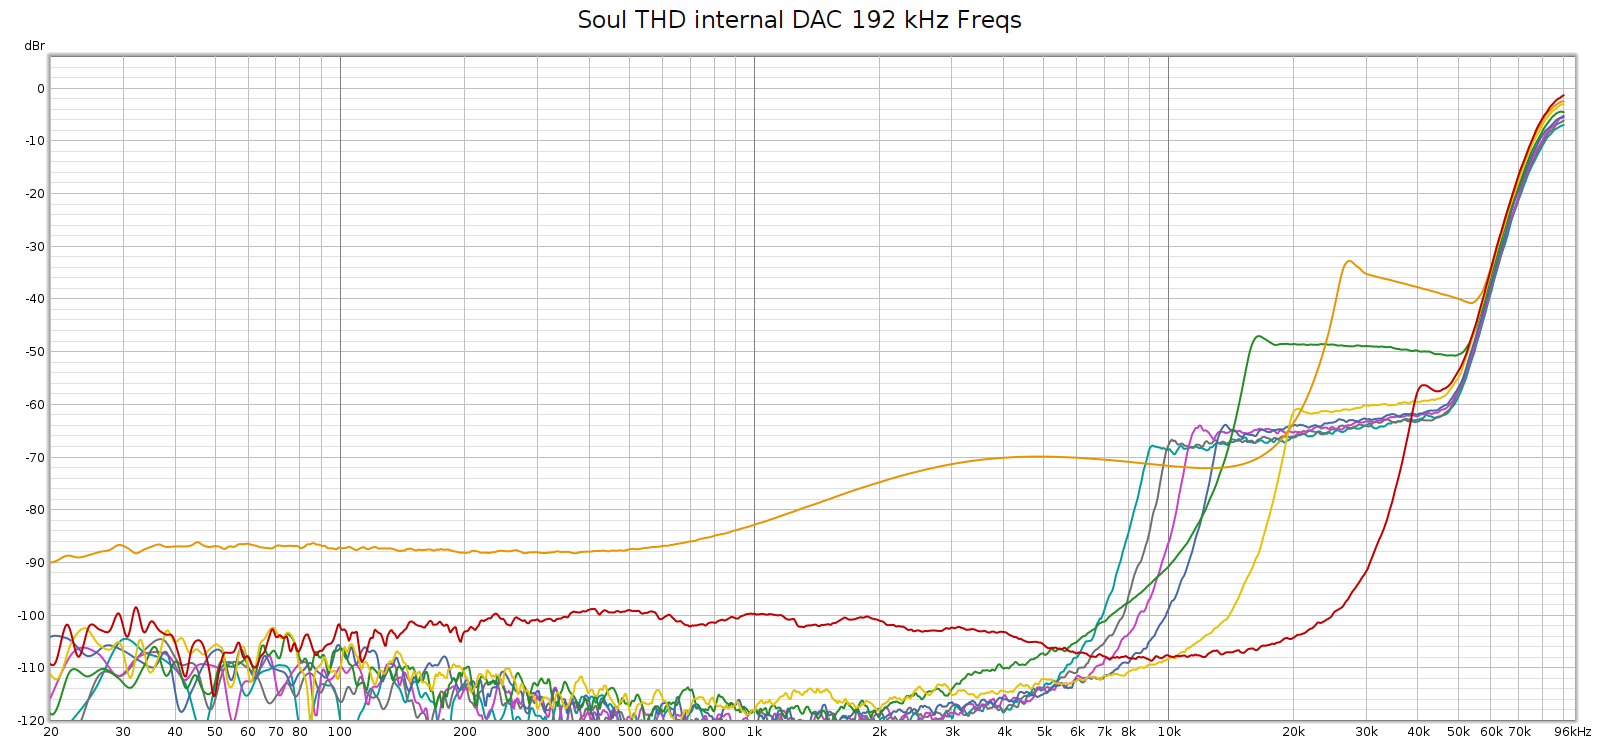
But, the Soul’s power supplies (Meanwell IRM-20-24) switch at 65 kHz, not at 90 kHz. So where was that noise coming from? Maybe it wasn’t coming from the Soul at all.

Process of Elimination

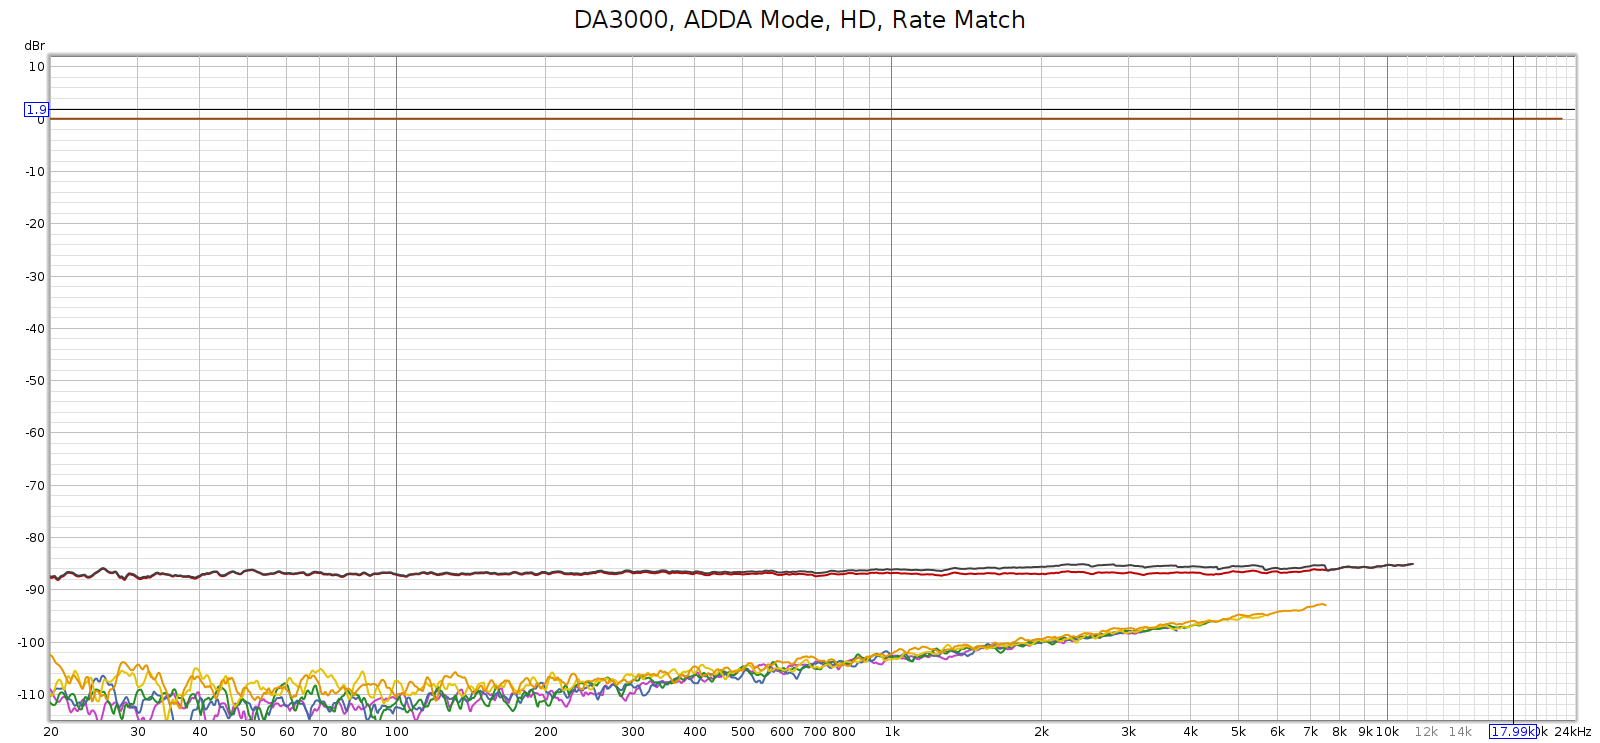
I connected the E70 balanced analog outputs directly to the Tascam DA3000 inputs and recorded a 192 kHz sweep. Here’s what I got:

Or, looking at this plot the other way:

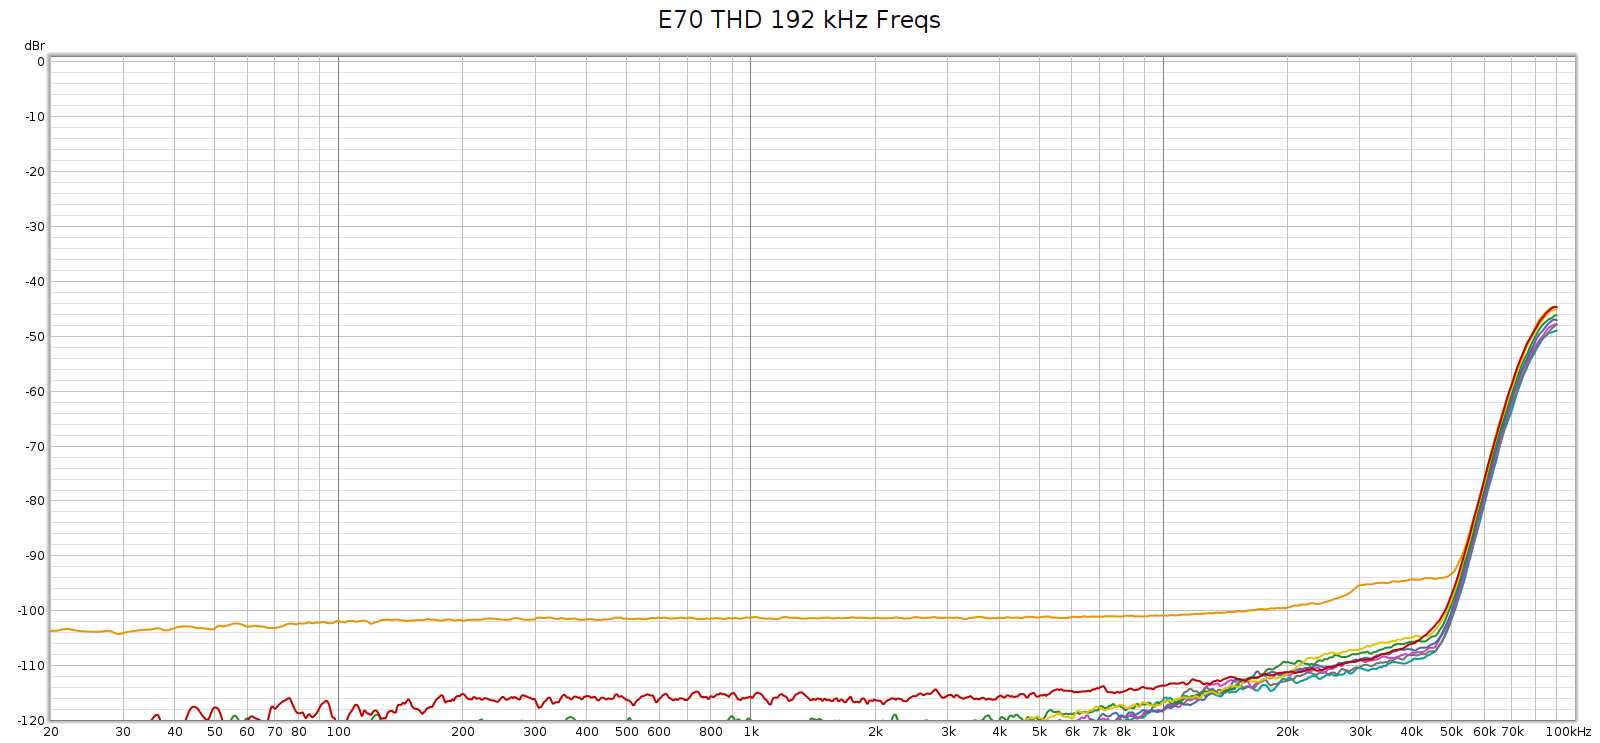
So that HF noise wasn’t coming from the Soul.

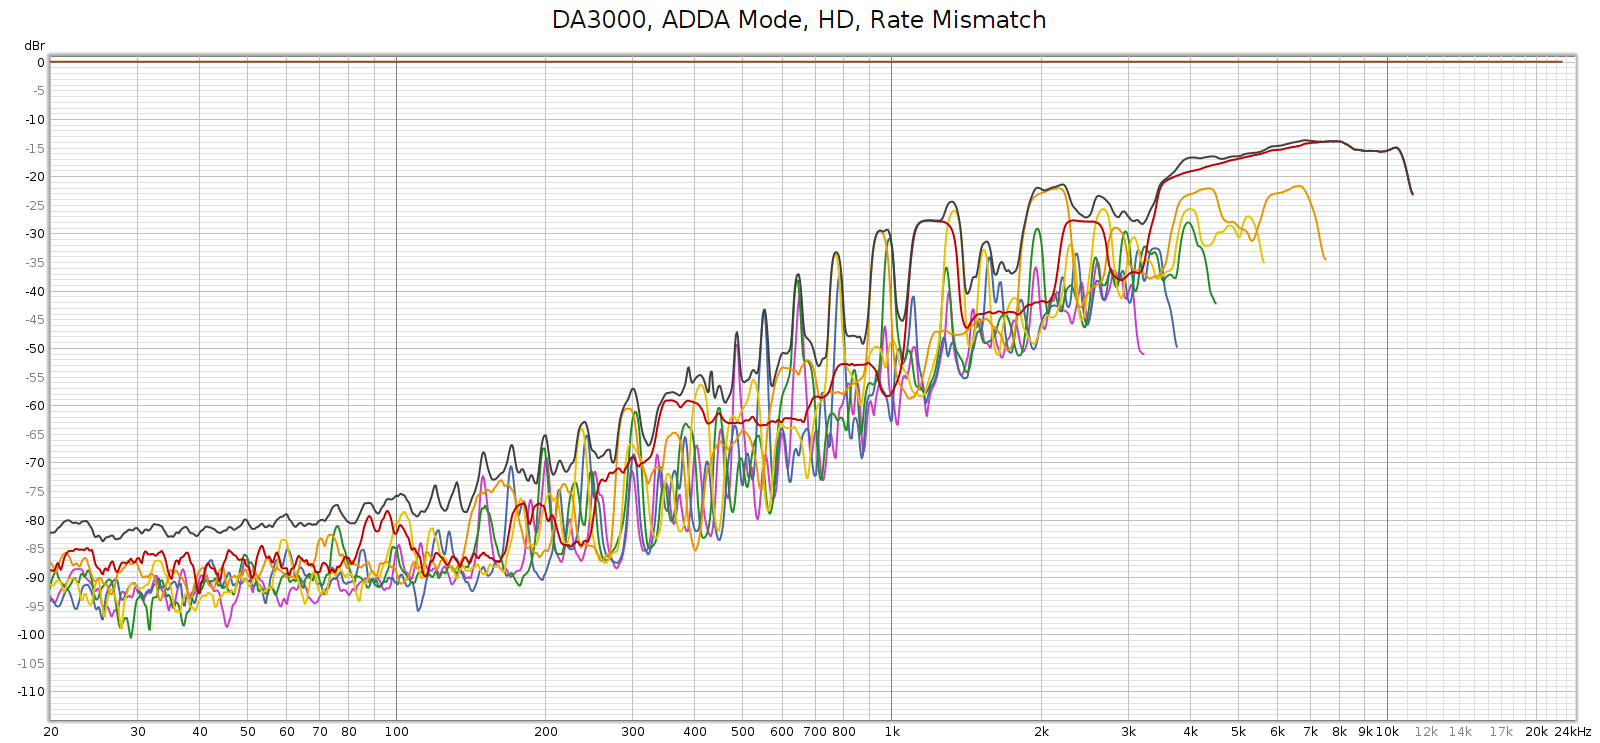
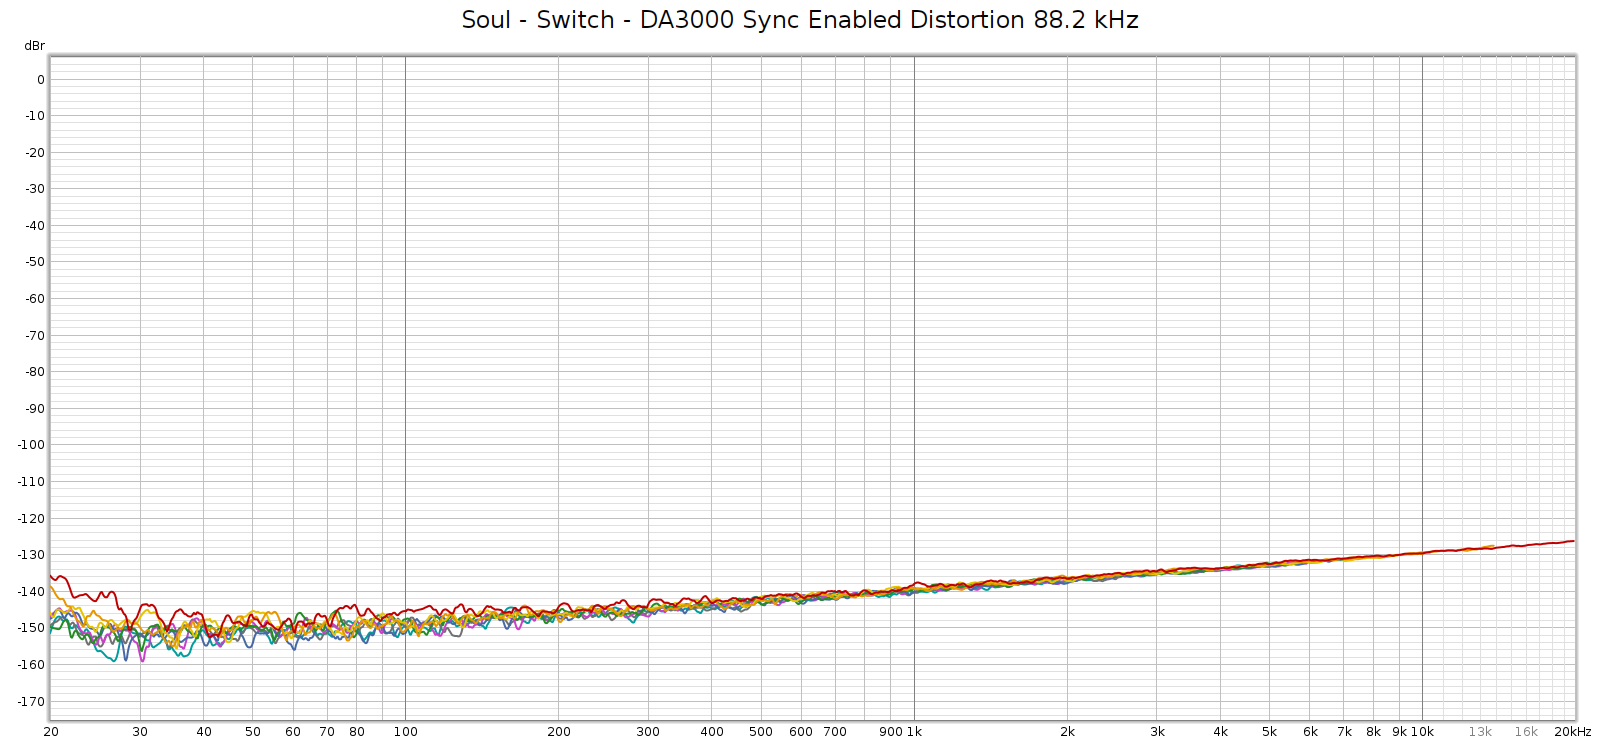
Next, I measured the Soul at 192 kHz using the E70 as its external DAC:

It’s essentially the same as the E70 direct, same shape just a few dB higher as it’s passing through an additional analog stage.

Setup – Conclusion

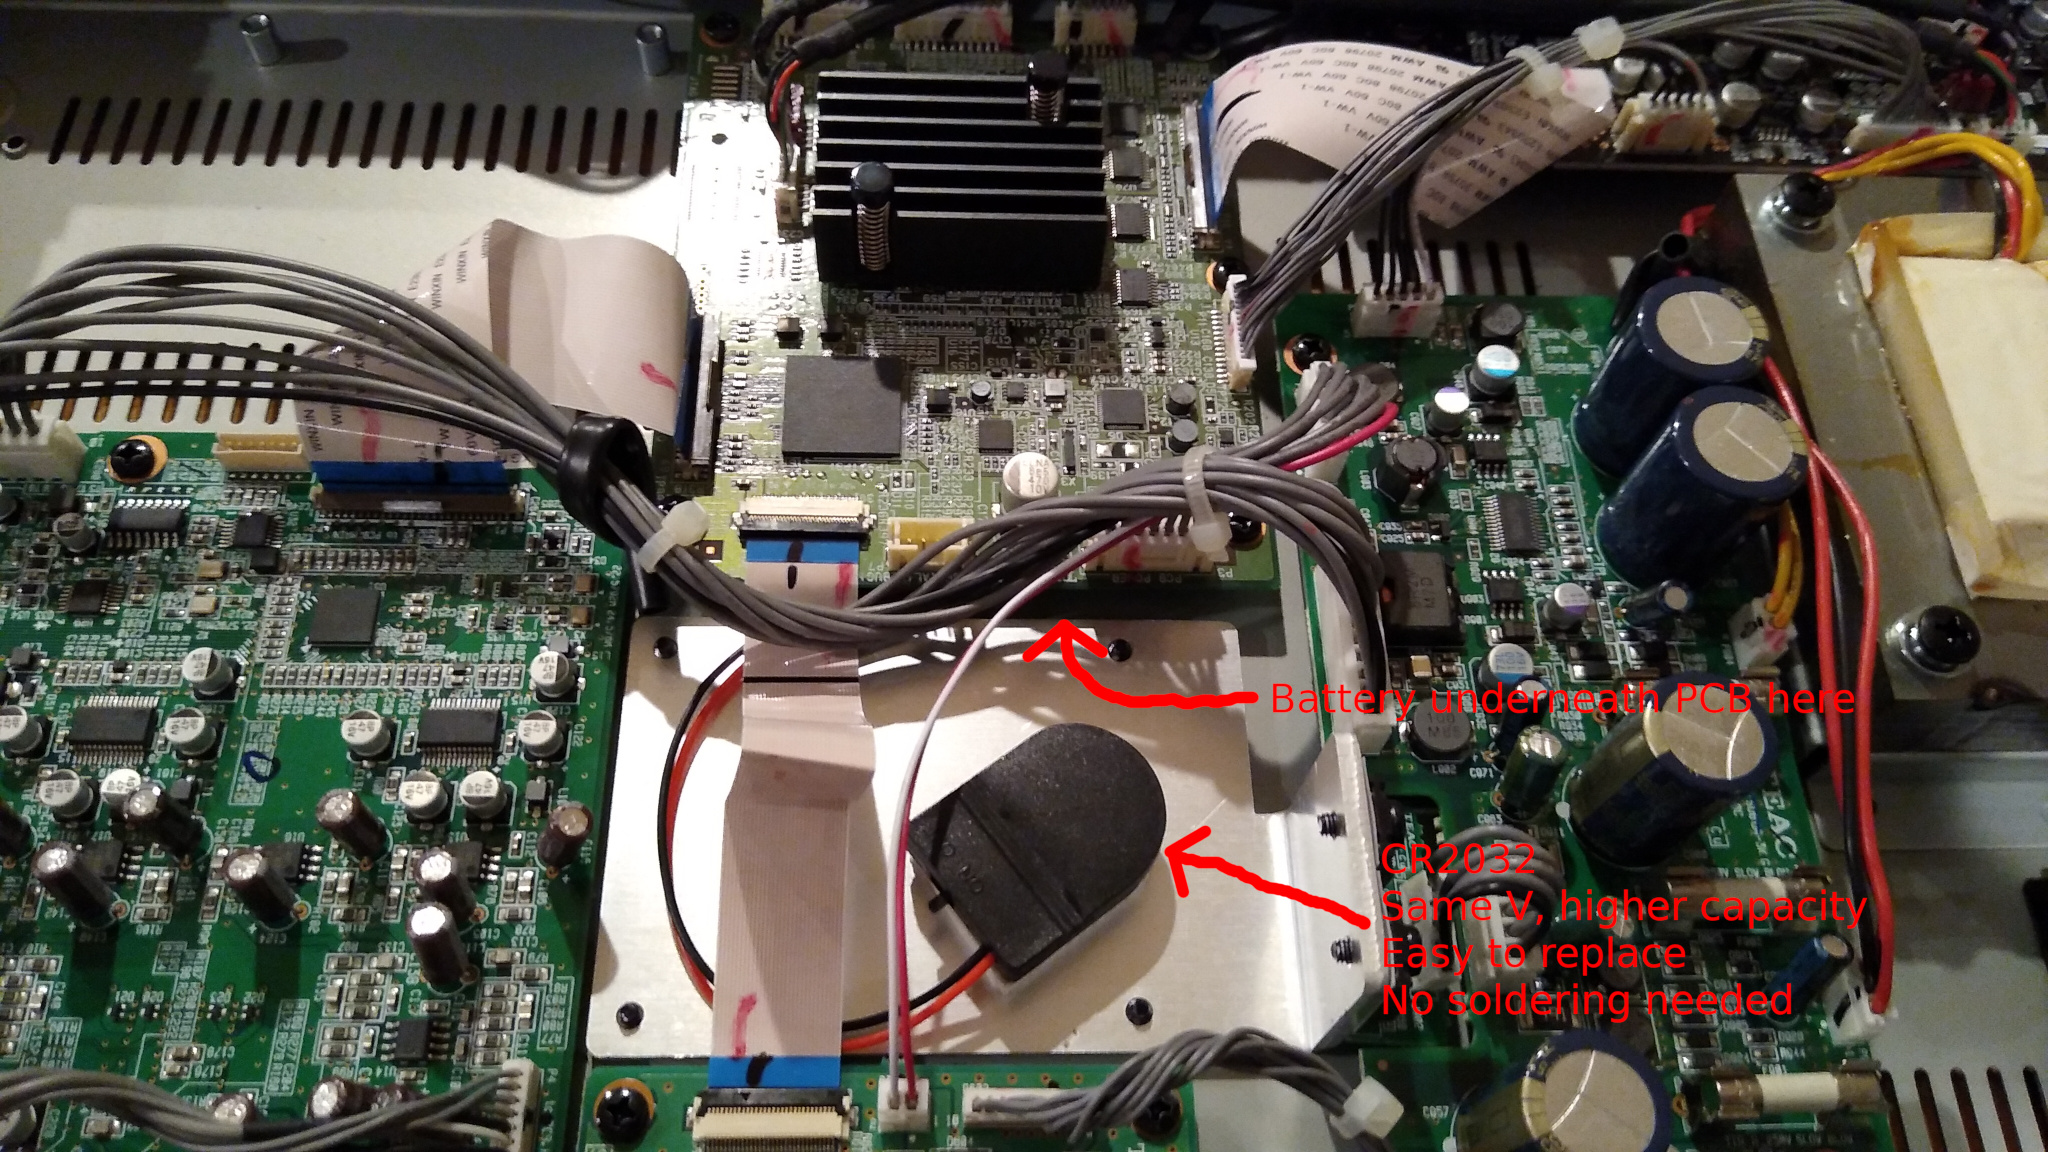
What I learned is that HF noise around 90 – 100 kHz is created by the Tascam recorder. When you record from its analog inputs, the signal passes through its A/D converters which introduce this noise, probably from a system clock or switching power supply. This noise is only at sample rates of 176.4 kHz and higher, because at lower rates, it’s above the Nyquist frequency so the digital filters kill it.

The E70 DAC is clean at all sample rates including 192 kHz. And the Soul’s analog stage is also clean. The Soul’s internal DA converters are not as clean, adding at bit of distortion at midrange-treble frequencies in the audible band. Thus, the Topping E70 addresses the Corda Soul’s relative weak point, and the combination gives truly SOTA audio reproduction.

One might ask why not simply use the E70 to directly drive my power amp? Why use the Soul at all?

  • The Soul serves as a convenient preamp, having multiple digital inputs.
  • The Soul has unique and valuable DSP functions: tone controls, headphone crossfeed, etc.
  • The Soul’s volume control is an analog stepped attenuator gain switch that is mechanically reliable and ultra clean with perfect channel balance at all settings.
  • The E70’s volume control is software which can glitch or lose memory, causing instant power spikes damaging speakers.
  • The Soul’s analog stage is clean and transparent, so there is no downside to its value and convenience.
  • Reliability and durability: the Soul is built like a rock by Lake People in Germany, well beyond Chi-fi quality standards.
  • Redundancy: if the E70 (or any other external DAC that I use) ever dies, I can use the Soul as a complete system while getting the DAC repaired or replaced.

E70 Review

Setup issues resolved, let’s return to the E70 review. It’s a simple black box with minimal controls:

  • Power switch on the rear left side
  • Rotary knob / button on the front right side
  • Capacitive touch button on the front left side
Features and Observations

You can leave the power switch on all the time and it will automatically power up and down as it detects a digital input signal.

You can set its output level to 4V (standard unbalanced) or 5V, which is about 2 dB louder with consequently higher SNR. 5 Volts may be too much for some devices, so make sure it is compatible. However, if this is the case, I recommend using 5 V anyway and setting the digital volume to -2 or -3 dB for reasons explained below.

I wish its high voltage output supported 16 V which is standard for professional balanced audio (as the Tascam DA3000 has). But it doesn’t.

It has digital volume control set in software. It might seem there is no reason to set it to anything other than max (0 dB). Yet setting it to -2 or -3 dB should give more headroom to better decode digital audio that is recorded too hot with intersample overs or clipping.

When the digital volume control is enabled, the display shows only the volume level, not the current sample rate. When disabled (always output max volume), the display always shows the current sample rate. I wish this were configurable. I’d like to enable digital volume and see the current sample rate.

The display can be configured to go dark and light up only when the knob is used. This is a nice feature yet it has a little bug described below.

The E70 has 7 different digital filters. Here’s how they measured at 44.1 kHz:

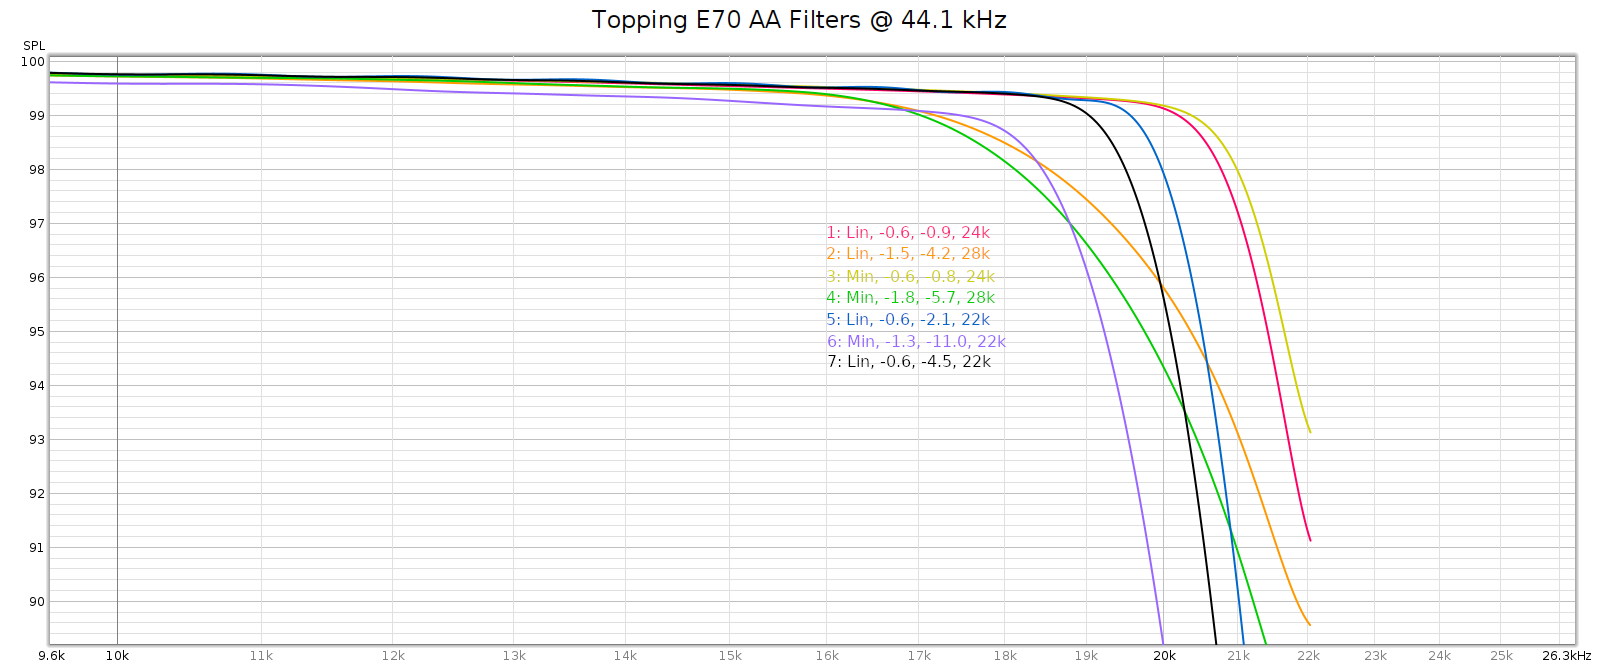
Filter #3 is the default, which is a decent choice. But it is minimum phase, so I switched to filter #1 which has the same response and is linear phase.

Drawbacks & Limitations

Whenever the input sample rate changes, the E70 emits a “click” / “chirp” to the analog outputs. Take care to adjust volume when changing recordings.

If while the display is dark you turn the knob to adjust the volume, the first knob click that wakes up the display changes the volume yet the display shows the prior volume before it changed, so the displayed volume is incorrect.

Firmware 1.04 adds the capability to set SPDIF sample rate lock sensitivity with a new setting called DPLL. This was essential for me because the default DPLL setting 5 didn’t handle 88.2 and 176.4 sampling well, so I upped it to 7 and it became clean. Setting 6 also worked but I figured I’d give it one extra nudge just to be sure. But Topping hasn’t yet put this firmware up on their support site. You can get an unofficial copy at ASR: https://www.audiosciencereview.com/forum/index.php?threads/topping-e70-stereo-dac-review.39188/post-1411763

Sound Quality (Subjective)

When level matched, the E70 is virtually indistinguishable from the Corda Soul’s built-in WM8741 DACs. There is no difference in voicing or frequency response. Yet when playing certain kinds of music there is a slight difference. The E70 better resolves layers of subtle detail in complex orchestral music. In recordings with moderate to heavy reverb/echo, such as from a cathedral, where the music can get drowned or saturated with reverb, it resolves the musical line more clearly. These differences are very subtle, audible with only some kinds of music, and easy to over-state. Yet they can be heard.

In contrast, the Tascam DA3000 in DA-AD mode (DAC only) shows a greater difference. It is voiced slightly warmer than the Soul or E70.

Conclusion

The E70 provides truly SOTA sound quality both subjectively and in measurements. It’s not perfect, having some firmware bugs, and Topping is not known for good support. And the build quality seems good yet long term reliability is unknown. But for the price (about $350) it cannot be beat.

Audio: DACs and Revelations

Introduction

It’s commonly held among audiophiles who understand electronics that well engineered and built DACs are audibly transparent. This belief comes from properly conducted double blind tests with well trained listeners, performing ABX testing, learning about how DACs work and how to measure them, reading detailed DAC measurements made by others and performing those measurements themselves.

However, “well engineered and built” is a loaded phrase. Some DACs use a AA filters that start attenuating within the passband (below 20 kHz), or have passband ripple, or non-flat phase response. Some DACs have elevated IM distortion at moderate levels (the ESS IM hump). Others have increasing distortion near full scale. Some modulate power or clock noise into the outputs due to insufficient filtering. All of these limitations can be audible under the right conditions, and have been observed with DACs considered to be well engineered and built.

Also, “audibly transparent” is a loaded phrase. Does it mean musically transparent, or perceptually transparent? Consider the  difference between 96 kHz and 44.1 kHz rate, or a linear vs. minimum phase filter having equal amplitude responses. These differences are considered to be inaudible. I can differentiate them in an ABX test, but only using “appropriate source material”. In this case, a high quality recording of jangling keys or a square wave. Differentiating them with a musical signal is much more difficult, and I’m not sure I could do that. In some cases, I’ve detected these differences with high quality castanet recordings, but is that really music? I consider it on the borderline between music and test signal. We listen to music, not test signals, so while I believe a good audio system should strive for perceptual transparency, some people consider the lower bar of musical transparency to be sufficient.

The Corda Soul is a DAC, preamp, and headphone amp with useful DSP functions. I’ve owned one for nearly 5 years and in some ways it’s one of the best measuring pieces of gear I have seen. Subjectively it sounds fantastic (by which I mean it is transparent, or doesn’t sound like anything – and many DACs and preamps do not achieve this, adding their own coloration to the sound) and I prefer the Soul to other high quality DAC / preamps in direct comparisons. I never expected to encounter a better sounding DAC…

The Setup

I recently replaced my Tascam SS-R1 with the newer model, the DA3000. The SS-R1 still works like new but is limited to 44.1 k and 48 k sampling, where the DA3000 supports every sample rate from 44.1 k to 192 k and DSD 64 and 128. This means I can connect the Soul digital output to the DA3000 digital input, and the DA3000 will simply work regardless of the sample rate. The DA3000 analog output (balanced XLR) goes to the Soul’s analog input.

I tested the DA3000 and the Soul by playing test signals through the Soul and capturing its analog output on the DA3000. The Soul always had a small hump in the distortion curve that peaks at -70 to -80 dB at 1,000 to 2,000 Hz, and appears at every sample rate. Since I now had two recorders – both the DA3000 and the SS-R1 – I was able to narrow down what causes this by bypassing the Soul’s DA converters, using only its analog gain stage. I connected the Soul’s digital output to the DA3000, then sent the DA3000 analog output to the Soul’s input, then recorded the Soul’s analog output on the SS-R1. The hump disappeared entirely!

This means the Soul’s distortion hump was coming from its internal DA converters, or its FF de-emphasis curve which is implemented in DSP (both of which are bypassed when you use an external DAC). This is surprising, since the Soul goes to great lengths to ensure clean DA conversion. It uses well regulated switching power supplies and dual WM8741 DAC chips, each in mono mode, one for each channel, fully balanced. However, the Soul’s analog gain stage measured entirely transparent. Noise was below any threshold I could record. The SS-R1 is only 16 bit, so all I can say is that noise is below -96 dB even at low volume settings. Frequency response was perfectly flat. Distortion measured at -96 dB, the limits of 16-bit.

So: the Tascam DA3000 DA converters measured cleaner than the Soul (here for measurement details). And not slightly cleaner, but a whopping difference: from -70 dB to below -96 dB, at least 26 dB and probably more. And this is in a frequency range where our hearing is most sensitive. But that said, not every difference you can measure, is audible…

The Revelation

The Soul allows the use of an external DAC and has a switch to instantly switch between that and its internal DAC. The difference is readily audible, by which I mean I can hear it not only with test signals but on a wide variety of music. Perceptually and subjectively, compared to the DA3000, I characterize the Soul’s internal DAC as:

  • Slightly edgier, tonally as if adding just a smidge of upper midrange
  • A tad grainier, or less pure
  • Bass is a bit less prominent, but this could be subtle perceptual masking from slightly emphasized upper mids
  • Soundstage is a bit narrower
  • About 0.2 dB louder

In contrast, the DA3000 DAC sounds a touch more pure, more open, with more natural bass and a bigger soundstage.

I call this a revelation because it was so unexpected. It really surprised me. Up to now, the Soul has been less edgy / grainy than other DACs I have owned, such as the Oppo HA-1. Even though the difference is subtle, it is a joy to listen to my familiar recordings with a slightly smoother, more natural perspective.

Note: The 0.2 dB loudness difference is the obvious culprit. It’s small enough to be barely perceptible as loudness, yet perceived indirectly as “richer”, “more detailed”. Yet normally, all else equal, slightly louder is perceived as slightly better. So it’s the opposite of expected. And I hear the same subtle differences even after adjusting for the 0.2 dB loudness difference.

But Wait, There’s More!

Upon further listening I made some other observations. The Tascam DA3000 DAC doesn’t resolve fine detail quite as well as the Soul. It slightly veils some of the subtle background sounds. However, in voicing and soundstage I still preferred the Tascam. So the difference was more of a trade-off.

The Conclusion

The Soul is still a keeper. As an analog preamp, it is unmatched both subjectively and objectively: clean and transparent with noise and distortion so low I can’t measure it, and perfect channel balance at every volume setting. Its DSP functions are useful and well implemented. And it is well built with great support.

However, I am now looking at other DACs to potentially bypass the Soul’s internal DAC. More on this here.

If my opinion isn’t clear by now, I’ll just say it. Well engineered DACs do not all sound the same. Some may sound the same, while others may have audible differences. All audible differences can be measured – if you know what to measure and how to do it right. But most published specifications are only the most basic measurements that don’t cover everything that can be heard. So just because basic specs like SINAD and FR are the same, doesn’t necessarily imply they sound the same.