I was curious about my Corda Soul, so I measured a few things. My measurement setup is pretty basic, which limits what I can measure.
Setup
This PC has a Juli@ XTE sound card. It’s a great sound card, but it’s not professional test equipment. But it does have balanced inputs & outputs. So here’s the setup:
Source: PC playing test signals through USB output
Test Device: Corda Soul, USB input, Analog output (balanced XLR)
Measurement: PC sound card, Analog input (balanced TRS)
Update: I also used Tascam SS-R1 and DA-3000 recorders to explore distortion & noise, see below.
Baseline Loopback
I made these measurements with my sound card, so its performance is the baseline. To measure that, I used TRS cables to connect its balanced outputs directly to its inputs to measure its loopback performance.
As you can see below, the Juli@ measures quite well for a sound card. It should be audibly transparent.
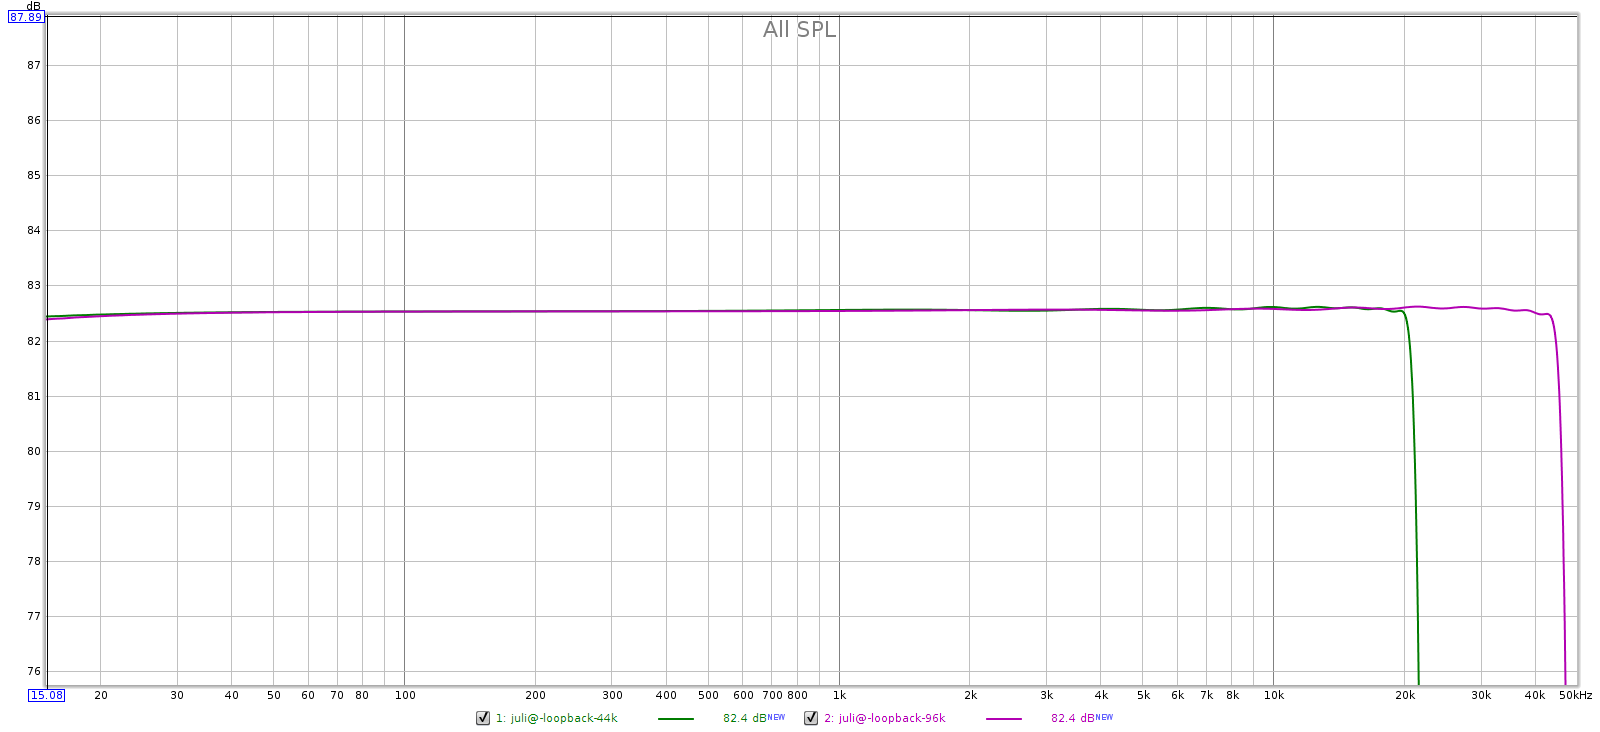
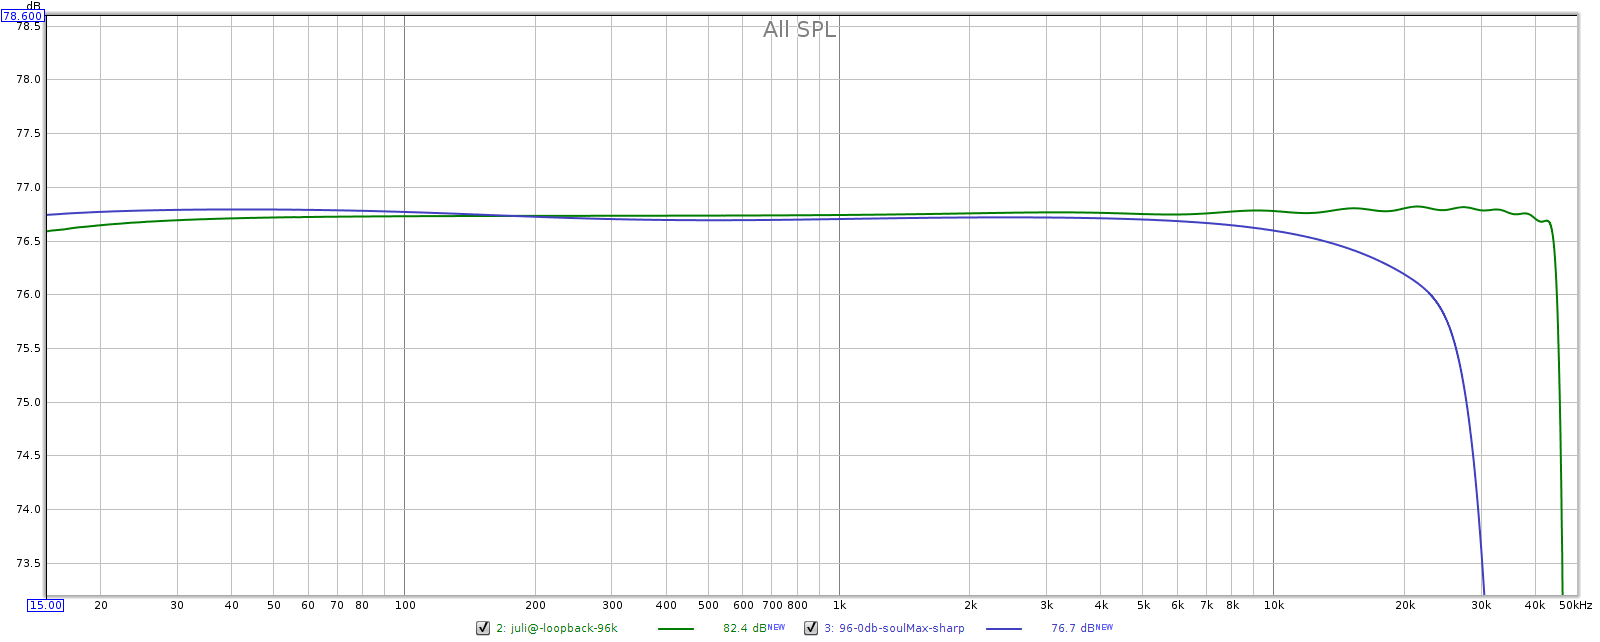
Loopback Frequency Response
At both sampling frequencies, frequency response is flat with less than 0.1 dB variation through the audible spectrum. Phase response and group delay are equally flat.
Loopback Distortion
The Juli@’s distortion was the same at 44.1 and 96 kHz sampling. So I’ll show the graph for 96, measured with a -1 dB digital signal:
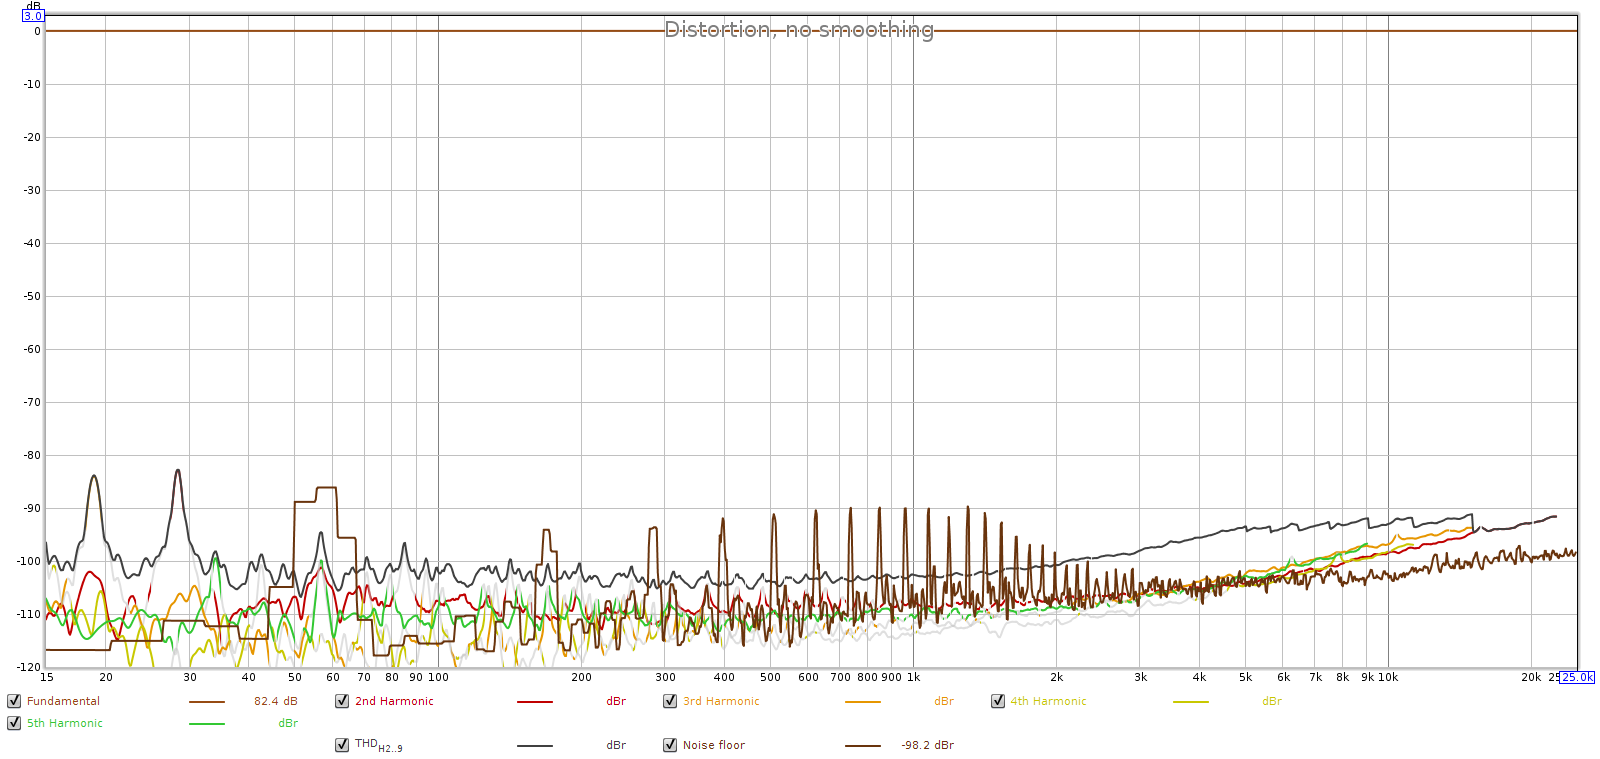
We can see 60 Hz power at -86 dB and its harmonics nearly as strong. Overall, this is good performance for a sound card (especially one nearly 10 years old) and should be audibly transparent. The baseline now completed, let’s look at the Corda Soul.
Frequency Response
I expected to see perfectly flat response, but it wasn’t. At 96 kHz sampling with the filter in the “sharp” position, the Soul is entirely ripple-free, yet shows slow rolloff, down 0.5 dB at 20 kHz.
I measured the Soul’s frequency response at different volume settings. Why? Because it has 2 unique design features that might make its response vary with volume.
- Its unique volume control
- Its frequency-shaped gain-feedback
The Soul has a uniquely designed volume control. Instead of attenuating a fixed gain ratio like most preamps do, it changes the gain ratio. It has 64 discrete positions, each applying different resistors in the gain-feedback loop. As you reduce volume from full, it has less gain and more negative feedback. Theoretically, this gives lower volume settings lower noise and distortion, and wider bandwidth, which could impact frequency response.
The Soul’s frequency-shaped gain feedback means it digitally attenuates low frequencies before DA conversion, then it boosts them back to normal level in the final analog stage (after DA conversion and analog gain/volume control). These shaped curves are applied in separate steps, one digitally, one analog, so any imperfections in the matching of these curves should appear as variations in frequency response.
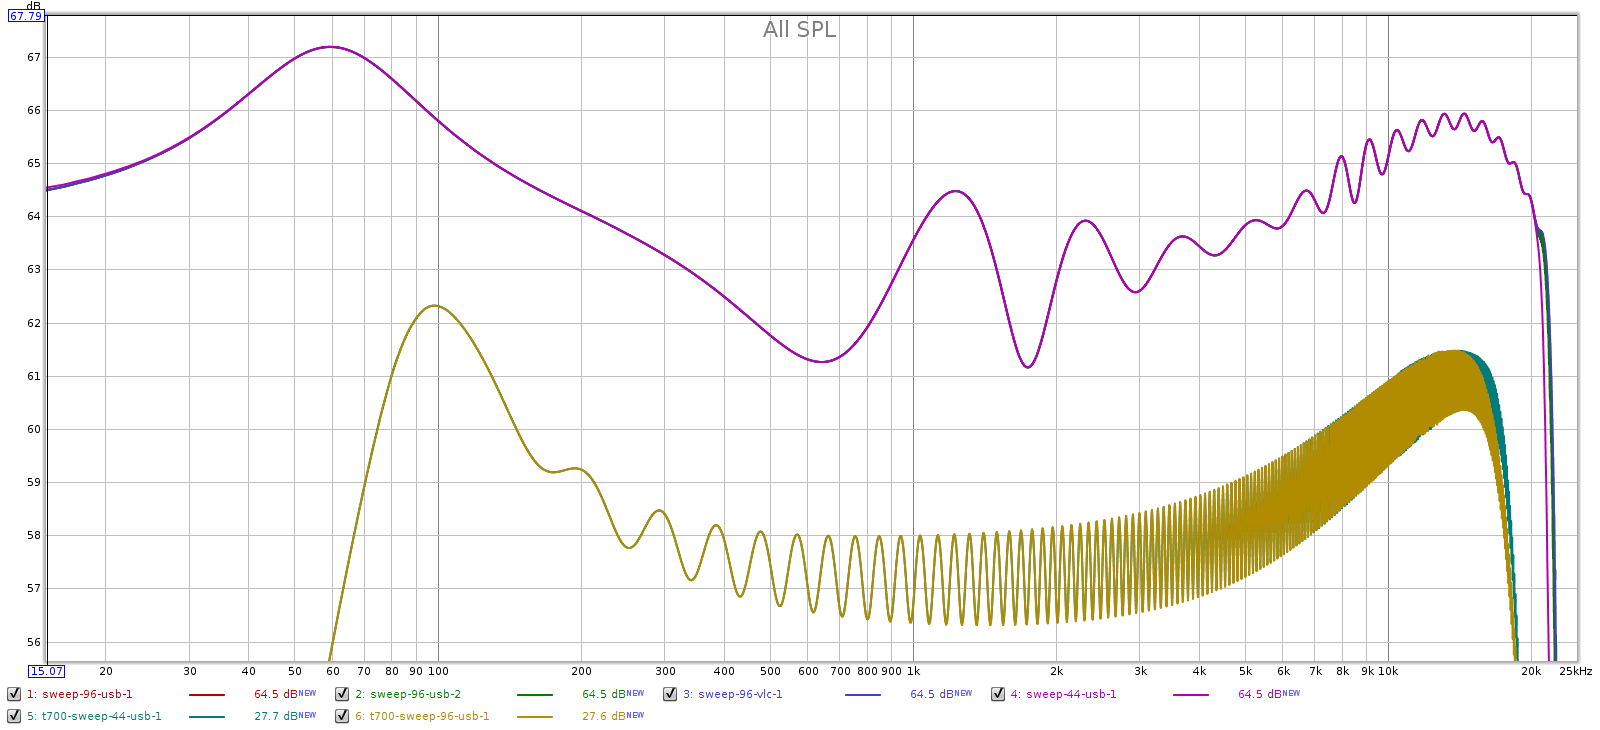
To see if the above features had any measurable impact, I tested frequency response at different volume settings:
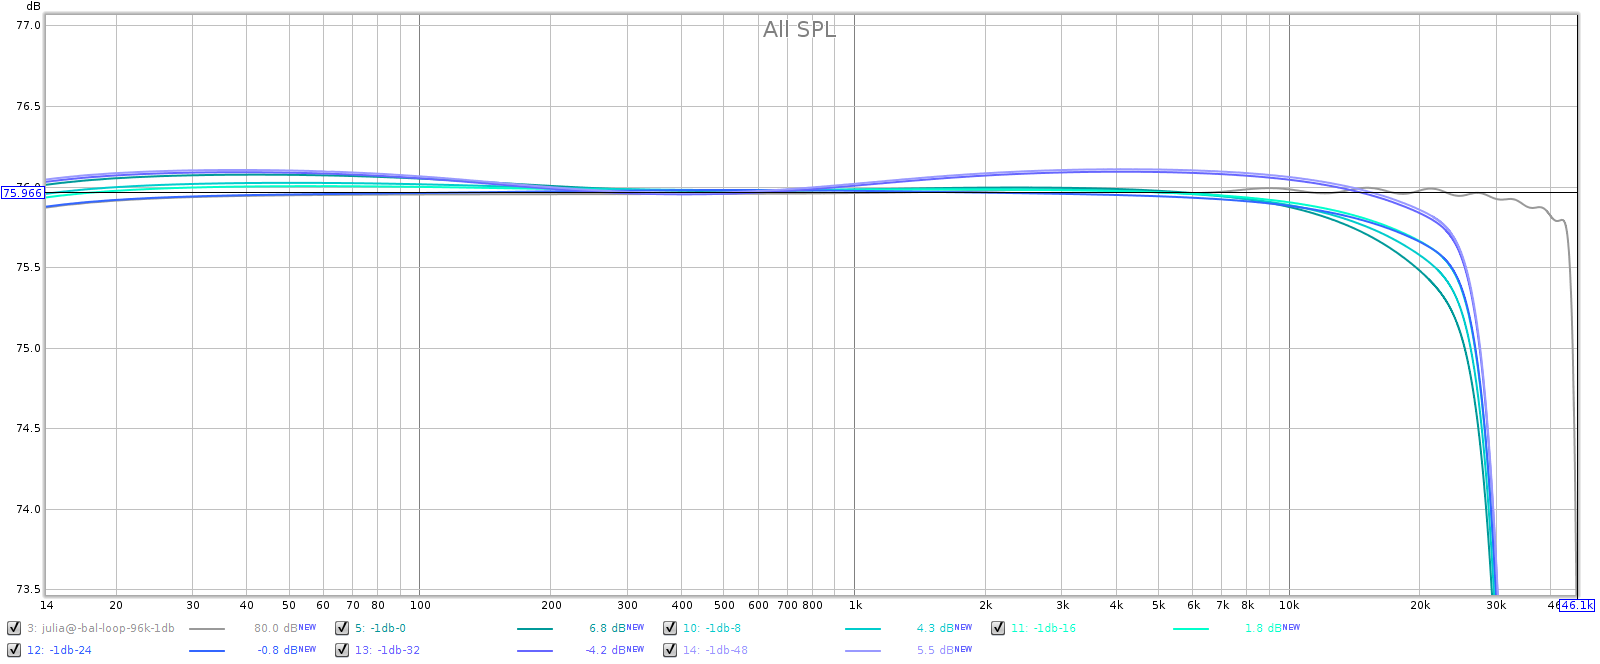
The grey line is the sound card, for reference. I made all lines equal at about 600 Hz, which is the perceptual midrange. Note the Y scale is only 1/2 dB per division to exaggerate the differences. At lower volumes the Soul has a small lift in the bass and the treble. This is only 1 or 2 tenths of a dB, so it is inaudible. Also, it has a gradual rolloff in the treble that is down from 0.2 to 0.5 dB at 20 kHz, also inaudible. Note also that the Soul’s frequency response is perfectly smooth, free from the Juli@’s ripples.
At higher sampling rates (48, 88, 96 and 192), the Soul applies a slow rolloff that starts just above 20 kHz. This minimizes passband distortion.
Note: when using an external DAC, the Soul's frequency response is ruler flat in the passband and still applies a slow rolloff above 20 kHz. So these slight frequency response variations are caused by its DA converters (within spec for the WM8741 chip), not by FF curve matching. More on this later...
Below, frequency response at half volume at sample rates 44, 48, 88, 96 and 192. It’s essentially ruler flat so I zoomed the Y scale to 0.1 dB per division to see the differences. The 0.2 dB LF attenuation at 192k is the Juli@ sound card, not the Soul.

Now the same, but from 10 kHz on up. They’re identical up to 20 kHz. Each sample rate is free of ripples and uses the full available transition band to make the smoothest, gentlest attenuation.
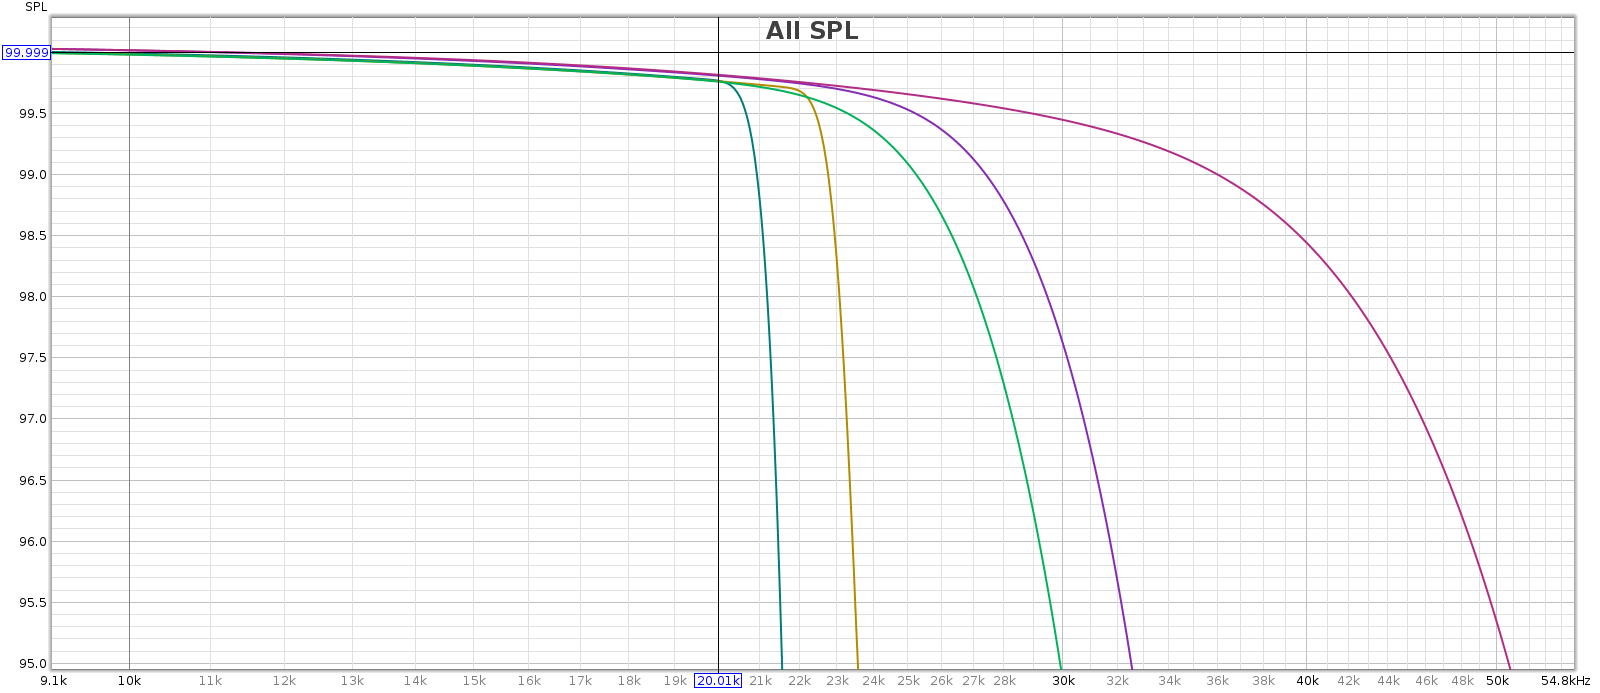
In chart form:
| Rate | Filter | 20k (max; half) | -1 dB Fr | -3 dB Fr | -3 dB %Fs |
| 44.1 | lin | -0.5; -0.2 | 20,960 | 21,350 | 0.484 |
| 44.1 | min | -4.4; -4.1 | 19,500 | 19,850 | 0.450 |
| 48 | lin | -0.5; -0.2 | 22,750 | 23,250 | 0.484 |
| 48 | min | -0.5; -0.2 | 21,200 | 21,620 | 0.450 |
| 88.2 | lin | -0.5; -0.2 | 25,350 | 28,350 | 0.322 |
| 88.2 | min | -0.5; -0.2 | 25,810 | 28,650 | 0.325 |
| 96 | lin | -0.5; -0.2 | 27,350 | 30,700 | 0.320 |
| 96 | min | -0.5; -0.2 | 27,850 | 31,050 | 0.324 |
| 192 | lin | -0.5; -0.2 | 36,000 | 45,800 | 0.238 |
Note: the Soul’s output is non-inverting, so readers with EE knowledge may wonder: if the Soul’s volume knob changes the gain, how can it have less than unity gain? The Soul uses an inverting topology in the gain-feedback loop, so gain is simply Rf/Rin and can be less than unity. Its final fixed gain stage is also inverting, so it does not invert overall.
The high frequency rolloff starts a little lower sampling at 44.1 kHz with the filter in “slow” mode, due to its internal WM8741 DAC chip’s filter implementation. More on that subject here.
Noise & Distortion
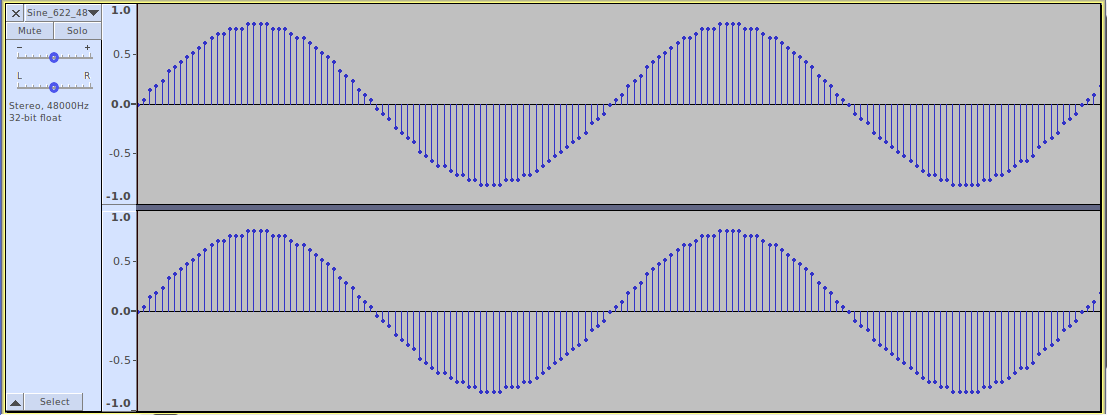
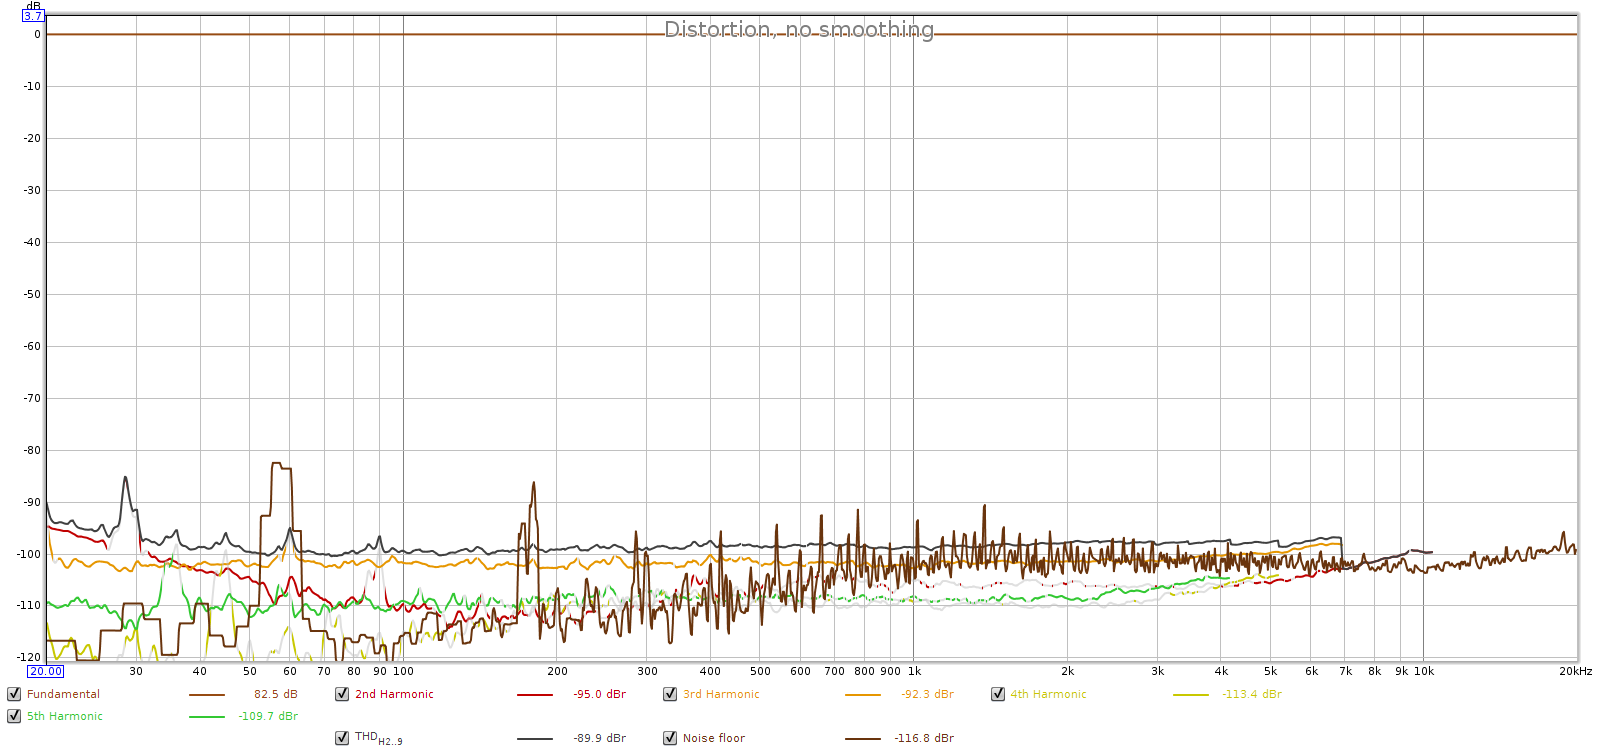
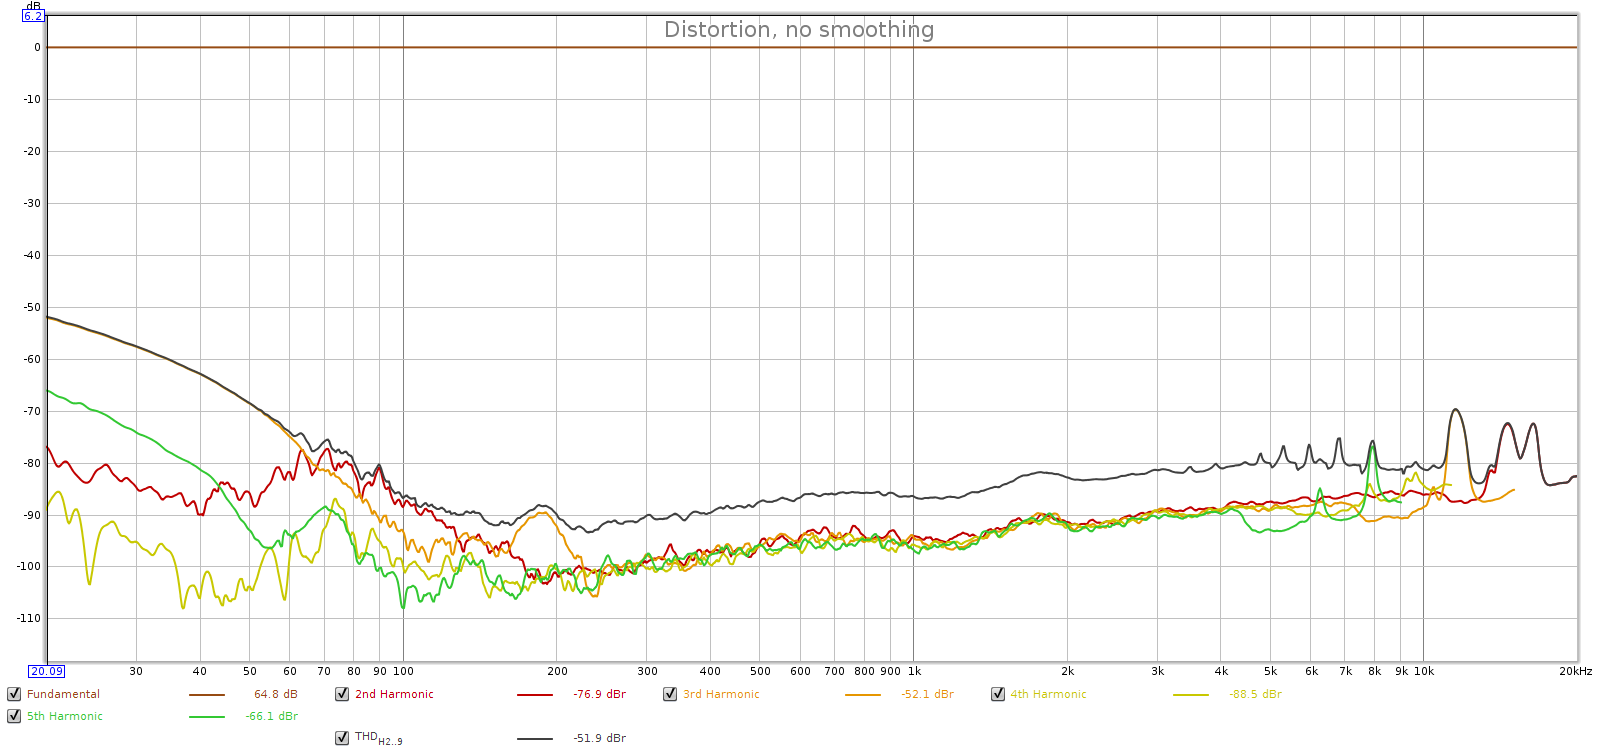
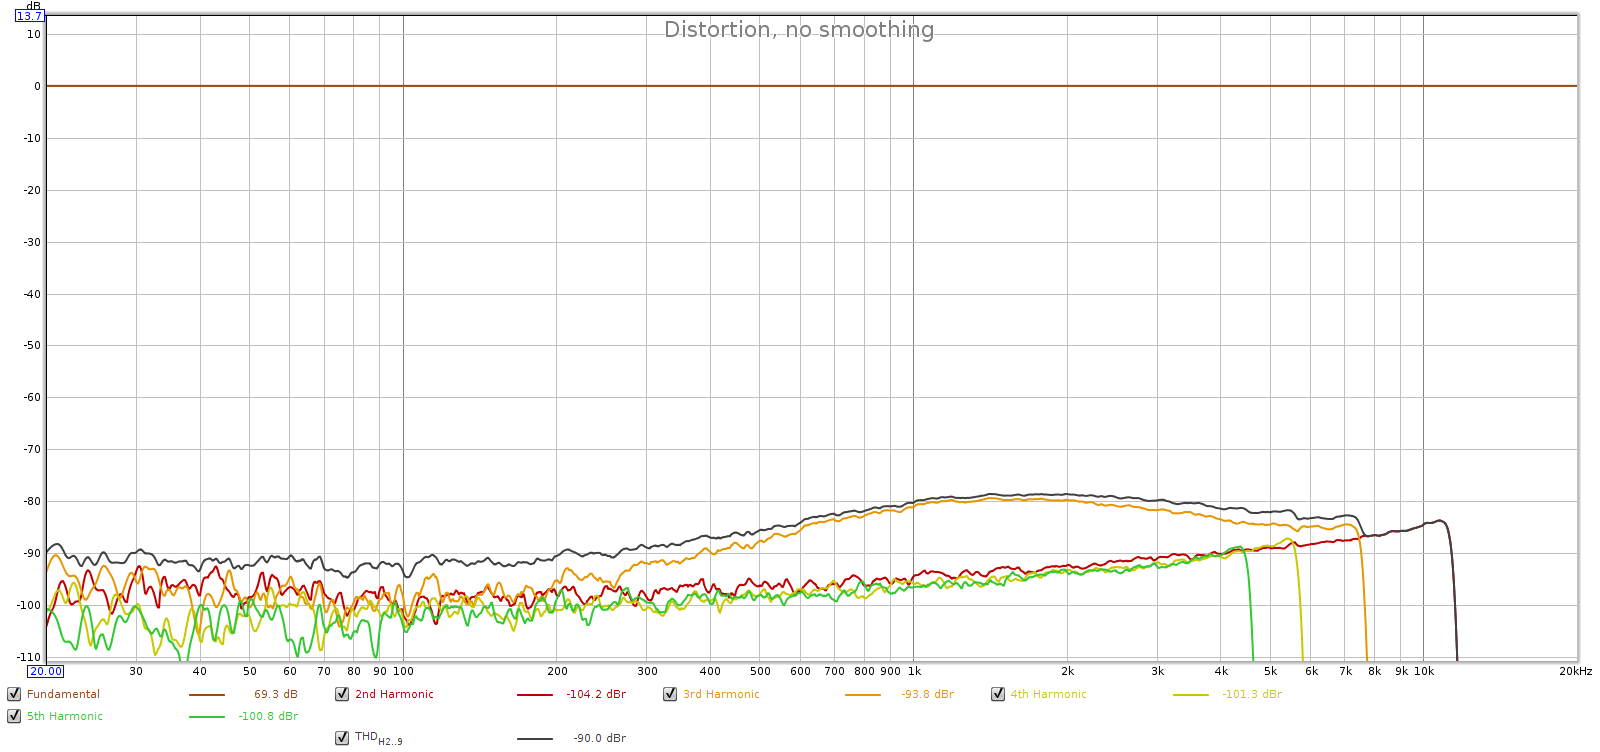
Here’s a -1 dB digital signal, with Soul at max analog volume:
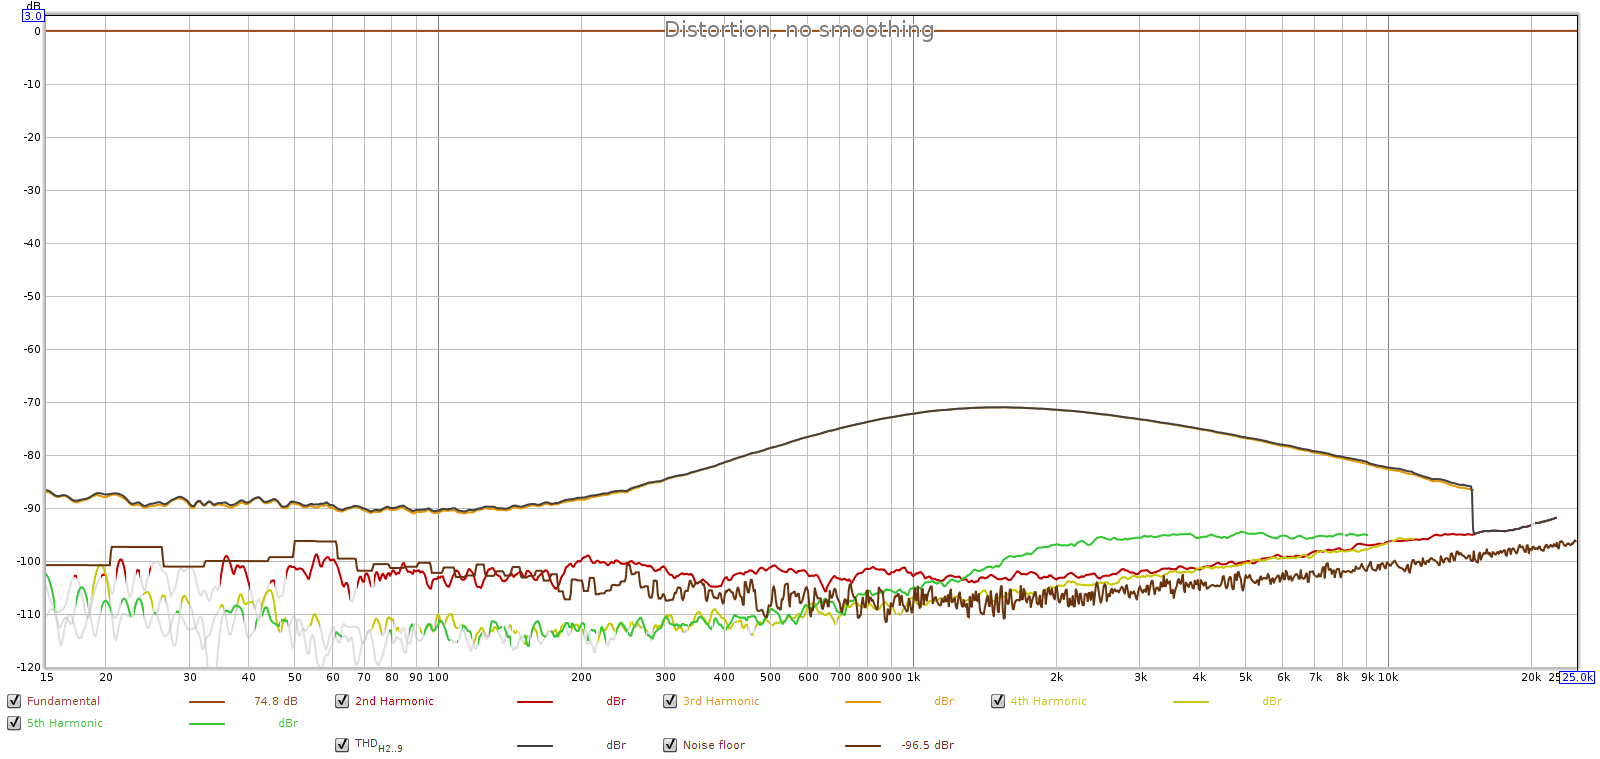
Here we see the Soul is much cleaner with a noise floor lower than the loopback connector. But the Soul does have an interesting distortion profile, peaking around -70 dB between 1 and 2 kHz. This is surprisingly high distortion. But look closer: this is dominated by 3rd harmonic with a little 5th (green). This pattern of odd harmonic distortion is sometimes seen in balanced (differentially signalled) systems, which tend to squash even harmonic distortion.
This unusual result was worth another test, so I played the same test signal through the Soul and recorded its analog output with my Tascam SSR1 instead of the sound card.
Wow – what a difference! The Tascam is professional equipment and we can see it is cleaner than the Juli@ sound board. The distortion is 10 dB lower and matches the spec for the Tascam recorder (-80 dB). Also, there is no hint of any 60 Hz or its harmonics. This is to be expected since the Soul uses a switched power supply. Yet the distortion hump is still there, even if smaller. What’s up with that?
Bypassing the DAC
Where exactly is that distortion hump coming from? To find out, I played test signals through the Soul, bypassing its DAC. This is possible due to a unique feature of the Soul. It has a switch on the front panel to listen to its analog input, but this switch is separate from the digital input selector and does not disable its digital processing. It still receives and processes the digital input, and sends it out via toslink SPDIF. You can route the Soul’s digital output to an external DAC, and connect that DAC’s analog output to the Soul’s analog input. Of course, the external DAC must have balanced XLR output.
Like this:
(Digital Source) --d--> (Soul for DSP) --d--> (external DAC) --a--> (Soul for volume control) --a--> (headphones or power amp)
In this mode, the Soul becomes a DSP processor and analog balanced preamp. DAC is handled externally. Why? Future proofing. DSP is purely digital which at 32-bit precision is near mathematically perfect, so it’s not going to improve over time. Analog preamp technology fully peaked and optimized years ago so that’s not improving either. But DACs are constantly evolving, so the Soul enables you to use an external DAC while keeping the rest of the unit.
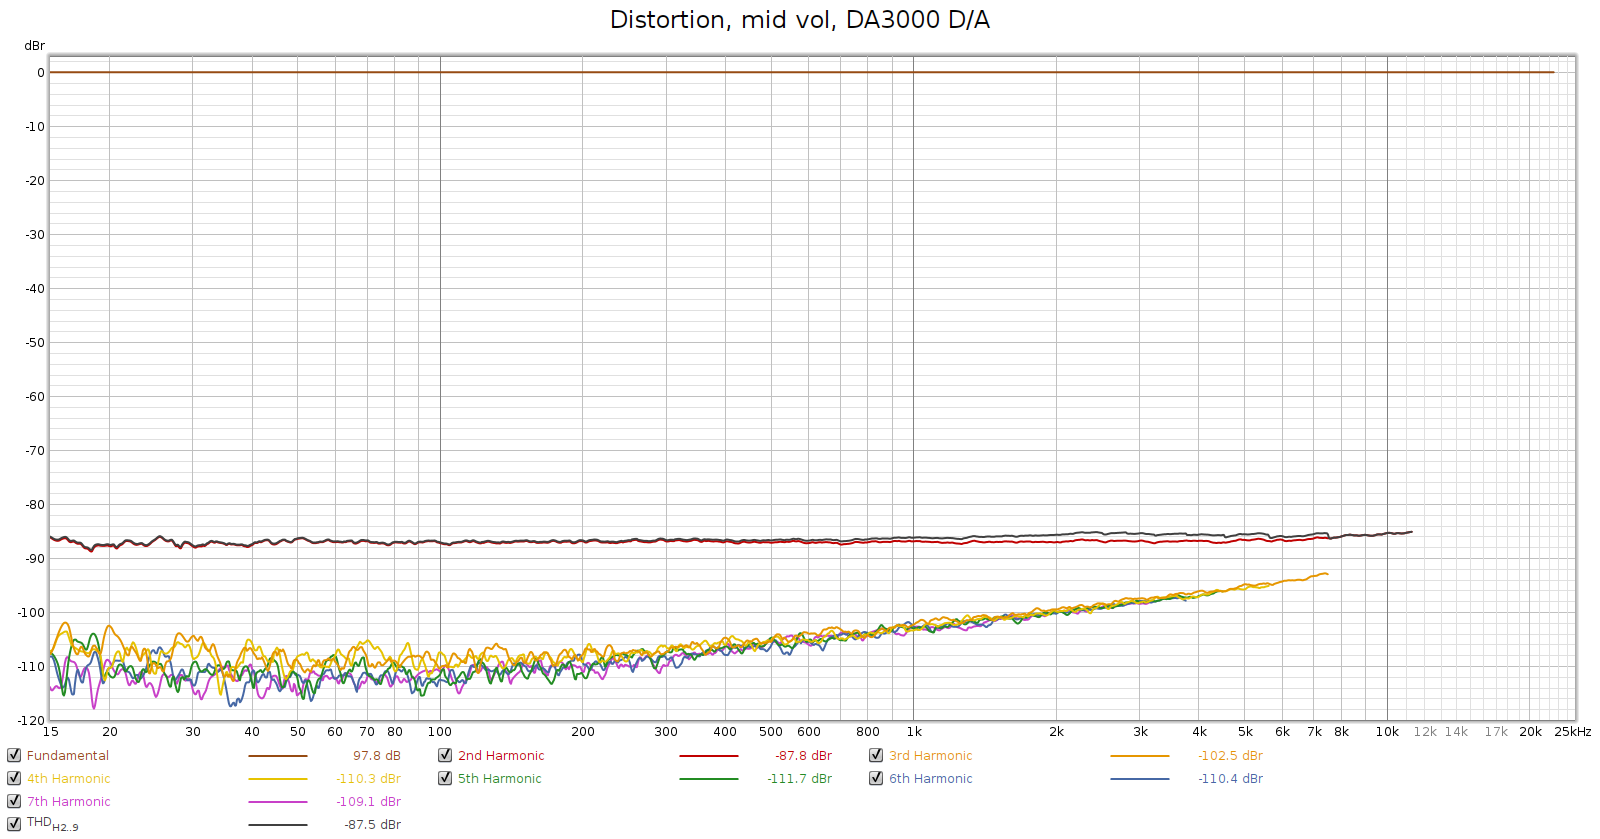
The signal chain: UAPP on my phone, playing in bit perfect mode (at 48k sampling) to the Soul’s USB input, the Soul’s digital output sent to the Tascam SS-R1, which performed D/A conversion and its analog balanced output sent to the Soul’s analog input, then record the Soul’s analog output with a Tascam DA-3000.
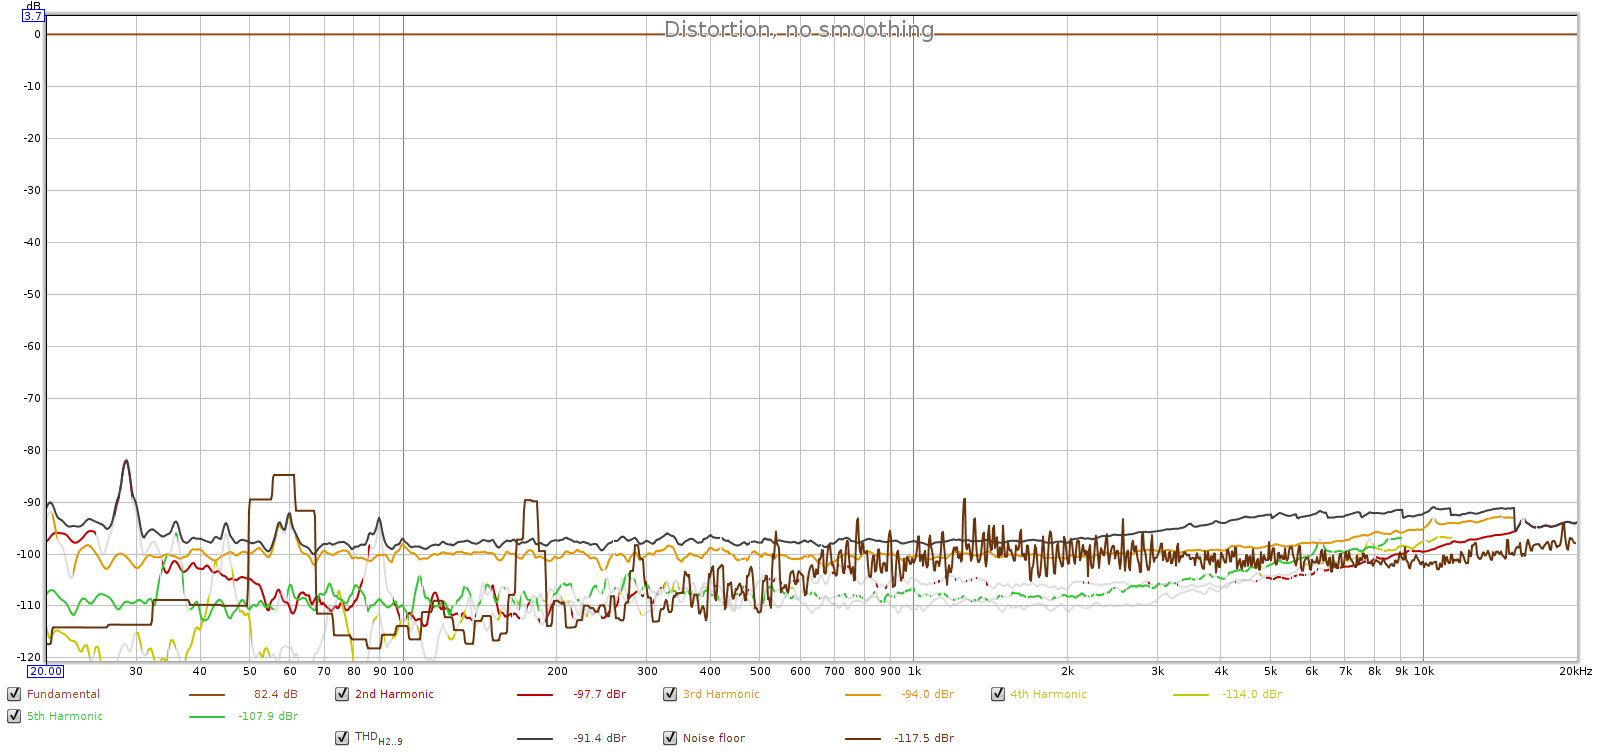
Here’s the distortion plot using the DA-3000 for D/A conversion:
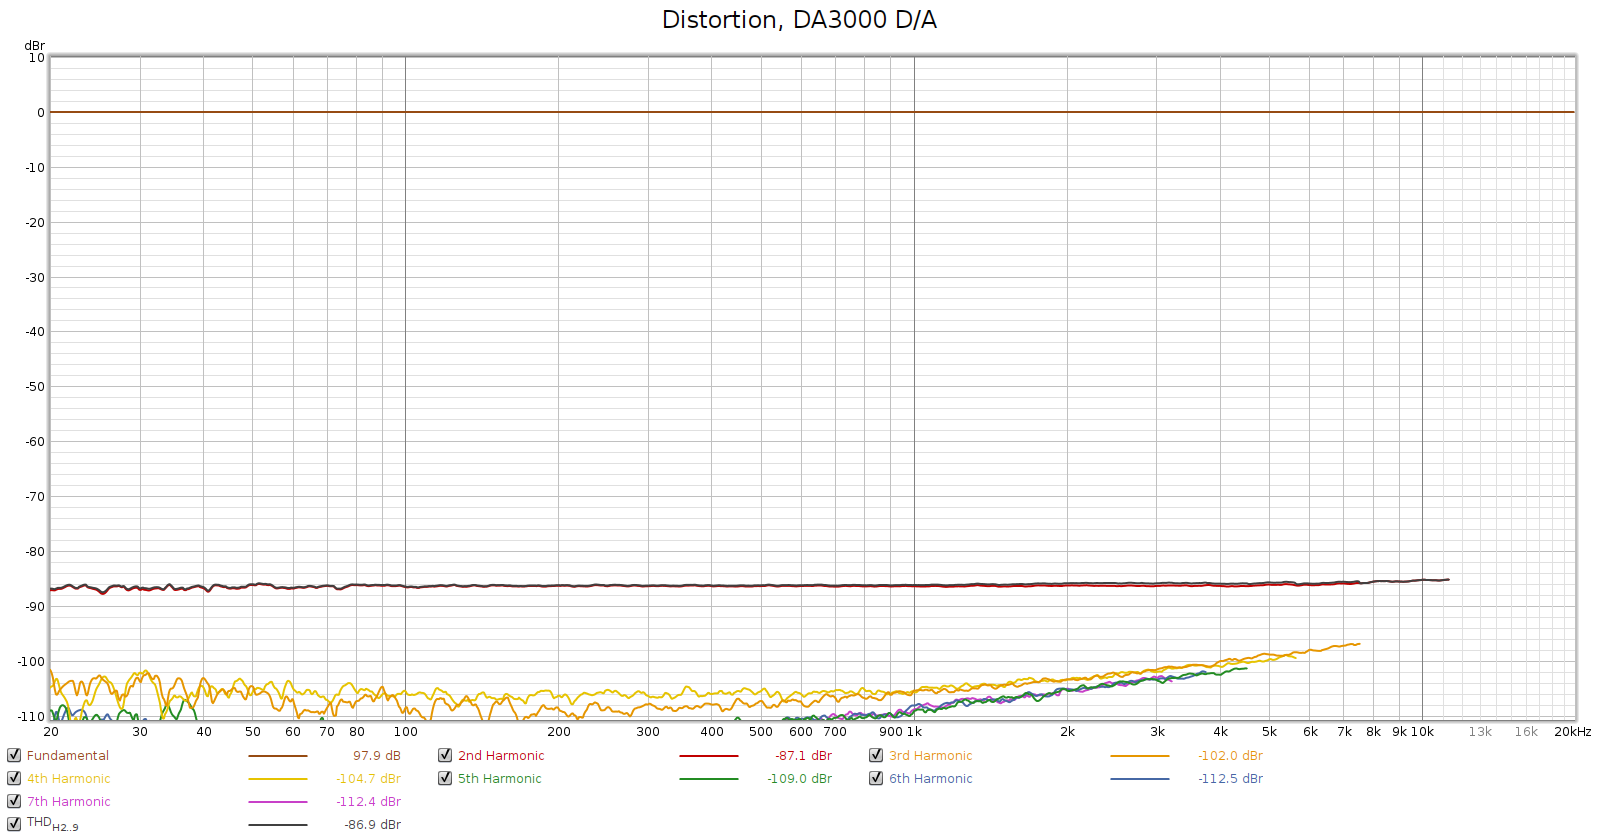
Using an external DAC, the distortion hump entirely disappears. The noise is so low I can’t measure it, and distortion is at the limits of the 16-bit recorder. Conclusion: the Soul’s distortion hump is caused by its DA converters.
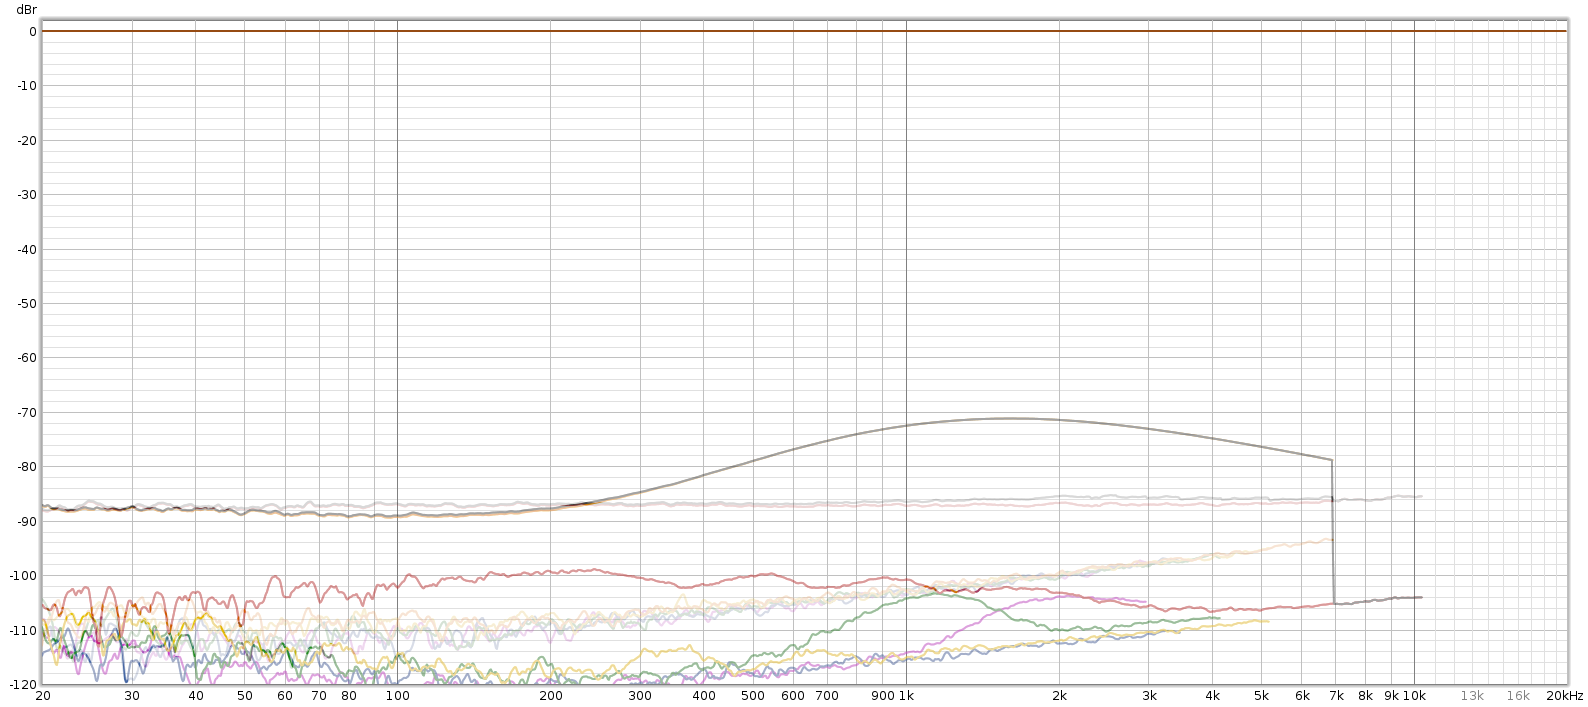
In the comparison plot below, the solid lines are using the Soul’s internal DA, and the semi-transparent lines are using the Tascam DA3000 as an external DA:
Soul vs. JDS Atom
I happen to have a JDS Atom headphone amp, which is one of the best (lowest noise & distortion) that Amir has measured at ASR. Subjectively, the Atom is a great sounding amp, a little “giant killer”. It’s as good as amps in the kilobuck price range. One impressive aspect of the Atom is how well it performs as you turn down the volume. Its SNR at 50 mV is 92 dB, which is phenomenally high. This is important because SNR is usually measured at full-scale max volume. But nobody ever listens that loud, so this is an example of measurements that are pointless because they don’t reflect actual listening conditions. When you turn the volume down to actual listening levels, the SNR in most amps typically drops by 30 to 40 dB.
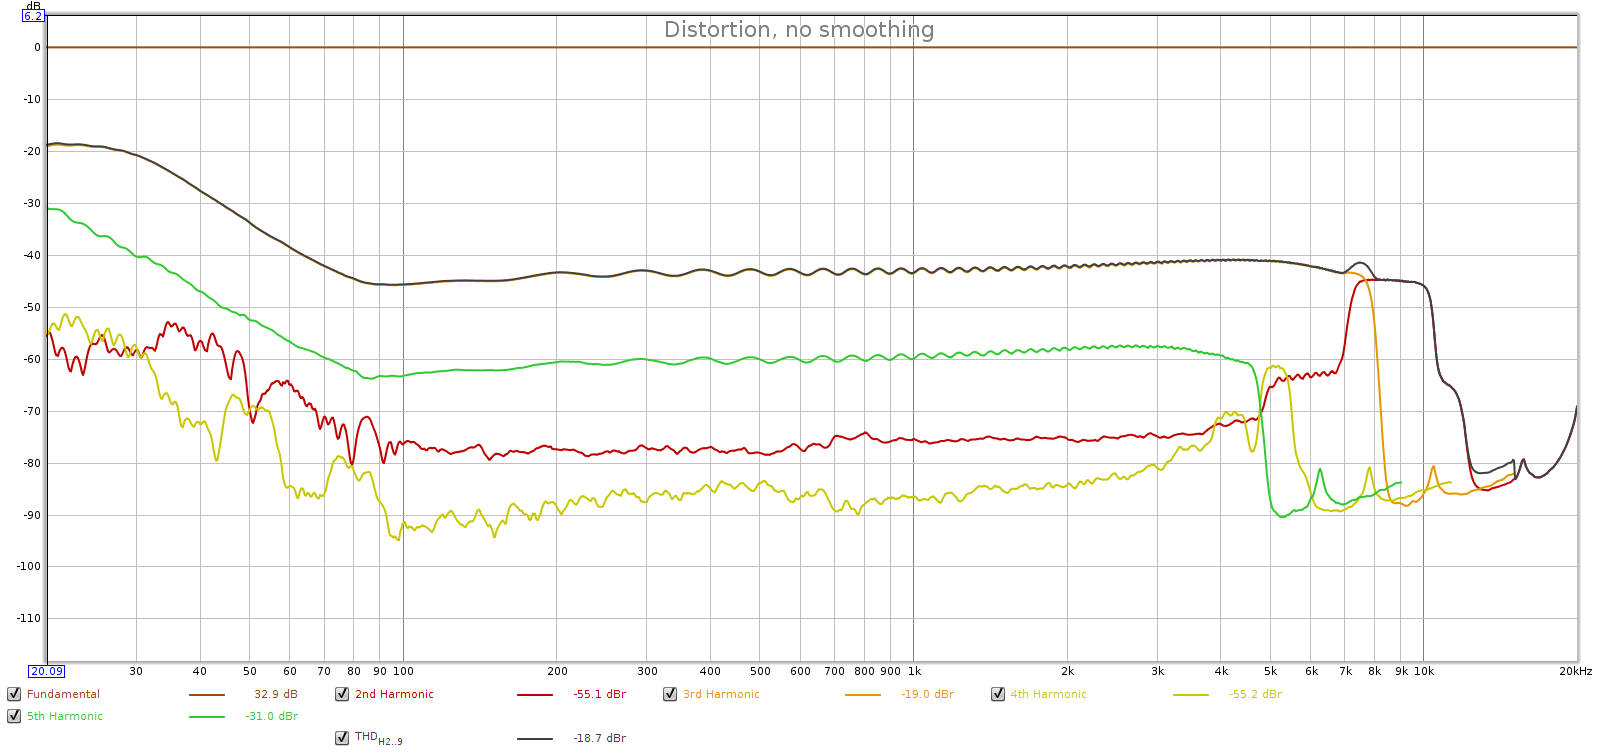
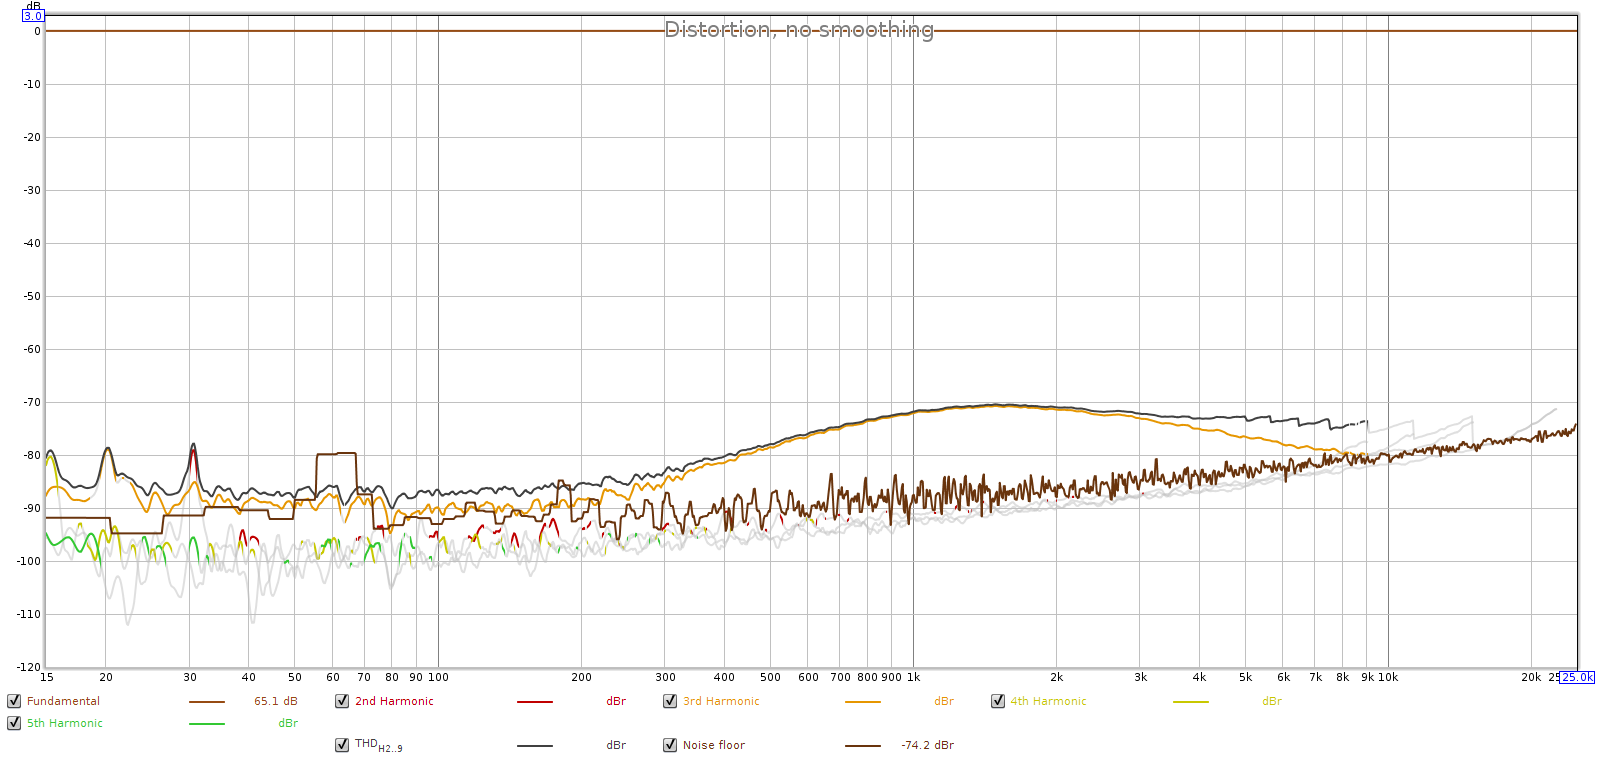
So let’s get a comparative measurement at actual listening levels. I measured the Atom and the Soul at a typical listening level with my LCD-2F headphones, which is the 10:00 knob position on both (low gain on the Atom).
Here is the Soul at the 10:00 knob position (about 15 clicks up from the min):
Here is the Soul at the 10:00 position, using the Tascam DA3000 DA converters:
Here is the JDS Atom (low gain, 10:00 position):
We can still see that the Soul has lower noise, and about the same distortion, as the JDS Atom. When an external DA converter is used, the Soul simply blows away the JDS Atom. REW says the Soul’s noise is at least 8 dB lower than the Atom, which would put the Soul’s 50 mV SNR at least 100 dB, higher than anything measured at ASR.
In summary, the Soul’s performance looks “good” for distortion and “great” for noise. The WM8741 DACs that it uses were great for their time, but that was several years ago and DAC technology has improved. Its limitations are most likely inaudible, but if you use a high quality external DAC, the Soul is truly state of the art.
Note: using an external DAC with the Soul is not a decision to be taken lightly. The Soul's noise floor is extremely low, so you may end up eliminating distortion that can't hear, at the cost of introducing noise that you can hear.
Headphone Notch Filters
Many headphones have a resonance causing a bump in frequency response between 6 and 12 kHz. The Soul has a notch filter to correct this. The manual says it ranges from 6 to 11 kHz, each is -6 dB, Q=2.0. Specifically, the frequencies should be spaced 6.3% apart which is 1/11 of an octave, or slightly further apart than a musical half-step.
Here’s how they measured. The grey line is the frequency response with all controls disabled.
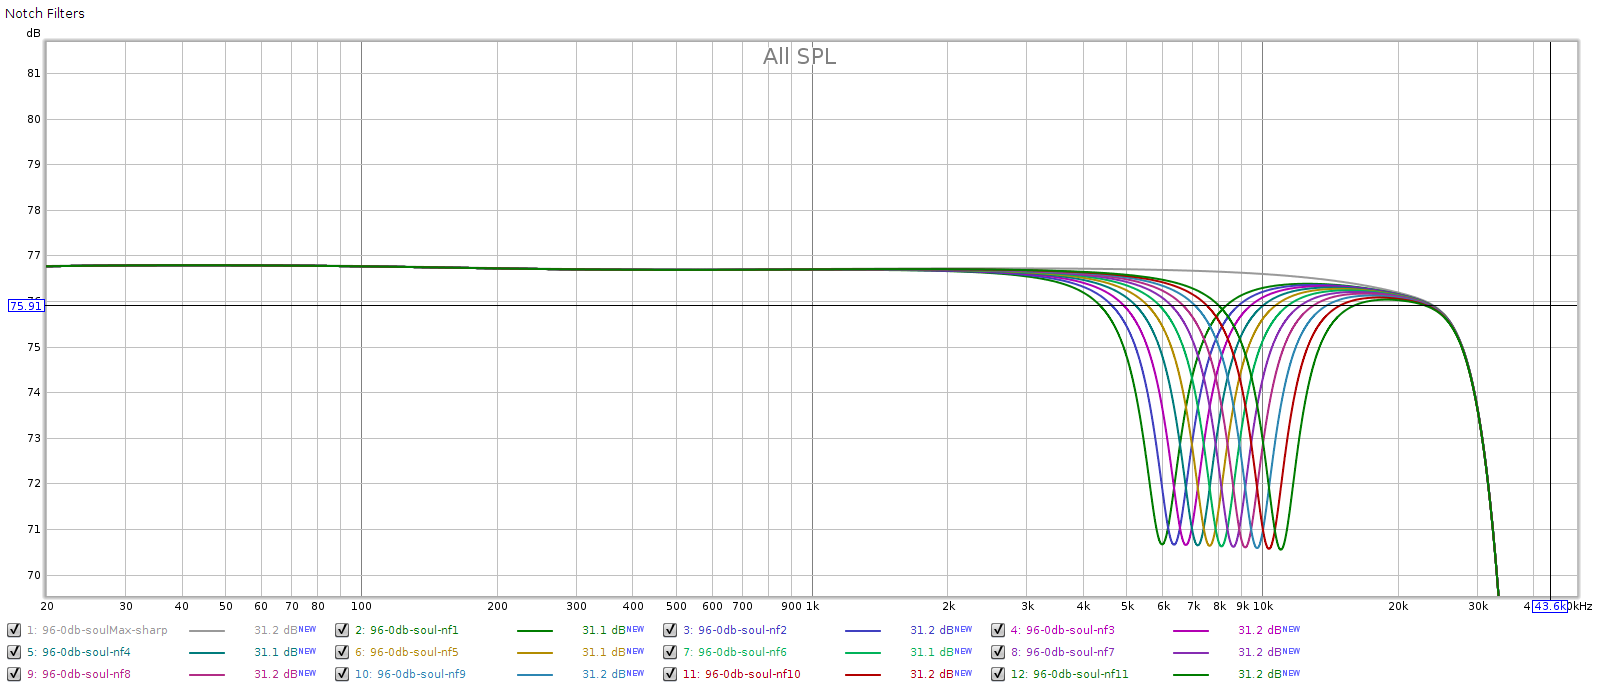
Here’s a closer in look:
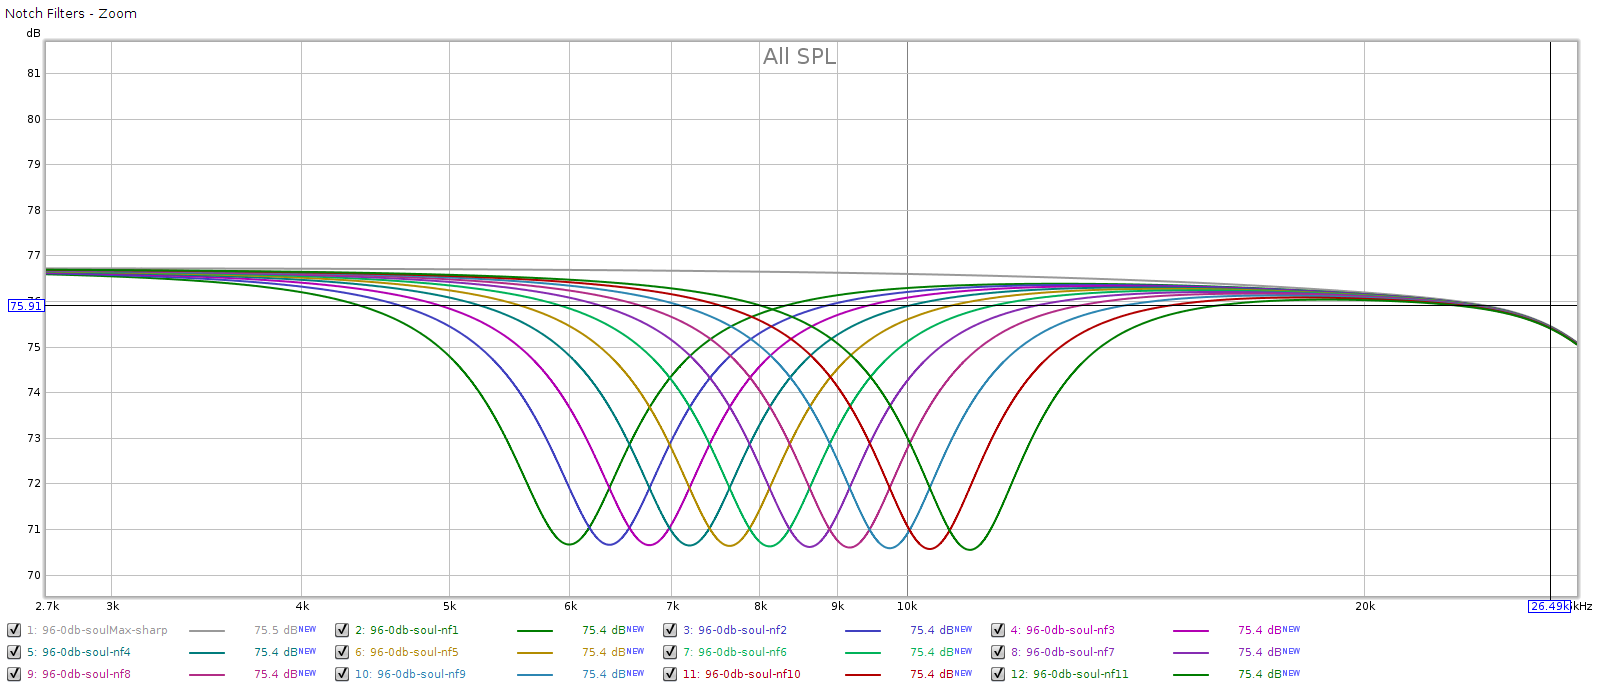
Each measures spot-on to what the Soul’s manual says: in frequency, amplitude and width.
Tone Controls
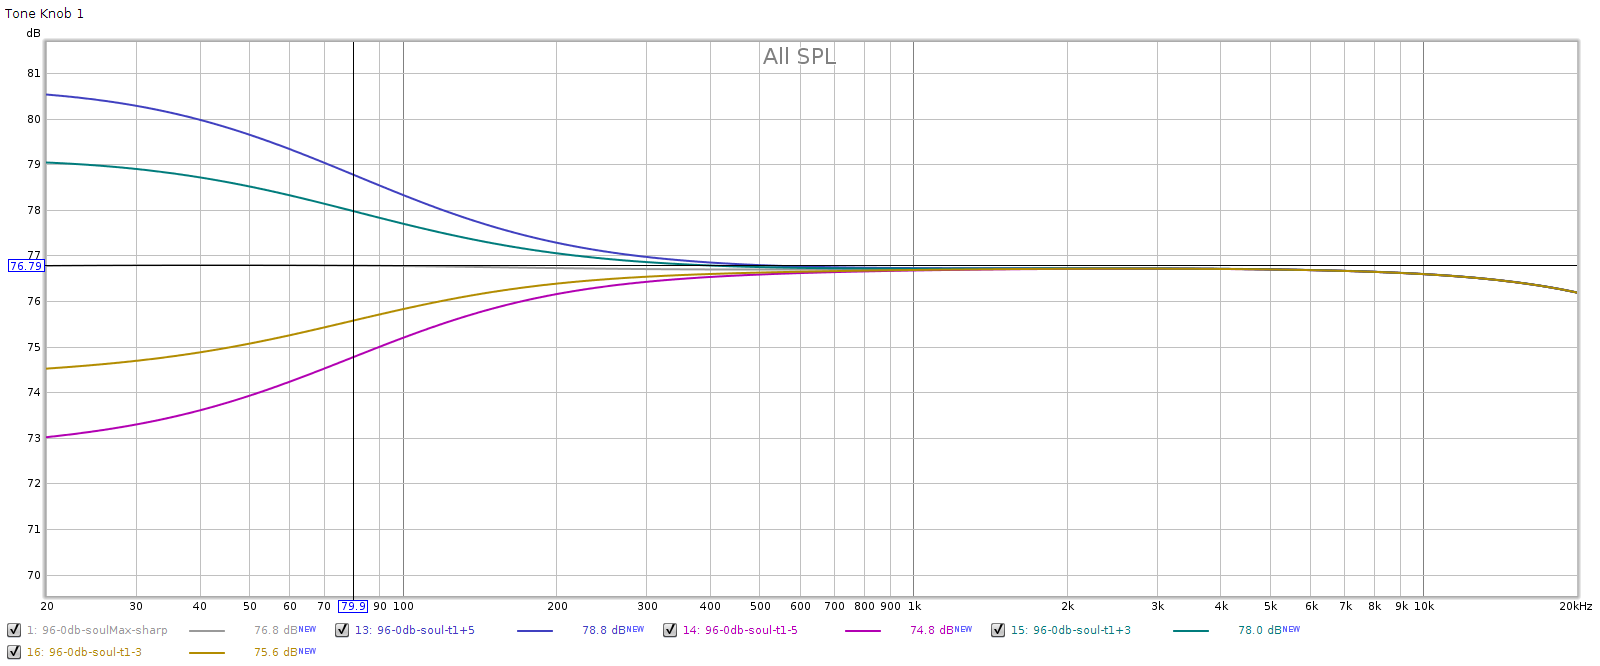
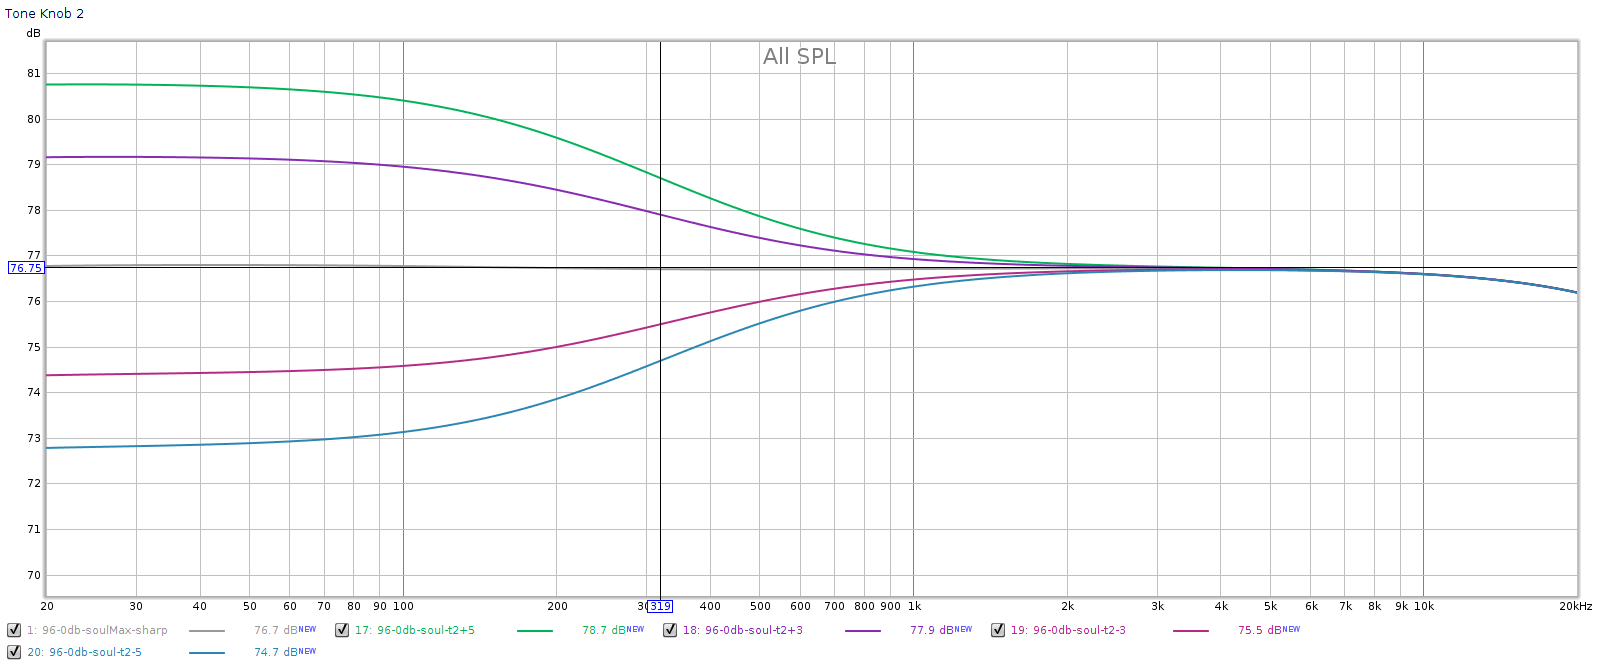
The Soul has 4 tone controls. Meier customized mine to be equally spaced in octaves. That is, the corner frequencies should be 80, 320, 1,250 and 5,000 Hz. All 4 are shelf controls; the bottom two are low pass, the top two are high pass. Each control has 5 clicks up and 5 clicks down, each click should be 0.8 dB. I measured each at click positions -5, -3, +3, and +5.
Note: I measured these with a digital frequency sweep at full scale / 0 dB. This should cause digital clipping when the tone controls are set in the positive range. But due to Meier’s “FF” or frequency shaped feedback, the lower frequency controls don’t clip. That is, “FF” is reducing low frequencies more than 4 dB, which is the tone control range. More on this later.
In each of the following graphs, the vertical marker is at the corner frequency.
Knob 1, low bass.
Knob 2, mid bass
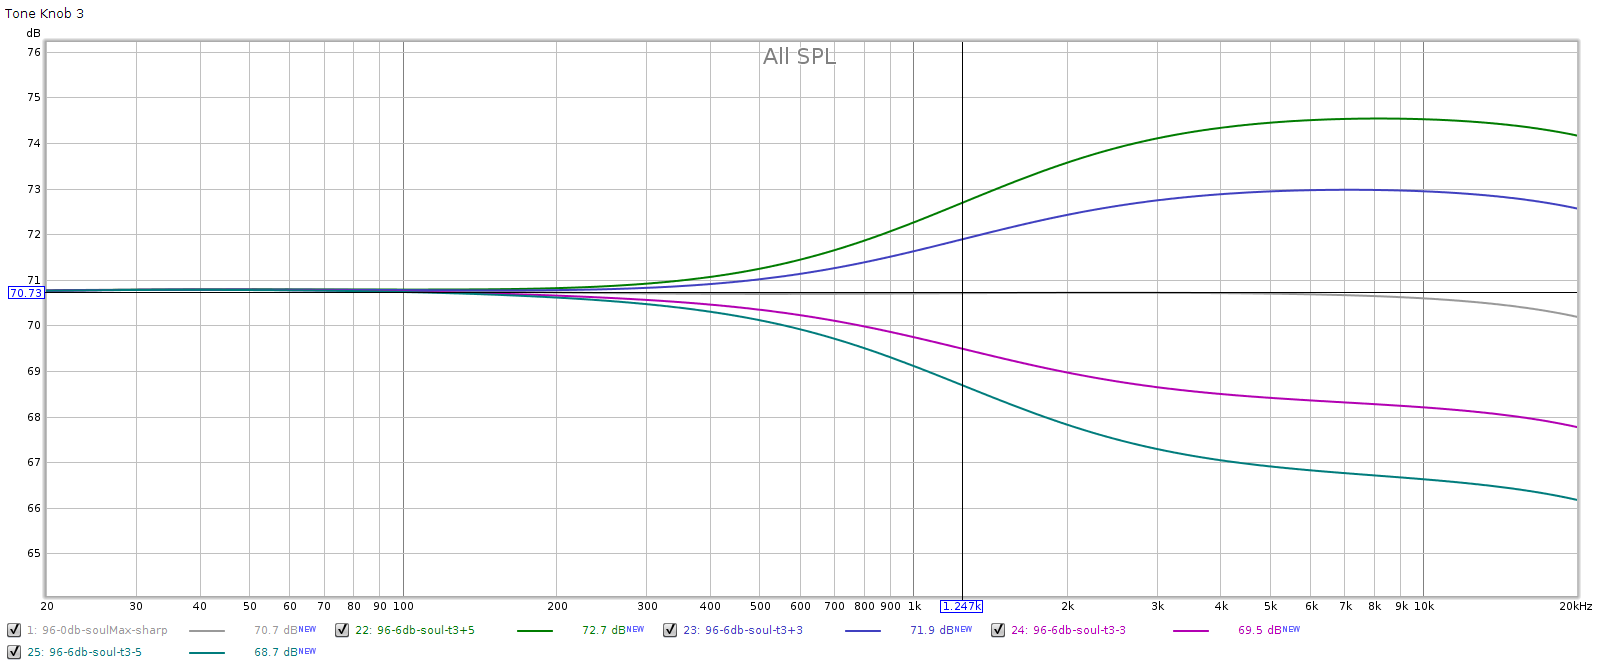
Knob 3, mid treble
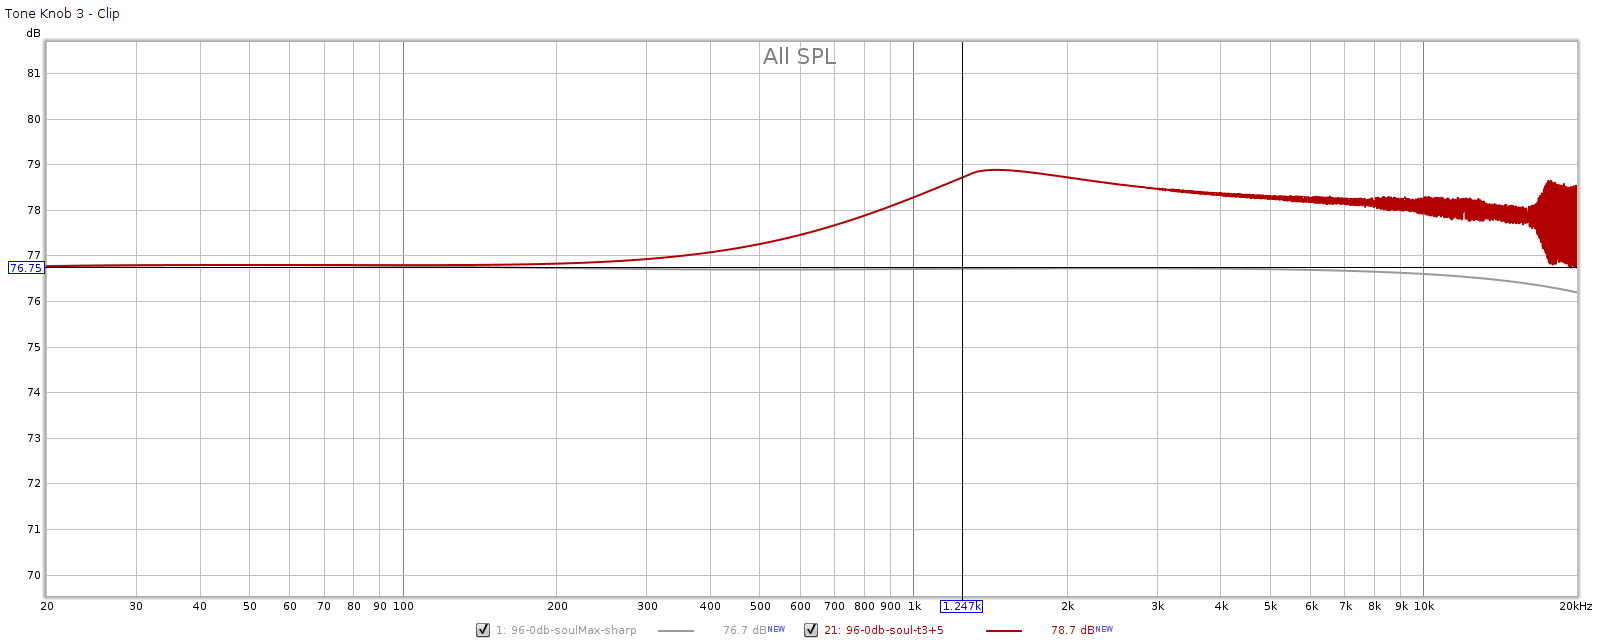
Aha! In the above we finally see clipping, so we get some idea of the shape of the FF response curve. To compensate, I lowered the frequency sweep to -6 dB:
Knob 4, high treble
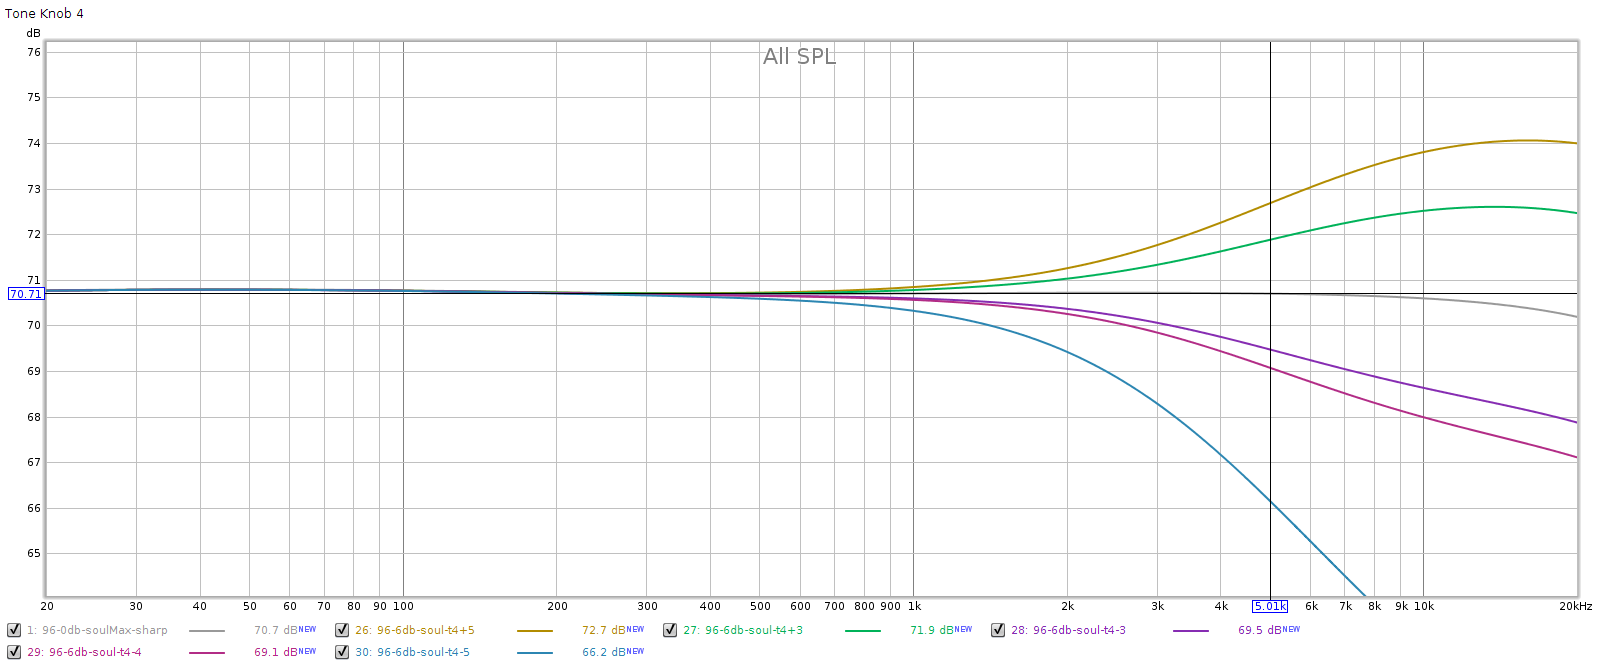
You can see that the lowest position attenuates a lot more. Let’s zoom out a bit to see the full curve:
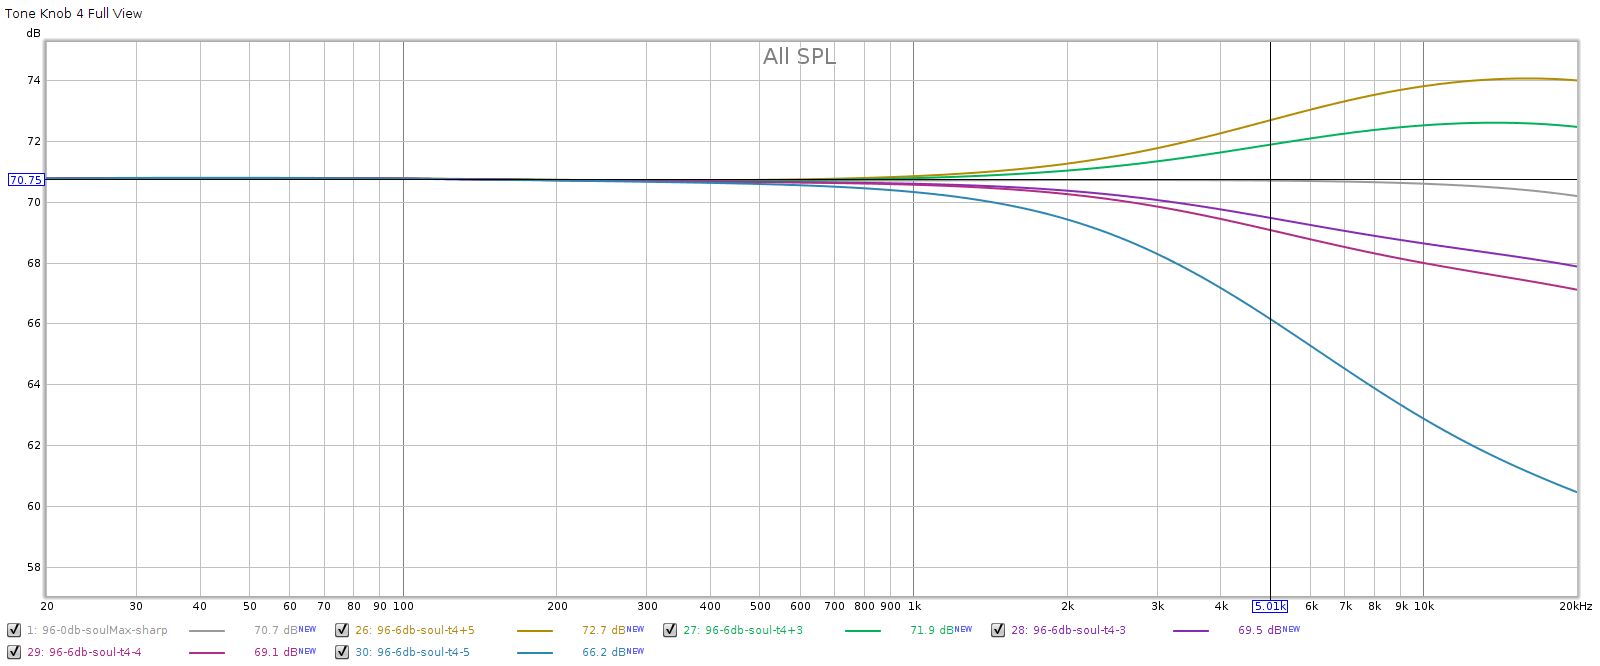
What we see here is that the lowest position on knob 4 triggers the CD redbook de-emphasis curve, which is a gradual cut that starts at 1 kHz and becomes -10 dB at 20 kHz. This feature was rarely used, but if you have any old CDs using it, and they sound too bright, it means your playback equipment failed to detect it. The Soul enables you to apply the proper de-emphasis manually.
Here are all the tone control knobs seen at once
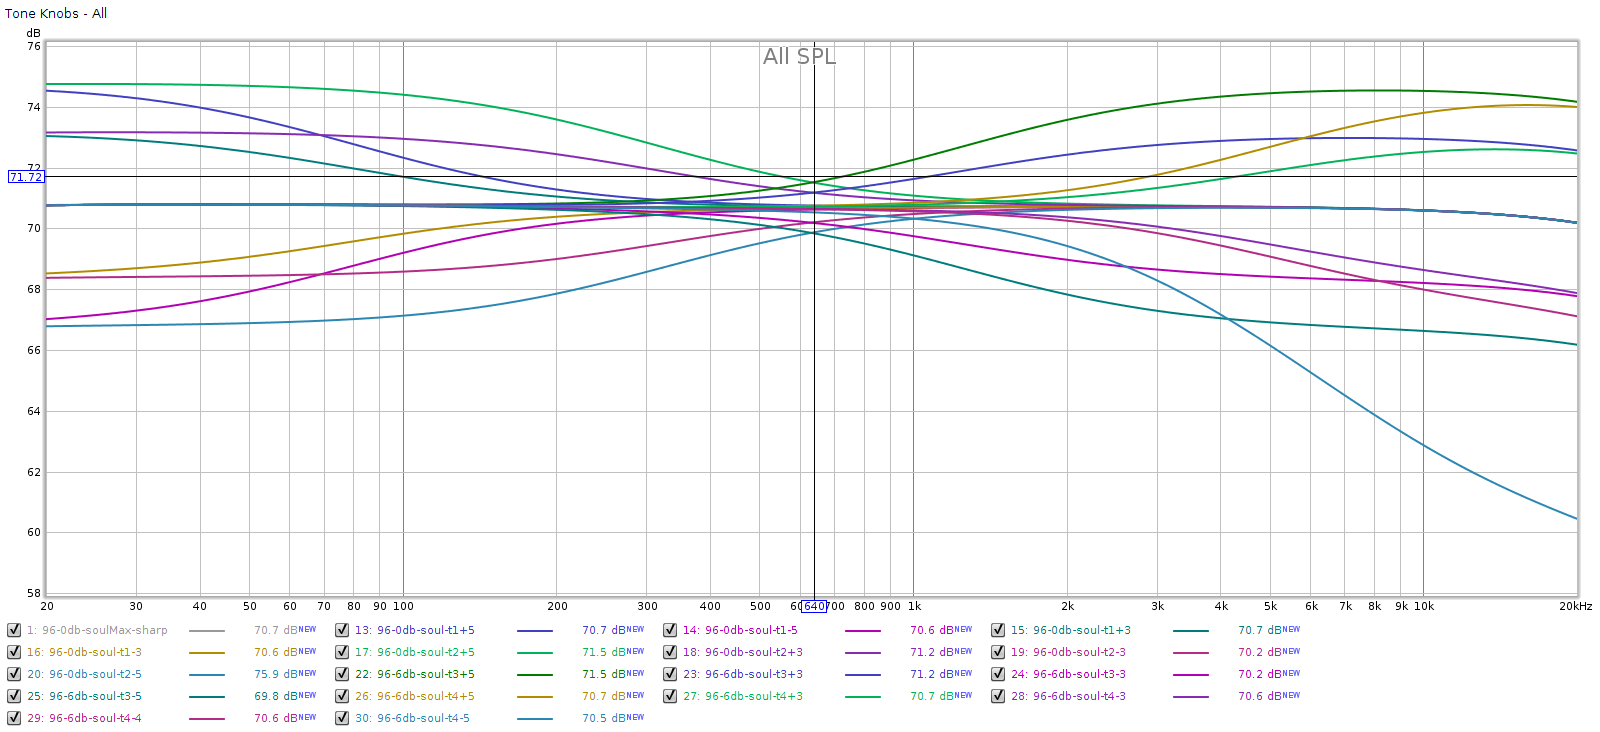
You can see they are spaced symmetrically. Also, their combined effects are cumulative, which enables a lot of flexibility when setting them. Because they are shelf controls, you won’t get amplitude ripples when combining them.
Crossfeed
The Soul has DSP to narrow (for headphones), and widen (for speakers), the stereo image. This is a common feature for headphone amps, having several different implementations. Meier’s is one of the best: it reduces the “blobs in my head” effect that headphones can have, especially with recordings that have instruments hard-panned fully L or R. And it does this without any perceptual sonic side effects like changes to frequency response, which is what sets it apart from others.
I measured the Soul’s frequency response in all 10 modes (5 narrow, 5 wide), plus its frequency response with all DSP disabled. As you can see below, all 11 curves are exactly the same, even with the Y scale zoomed in to 0.1 dB per division.
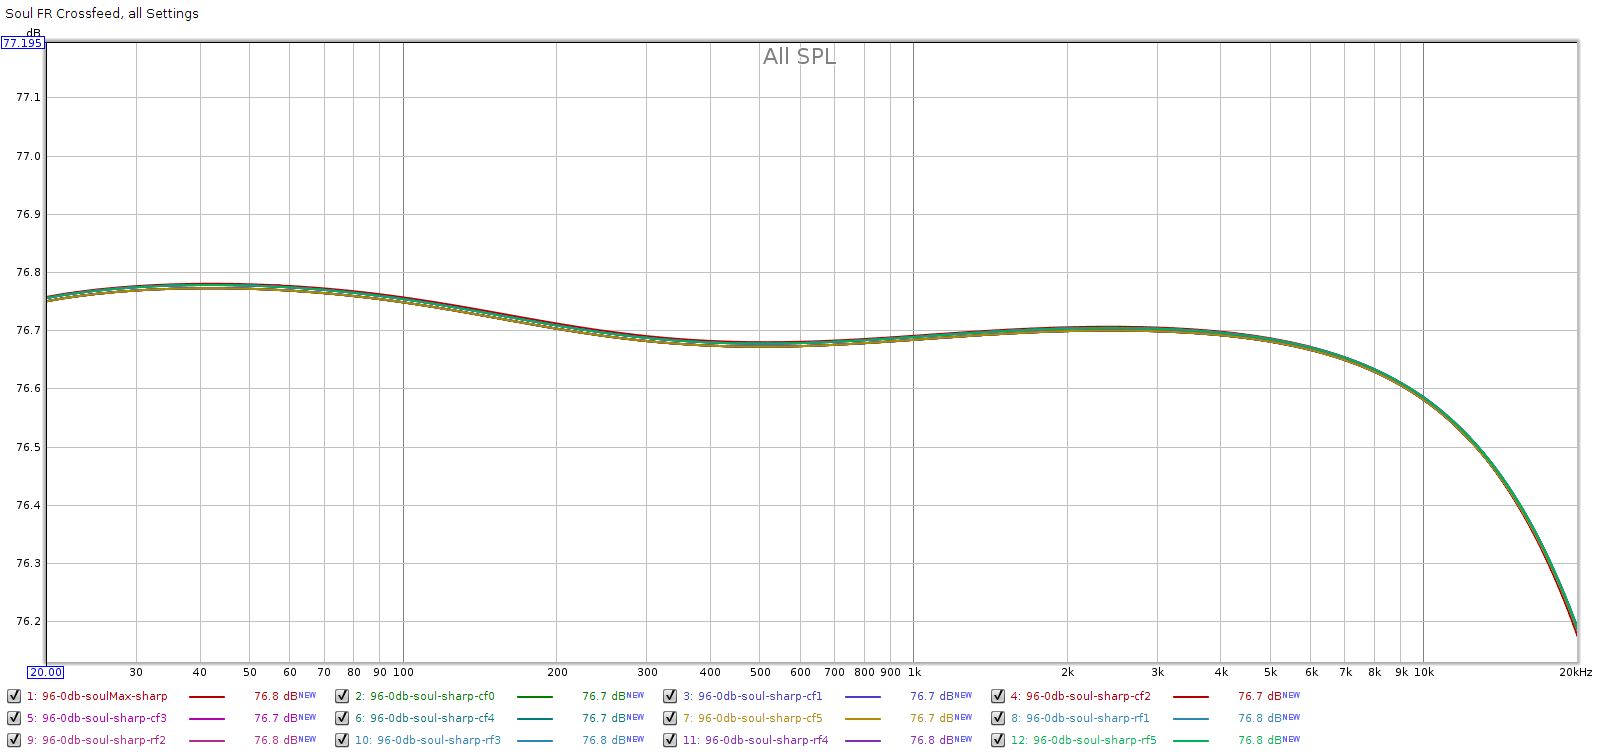
For example, the crossfeed in the Headroom amps from 15-20 years ago attenuated mids & treble due to comb filter effects from their inter-channel time delay. These amps had a gentle high pass filter to compensate for this. Meier’s crossfeed is free of these effects.
This doesn’t necessarily mean the crossfeed will be perceptually transparent. Measuring the same doesn’t imply that it sounds the same, because crossfeed is mixing some L into R and vice versa, with time shifts. Percepetually, this may make it sound like the FR has changed, to some people.
Meier FF
The Corda Soul uses Meier’s Frequency Adaptive Feedback. I’ve written about this here and here. Essentially, it shapes the frequency response to attenuate low frequencies in order to “unload” the digital and analog stages of the DAC and preamp, and brings the bass level back to normal for the final output stage, so the overall frequency response remains flat. This improves the midrange & treble where our hearing perception is most sensitive.
Meier customized my Soul’s firmware to make some changes I requested. These changes are:
- Auto-Mute: the Soul auto-mutes whenever the digital input signal drops below a threshold for more than a brief time. This prevents the outputs from carrying a DC offset. The threshold is just above digital zero, so digital dither won’t prevent auto-mute from triggering. Auto-Mute is a standard Soul feature, not something Meier did just for me.
- Extend the auto-mute delay
- The original delay at 44 kHz was only a couple of seconds. This caused the Soul to auto-mute, then turn back on, on some CDs that had between-track silence. When doing this, the Soul emitted an audible “click”.
- The new delay is about 20 seconds at 44 kHz, so this never happens anymore.
- Disable auto-mute entirely
- The Soul has a 3-way gain switch: high, medium, low. It’s implemented digitally. I never used the high position, so on my Soul, this switch position disables auto-mute entirely (mine has no high gain mode).
- The medium and low settings are unchanged.
- Silent auto-mute
- The Soul emitted an audible click when auto-mute triggered. Meier changed my firmware so this does not happen; the auto-mute is completely silent in both ways, coming on and off.
- Tone control changes
- Space the corner frequencies at equal octave intervals (80, 320, 1250, 5000).
After doing these customizations, Meier sent me the firmware code so I can keep a backup copy, in case my Soul ever needs maintenance. From this code, I have the actual frequency response curve he uses for FF. Meier asked to keep this confidential, so I do not publish it here. Suffice to say, like the rest of the measurements above, it is truth in advertising. The implementation is exactly what he says it is.