Category Archives: Bikes

Bikes: Seat Failure?!

Yesterday I took my old city bike for a ride. It’s my brother’s old Trek 330 from the 1980s that I converted to a single-speed with a 2-speed Sturmey Archer kick-back shift rear hub, and mustache handlebars. It’s a cool old vintage bike that’s fun to ride.

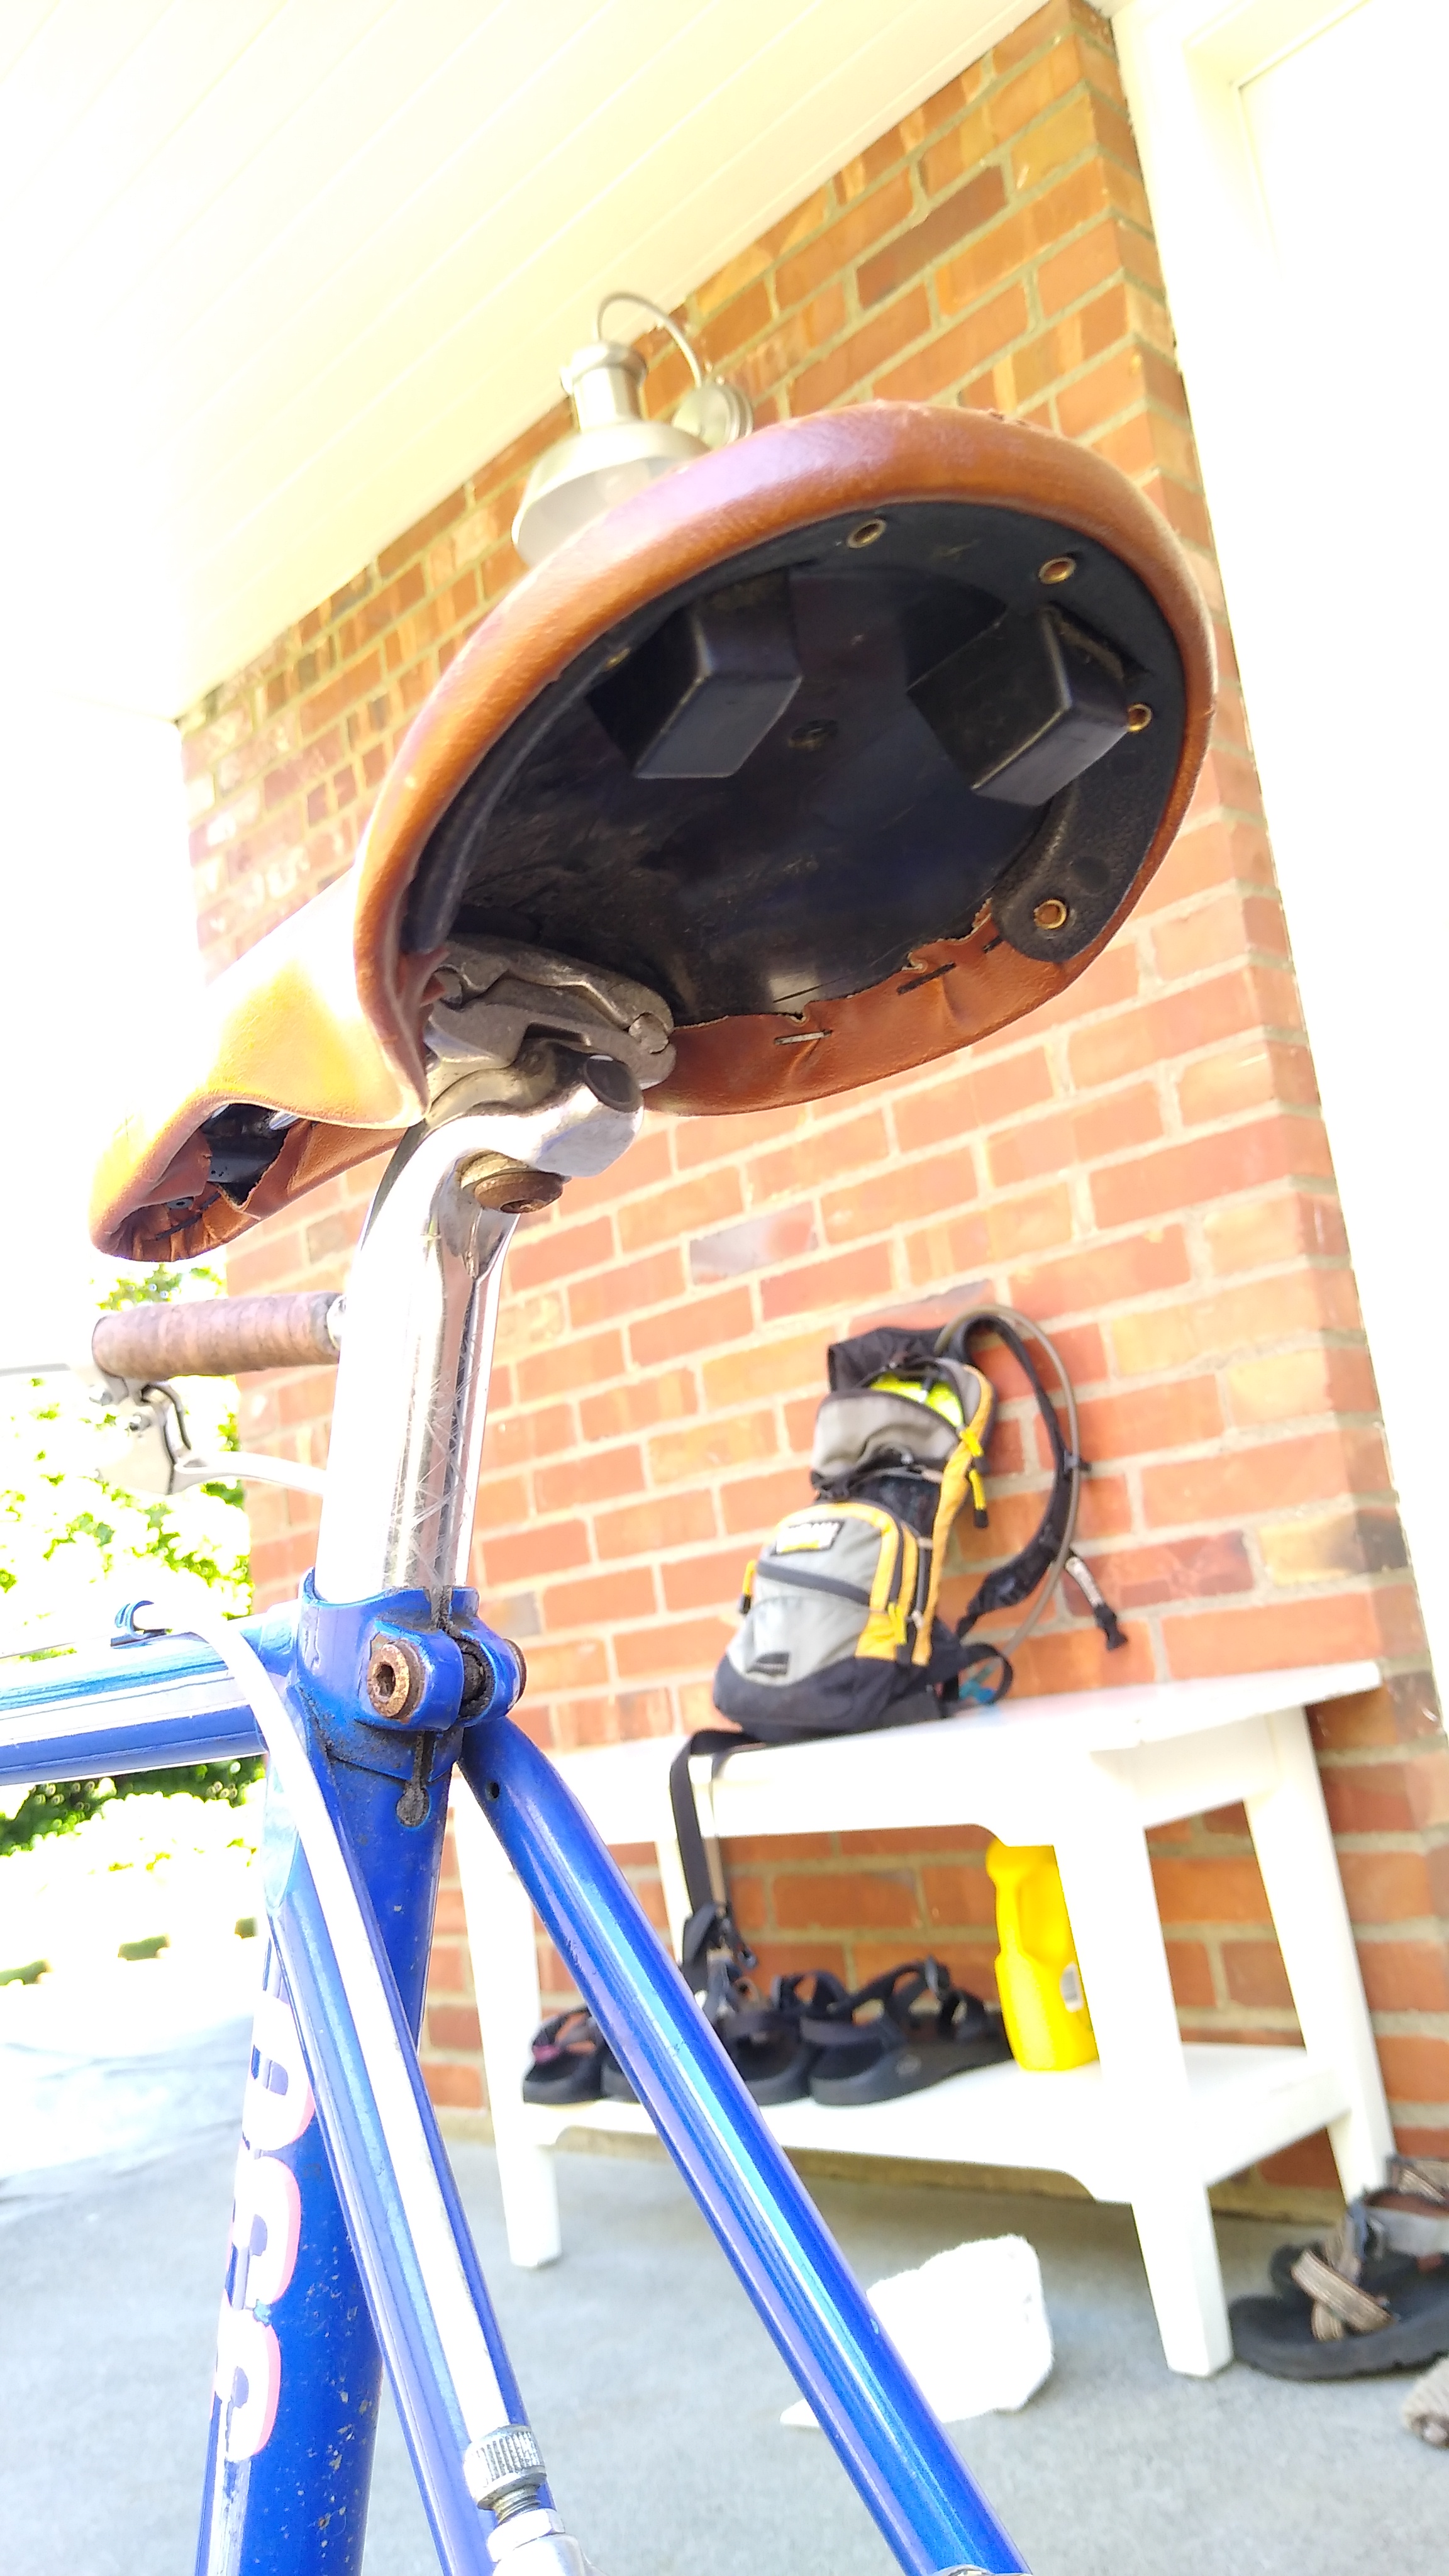
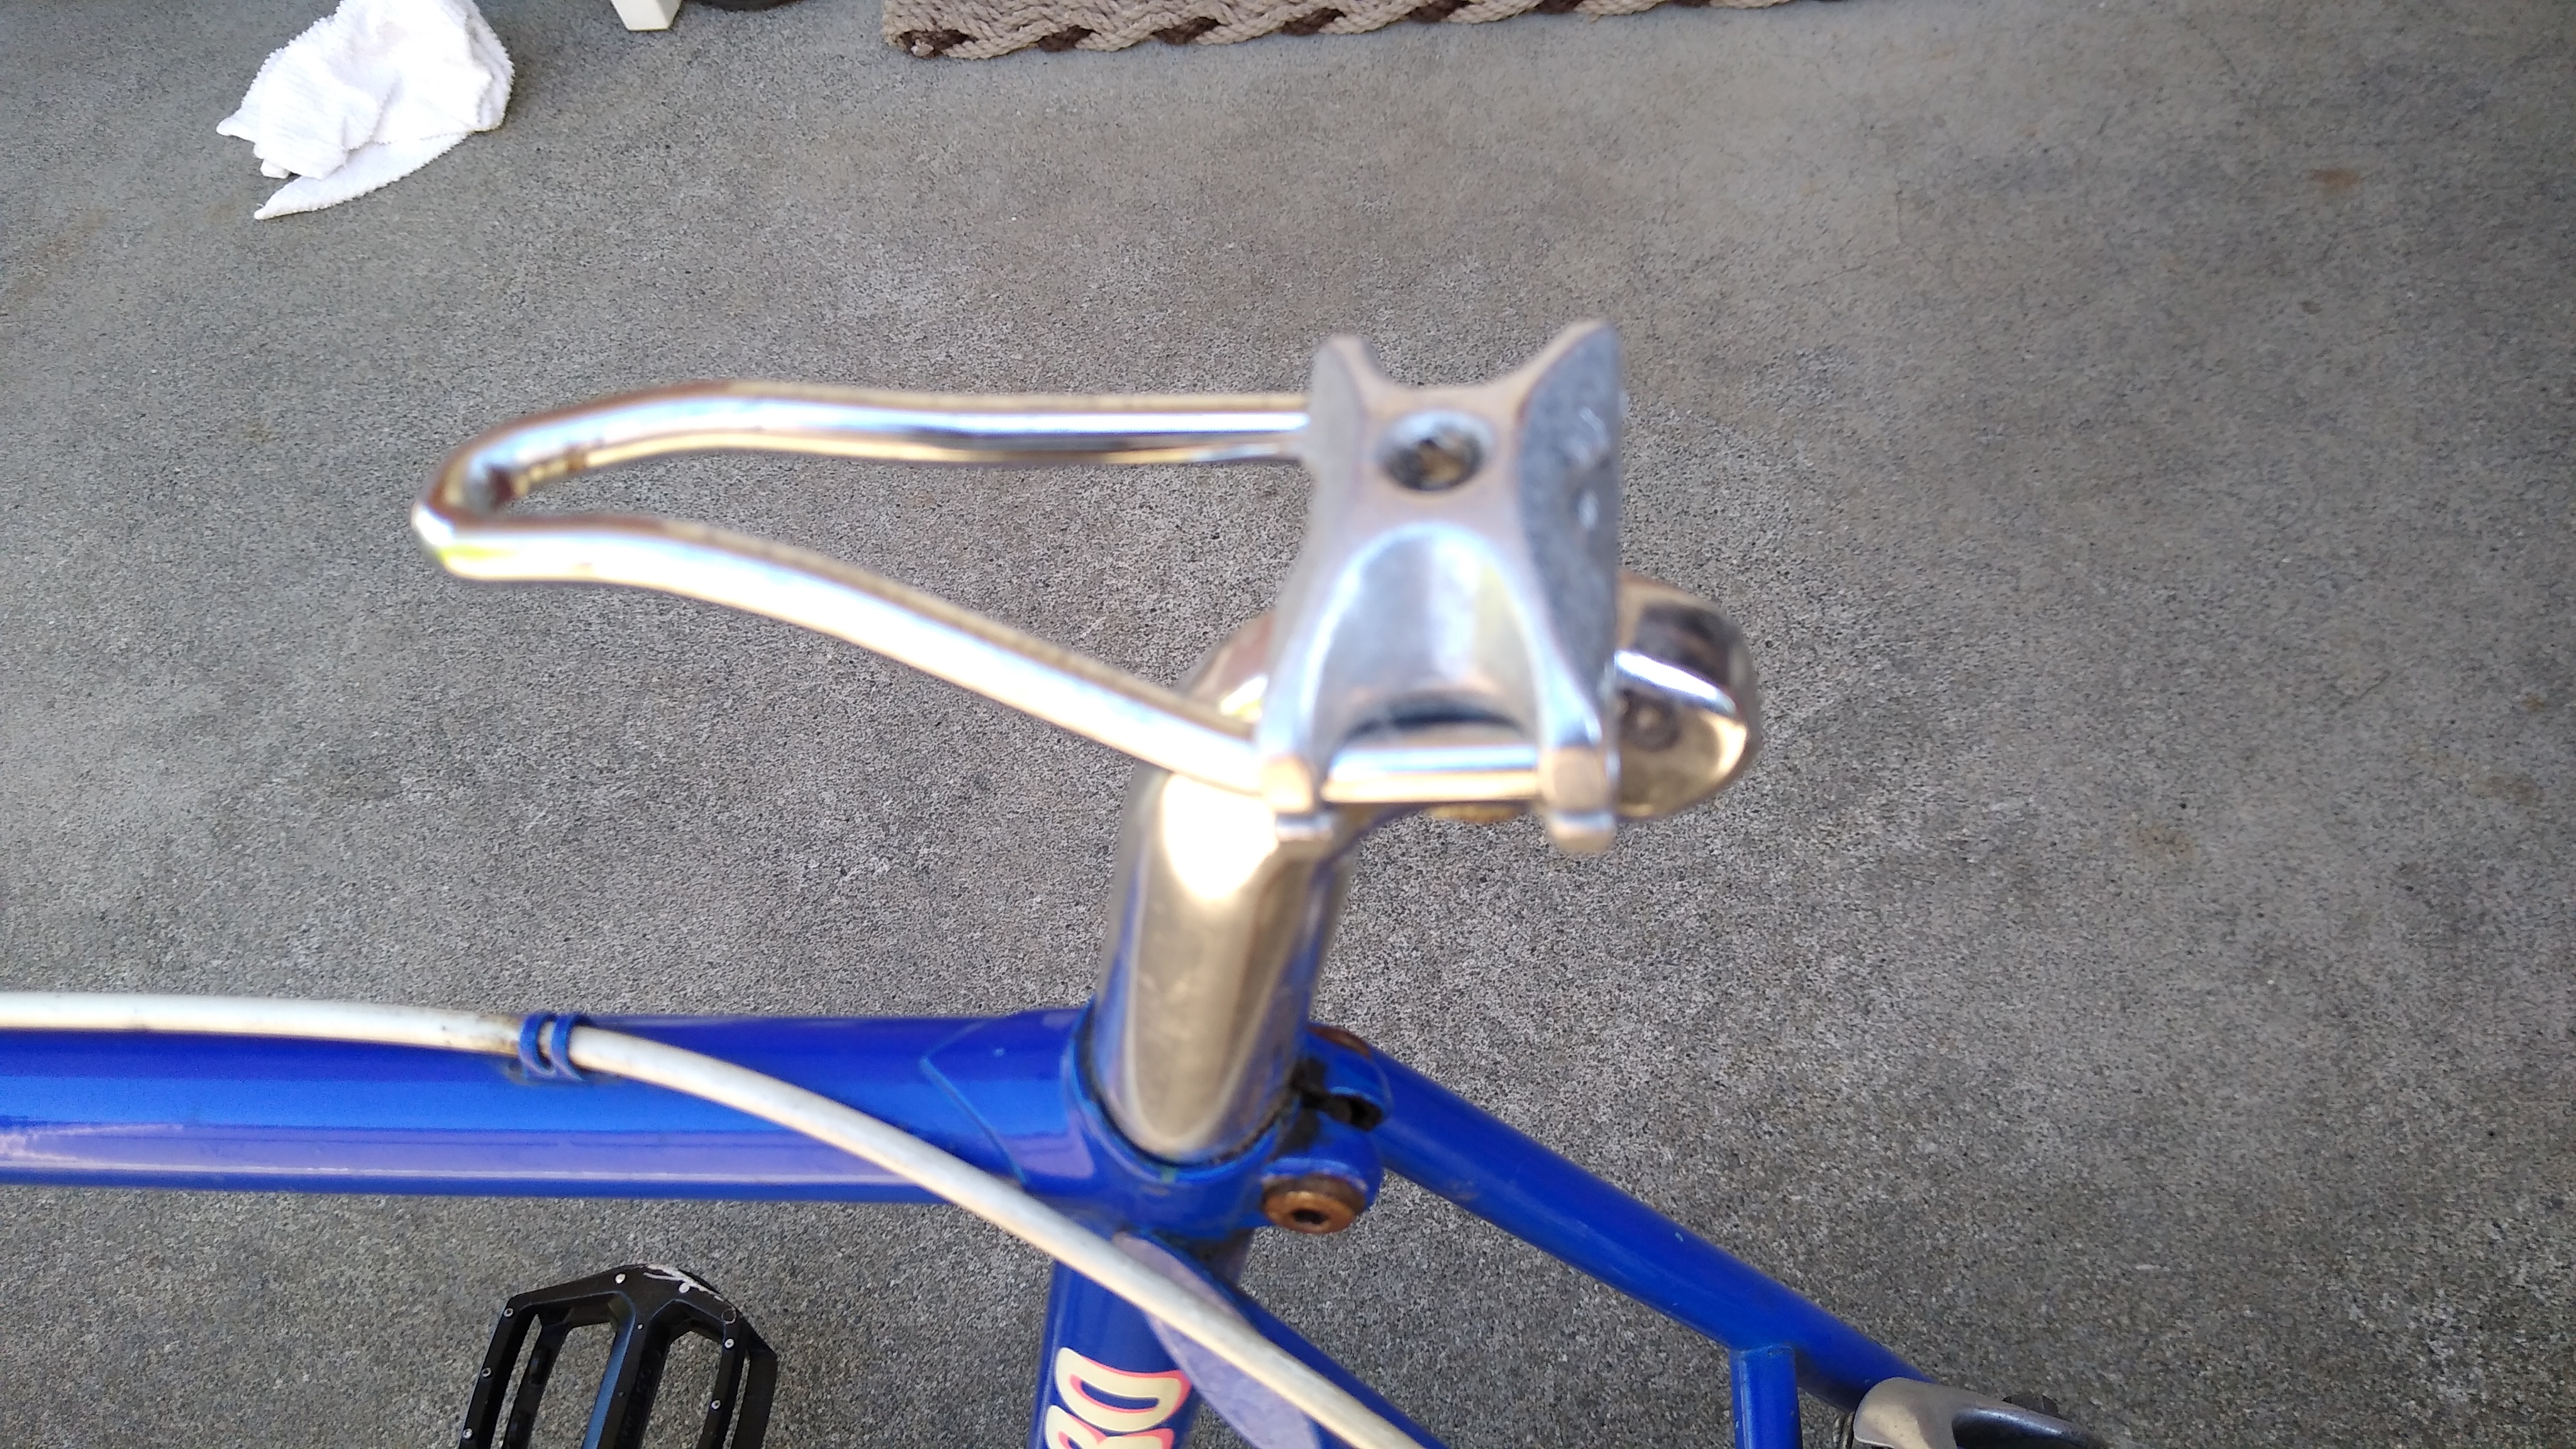
About 14 miles into the ride, just after I turned around to head home, the seat suddenly rotated back as if the bolt were loose. I stopped and got out my tools, ready to tighten it. But it wasn’t loose. One of the seat rails had sheared or snapped off! It’s made of metal! I’m not a big heavy guy so I have no idea how this happened. In over 40 years of riding and working on bikes I’ve never seen a failure like this. Then a couple of miles later the other rail broke.

Pics or it didn’t happen:

The front of the seat rail still fit into the nose of the seat, but it was loose and fell off a few times on the way home, making me stop to go back and pick it up. So for the last 10 or so miles I got a new kind of bike exercise:

  • Slide forward and ride on the front nose of the seat (ouch!)
  • To pedal, legs now push down and back, for a new kind of muscle workout
  • Pinch the seat nose between your butt cheeks while pedaling, to keep it in place

What a weird failure. Of course, I made it home and swapped the seat for an old spare I had in one of my bike parts bins.

New Bike Day!

Summary

I’ve been riding the same road bike for over 20 years. I decided it was finally time to get a new road bike. My research and prior experience led me to pick a Fezzari Empire.

20211025_121845.jpg

20211031_123620.jpg

The Old: Trek 2200

I bought this Trek 2200 back in 2000. Aluminum frame, Shimano 105, Rolf Vector wheels. The reason I’ve been riding it for so long is because it’s such a great bike. Over the years I’ve serviced (cleaned & repacked) every bearing (wheels, headset, bottom bracket), replaced the chain & rear cassette (wore out a couple), and of course gone through several sets of tires & brake pads. I’ve also had to rebuild the wheels due to failed spoke nipples. What’s most surprising about this bike is that everything else is still original: frame (of course), hubs, rims & bearings (serviced but never replaced), front chainrings, shifters/brake levers, even cables!

Early on, I installed a suspension seat post because this Al frame is so rigid you almost need a mouthpiece to ride it <g> This helped quite a bit, though it needs to be disassembled, cleaned and re-greased every year. I also replaced the original 12-25 cassette with an 11-28. Otherwise it’s bone stock. The bike weighs 21.5 lbs. ready to ride pedals and all.

Why?

Why get a new bike, especially if this one is so great?

  • Gearing: the Trek’s original lowest gear was 39-25 or 1.56:1, about 41.2 gear-inches. This always felt a bit high, even when my legs were 20 years younger. The front crank BCD doesn’t allow a smaller front chainring. The rear derailleur can take a max 28, so when the cassette wore out I replaced it with an 11-28, giving a 12% lower first gear, 1.39:1 or 36.7 gear inches. This helped but still I’d prefer a lower 1st gear, which is impossible with this bike. While keeping the same top gear (52-11, or something close to that).
  • Comfort: the Trek is so rigid I installed a suspension seatpost. I’d like a bike that is just as efficient yet naturally more compliant. And the Trek has racing geometry with a steep fork angle and short 38″ wheelbase. This is responsive yet twitchy. I love the handling of our Santana tandem, which is more stable and relaxed. It doesn’t slow us down in the twisty curves.
  • Performance: who doesn’t want higher performance? Better aerodynamics and lighter weight. And better brakes.

What?

Once I articulated the reasons why, I could now start to define what, or derive requirements:

  • Carbon frame: the ultimate for efficiency, compliance, and weight
  • Carbon wheels: enables deeper aero profile without adding weight
  • Disc brakes: necessary for carbon wheels
  • Mechanical shifting: because electronic is an expensive solution in search of a problem that doesn’t exist

Mechanical shifting was hard to get in bikes with carbon frames & wheels. So I had to consider the requirements as guidelines. I found the following bikes that meet most of these requirements.

CompanyModelPriceFrameWheelsGroupset
CanyonEnd CF SLX Disc 8 eTap$6000CarbonCarbon Reynolds AR41SRAM Force eTAP
TrekDomane SLR6$6800700 OCLVAeolus CarbonUltegra Manual
CannondaleSynapse Carbon$4400CarbonFulcrum AlloyUltegra Di2
GiantDefy Adv Pro 2$4550CarbonSLR-2 CarbonUltegra Manual
FezzariEmpire Elite$2900CarbonDT E1800 AlloyUltegra Manual
FezzariElite Race$4300CarbonVision SC40 CarbonSRAM Rival eTAP
FezzariCustom$4100CarbonVision Metron 40 CarbonUltegra Manual

Fezzari had the least expensive bikes, $1500 to $2500 less than comparable alternatives. The closest/best alternative was the Giant. Yet they were backordered for 6+ months and have only a 2 year warranty. Fezzari had a lifetime warranty and estimated delivery at 8-10 weeks. Fezzari didn’t have exactly what I wanted, but I called them and they could do the custom bike described in the last row of the table. Take the “Elite” model with Ultegra manual, and replace the Swiss DT E1800 alloy wheels with Vision Metron carbon (bottom row of the table). A full carbon bike with the same wheels Peter Sagan used in the Tour de France for $4100 is an unbeatable value.

Fezzari Experience

Past

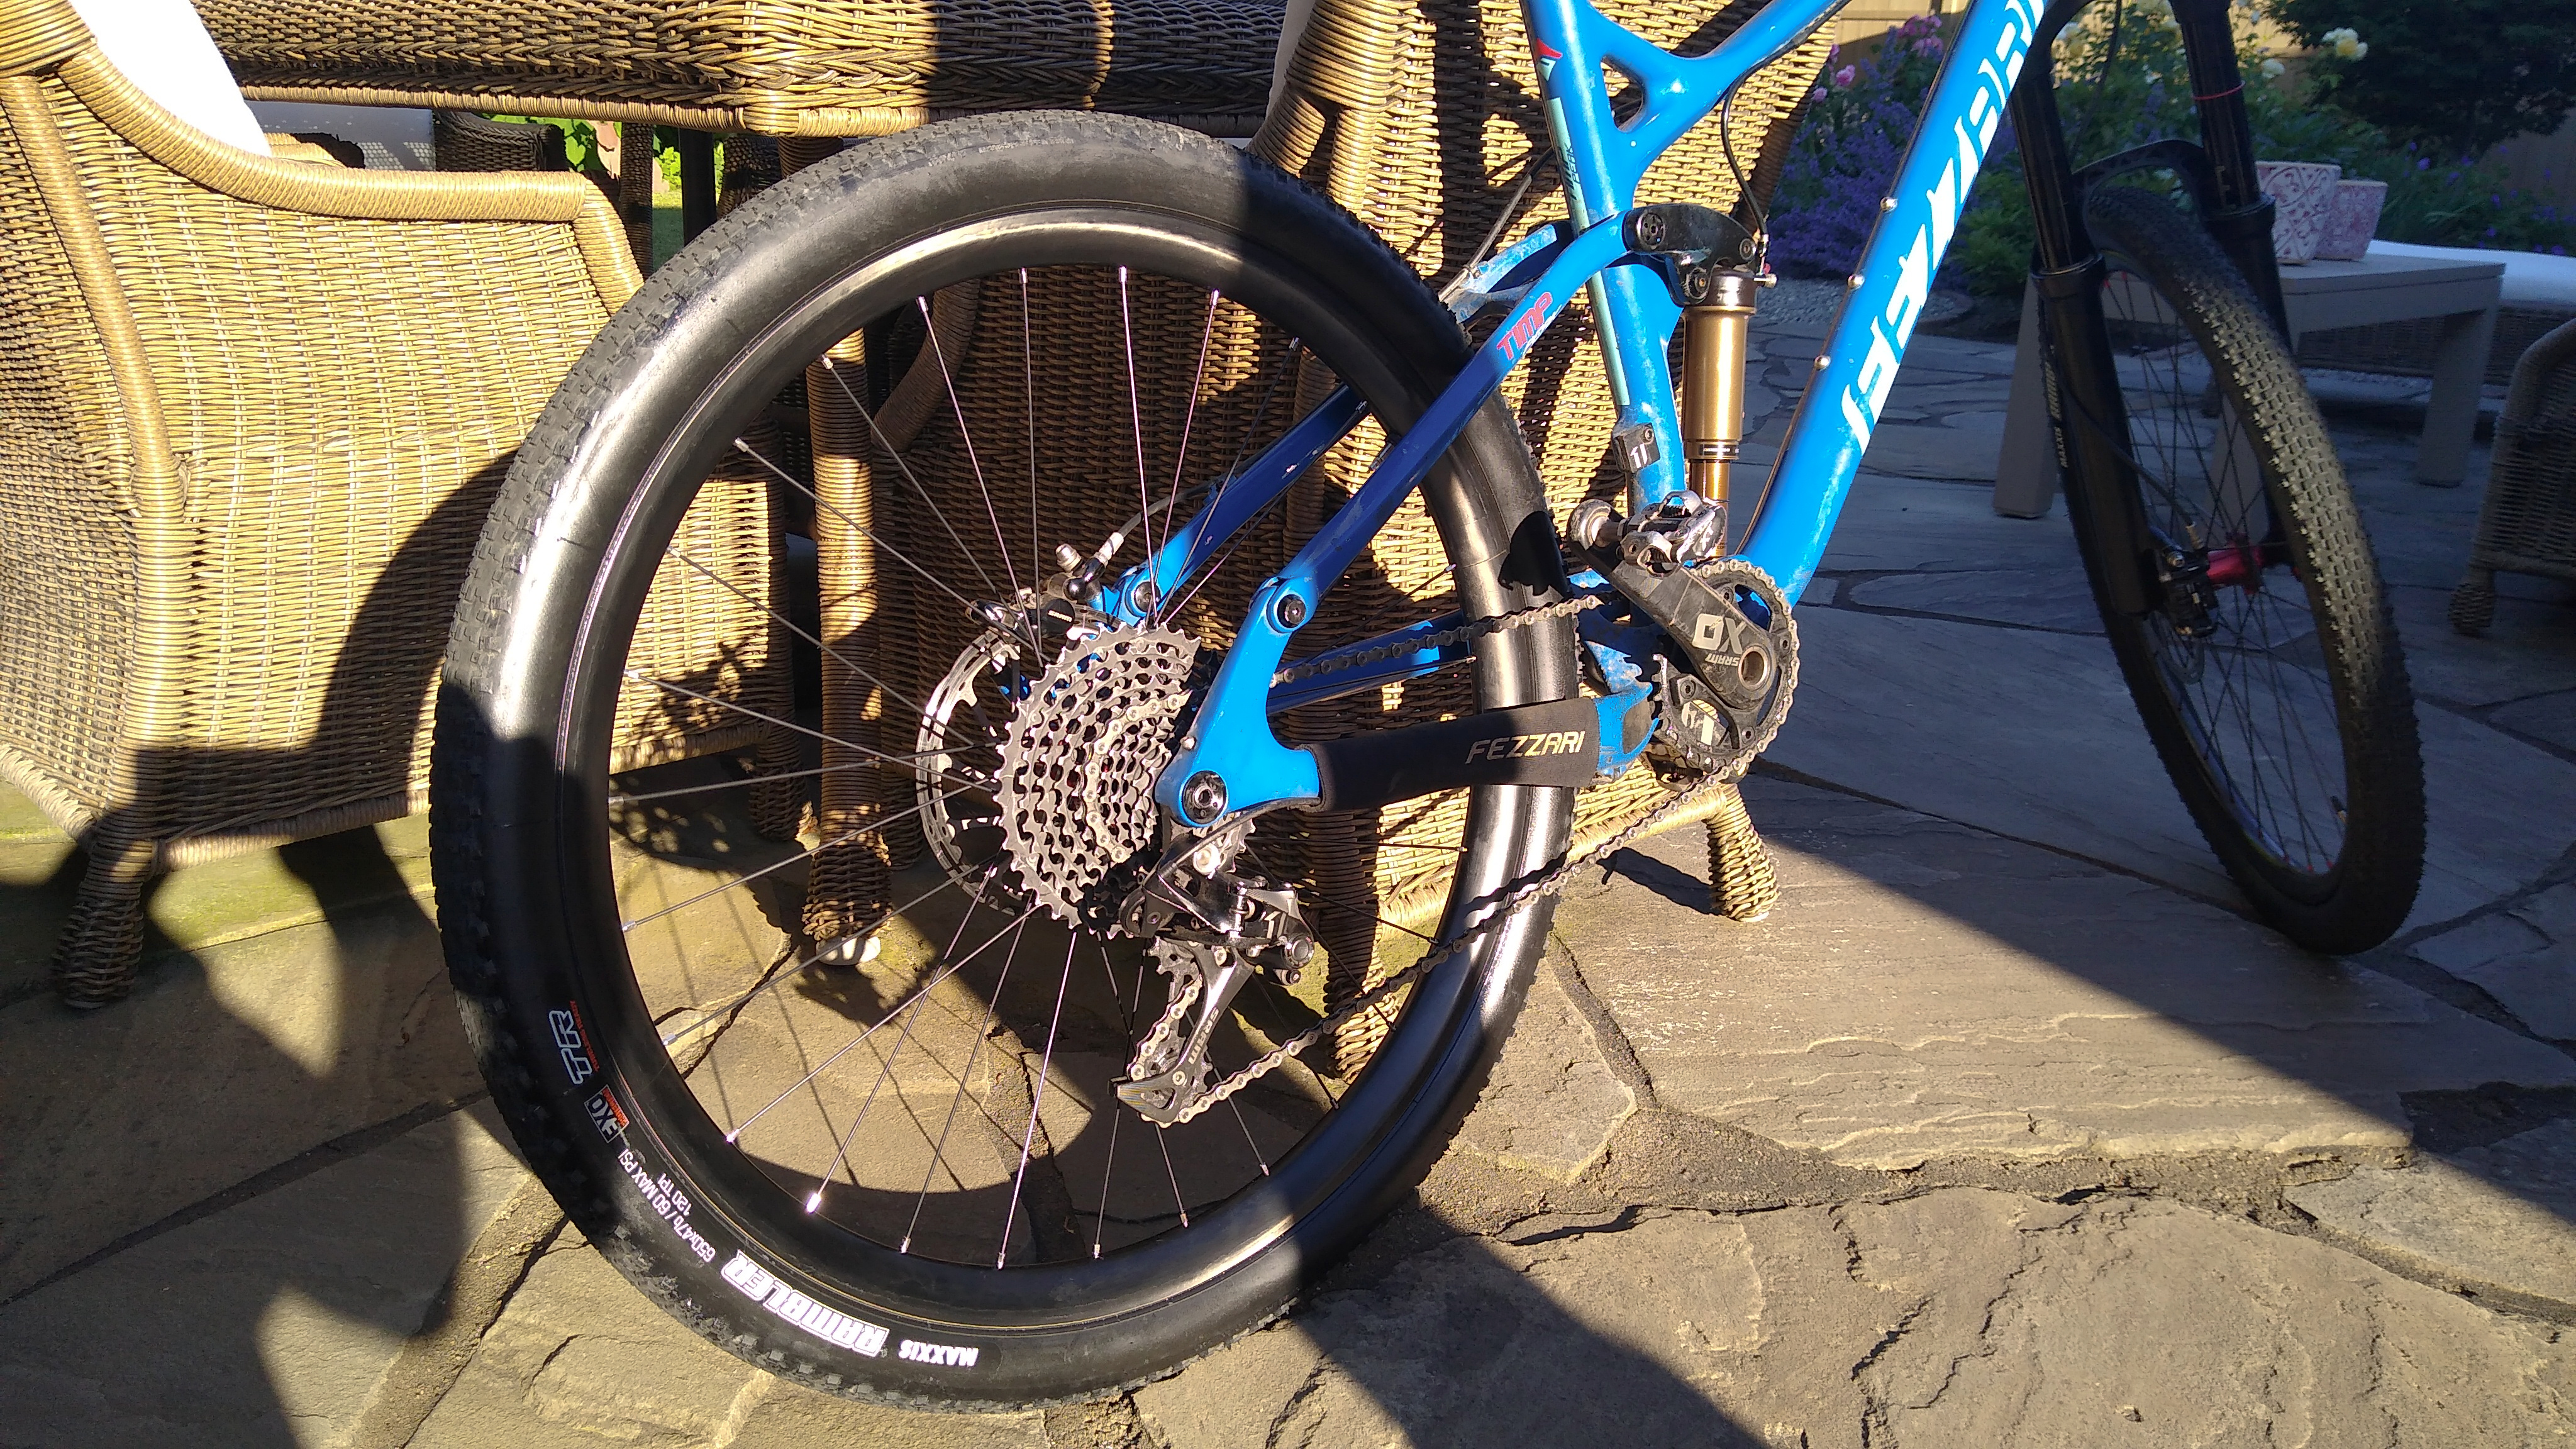
7 years ago I bought a Fezzari mountain bike, their top of the line model called the Timp Peak. Carbon frame, 27.5″ Reynolds carbon wheels, dual suspension (Rock Shox Pike front, Fox CTD rear) with remote, SRAM XX1 groupset, carbon handlebars, hydraulic dropper seatpost. It cost about $6300, where comparable bikes from Trek and Cannondale were around $9k. I rode it on some big rides: Kokopelli’s trail (Bikerpelli), all around Boulder CO, the Oregon Trail Gravel Grinder, and local rides like Tiger Mountain. Over the years it has proven to be a fantastic bike. But nothing is perfect.

When it first arrived, some of the frame’s accessory attachment points had their thread barrels spinning freely inside the frame; they had delaminated. Defective frame, no way to fix it, I sent it back. Fezzari handled it well, paid shipping both ways and did some other minor mods to the bike for me. But it did cause a 5 week delay in getting the bike.

This is a fantastic bike: light (27 lbs. with heavy knobby tires, 25 lbs. with gravel tires), efficient, full suspension, totally rugged and durable. Yet it hasn’t been perfect. Here’s a summary of issues, excluding normal maintenance. Details here:

  • The brake levers (SRAM Guide) developed the “sticky brake lever” problem where the internal pistons expand and get stuck tight inside the lever cylinders. First, I disassembled them and ground them back down to size. But a few months later the problem recurred. Then I replace them with aftermarket metal pistons — problem fixed for good.
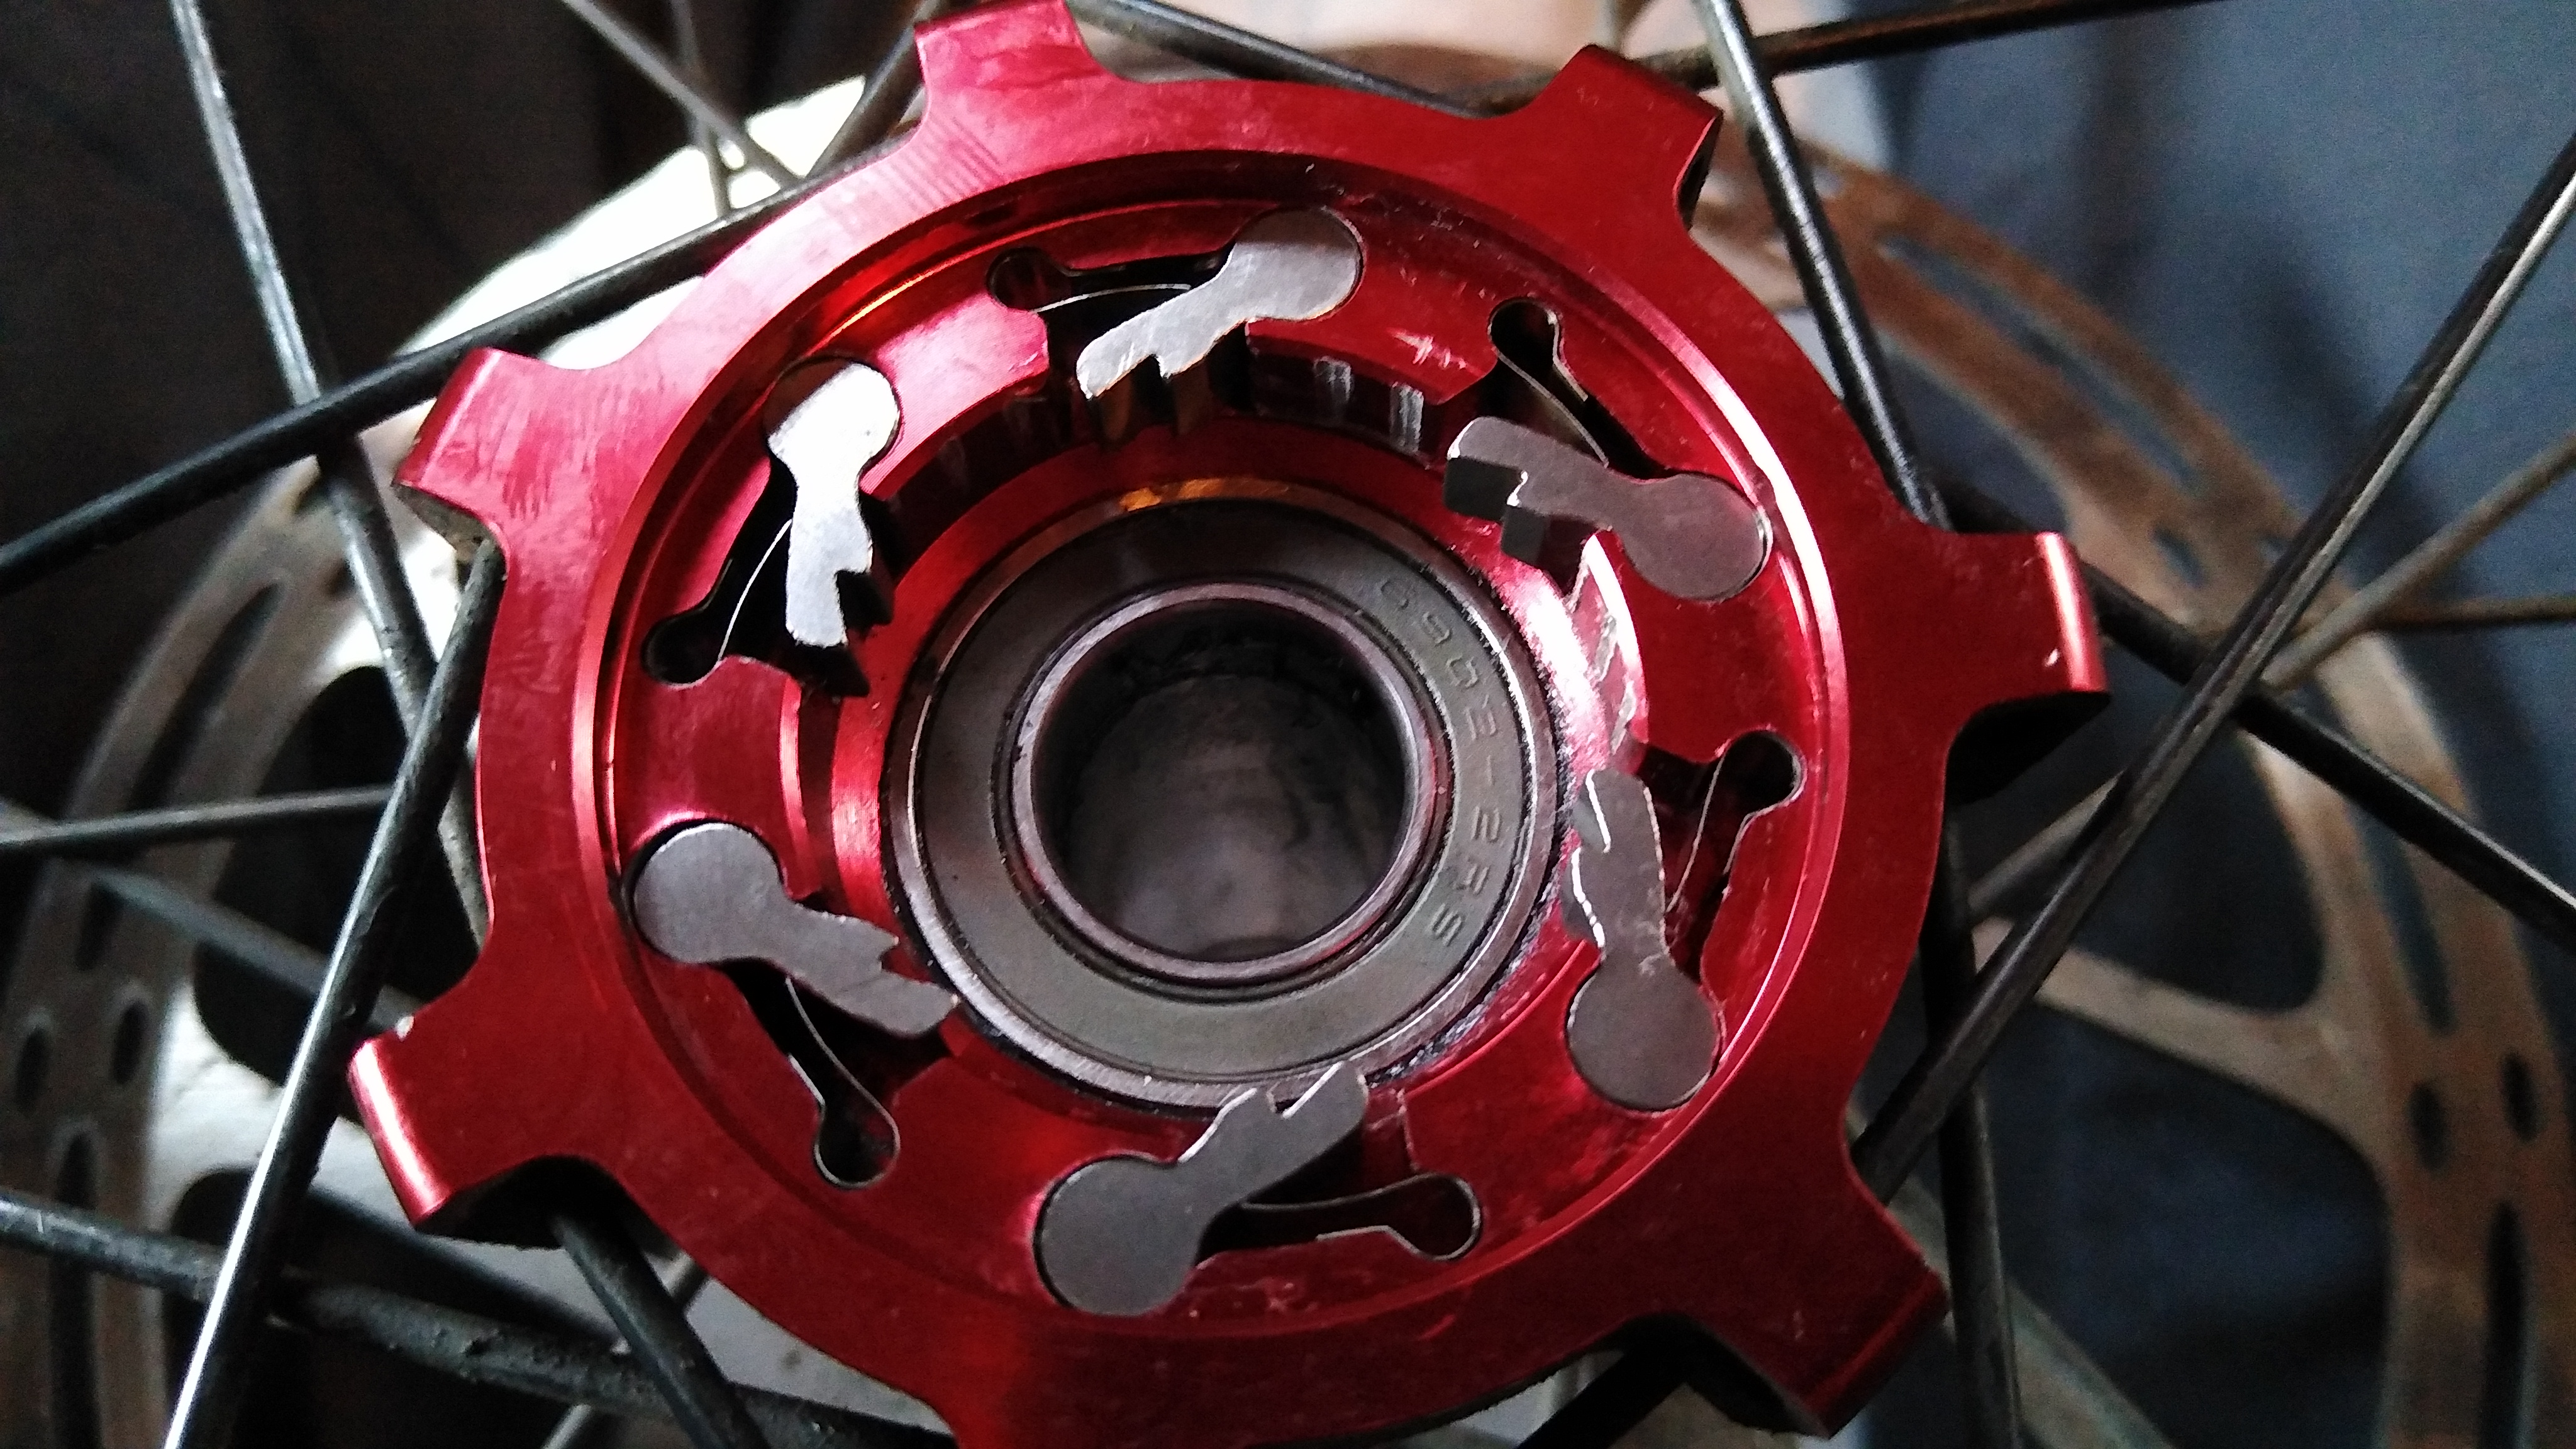
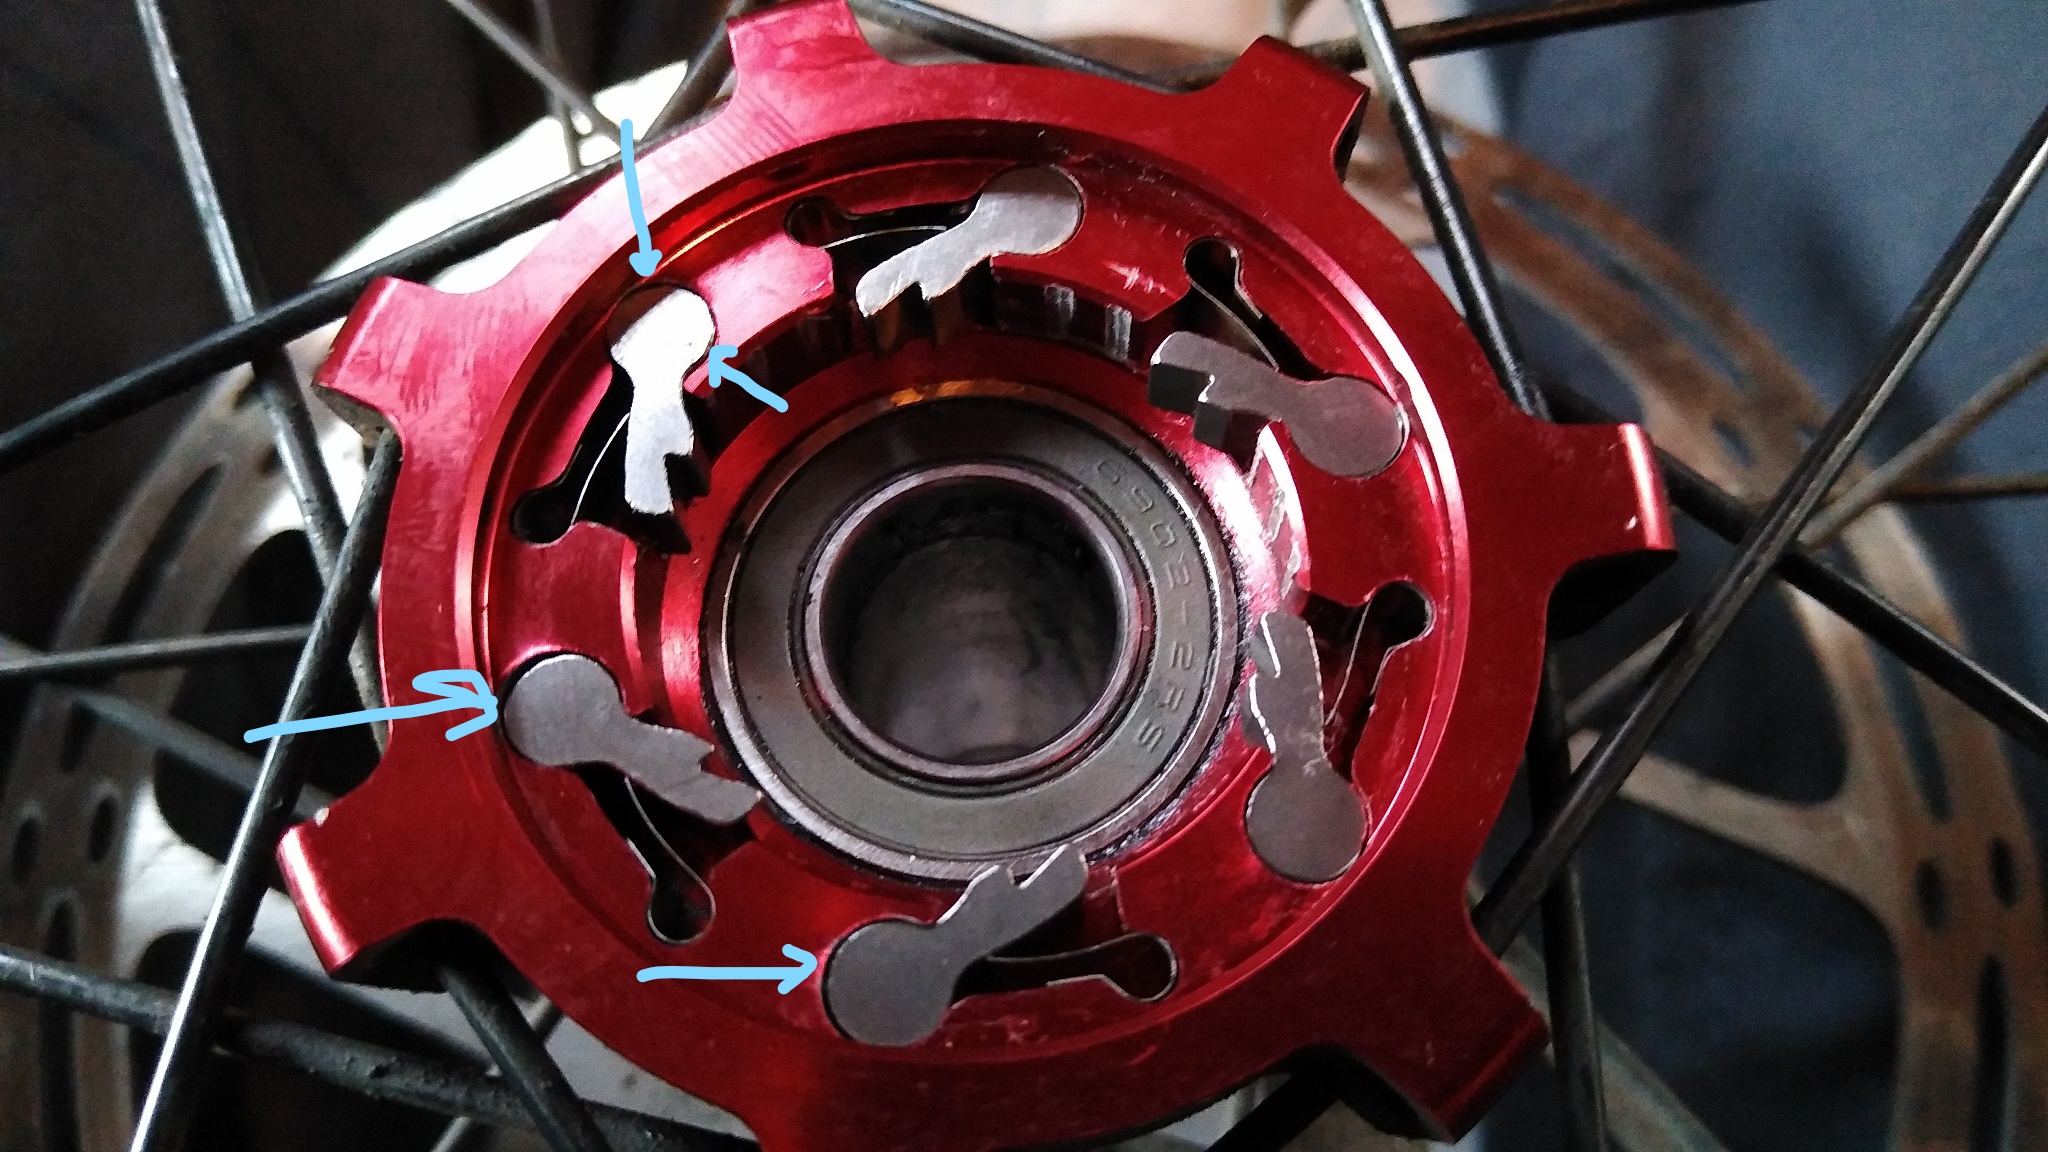
  • The rear hub’s internal freehub pawls sheared down and had to be replaced. This stranded me in the middle of the Moab desert. I got the pawl & driver rebuild set from Reynolds and did this.
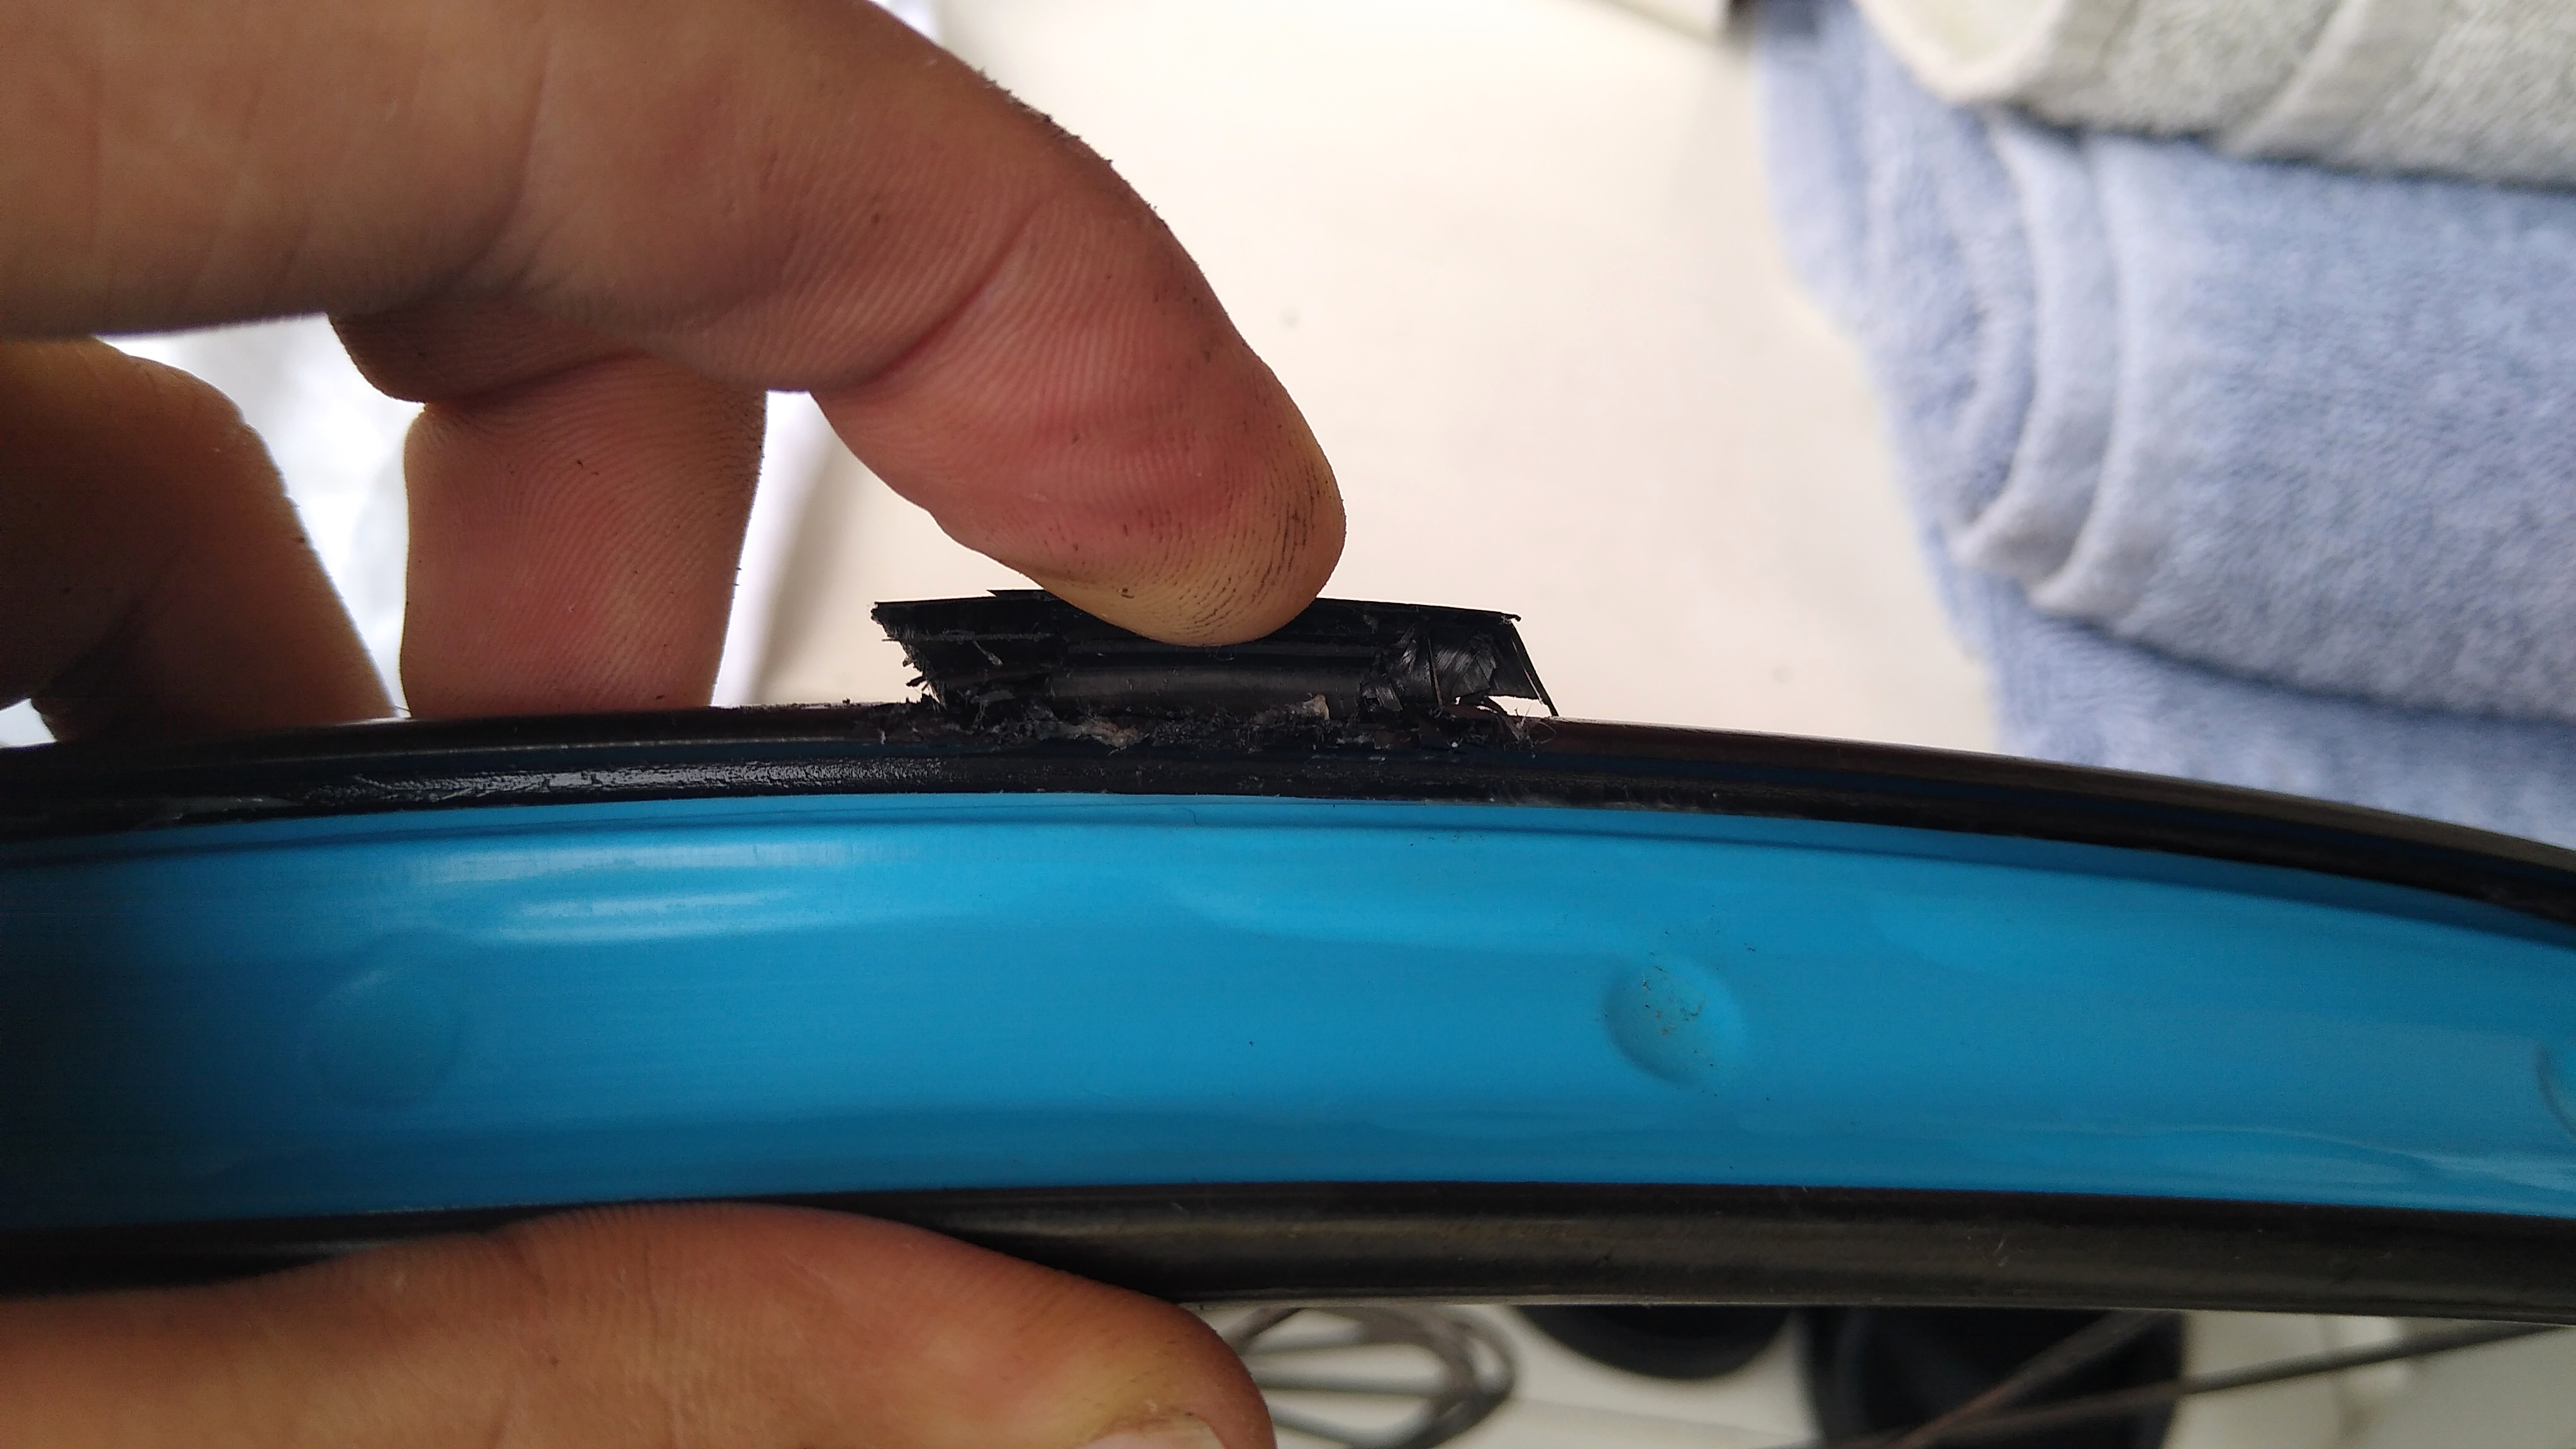
  • The rear carbon rim delaminated and Reynolds replaced it under warranty. They sent me a replacement rim and I rebuilt the rear wheel. This actually turned out to be an upgrade as the new rim is nicer than the old one.
  • The rear hub shell distorted from the pawl pocket forces when climbing hills. Reynolds would not warranty this defect so I bought set of new DT350 hubs and rebuilt the wheels.

Observe that none of these problems are due to Fezzari. Their frame has been solid and has a lifetime warranty. And the overall setup: geometry, components, etc. all works together well. Over the years I’ve emailed Fezzari a few questions, they always are responsive and helpful. Because of this, I felt confident getting another bike from them.

Present

Pre-Order to Delivery

I placed my Fezzari Empire order on July 20. One difference I noted is that 7 years ago, there was no tax or shipping. This time there was, which added up to about $500. Even so, it was still a good deal so I paid a 20% deposit to reserve a bike when parts became available. I was skeptical of their 8-10 week delivery estimate, due to COVID related supply chain disruption, but it’s faster than any other bike company was offering, and it is refundable.

A month later Fezzari slipped the delivery estimate from mid-late-Sep to late-Sep-early-Oct.

On Oct 11, Fezzari called to say the frame and parts were in stock and they were ready to build my bike. This was 2 weeks after the original delivery date.

A few days later they called to say the Vision Metron 40 wheels did not fit the Ultegra parts for my bike, but they had SC40 wheels that did fit. What’s the difference between Metron 40 and SC 40? They’re mostly the same, both carbon rims with 40mm depth, bladed straight-pull spokes with brass nipples, and disc brakes.

Differences between Metron and SC:

  • Metron 40 wheelset is 30 grams lighter
  • Metron 40 has 3 fewer spokes on the front wheel (21/24 instead of 24/24)
    • Note: this probably accounts for the 30 grams
    • Note: I want that extra spoke more than the 30 gram weight savings
  • Metron 40 has preload adjustable hubs
  • Metron 40 is about $750 more expensive ($1800 vs. $1050)

However, the price Fezzari quoted me was only $200 cheaper. Why? They said the difference is based on the prices they pay, which are different from the retail prices.

Even with the price discrepancy it was still a great value, so I said OK.

On Oct 20, Fezzari said the bike is ready to ship, so I paid the rest of the invoice. They gave me a tracking #. My new bike was on its way!

Delivery and Inspection

After some FedEx delays, the bike arrived on 10/25, 1 day short of 14 weeks since I ordered it. That made it 4 weeks late. I didn’t think that was too bad, considering what’s been happening with supply chains and shipping lately.

I’m an experienced bike mechanic and wheel builder, so you know I checked it out from top to bottom.

Tires

It comes with Maxxis High Road 700×28 tires. They’re decent tires but too wide and heavy for my road bike preferences. But 700×28 is the tire size I use on our tandem, which needed a new set of tires. So I was going to install these new tires on the tandem and replace them with a new set of Continental GP5000 700×25 tires.

As I removed the tires from the Empire I noticed it was set up as tubeless. Fezzari does this optionally for customers who want it. I didn’t want it or ask for it. Tubeless is great for mountain bikes since you can run much lower pressures to get better traction. But it has no benefit on road bikes, where I prefer to run clinchers with latex inner tubes. This is simpler and cleaner with no sealant mess or hassles. I wonder if one reason the wheels were more expensive than expected is because they charged me for a tubeless setup that I never asked for?

Anyway, converting to clinchers with latex tubes was quick and easy, and the new tires were great on the tandem.

Front Wheel

As I reinstalled the front wheel, I heard a quiet rustling sound as it spun. Sounded like there was debris inside the carbon rim. I removed the wheel, tire, tube and rim strip, and tapped the side of the rim with the palm of my hand all around its circumference to locate it. Using needlenose pliers I fished a wad of scotch tape and a small rubber grommet out from inside the rim, through a spoke hole. I reinstalled the tire and wheel, it was dead quiet now, perfect and ready to ride.

Rear Hub

As I removed the rear wheel to replace the tire, I noticed that the through-axle was very loose, not even finger tight. As were the axle nuts. As I turned the axle nuts finger tight, the cassette locked up and would not freewheel! I loosened the nuts and it freewheeled normally. Something was wrong with this hub.

Long story short, the hub was improperly assembled without a critical part. It was missing the spacer that goes on the axle, between the hub bearing and the freehub/driver. This spacer bears the side load of the pressure from the axle nuts and through-axle, keeping the freehub/driver properly positioned. Without it, the pressure from the nuts squashed the driver body’s dust seal lip against the hub. There is no bearing here, as it shouldn’t make contact let alone bear a load.

Aha! I thought, this explains why the axle nuts and through-axle were so loose. Whoever assembled this bike must have noticed that the cassette would not freewheel when the nuts were tight, so instead of troubleshooting the problem, they just loosened everything up until it could spin. This of course is improper and unsafe. It leaves the wheel so loose on the hub that it wobbles, and could damage the wheel, hub, derailleur, and even the frame, possibly locking up the rear cassette and causing a crash.

I contacted Fezzari and explained the problem, with photos. They agreed that was the problem and said they would look for a matching part. Meanwhile I called Vision, who makes the wheel. They confirmed that the wheel should have this spacer and they had some in stock. So I got Vision in touch with Fezzari. The next day I called Vision to follow up. They had not yet mailed the part to me, and their HQ and factory is just a few miles up the road from me, so I drove up there and picked it up in person.

Wheel fixed and ready to ride!

Derailleurs

The front derailleur was mounted too high, with at least 5 mm of gap between its outer edge and the big chainring. Shimano recommends a 1-3 mm gap. The smaller the gap, the better it shifts. I repositioned the derailleur and set its angle, cable tension, stop points, etc. Incidentally, with bikes these days using internal cable routing, there’s no way to easily adjust the cable slack tension, like the threaded barrels that bikes of old had. Shimano took care of that with a clever design, an adjustable pivoting derailleur cable clamp. I noticed that the 2 mm hex adjust screws were all pretty loose, likely to shift during rides, so I applied blue lock-tite.

The rear derailleur was OK but not quite perfect. The outer (smallest cog) stop was a bit too far in, so the chain occasionally jumped trying to get to the next bigger cog. Easy fix, no problem.

Wheels/Rims

After the 1st shake-down ride (about 13 miles including a 16% climb) the wheels settled and weren’t perfectly true. This is normal. I put them on my truing stand and took about 15 minutes to get them perfect. If my experience with the carbon wheels on my MTB is any guide, they’ll go a thousand miles before they need it again.

Inaugural Ride

After all of the above, the bike was ready for a real ride. I rode the Flying Wheels 45 mile route with a couple of friends. This includes cruising on the flats, plenty of steep climbs, and a couple of fast (50 mph) downhills. The bike performed great. Comfortable, fast, nice wide gear ratios, perfect quick shifting, and the brakes are powerful with good modulation. The handling is stable and confident, though more quick and responsive than the term “endurance bike” led me to expect.

The stock seat is high quality but a bit too wide for me personally. I replaced it with the Origin8 Axion from my old road bike. Incidentally, I saved 34 grams doing so (314 vs. 280 grams).

The bike weighs 18.7 lbs. ready to ride with Shimano PD-ES600 pedals. That’s decently light for a full carbon bike with the disc brake Ultegra groupset.

Ride report: this is a fantastic bike and everything I wanted and expected. And it looks clean with full internal cable routing.

Conclusion

The Fezzari Empire is a fantastic bike having great value and one of the best warranties in the business. However, while Fezzari’s customer support is quite good, their quality and safety checks are inconsistent. If the bike has issues, they will take care of you. But it may be up to you to figure that out. So make sure you’re confident doing quality & safety checks when the bike arrives, or you know someone who can.
Bicycle Tires and Efficiency / Rolling Resistance

Introduction

I’ve seen a lot of articles and videos about how “wider tires are faster”. This is incorrect. Yet like many commonly believed falsehoods, it springs from a thread of truth. It’s a misleading interpretation of how tires are tested for rolling resistance.

I’ll describe the testing and the truth of what it really means.

The Testing

This site has excellent info about bicycle tires: https://www.bicyclerollingresistance.com

Equal Pressure Testing

In many of the tests, wider tires have lower rolling resistance. However, in these tests they inflate the tires (both wide & skinny) to the same pressure. This is unrealistic and misleading, since nobody actually runs wide and skinny tires at the same pressure.

If you inflate a wide tire to the same operating pressure as a skinny tire:

  • You exceed the wide tire’s maximum pressure, which is unsafe.
  • The wide tire will be much more rigid and uncomfortable to ride, with poor traction.

If you inflate a skinny tire to the same operating pressure as a wide tire:

  • The skinny tire will be soft and sloppy, with poor traction.
  • You will get pinch flats when you hit bumps.

So equal pressure testing is purely a theoretical educational exercise, completely useless for pragmatic purposes.

Equal Comfort Testing

Often, the tests inflate the tires to pressures that give the same yield or squish measured in absolute terms. That is, under the same load, the wide tire and the skinny tire both flatten or squish by the same fixed distance (say, 5 mm). This should make the tires feel the same when riding, hence the name “equal comfort”.

When tested this way, tires of different widths tend to measure the same rolling resistance. That is, all else equal (same brand/make of tire, same load, etc.). So one could say that width doesn’t matter.

However, in order to make the yield distances the same, the skinny tire must be underinflated, and the wide tire overinflated, relative to each other. This is a variation of the same mistake that the equal pressure test makes: inflating the tires to pressures you would not actually use when riding.

So, like the equal pressure test, it is interesting and educational, but impractical.

Proportional Displacement Testing

Another way to test tires is to inflate them so that each tire yields or squishes a distance proportional to its width, under the same load. 15% is a typical value, so a skinny 23 mm tire squishes .15 * 23 = 3.45 mm, while a wide 32 mm tire squishes 4.8 mm.

Not coincidentally, the pressures that give this result are near or equal to each tire’s recommended operating pressures. This makes the test representative of actual real-world conditions. And not surprisingly, this testing shows that skinny tires have less rolling resistance than wide tires (all else equal).

Surface Composition

Rolling resistance is often measured using a drum having a smooth surface. Even if the drum is “roughened” like sandpaper, it is usually smoother than pavement on typical streets. This gives misleading information about rolling resistance.

A significant factor in rolling resistance is compliance: does the tire absorb uneven road surfaces, or does it transmit bumps & vibration through the wheel & frame? On rough surfaces, more compliance is not only smoother but also faster. If the tire itself absorbs a bump, that is usually more efficient than transmitting that bump to the bicycle & rider.

Compliance does have a down-side. Too much compliance (too wide a tire, too low a pressure) absorbs energy through excessive tire deflection and heat. The optimally fastest tire has just enough compliance to absorb bumps and vibrations from the road surface, but no more.

Consequently, the ideal tire width and pressure depends on the surfaces (trails or roads) that you ride on.

Summary

So when we inflate tires to the recommended pressures, what exactly are the characteristics that depend on tire width?

All else equal, wider tires…

  • Have more comfort
  • Have more traction
  • Are heavier and more durable
  • Have higher rolling resistance on smooth surfaces
  • Have lower rolling resistance on rough surfaces (absorbing surface imperfections)
Conclusion

Key take-aways for cyclists:

  • Articles & videos saying skinny tires are faster, are misleading.
  • Articles & videos saying wide tires are faster, are misleading.
  • The optimum tire width & pressure depends largely on what kind of surfaces you ride on.
  • We don’t usually ride on smooth indoor velodromes, and typical pavement is rougher than rolling resistance measurement drums.
  • While wide tires are slower on smooth surfaces, the penalty may be smaller than you think, which could make it worth paying for increased comfort and traction.
  • For maximum speed, choose the skinniest tire that provides the comfort and traction that you need, for the surfaces you ride on.

MTB / Mountain Bike: Fezzari Timp Peak

I’ve been riding bikes of all kinds since the 1980s and done some big rides. But the Fezzari Timp Peak I bought in late 2014 was the first really good mountain bike I owned. I got this bike to ride Kokopelli’s Trail with Bikerpelli in 2015. Great ride! This bike has also proven itself on some of the biggest, hardest rides in the country, like the Oregon Trail Gravel Grinder, 350+ miles and 30,000′ of climbing.

Carbon frame, carbon wheels, SRAM XX1, dual suspension, dropper seat, weighing 25-26 lbs. ready to ride. It’s been a great bike but no bike is perfect and they all require maintenance. Here are some of of the problems I’ve encountered and how I solved them.

Some of these issues are basic recurring maintenance. Others are caused by using aluminum or weak alloys in critical parts instead of appropriate materials like steel or brass.

SRAM Sticky Brakes

The first problem was the dreaded SRAM sticky brakes. The brake lever pistons gradually grow (yes they physically get larger!) and get stuck in the cylinder. In my case it took a few years to happen. Here is my fix. That worked for a year or so, then they got sticky again. At that point instead of sanding down the pistons again, I replaced them with aftermarket metal pistons. These have perfect fit & function, came with the o-rings, and fix the problem permanently.

Since then I’ve overhauled the levers with the complete rebuilt kit. This includes all-new seals and pistons, among other things. It made a big improvement so I’ll be repeating this every 3-5 years.

Frame Suspension Pivot Bushing

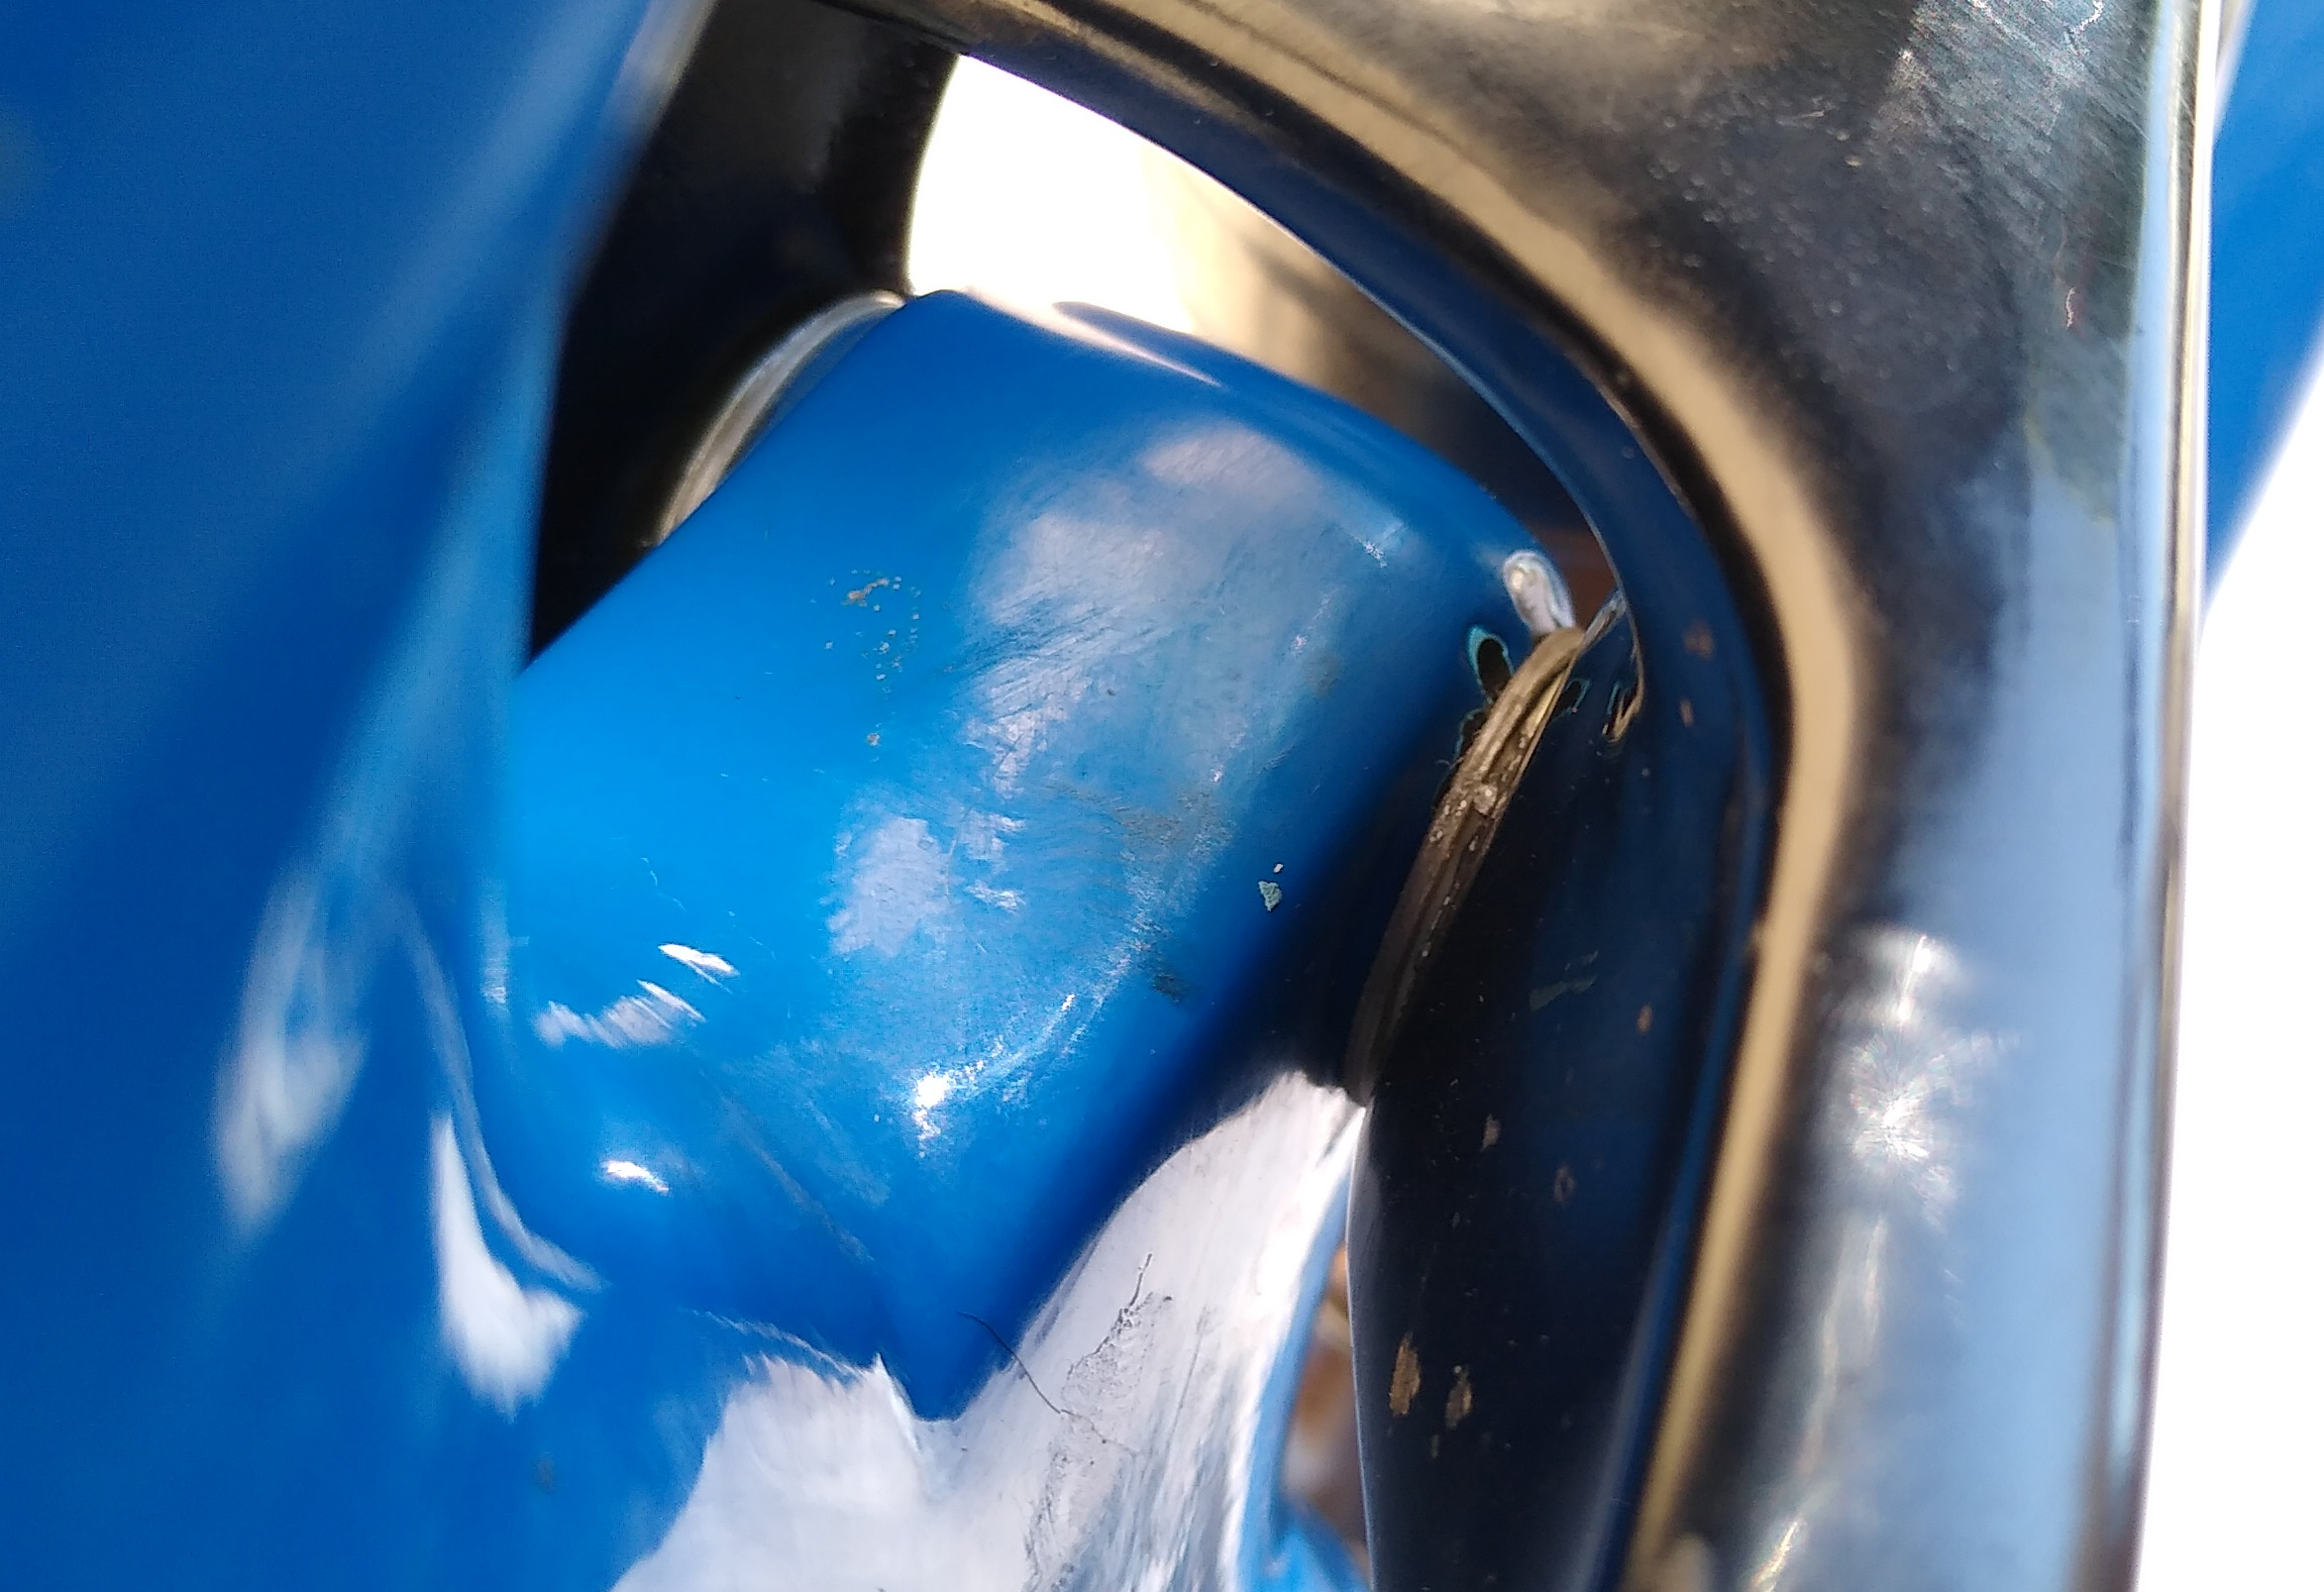
After a few years, the frame developed a bit of play. Most of the frame suspension pivots use bearings, which I serviced (cleaned, re-greased). But one of them uses a bushing, and that’s where the play developed. Over time the bushing wears and needs replacing. I contacted Fezzari and they told me:

The bushings at the main rocker pivot are IGUS L289 sleeve bushings. The part number for them is LFM-1012-06. The “-06” part of this part number is in reference to the bushing length which is 6mm.

However, what I would recommend trying is a bushing with a 10mm or 12mm bushing length (part no. LFM-1012-10 & LFM-1012-12, https://www.igus.com/product/?artnr=LFM-1012-10). It will allow for a bit more overlap with the frame and should help reduce the play.

I ordered that part, 12mm size. It fit perfectly and the frame is like new again. Actually, better than new!

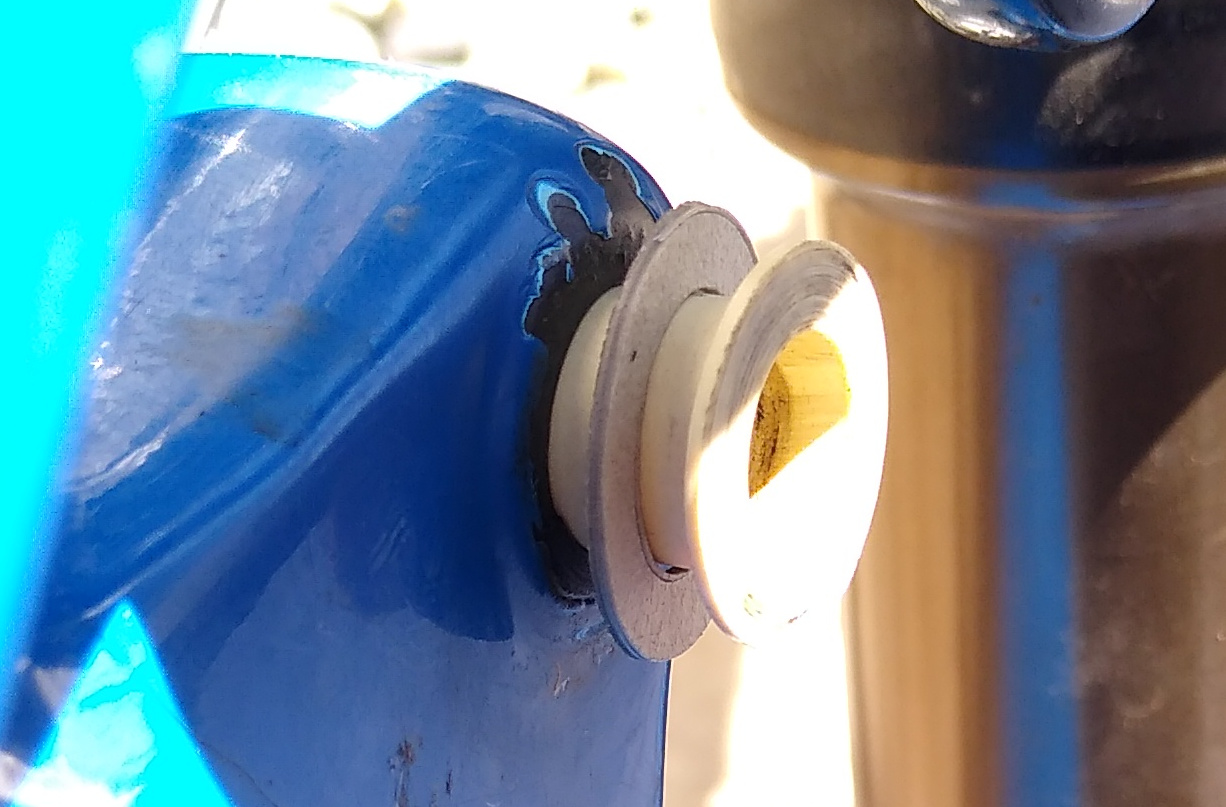
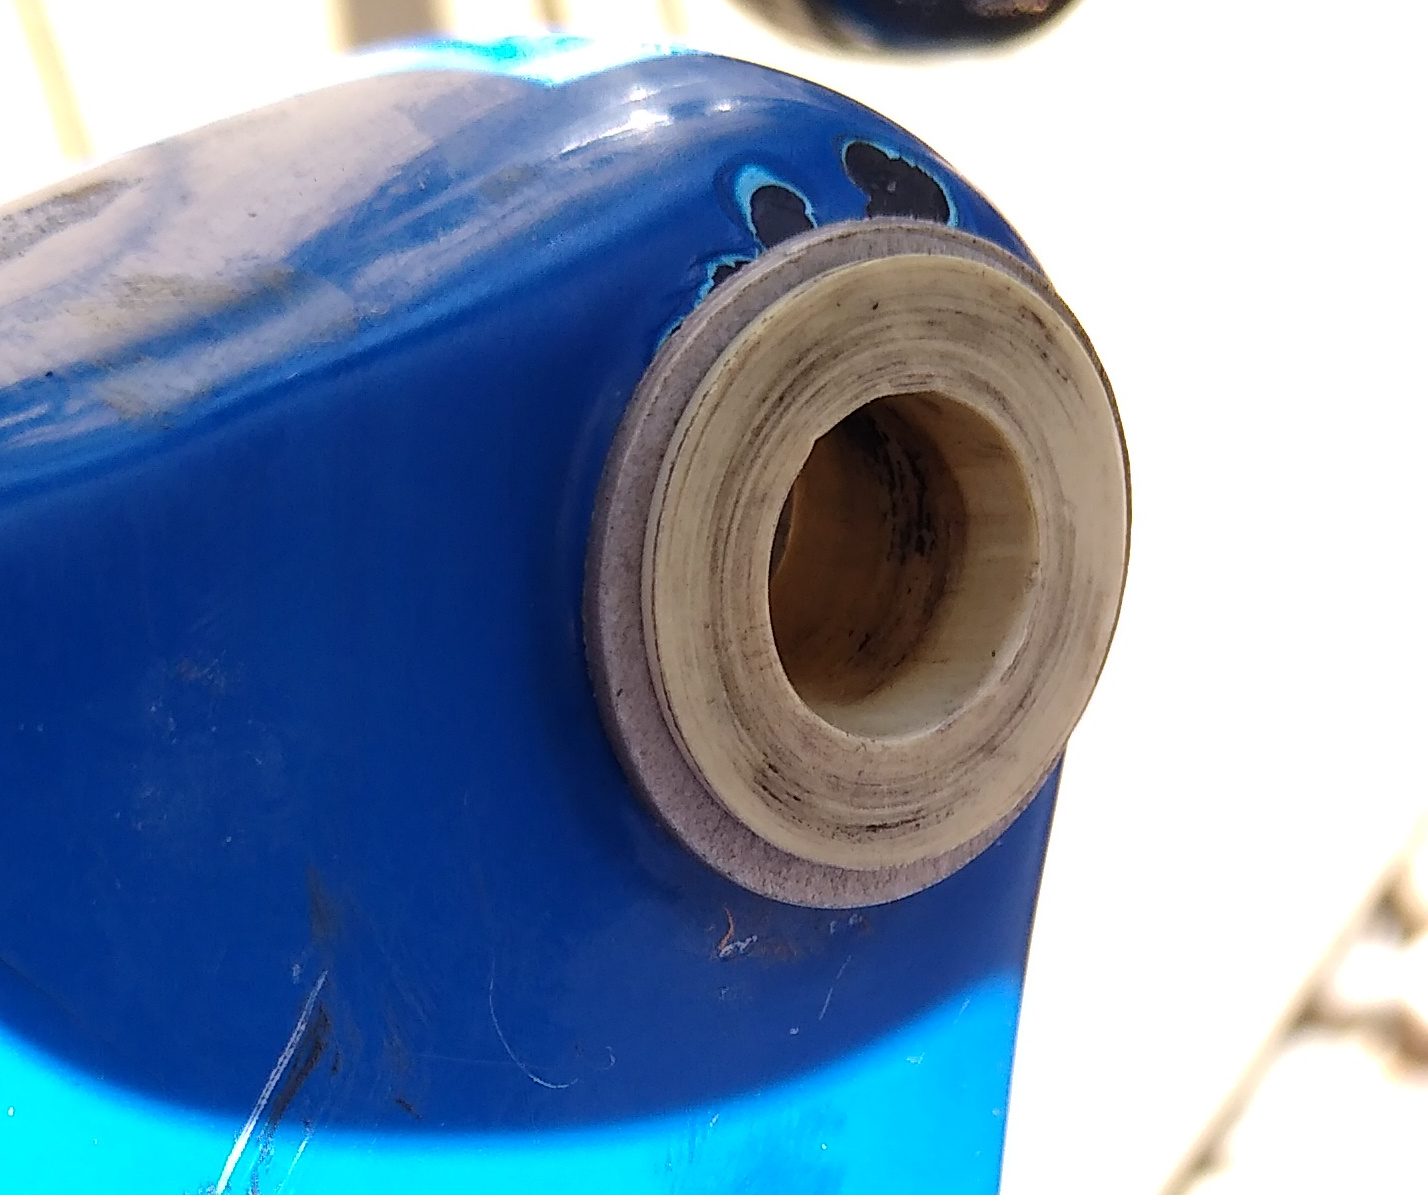
Another issue that gradually develops is side-to-side play. The frame pivot that meets the bushing has a shiny black surface (paint?) that gradually wears down, allowing this play. The solution is to place thin spacer washers around the bushing’s core, “inside” between the bushing face and the frame. This pushes the bushing faces slightly outward to eliminate the play. The best washer size is 1/2″ inside diameter, 3/4″ outside diameter, and 1/32″ thick.

Rear Hub Failure

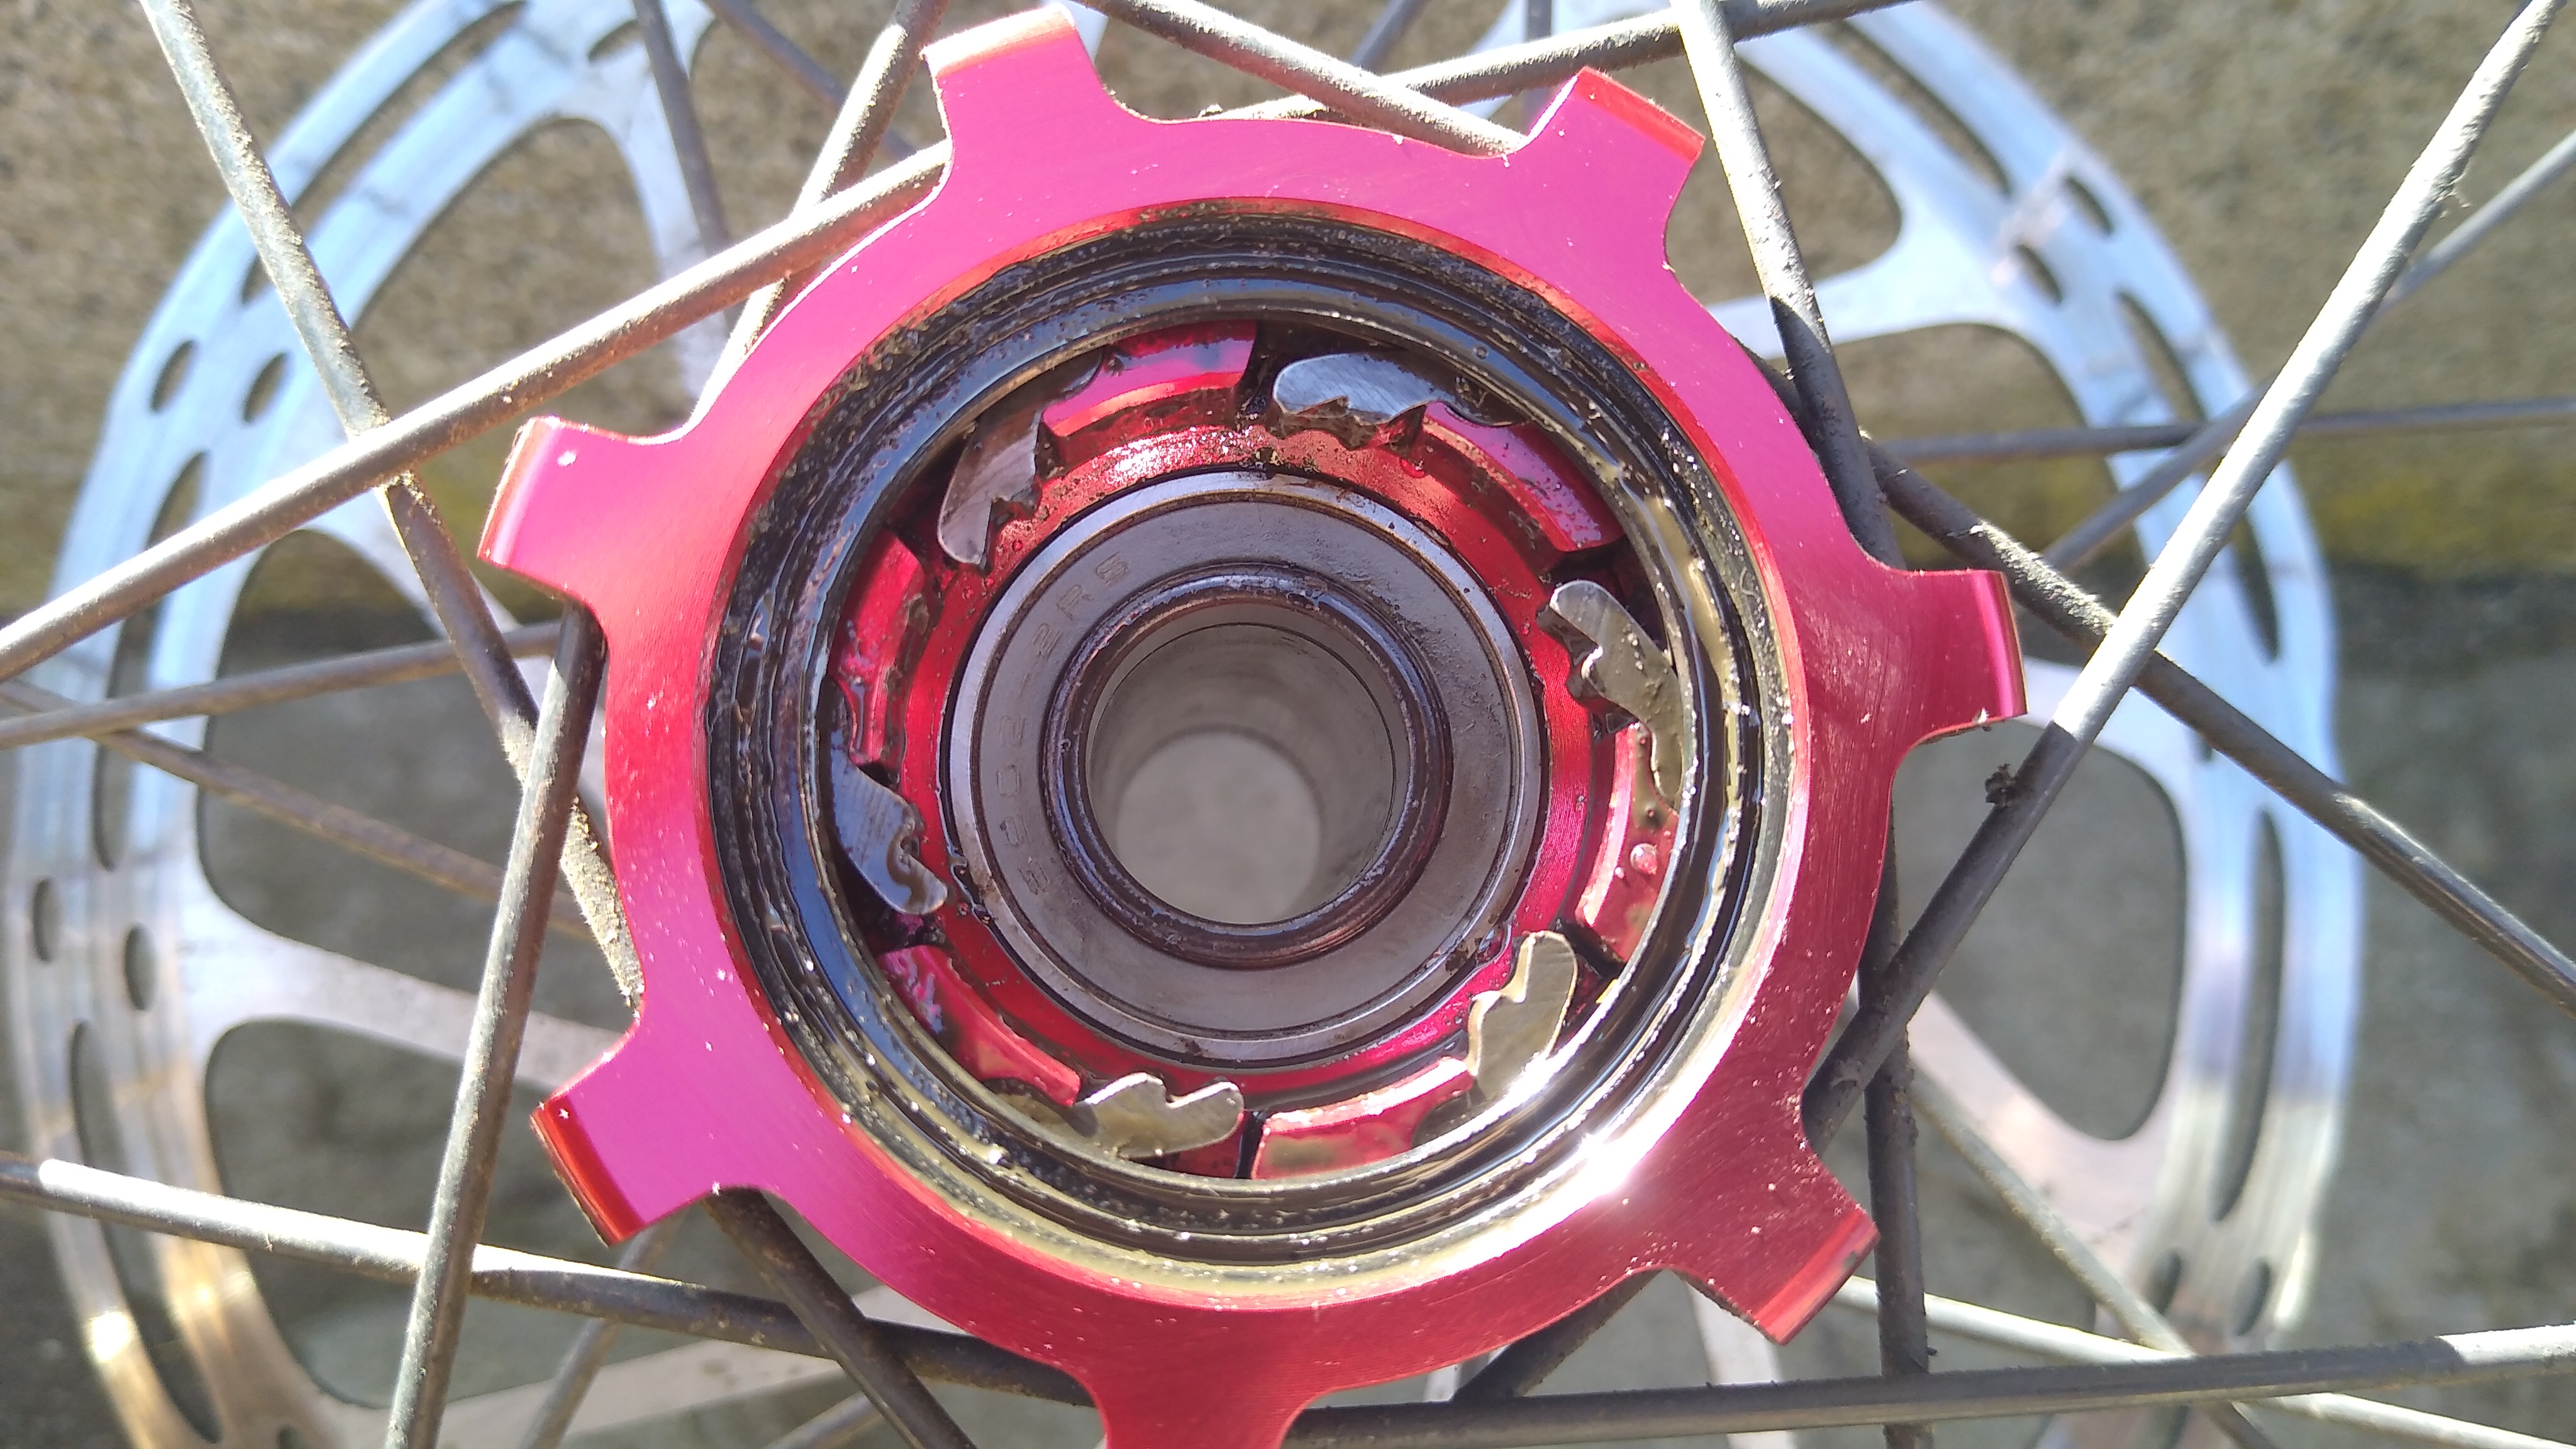
The last problem I encountered was a severe ride-stopper. It stranded me out in the desert near Moab and I had to walk my bike out. Going up a hill, the bike suddenly made a horrible clacking sound and the pedals were free-spinning. The chain was completely intact. I took apart the rear hub by the side of the road to discover that pawls that engage the freehub ratchet had worn down and were slipping.No way to fix that by the side of the road. And after I hiked back to the car and drove to town, none of the bike shops in Moab could fix it either.

Fezzari connected me to Hayes/Reynolds where I contacted a guy named Dan and ordered the parts:

Part 21290 "Reynolds XD Driver Body" replaces the cassette ratchet gear.

Part 20702 "2015-2016 Attack Assault Strike Hub Rebuild Kit" replaces the hub pawls (and other things).

When I told Reynolds this unusual and catastrophic failure happened to a bike that was only a few years old, equipped with some of their best carbon wheels, and left me stranded having to hike out of the desert pushing my bike, they gave me a 25% discount. The above parts fixed it. The pawls were the essential part; they were visibly and obviously worn down and rounded off. The freehub ratchet wasn’t obviously worn, but I replaced it anyway since it could have had non-visible damage from the damaged pawls slipping over it.

After just over a year, I inspected the new pawls to find that they had visible wear, though they were still working. I ordered another set of pawls, installed them, and kept these as emergency replacements.

It’s frustrating to note that if these pawls were made of steel, they’d last forever and the wheel would only be a few grams heavier. But they’re made of some kind of lightweight alloy.

Bottom Bracket Crank Arm Spindle Bolt

After servicing the bottom bracket (cleaning & re-greasing bearings) I was re-assembling it. These SRAM cranks have a single bolt on the left (non-drive) side that holds everything together. The spec says tighten to about 52 Nm, or 38 ft.lbs. As I was tightening it, well before it got that tight, I felt it give. I removed it and discovered 2 things:

  1. The head had sheared off the bolt
  2. The bolt was made of aluminum (or alloy) — not steel ?!

This is a high torque, high stress bolt. It should be made from steel! Making it from a softer, weaker aluminum alloy is a total fail in design. I’ll gladly pay a weight penalty of a measly 12 grams for the confidence of knowing my cranks won’t fall off the bike. Apparently I’m not the only person who thinks so. Shout-out to one of my LBS, Gregg’s Cycles, who had a replacement bolt in stock. I bet I know why they keep these bolts in stock… <groan>

Details:

  • Truativ GXP M15 Crank Bolt
  • CR2193
  • 11.6900.002.140
  • M15/M26

Sadly, it is alloy like the broken one. So it is probably “single-use”. I’m still looking for a steel one, but this one will serve until I find it.

Alloy Spoke Nipples

Descending Olallie, I heard a “ping” from the front wheel so I stopped. A spoke was loose; the nipple head had sheared off. I smoothly bent the free spoke to weave it through adjacent ones so it couldn’t flop around. Fortunately, the wheel is strong enough and with disc brakes I was able to finish the ride slowly.

The Timp Peak came with Reynolds AM 27.5 carbon wheels. Apparently, carbon fiber causes a redox galvanic corrosion reaction with alloy nipples. It starts slowly and progresses incrementally over time, so the wheels may go 5 years or so before it weakens the spoke nipples enough for the heads to shear off. I replaced that spoke with a brass nipple and re-sealed the wheel.

After the OTGG, another spoke nipple head popped off while I was truing the wheel–actually loosening the spoke, not tightening it! At this point I unsealed the wheel and replaced all of them with brass. While doing so, I found 4 others that were already cracked just waiting to break.

<rant>
No carbon wheel should use alloy spoke nipples. Brass will last forever and a set of 28 only weighs about 20 grams more. Alloy may be appropriate for super light road bike wheels, but the weight savings is immaterial on a MTB, considering we typically run 800 gram tires. This is an example of the race to the lightest wheelset at any cost. Reynolds confirmed that their wheel builders use only brass spoke nipples when servicing wheels, even though their OEM wheels come with alloy nipples.
</rant>

Rear Rim

The rear wheel rim delaminated near the outer edge; structure failure. Fortunately, I noticed it after a ride so it didn’t fail while riding.Reynolds replaced it under their lifetime warranty. Normally, this means mailing them your broken wheel, they rebuild a new rim onto your old hub and charge you $150 for the parts (spokes, sealing tape). It takes 6 weeks.

But 6 weeks wouldn’t work. This happened 1 week before the OTGG, a 5-day stage ride I had been training for 18 months. I asked Reynolds support to simply mail me a new rim, I would rebuild the wheel myself. And they did! They don’t make the AM wheels anymore, so now I have the closest match, a Blacklabel 287 (which has off-center spoke holes to equalize spoke dish angles). It arrived 1 day before the big ride, I built the wheel that afternoon (using DT 14 gauge straight-pull spokes and brass nipples) and it all worked out. Now that is just-in-time warranty service!

The new rim has a deeper profile, so the ERD is 9mm smaller, which meant I needed shorter spokes. Split the ERD difference in half means 4mm shorter on each side. But the original spokes didn’t fully protrude from the nipple heads, so I added 1mm (3mm shorter). This way the spokes would pass all the way through the nipple heads which makes it a bit stronger.OTGG was this new wheel’s first break-in ride. It performed flawlessly.

Rear Axle

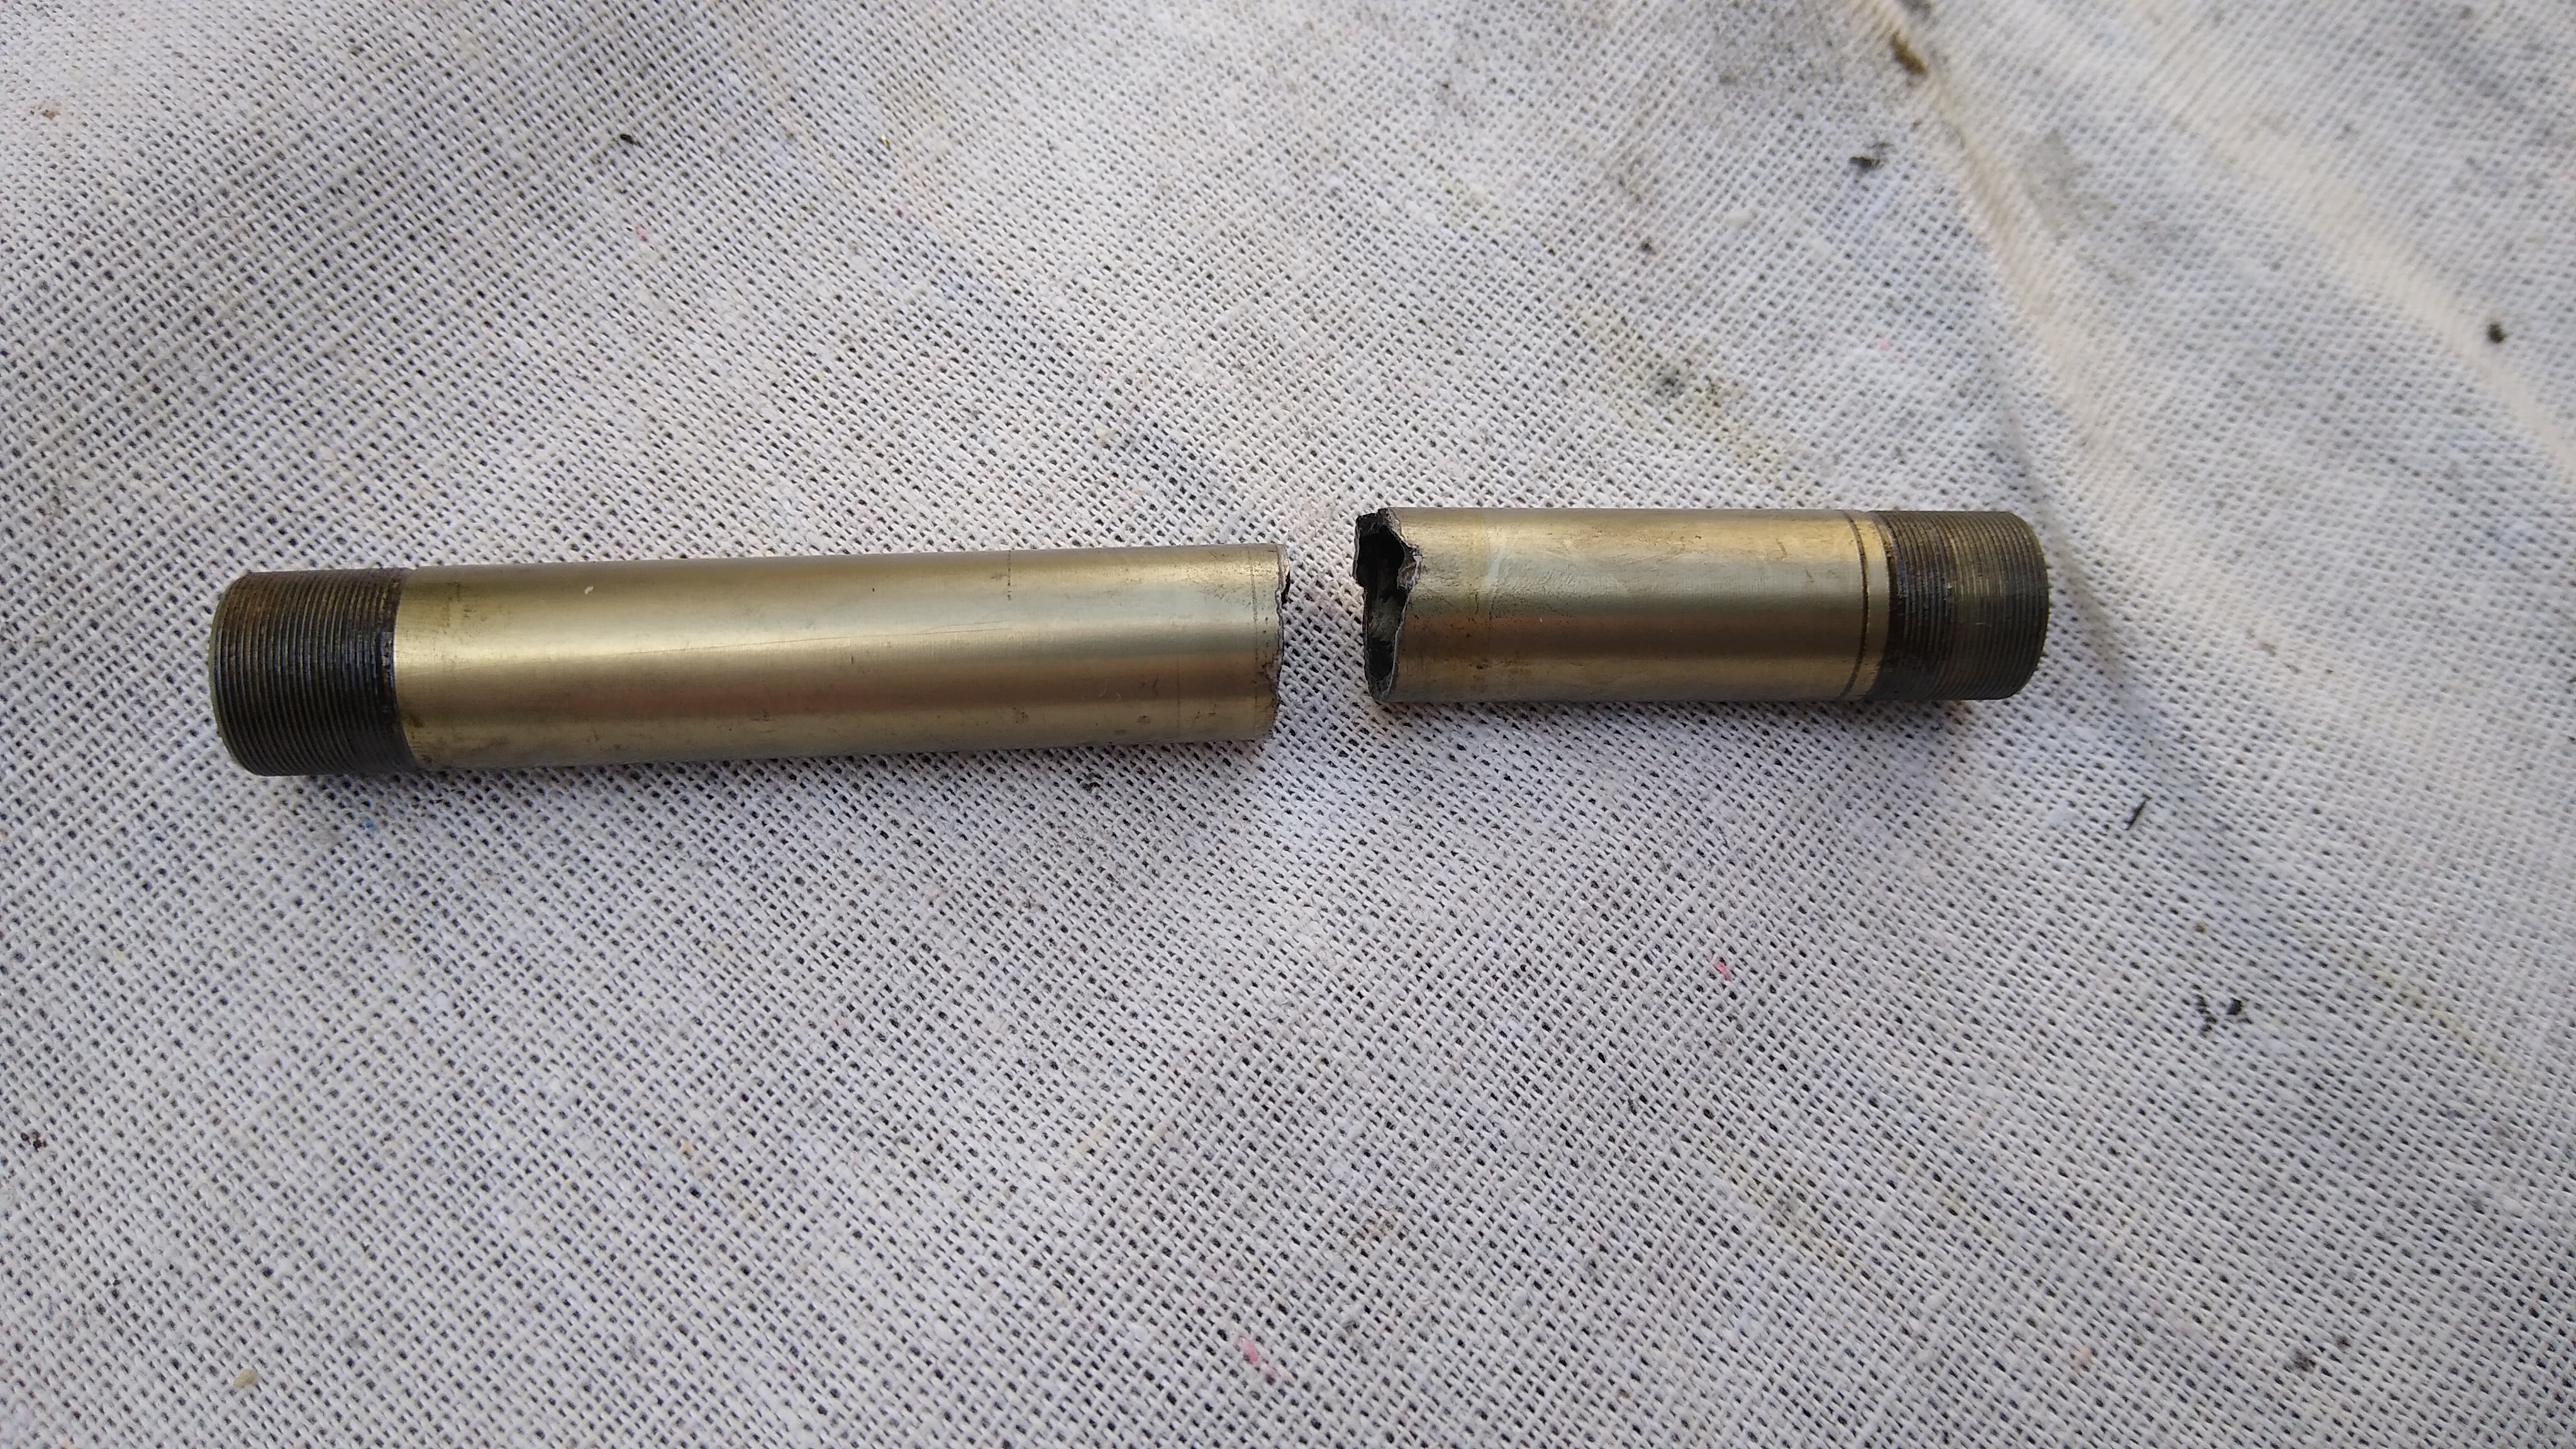
In Sep 2022 riding the John Wayne / Palouse trail, the rear axle broke between Beverly and Othello. This is normally a critical failure that makes the bike un-rideable. At the same time, the derailleur swung forward and sheared off the end stop of the hangar. I was able to MacGyver both the axle and the derailleur in order to ride back to the nearest town and hitch a ride.

Rear Wheel Bearings

While I was replacing the axle I decided also to replace the bearings. They were still in serviceable shape, but not perfectly smooth anymore. I ordered a set of NSK bearings (size 6902) since they’re supposed to be excellent. I cleaned out the rat piss that they use for OEM grease and packed it with Schaeffer’s 221 #2. The bearing was smooth as butter. After installing it (smoothly with a proper bearing press, not whacking it in), it was rough & notchy. I pressed it out and it was smooth again. Weird. So I bought a generic 6902 at the LBS. Same procedure: cleaned out the OEM grease, packed with Schaeffer’s 221 #2, installed. It was smooth as butter installed.

Perhaps the hub’s bearing socket wasn’t perfectly round? Maybe, but 2 other bearings were butter smooth as installed, so seems unlikely.

Perhaps somehow the compression/squeeze forces of the press-fit install, eliminated the bearing’s internal tolerances? Maybe.

Perhaps it was due to the generic bearing being cageless, combined with an imperfectly round bearing socket? The NSK is a caged bearing, which is normally better. Yet perhaps cageless bearings are more tolerant of imperfectly round sockets?

Rear Through-Axle

After riding the bike 15 miles with a broken axle, the through-axle showed metal fatigue right at the point where the axle had snapped. Apparently, this put more stress on the through-axle. It was still serviceable, but due to the visible metal fatigue I replaced it anyway. It’s 12mm OD, 142mm rear dropout spacing, 174mm total length, 20mm of threads at the end, with a 1.75 pitch.

Rear Hub Shell

When the 2nd set of replacement pawls showed signs of wear in only 5 months, I sent Reynolds a photo and asked for a warranty replacement. They studied the photo and found that the pawl pockets machined into the hub are worn & distorted. I took a close look and they’re right! The distortion is only slight and the hub is still serviceable, but its days are numbered.

Looks to me, and to a friend with experienced eyes, Reynolds should have used a harder grade of aluminum alloy. Not only for the hub shell, but also for the pawls, and for the axle (all of which have failed on me).

They offered to warranty the hub shell, which means mailing them the wheel, the rebuild it onto a new hub shell and send it back, charge me $200 for parts (spokes, axle, bearings, freehub) and labor. I asked if they had a parts list because I prefer to do my own work and build my own wheels. They said no, it’s only a service. Which is different from last year, when they mailed me a warranty replacement rim for me to build myself.

That doesn’t sound like a great deal because I can buy top quality parts for less and build the wheel myself. But I do appreciate their sharp eyes in detecting a problem that I overlooked. I suspect they knew what to look for, as this isn’t the first of their hubs that has had this problem. Indeed, after all the problems this rear wheel has given me, I’m not inclined to use another Reynolds wheel. In summary:

  • OEM spoke nipples cracked and failed, due to aluminum/carbon redox reaction. I rebuilt the wheels with brass spoke nipples
  • Freehub pawls sheared, stranding me in the Moab desert.
  • Carbon Rim delaminated; Reynolds sent me a new rim under warranty and I rebuilt the wheel (again).
  • Axle broke, stranding me on along the John Wayne Trail.
  • Hub shell pawl pockets wore out of shape.