Category Archives: Exercise

WRIAD: White Rim in a Day

Summary

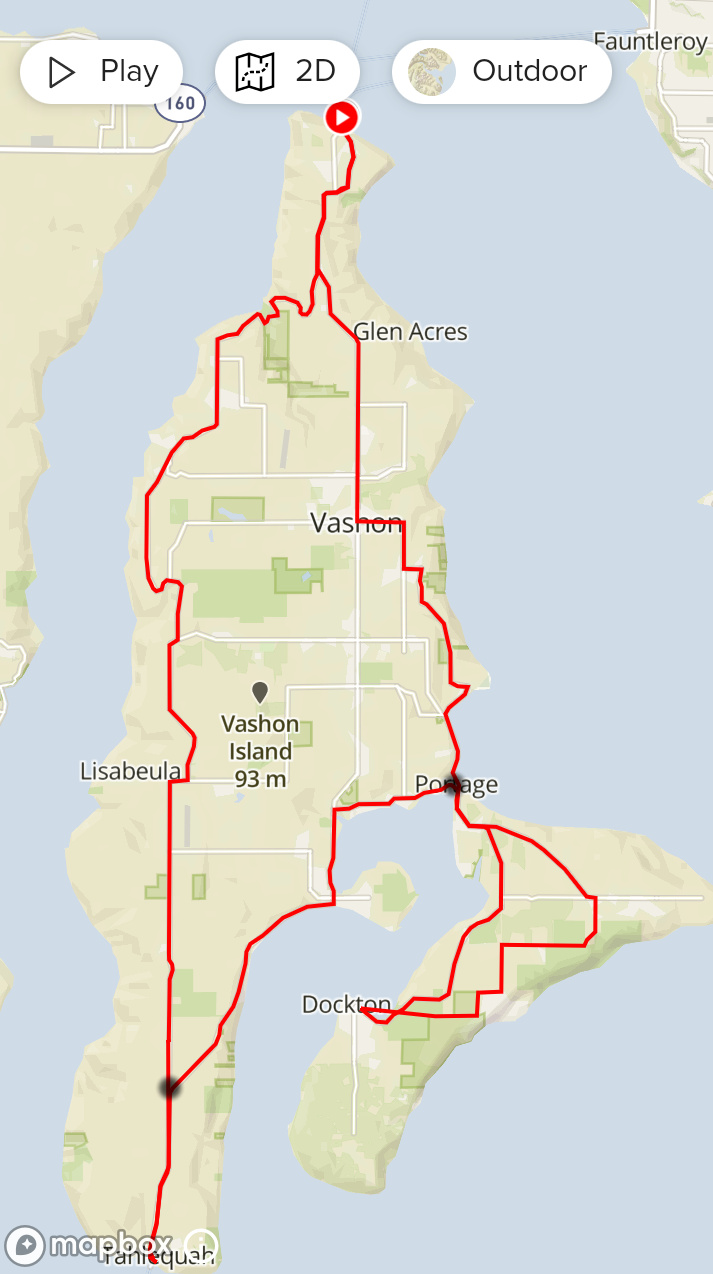
The White Rim Trail is SW of Moab Utah. It follows the Colorado River SW to its junction with the Green River, then NW up the Green River, making a rough “V” shape, then a mix of dirt & paved roads connect the top of the V. It makes a loop measuring 100 miles, about 8000′ of cumulative climb. The trail ranges from simple dirt/rock, to sand, to rugged steep technical with big rocks. Along the route there is no food, water or services. And mostly no cell/mobile coverage.

Most bicycle tours take 3-4 days to do this trail, supported with 4WD vehicles providing food, water and shelter. It is possible to ride it in a single day, but it’s a big physical effort that also takes some planning. It helps to have a gung-ho friend named Stefan to convince you to ride it with him.

Stefan rode WRIAD solo in Oct 2020, and he and I rode it together in Oct 2022. This describes what it was like and how we prepared for it.

Pics here: http://mclements.net/Moab-202210/

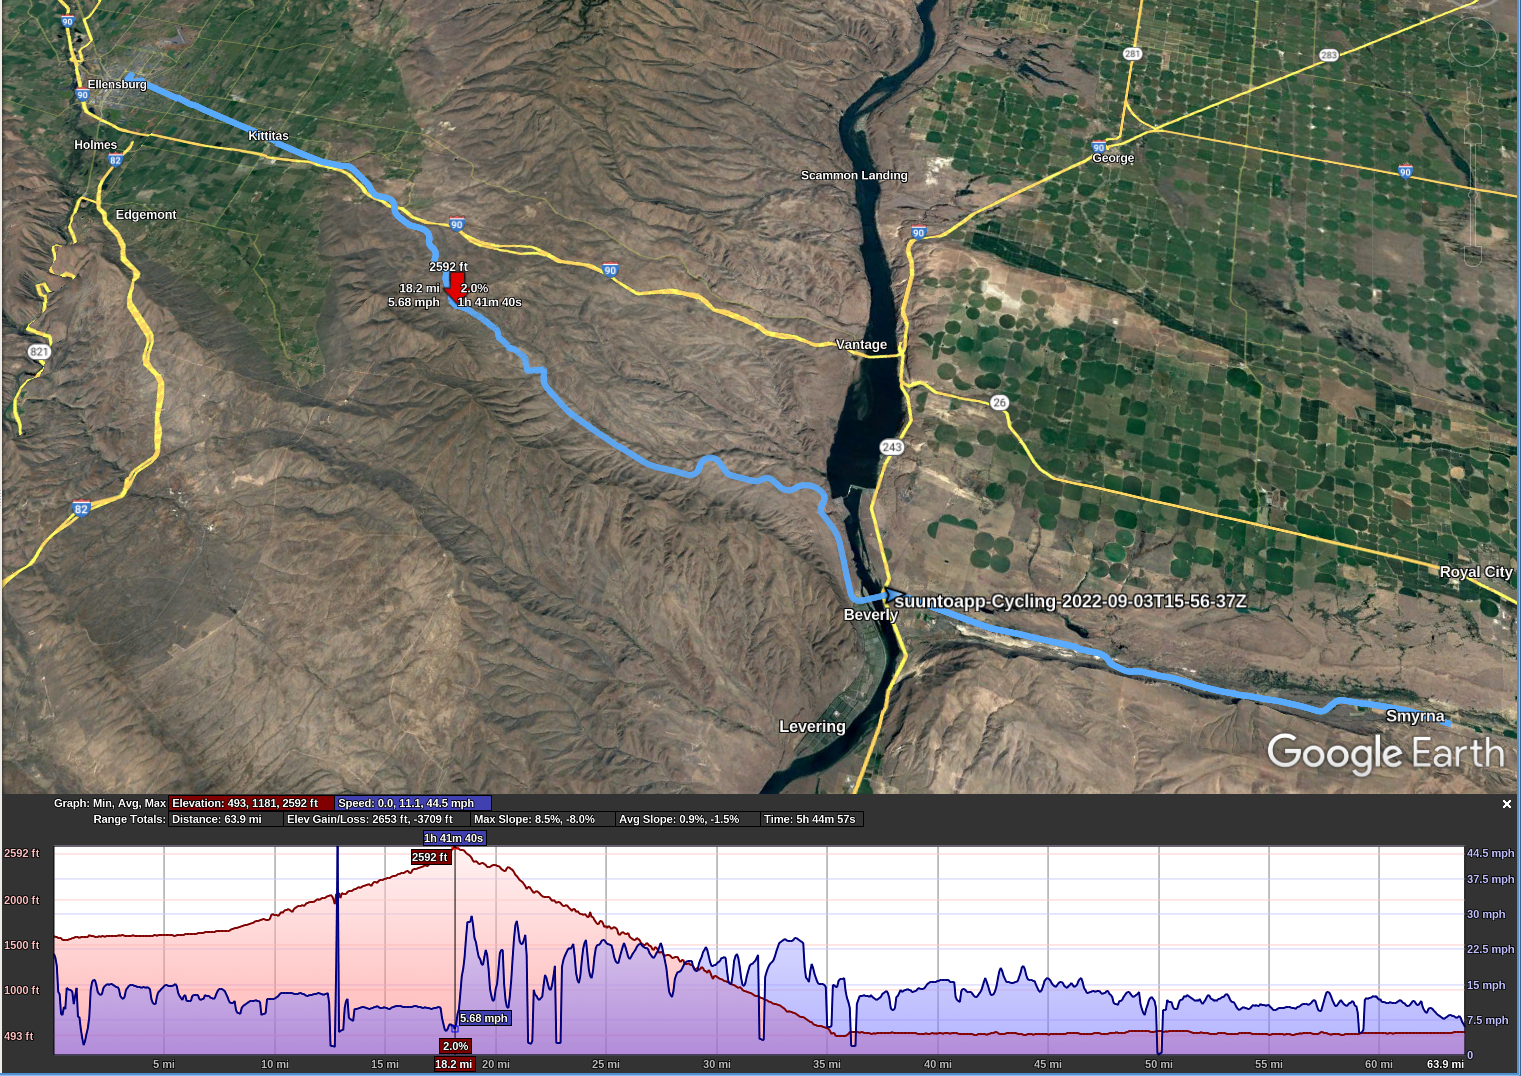
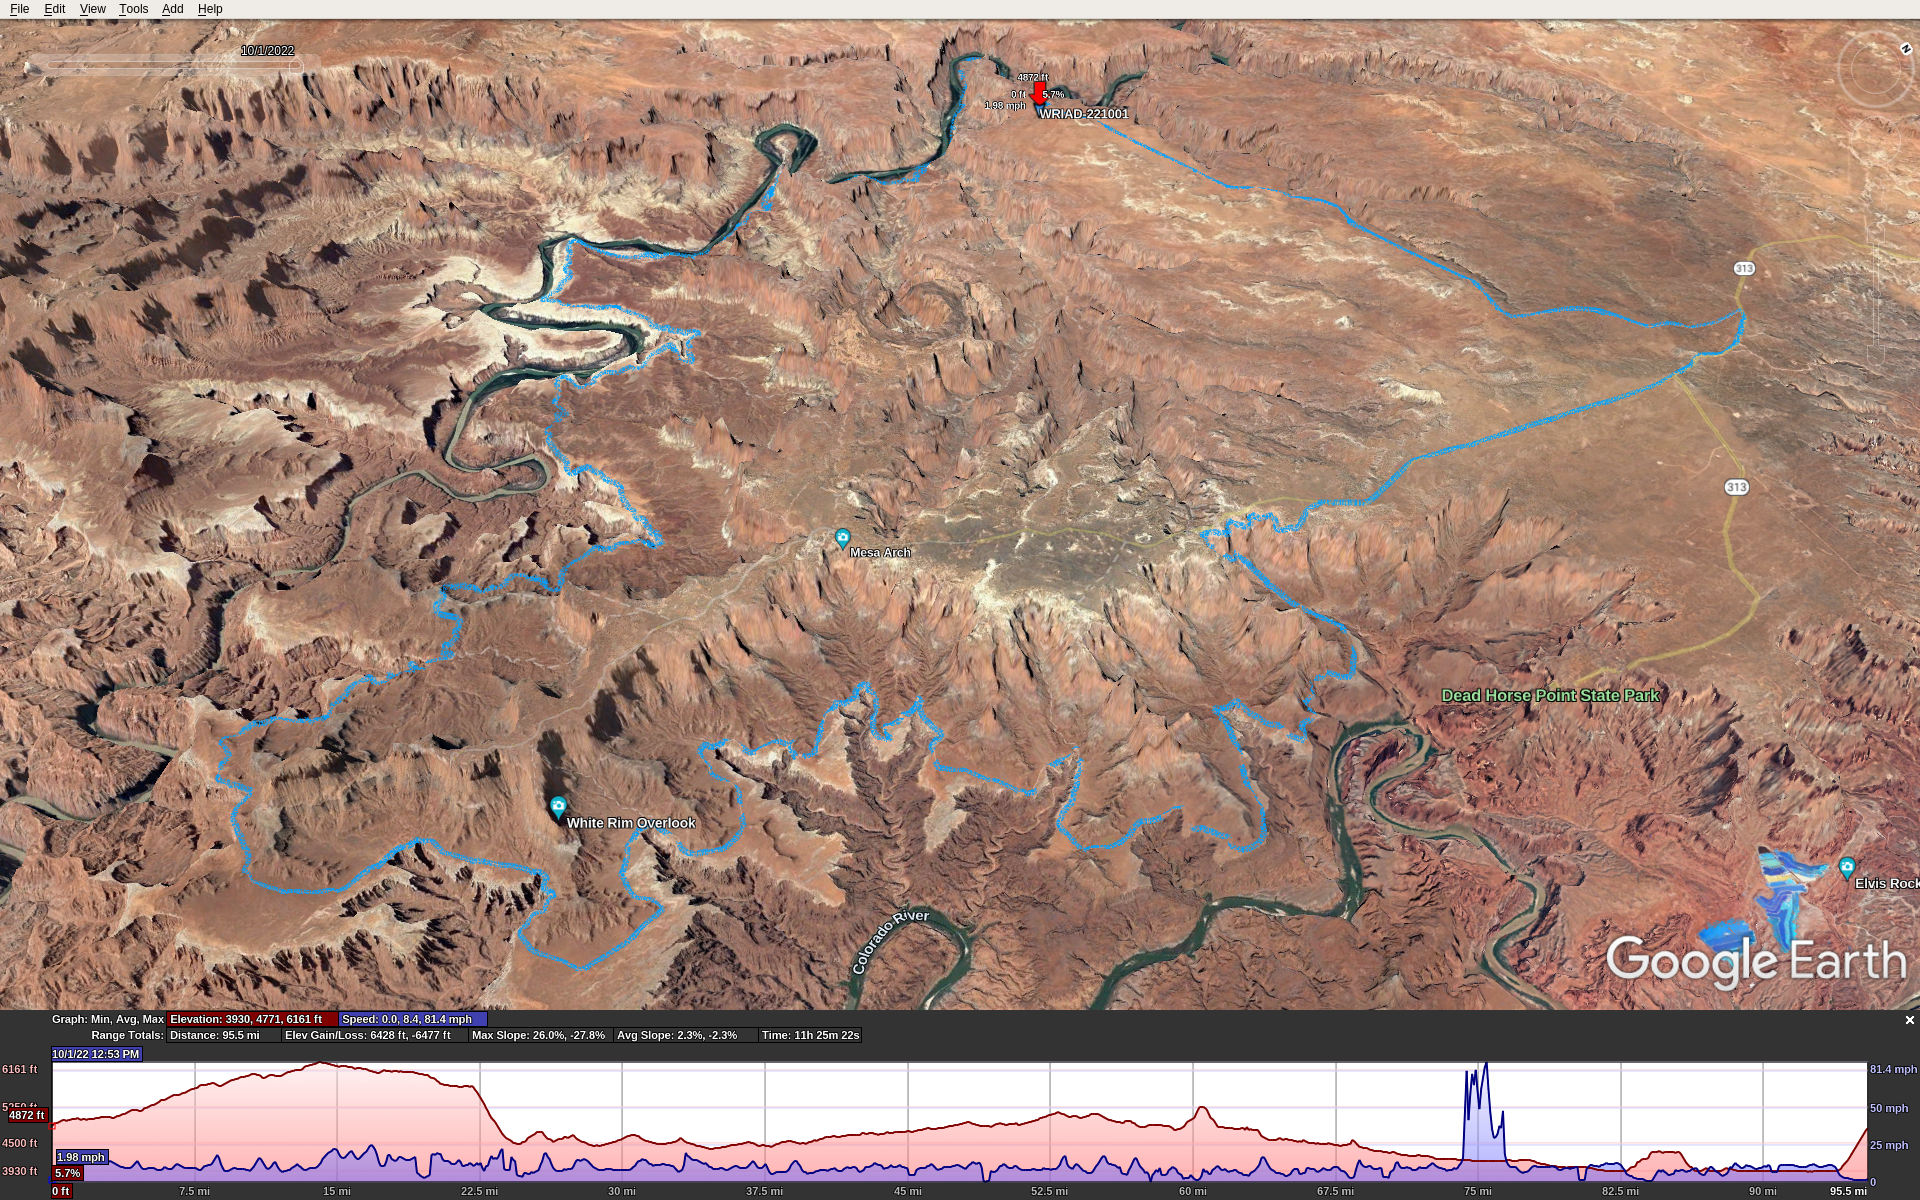
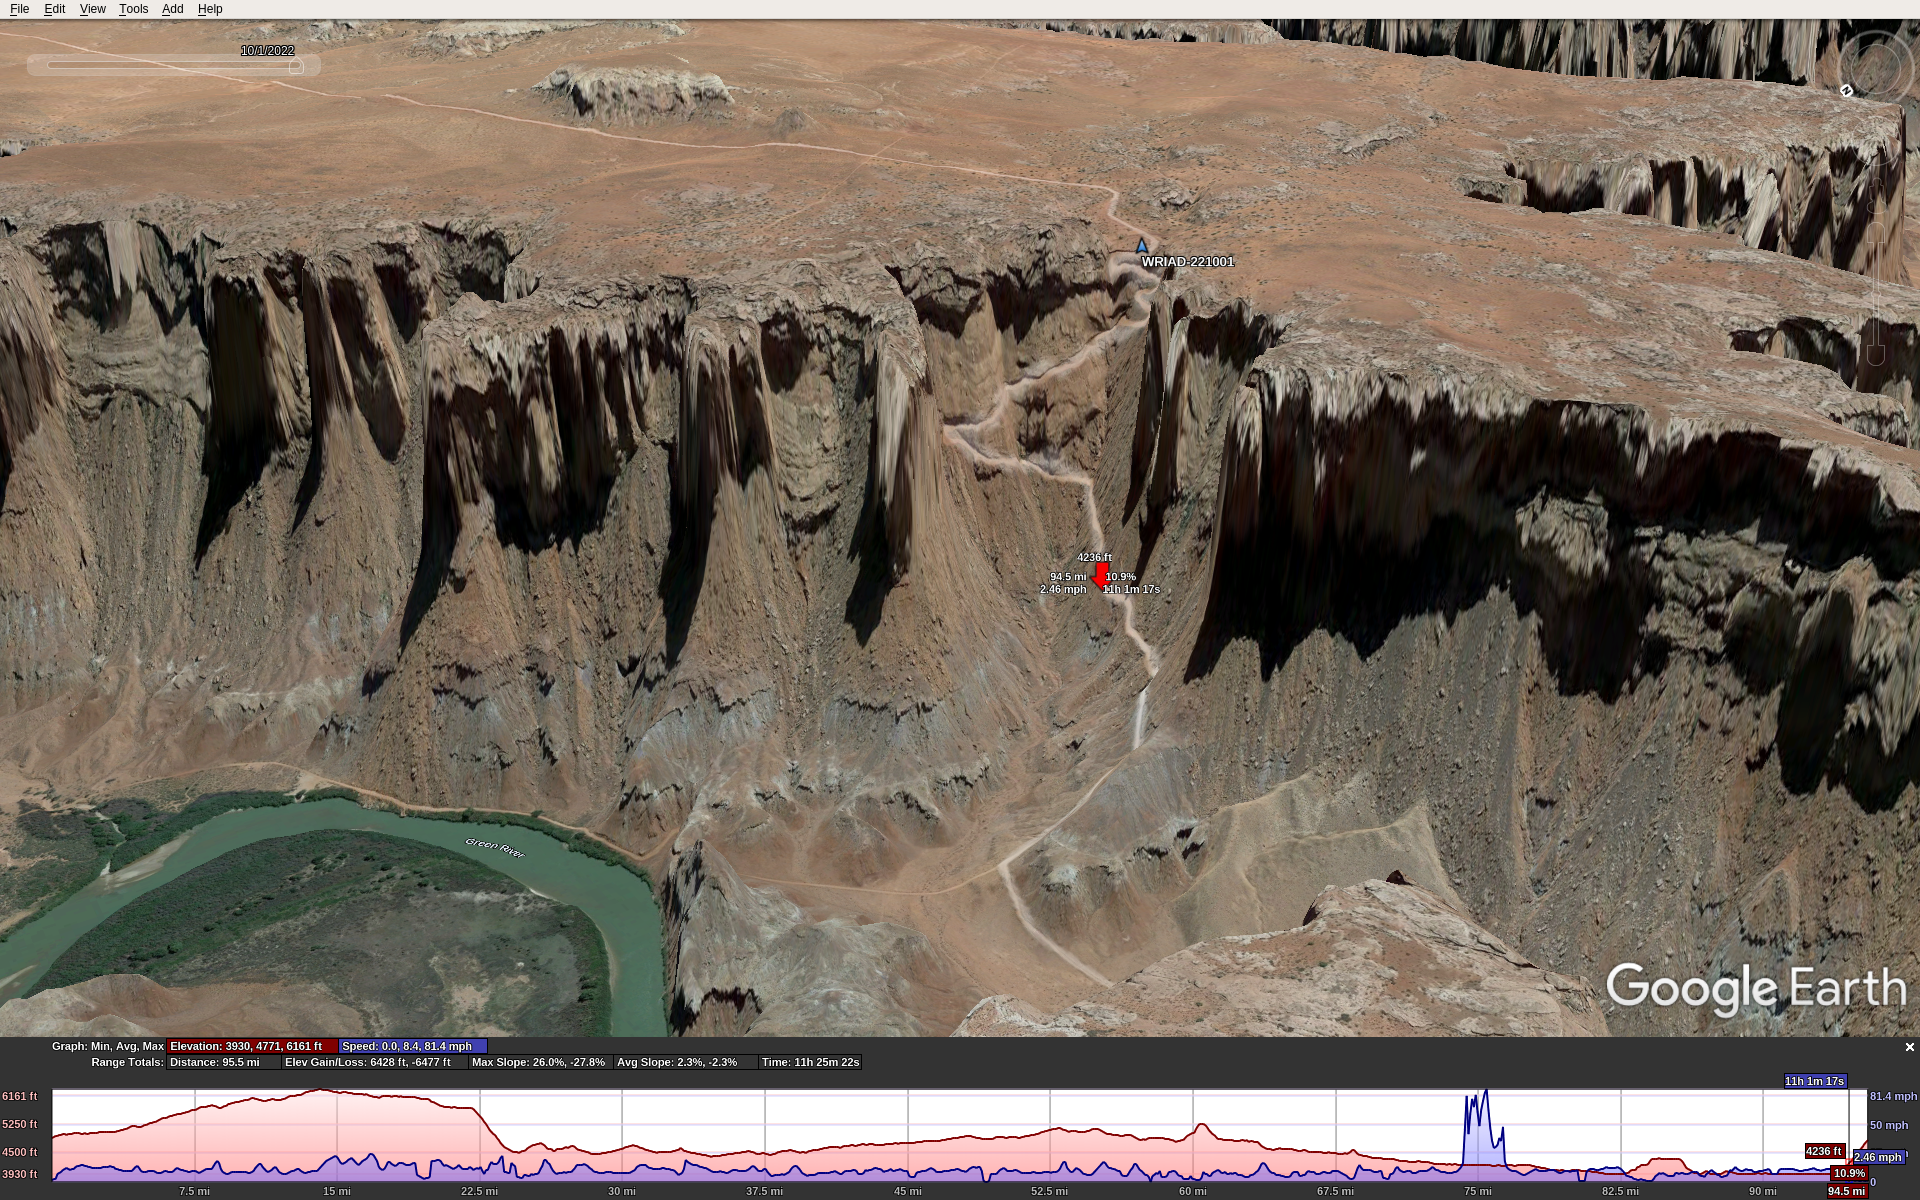
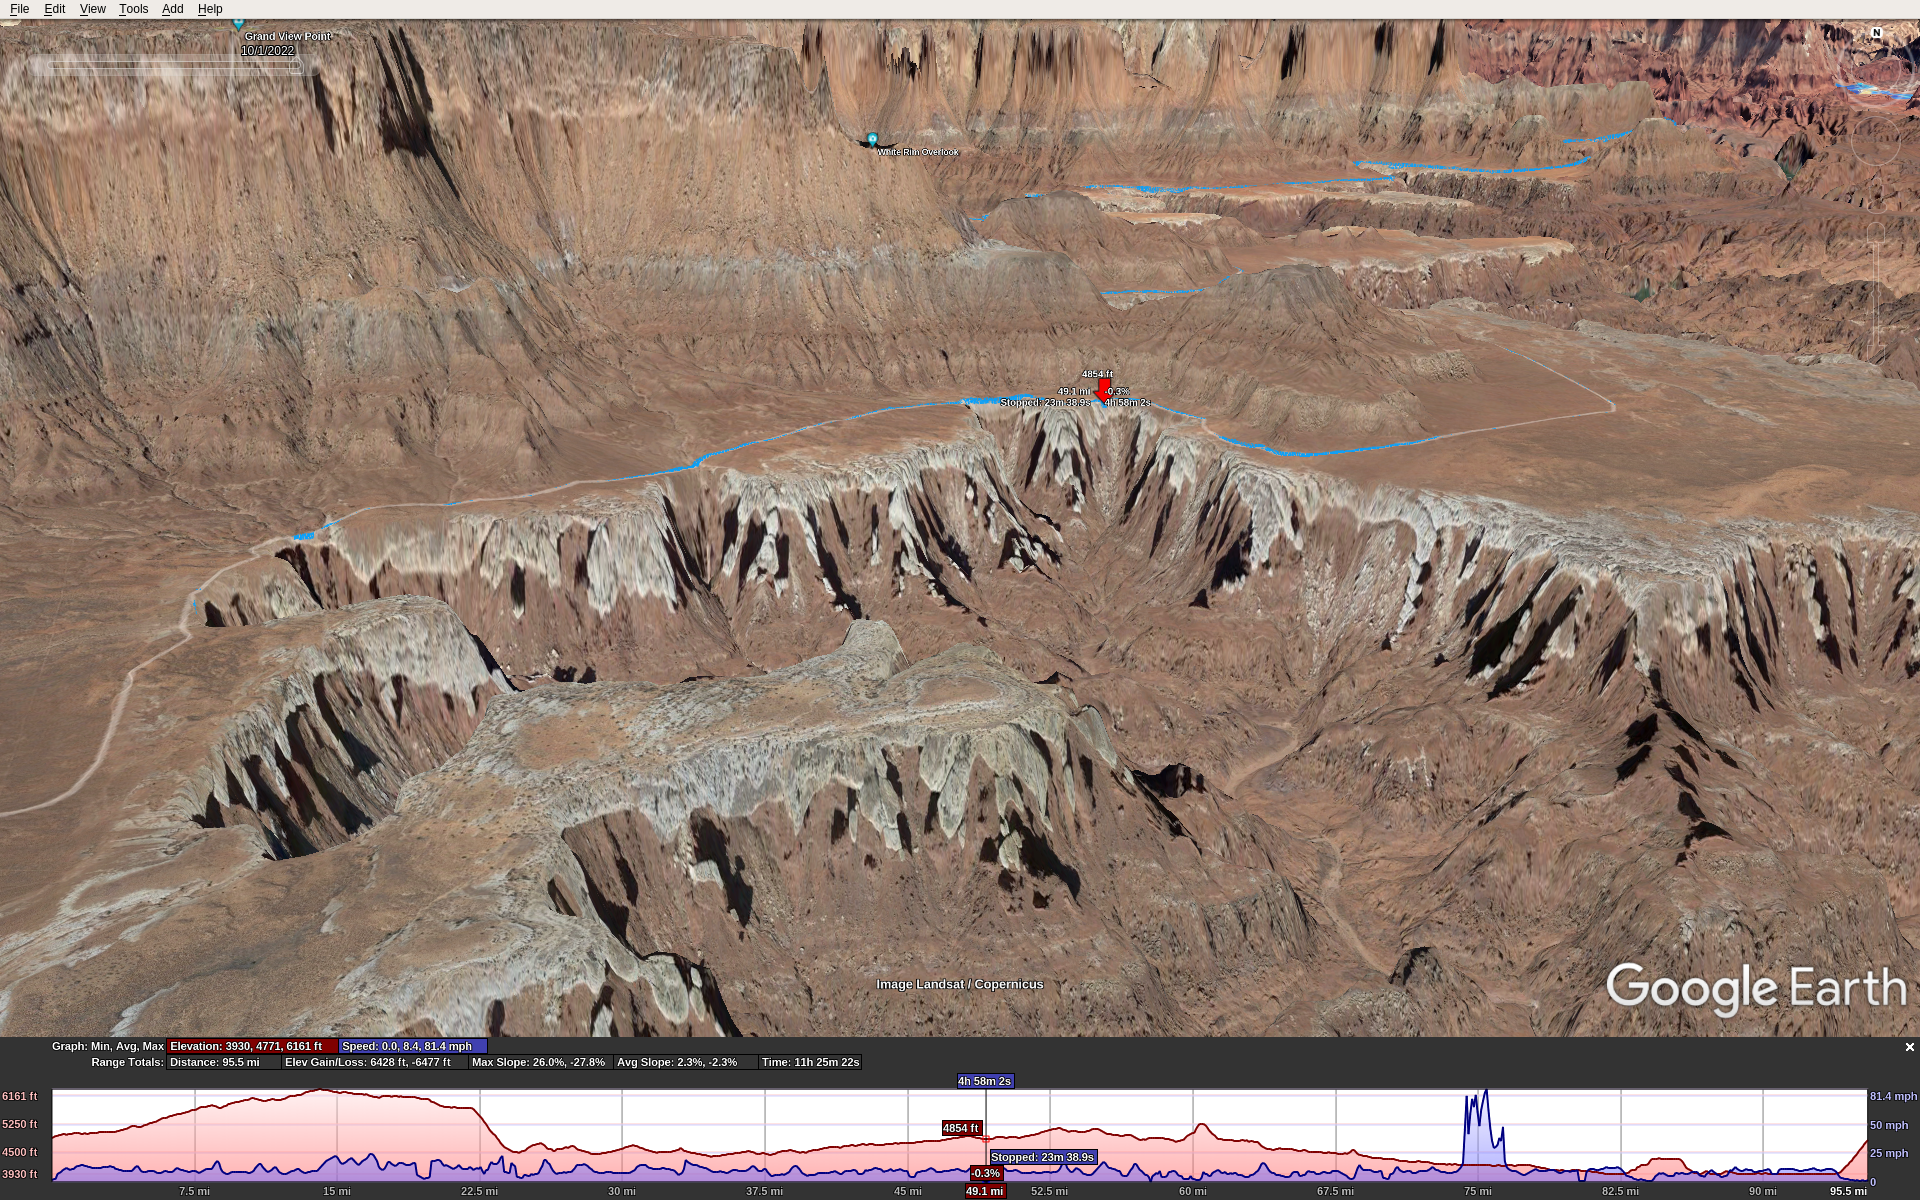
Here’s the GPX track overlaid with Google Earth, which underestimates the mileage and elevation because it over-smooths and simplifies the track. The red flag is our start/end point. The spike in speed around mile 75 is a GPS glitch.

Preparation

I’ve done some big tough MTB rides over the years. La Ruta, Kokopelli’s Trail, OTGG, and others of Stefan’s and my own devising. From a fitness perspective I knew what to expect. It takes several months to a year of serious training to get into the best physical fitness you can. You’re going to be pedaling for 10-12 hours over rugged terrain, miles of tire-sucking sand, and incredibly steep grades (> 25%) that make its 100 miles feel more like a 200 mile road ride.

The best time to ride WRIAD is in spring or fall. This means near the equinox, so you’ll have about 12 hours of daylight.

You need a day-use permit that you can get a day or two in advance, cost about $6. And you need to pay another $15 to enter the national park.

Plan on 11-12 hours total if you stop only once or twice during the ride. That means enough food and water to carry you through. Everyone is different; here’s what worked for me. I had 224 ounces of water: two 100 oz camelback bladders, plus a 24 oz. water bottle. I used all but 12 ounces of it. For food, bring some real food for lunch (sandwich, burrito, etc.) and about 240 cals per hour to eat while you’re riding. Have this food ready to eat while riding because if you stop to eat every hour, you might not finish the ride in daylight.

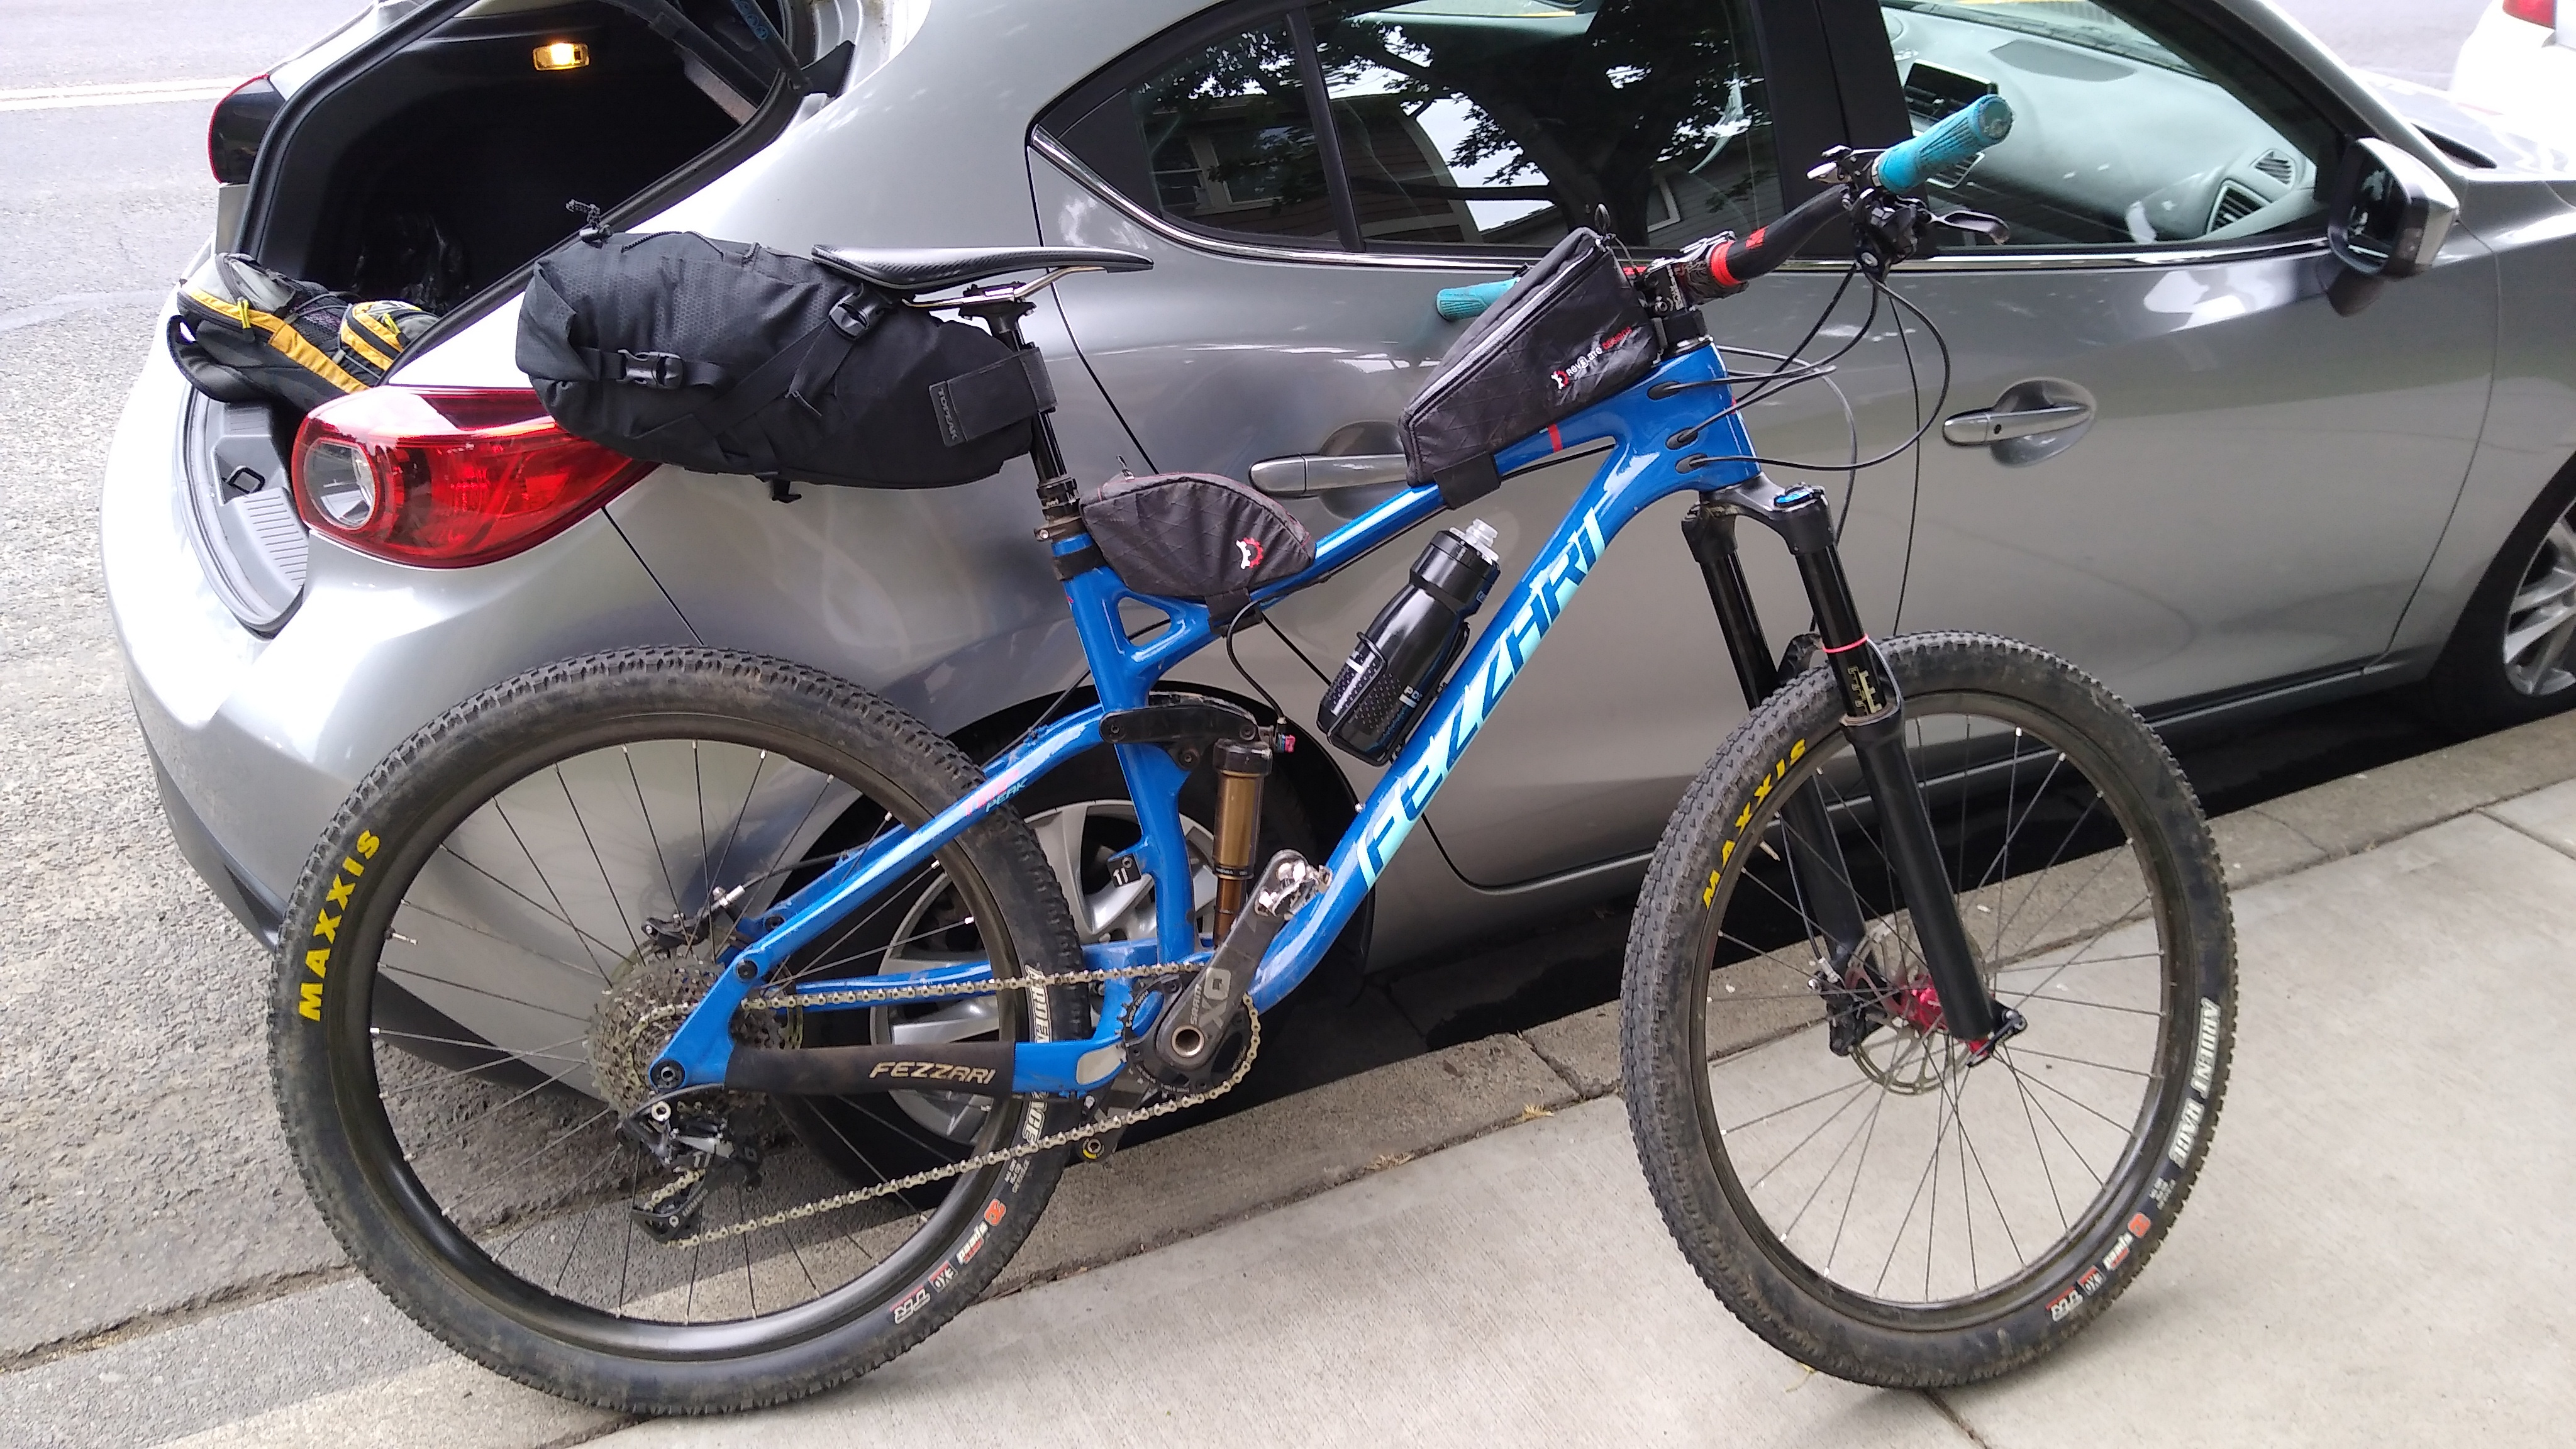
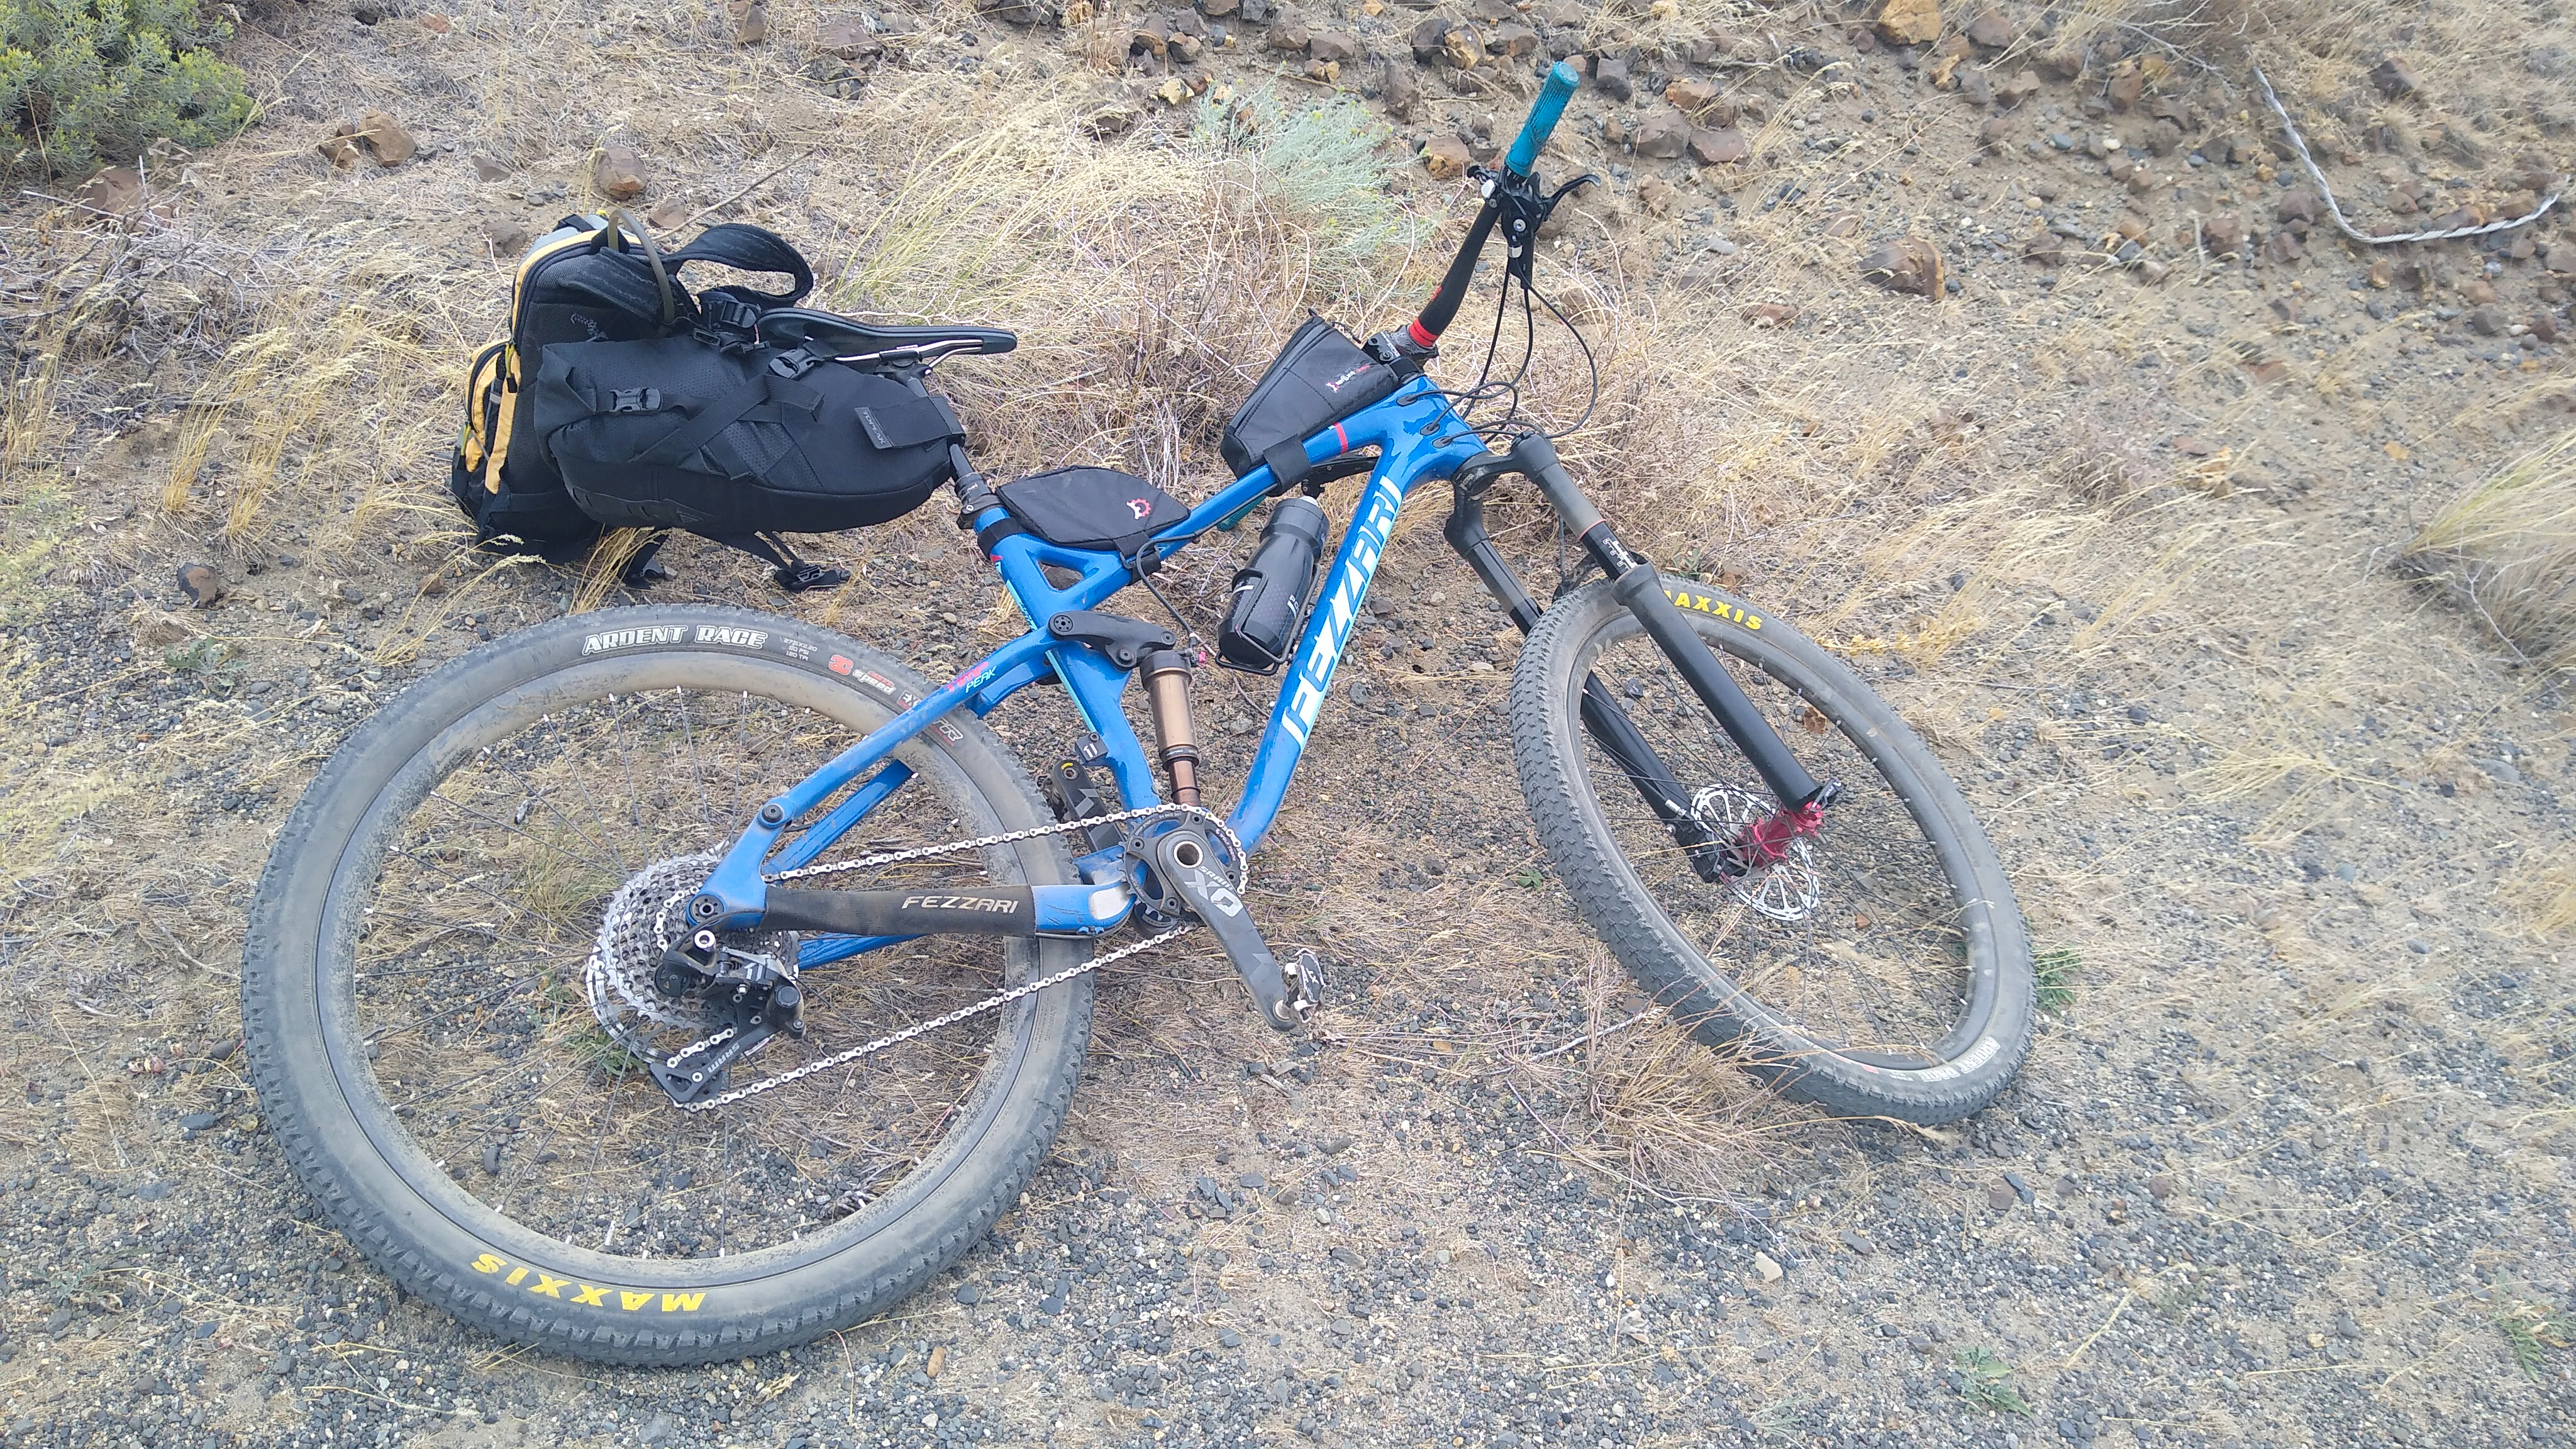
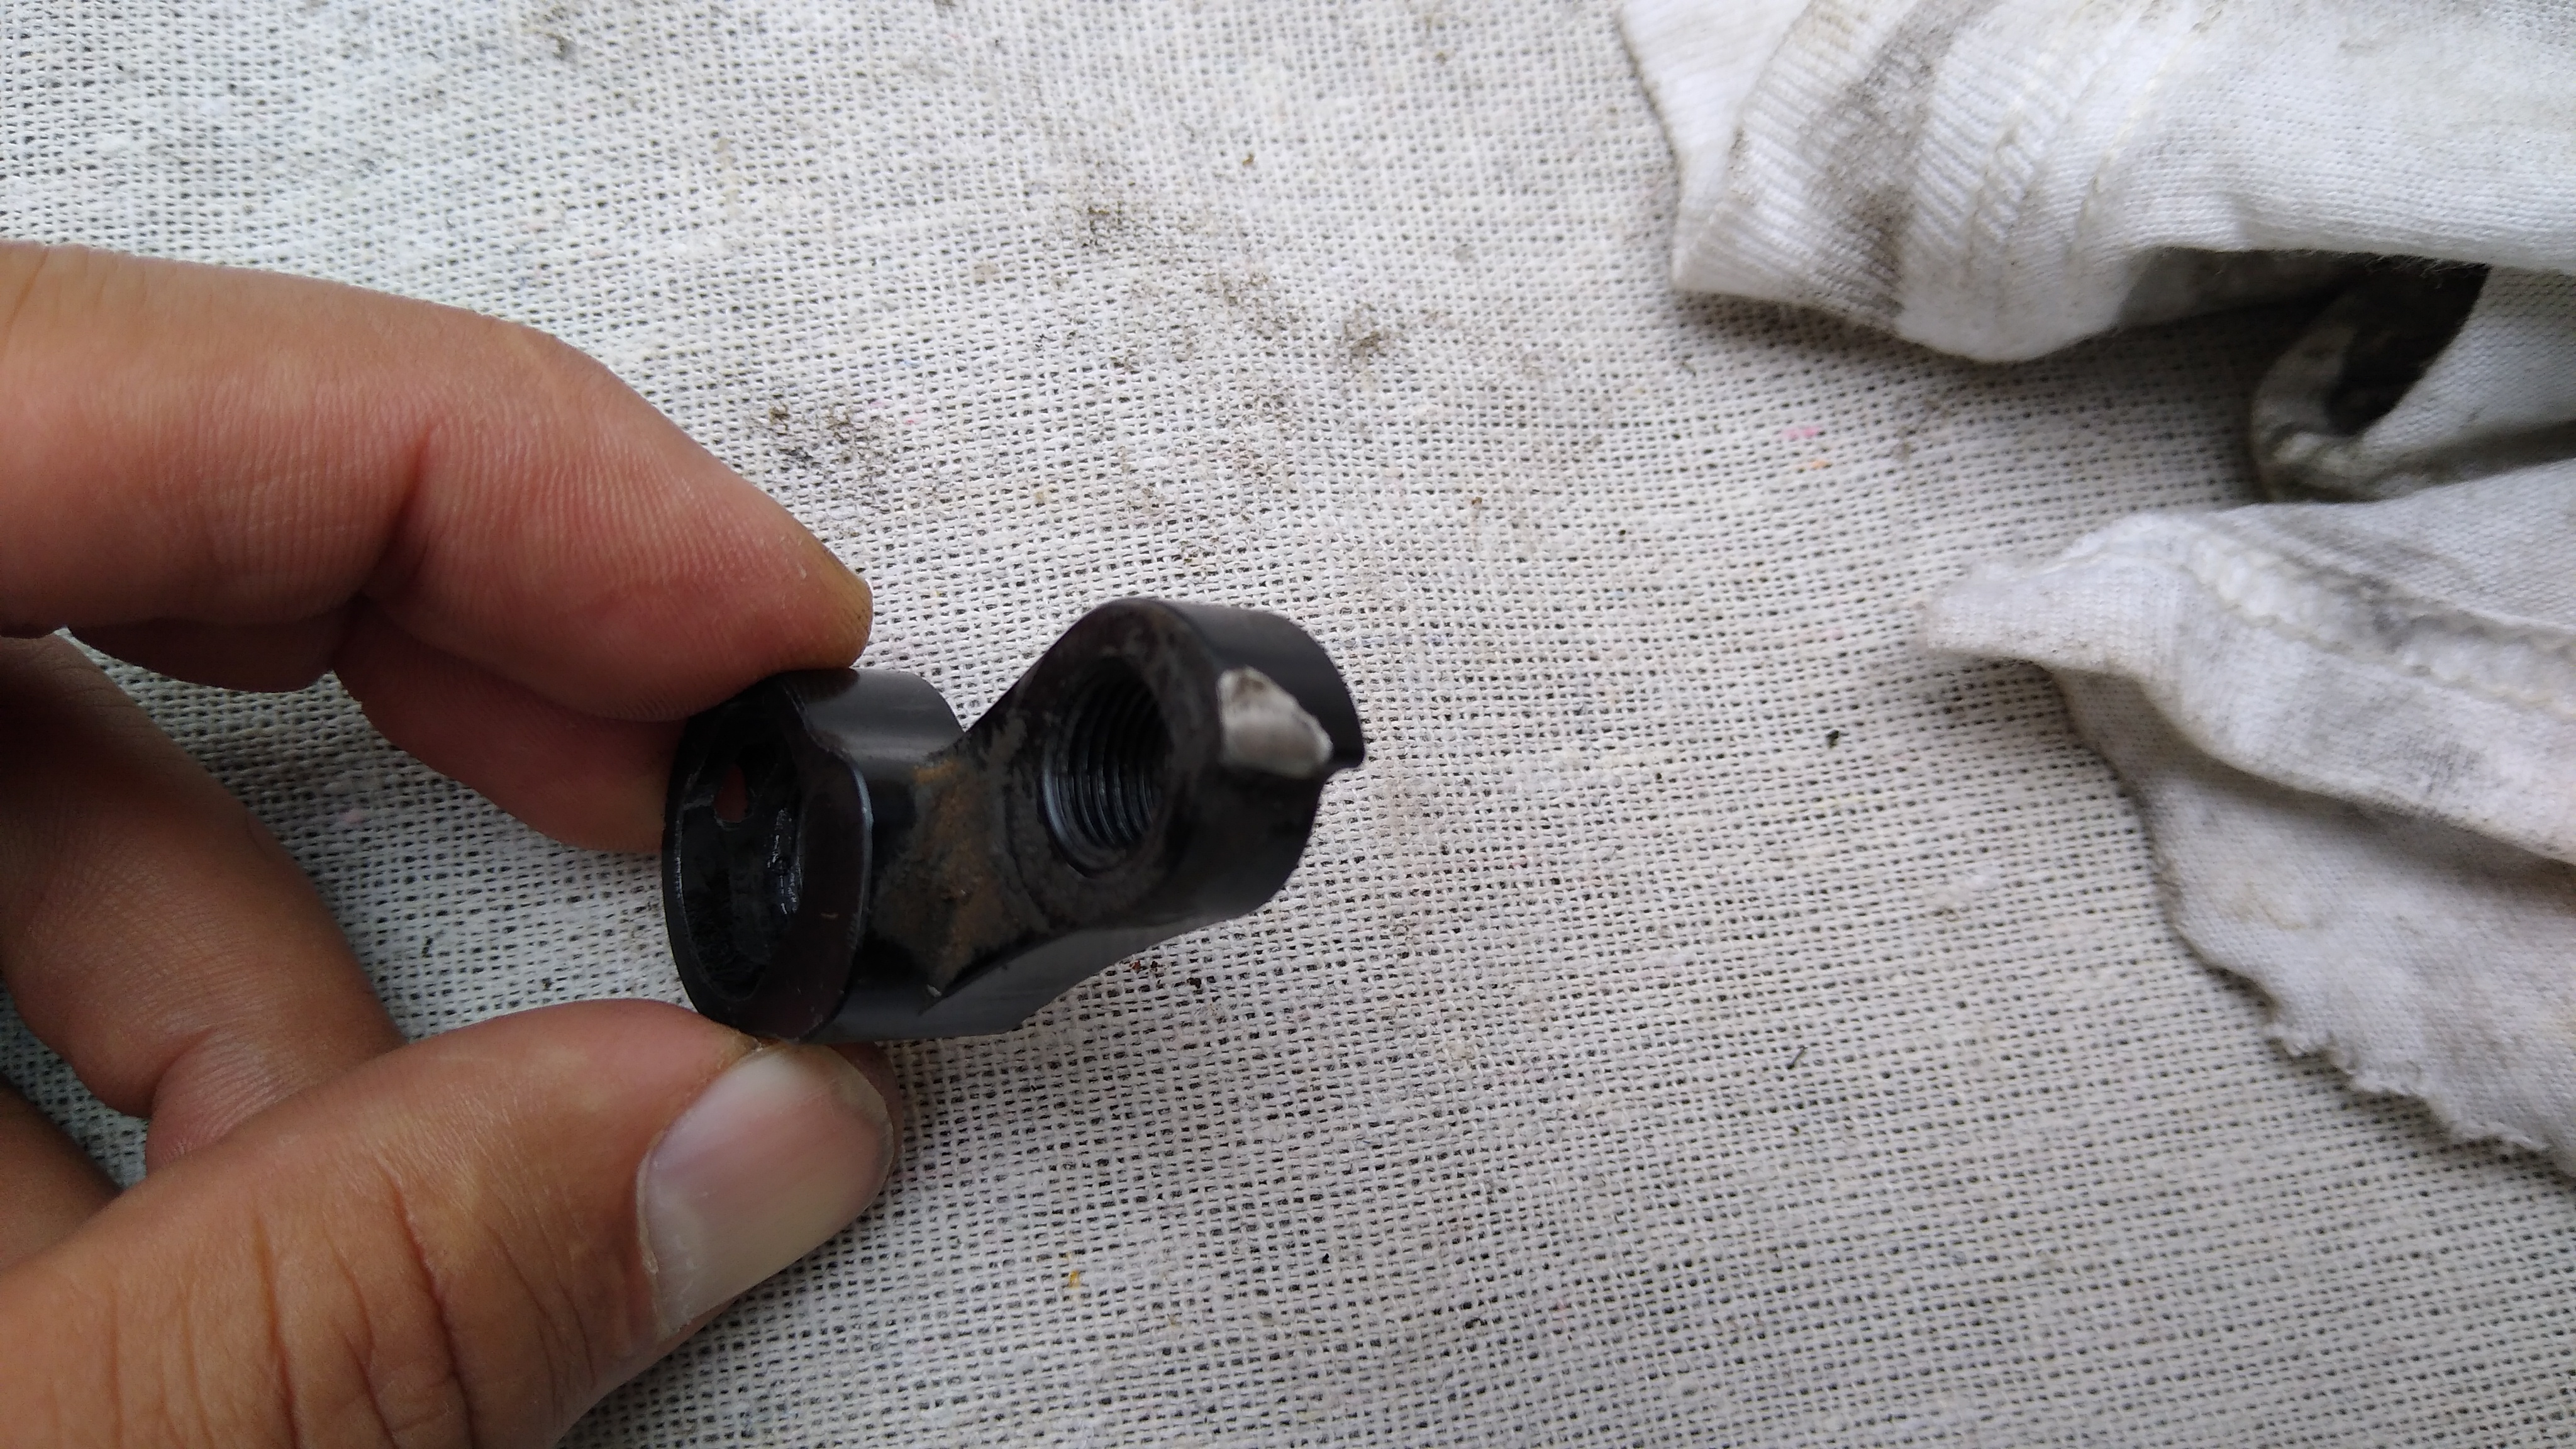
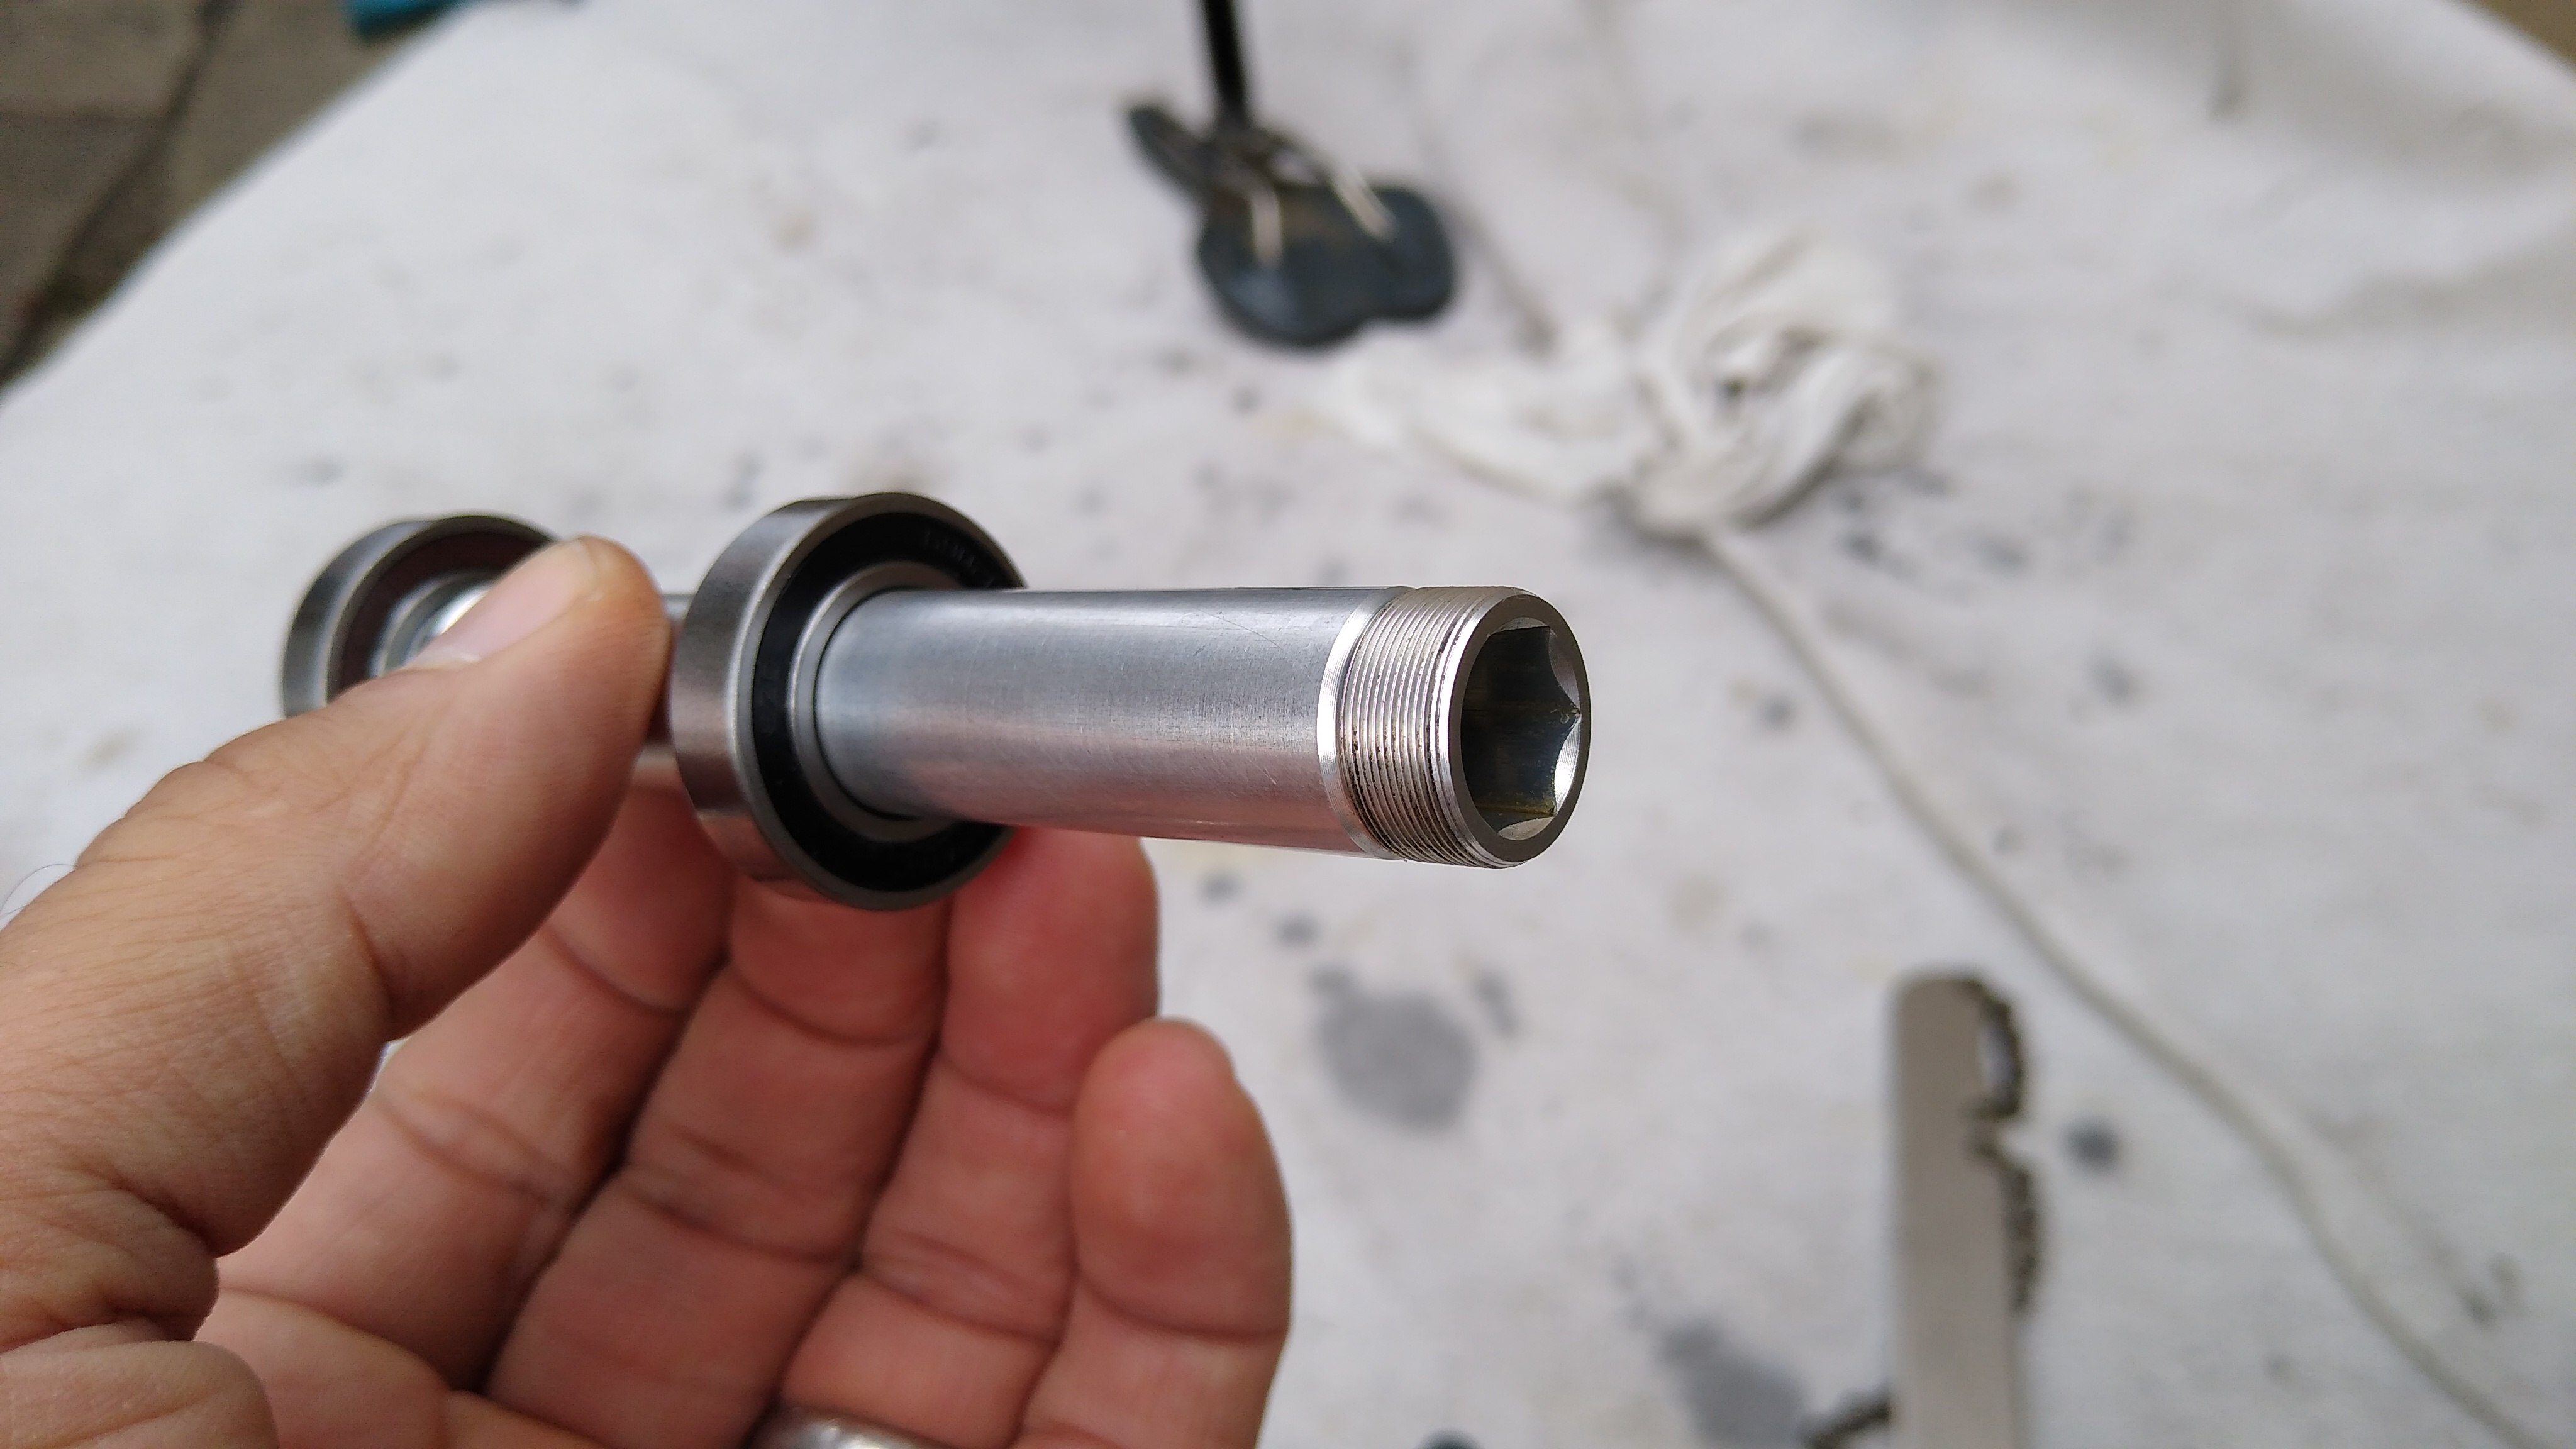
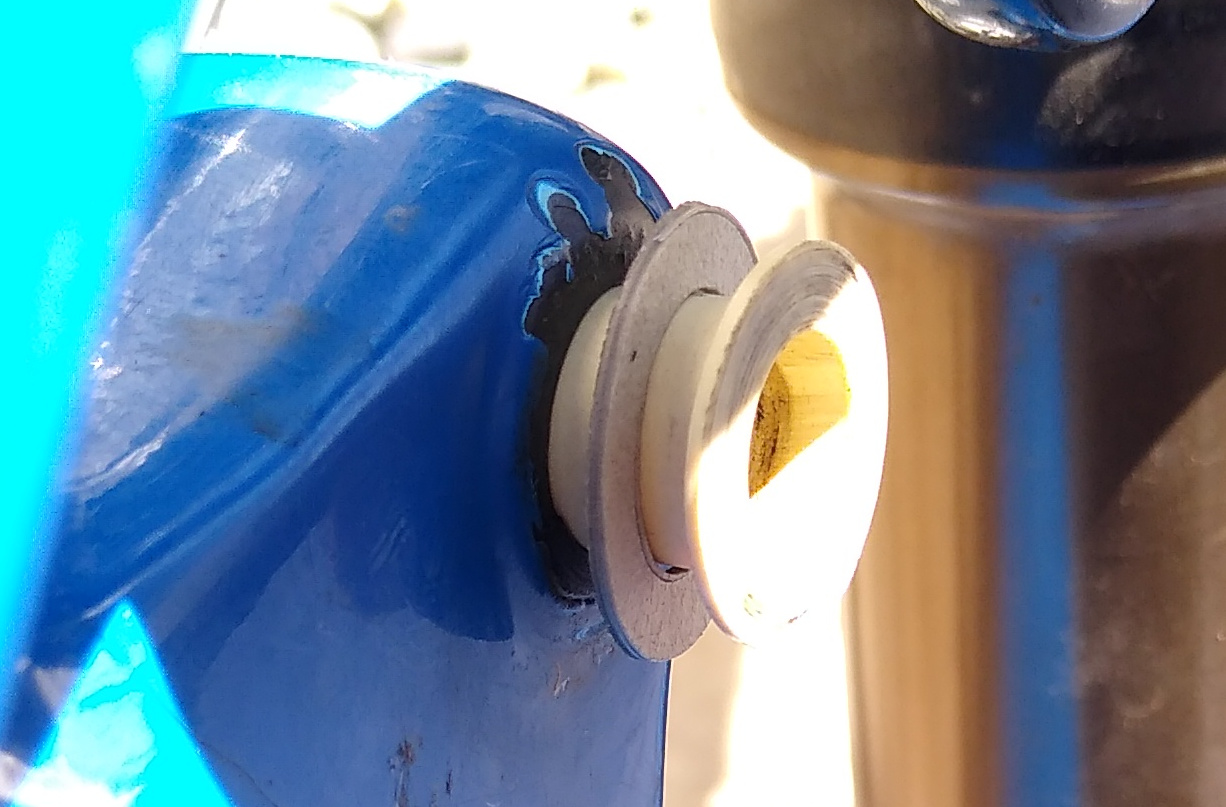
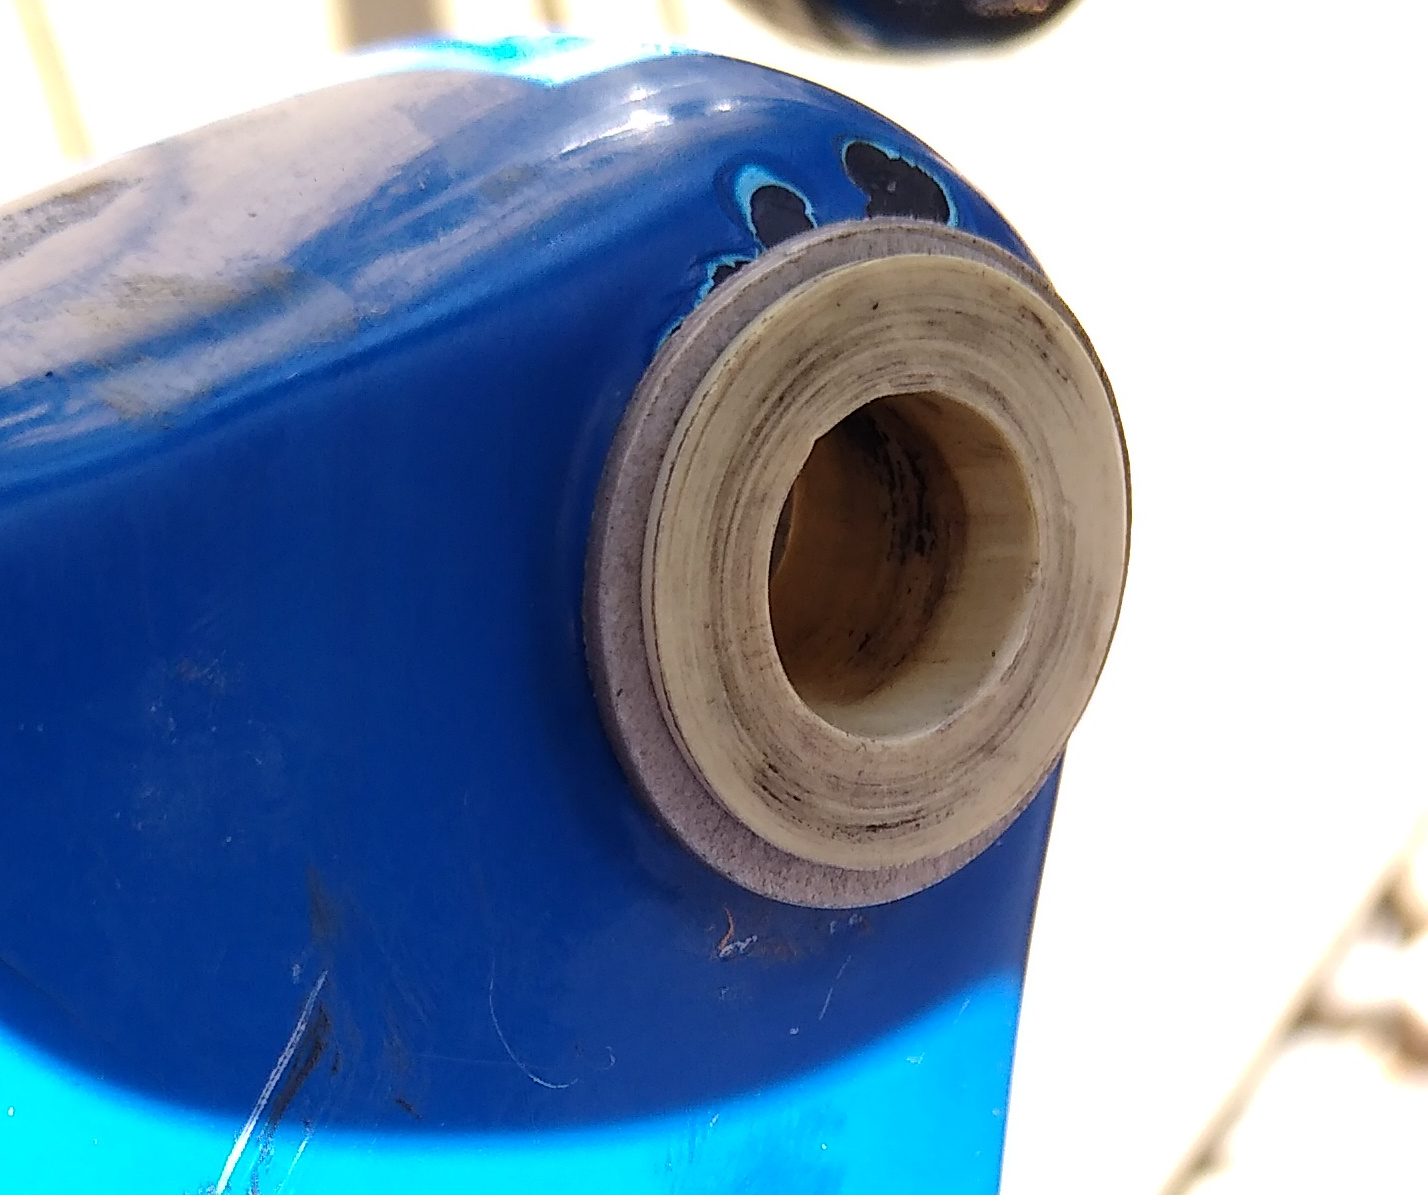
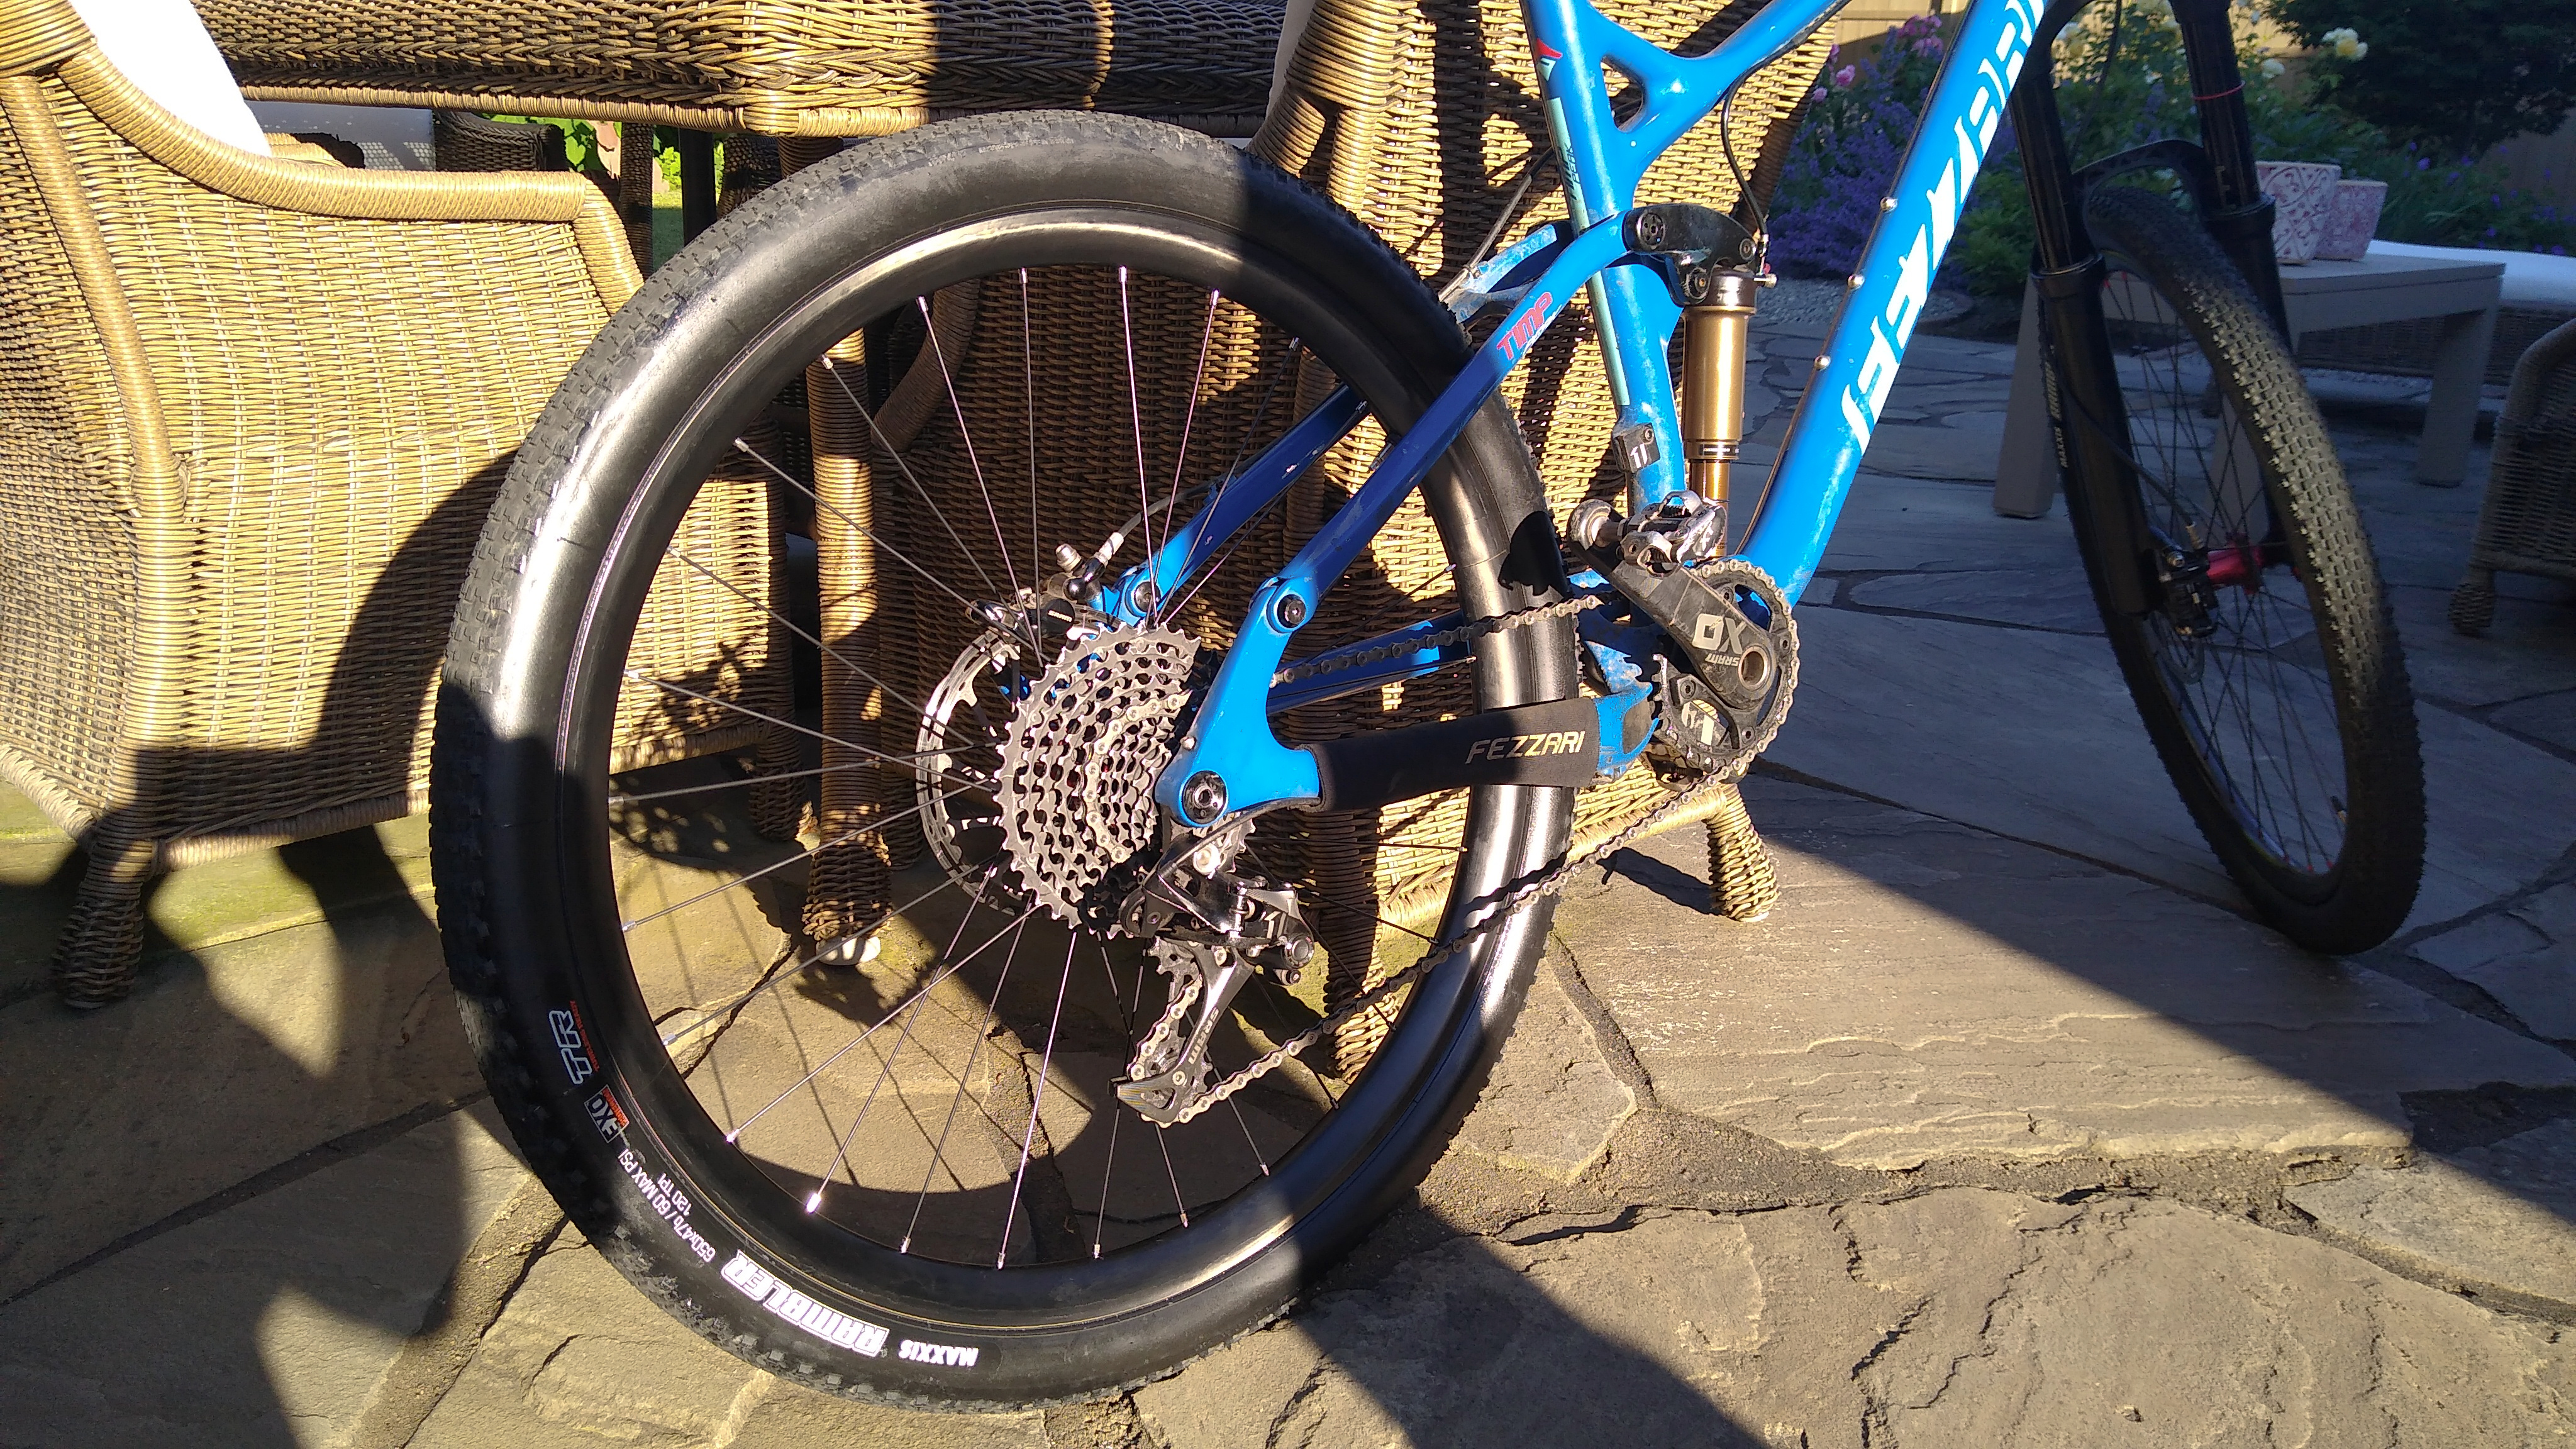
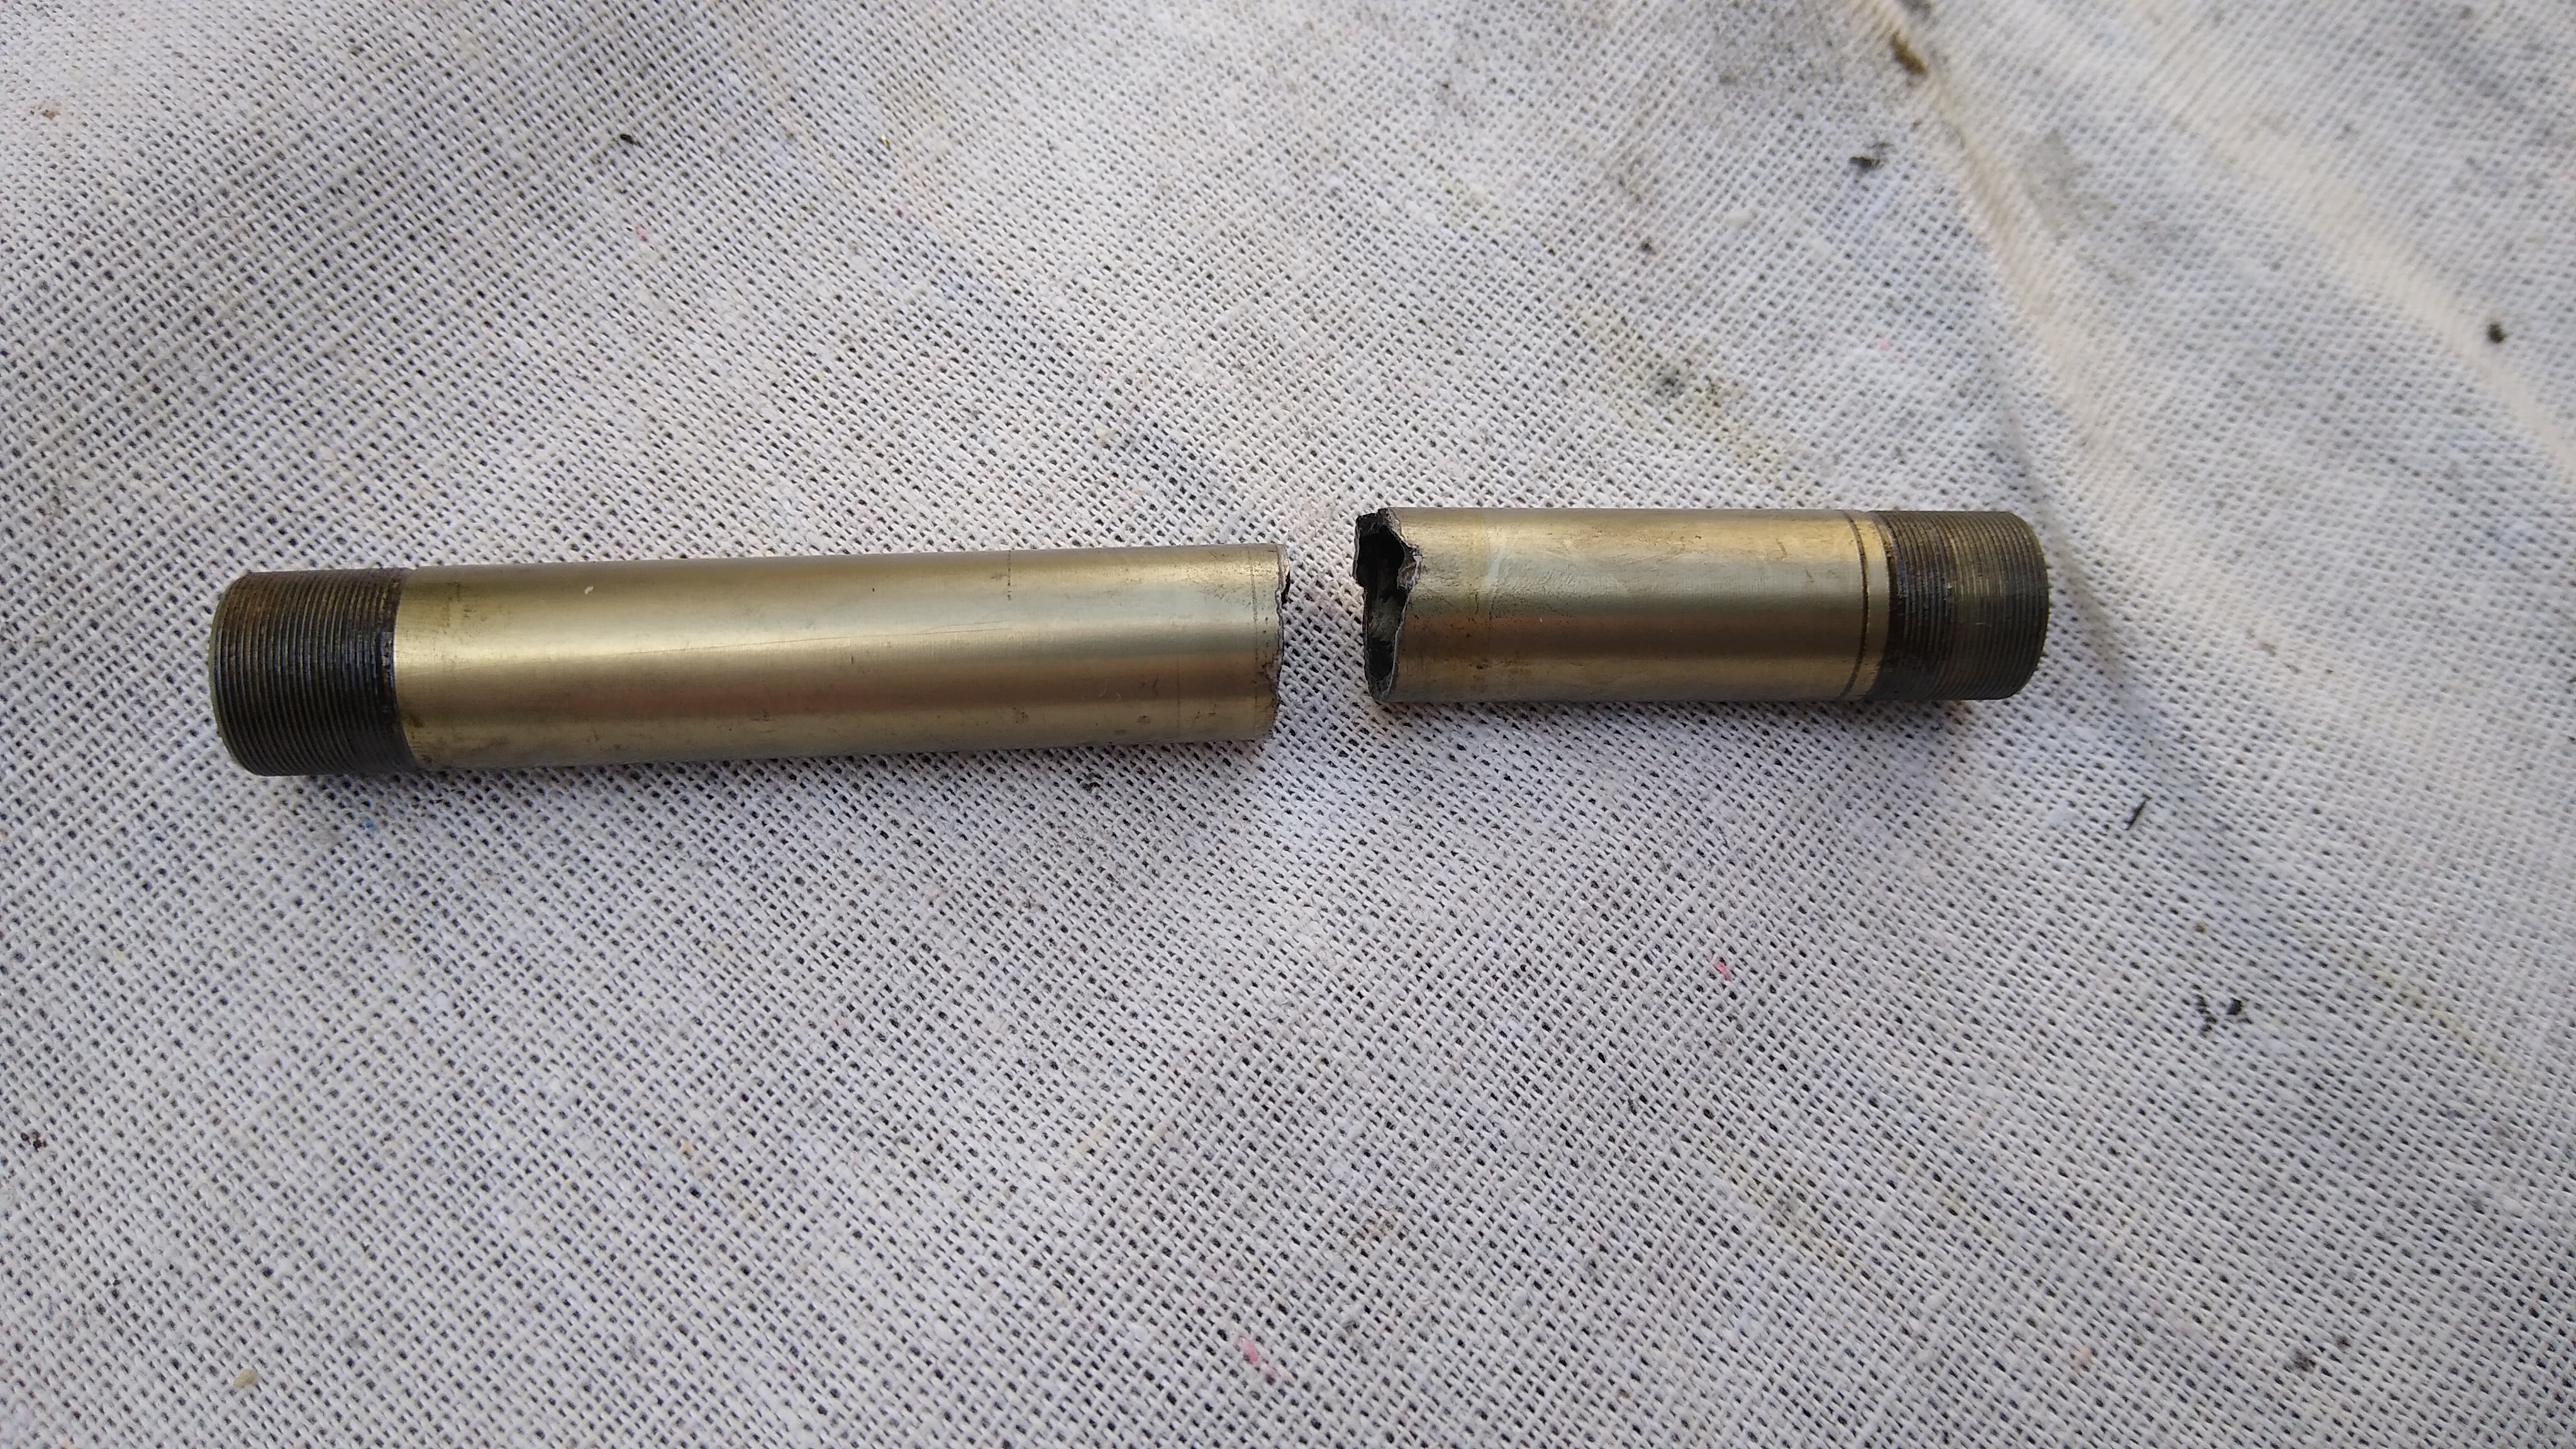
Have a bike that you trust, proven to stand abuse. A bike mechanical failure that strands you along the trail can keep you there overnight and become a life threatening situation. Make sure the entire drivetrain, axles, etc. are new and fresh. Several sections of the trail are too rugged for a gravel bike. You will need a true mountain bike, hard-tail or full suspension, with knobby or semi-knobby tires at least 2″ or 50mm wide. I used Maxxis Ardent Race, 2.2″ / 57mm and they were great. Anything narrower wouldn’t work, anything wider would make a hard ride even harder.

Clockwise or Counterclockwise?

This is a common question. Both ways are doable. Either way you go, you’ll descend into the canyon then climb back out again. These two points are Shafer on the NE side and Mineral Bottom on the NW side.

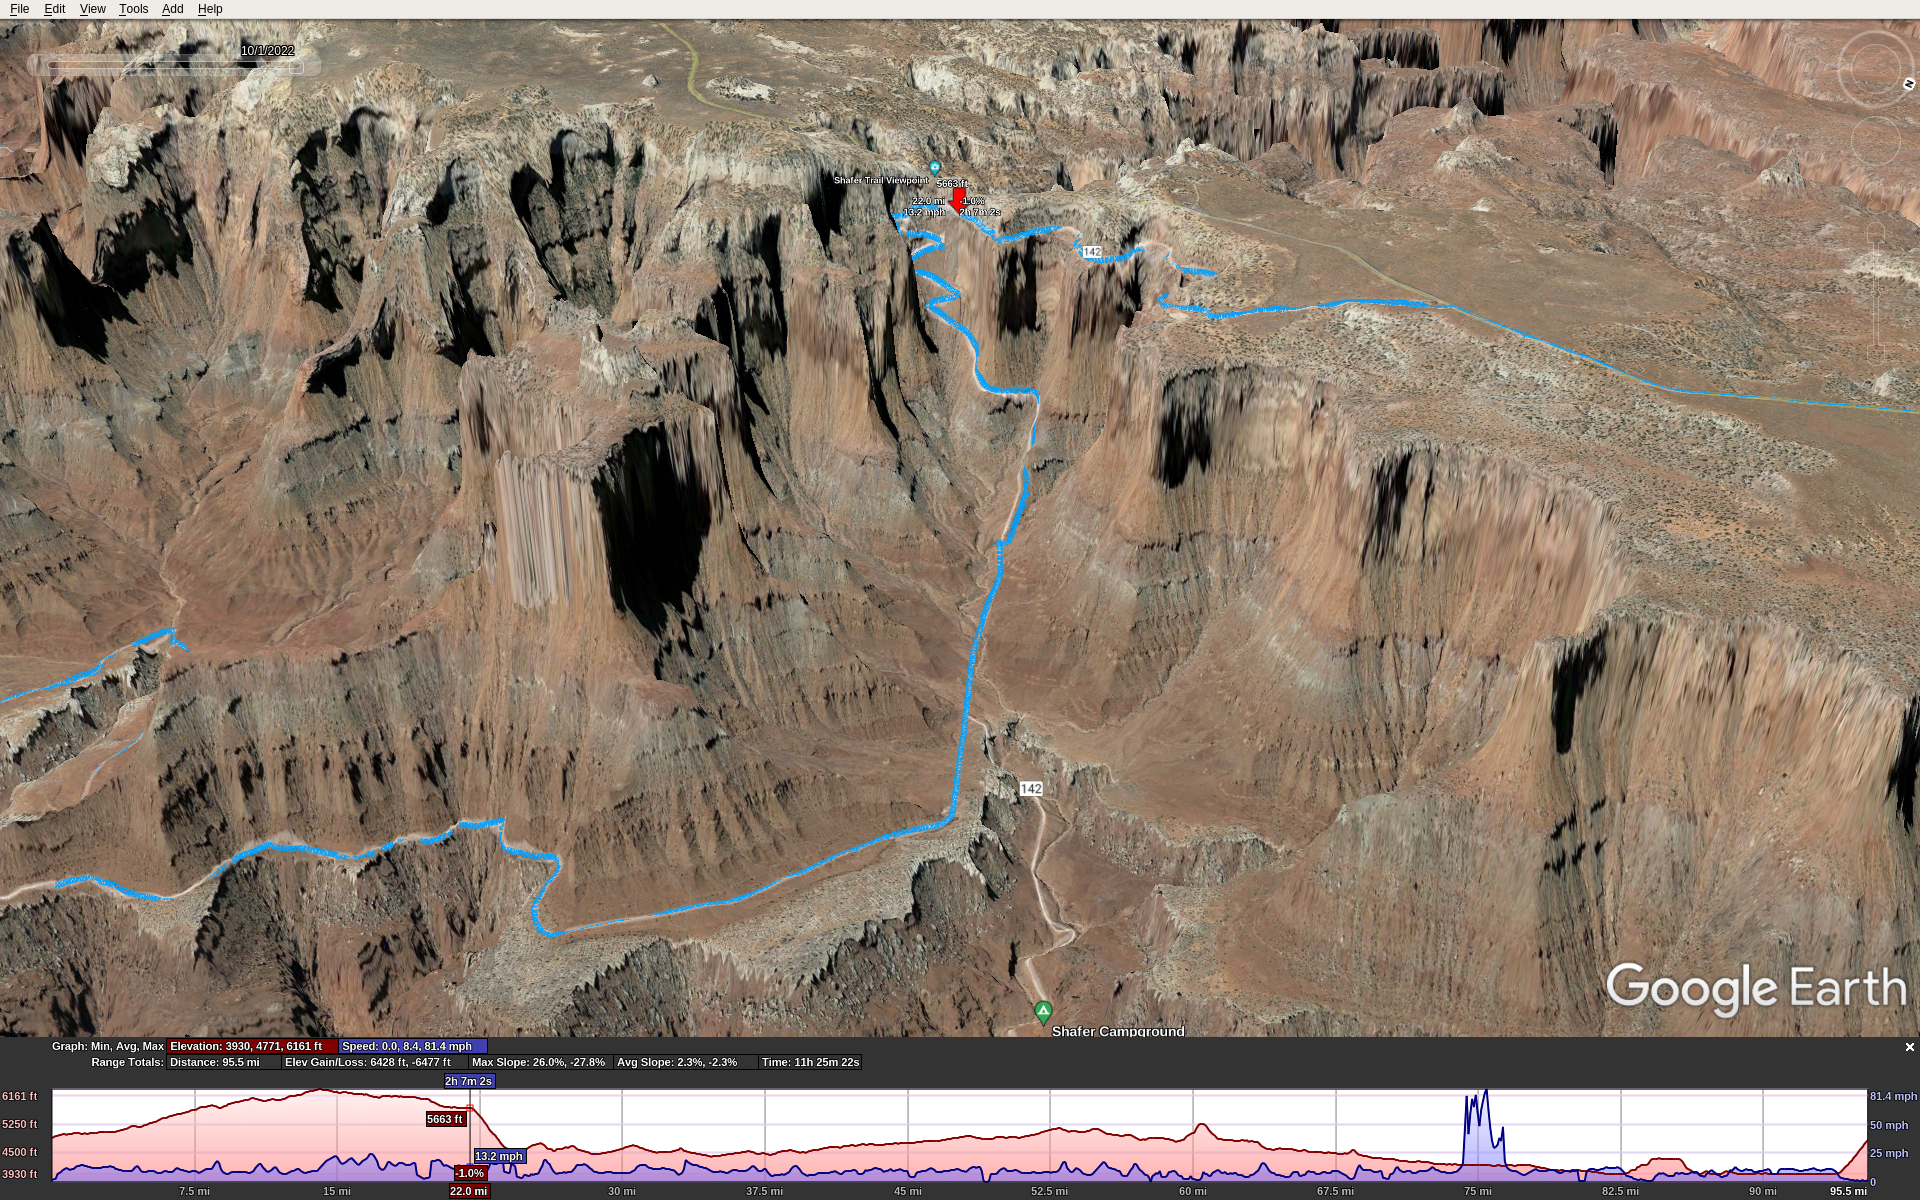
Here’s the Shafer grade. Red marker is poised at the top.

Here’s the Mineral Bottom grade. Red marker is half-way up, blue marker is our start/end point.

Also, along the trail in the canyon are 2 big notable climbs, each close to 1000′ with some sections too steep to ride. So no matter which way you go, you’ll have 3 very big climbs, in addition to the constant up and down of the trail.

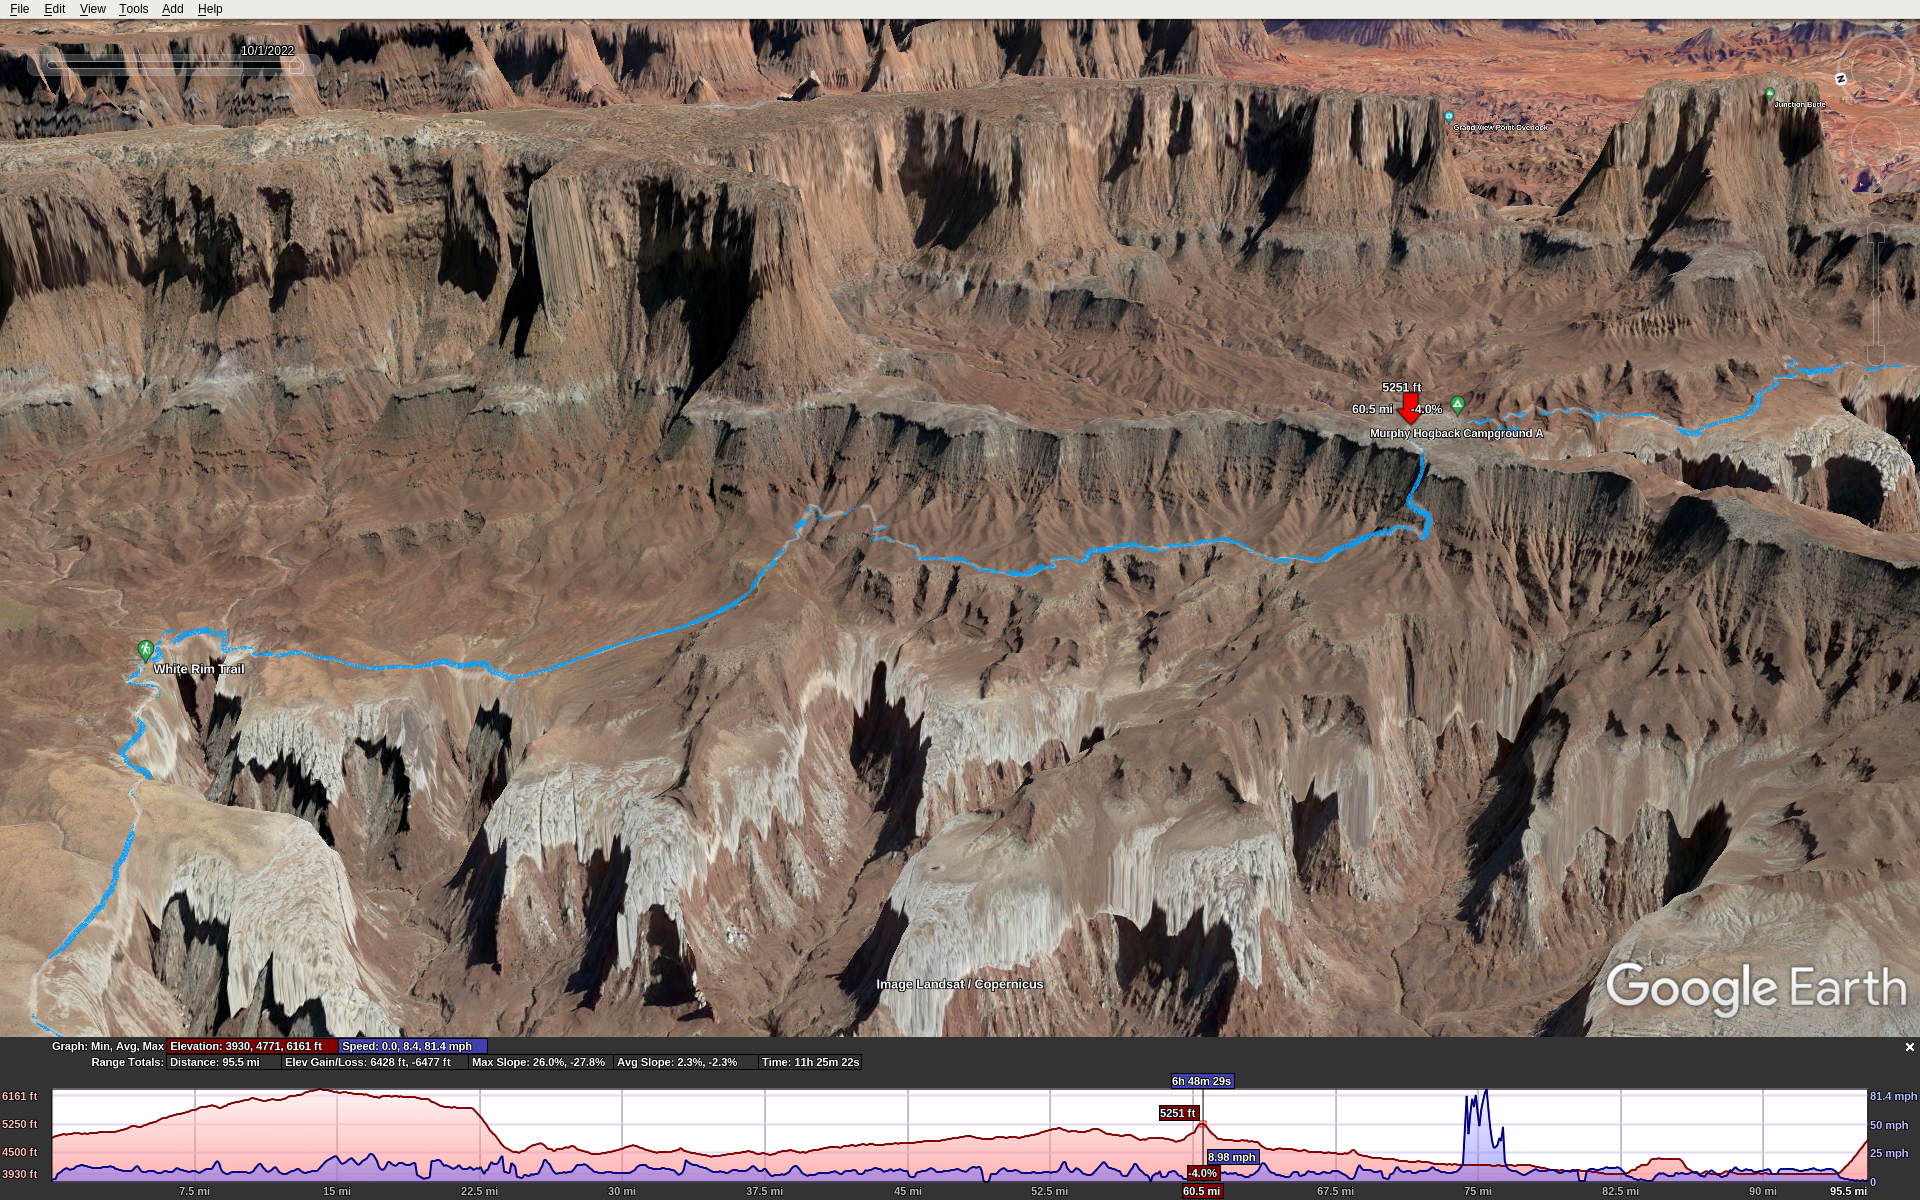
Climb 1, Murphy Hogback, the up side:

Climb 1, Murphy Hogback, the down side:

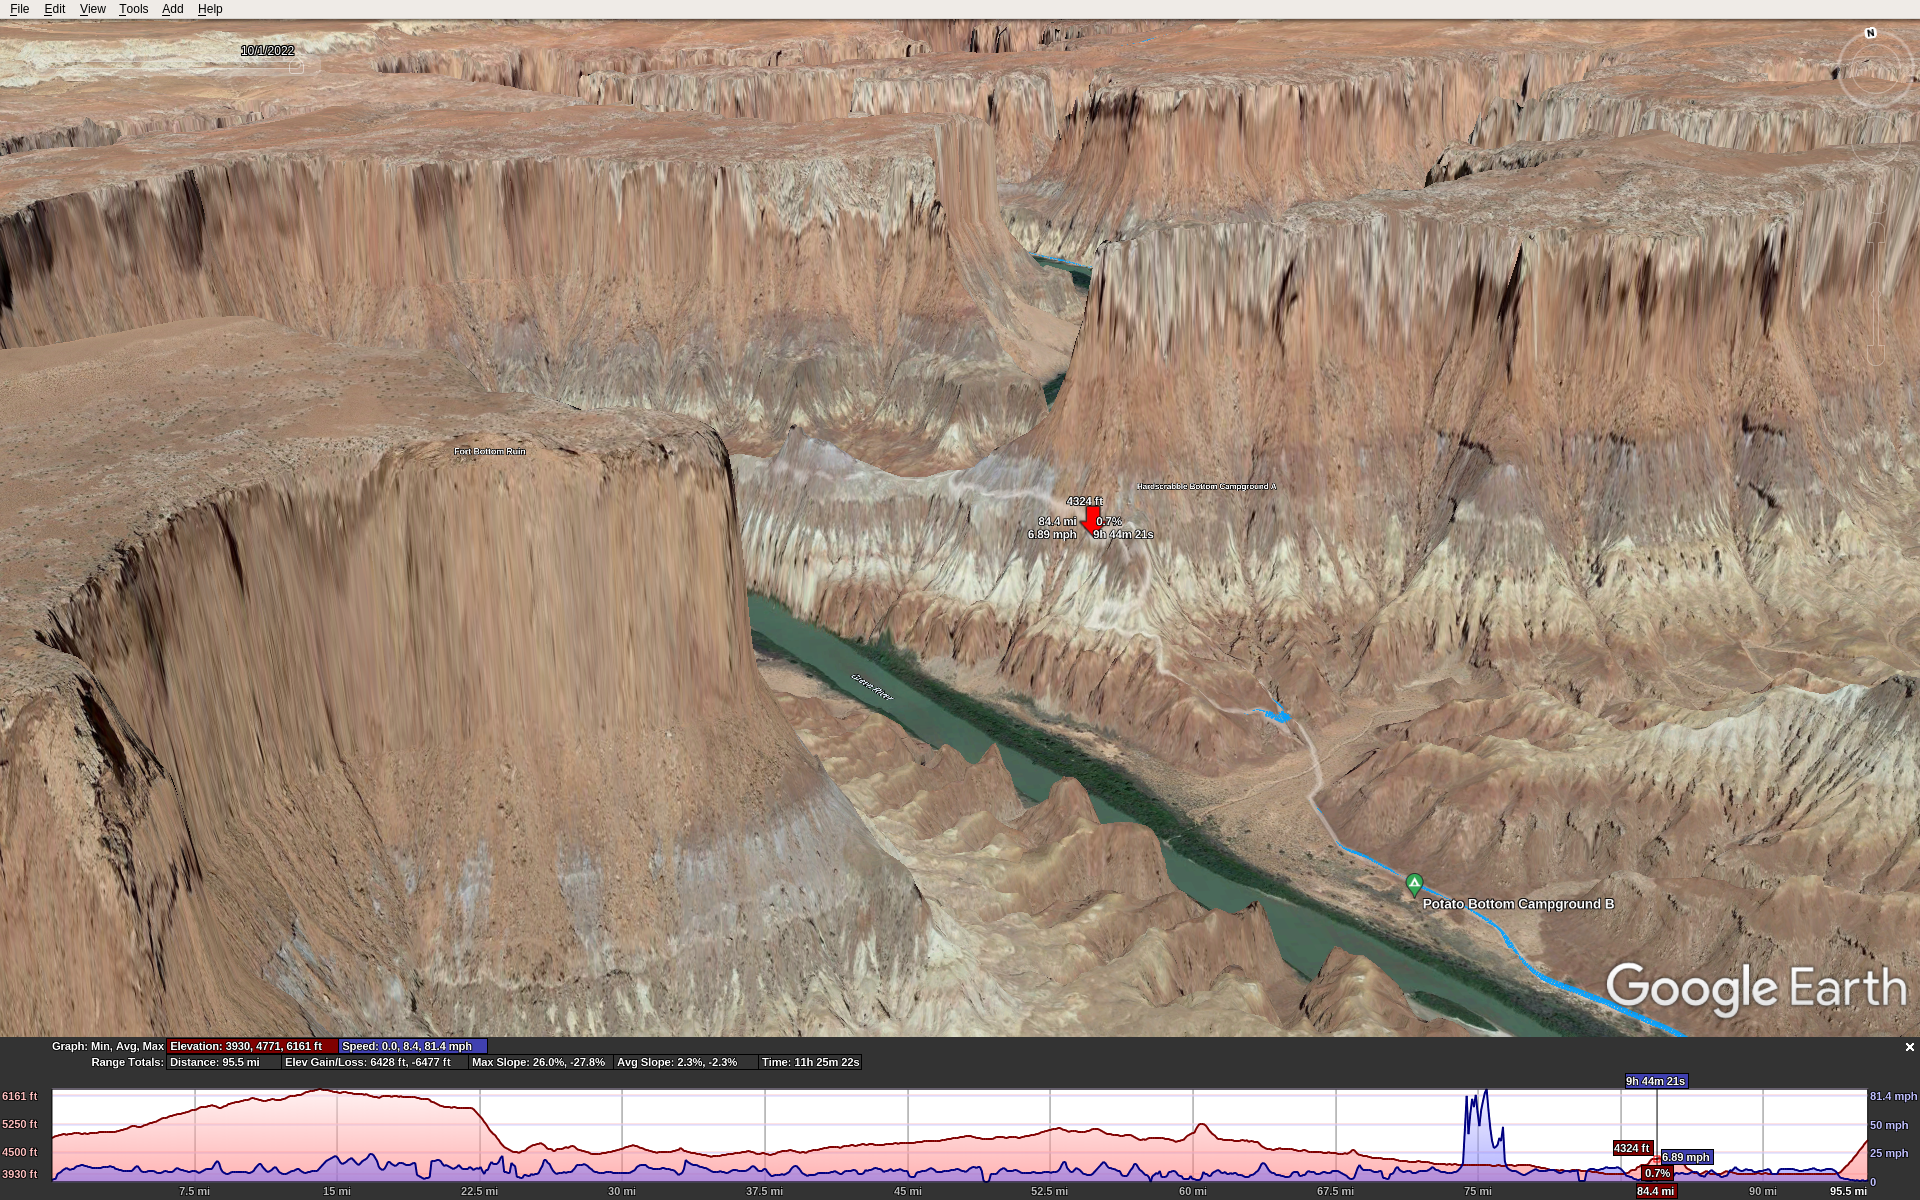
Climb 2, Hardscrabble Bottom, the up side:

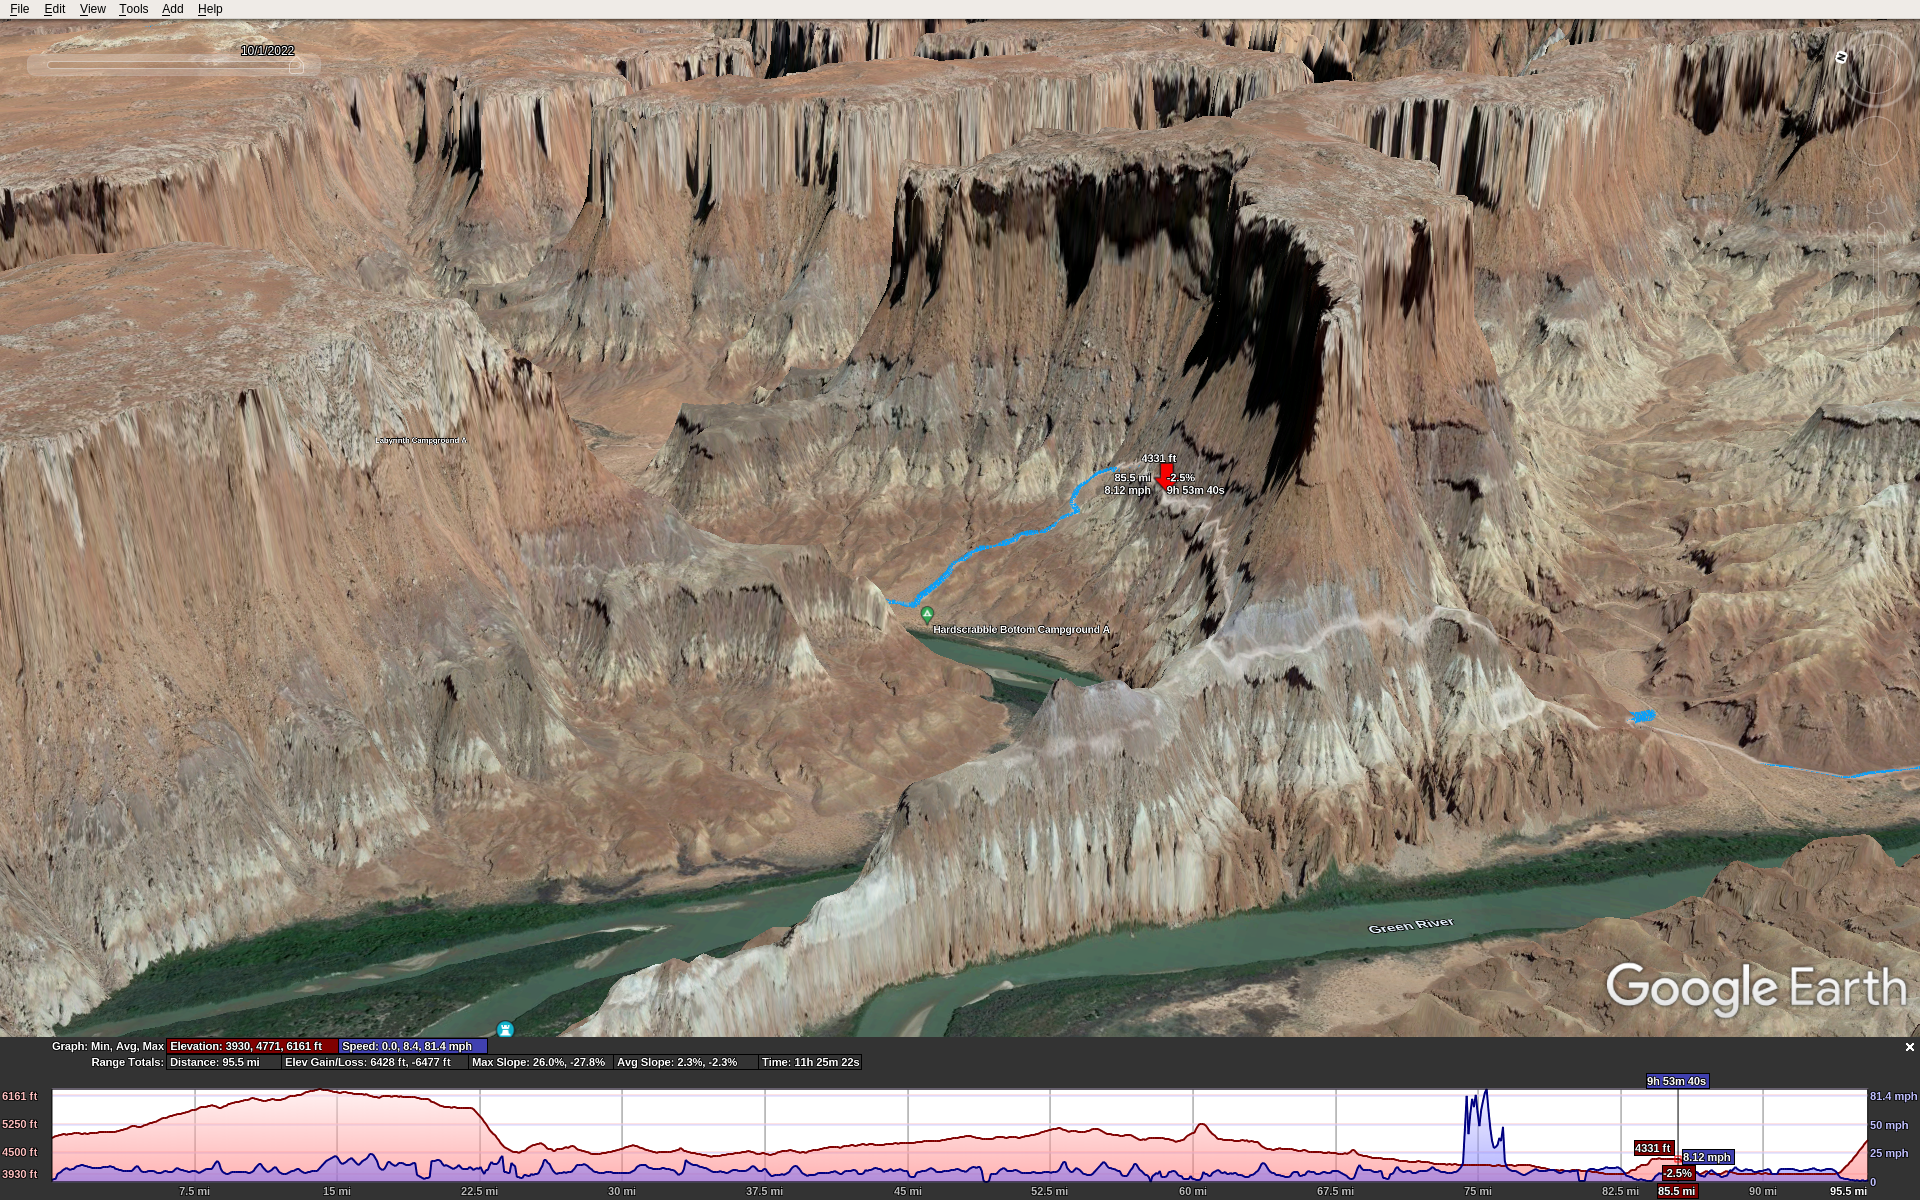
Climb 2, Hardscrabble Bottom, the down side:

We went clockwise starting from the NW corner of the route: the parking lot and toilet just at the top of the Mineral Bottom Climb. This means starting with a 12 mile dirt/gravel road ride that gradually climbs about 1200′, then turning right onto the paved road that runs into the park. Total distance to the Shafer descent where you enter the canyon trail is about 20 miles. Then you ride another 79 miles along the White Rim Trail, and then climb up Mineral Bottom back to where you started. It’s about 1000′ in 1 mile.

The east half of the ride is easier than the west half. It’s just a bit flatter, less sand, less rugged & technical. So the drawback of the clockwise route is that the toughest riding is in the second half of the ride. However, the Mineral Bottom climb, as tough as it is, isn’t quite as rugged or long as the Shafer climb.

Getting There

I flew from Seattle into Moab in my C-172, Stefan drove from Boulder, and we met at the Moab airport KCNY. We stayed at the Moab Apache Inn. It’s not fancy, but it’s a good place with truly excellent service/management.

Sunrise was at 6:45, so that’s when we started. Temps in early Oct were in the mid-high 50s at the start and got into the 70s during the day. This was fortunate!

The Ride

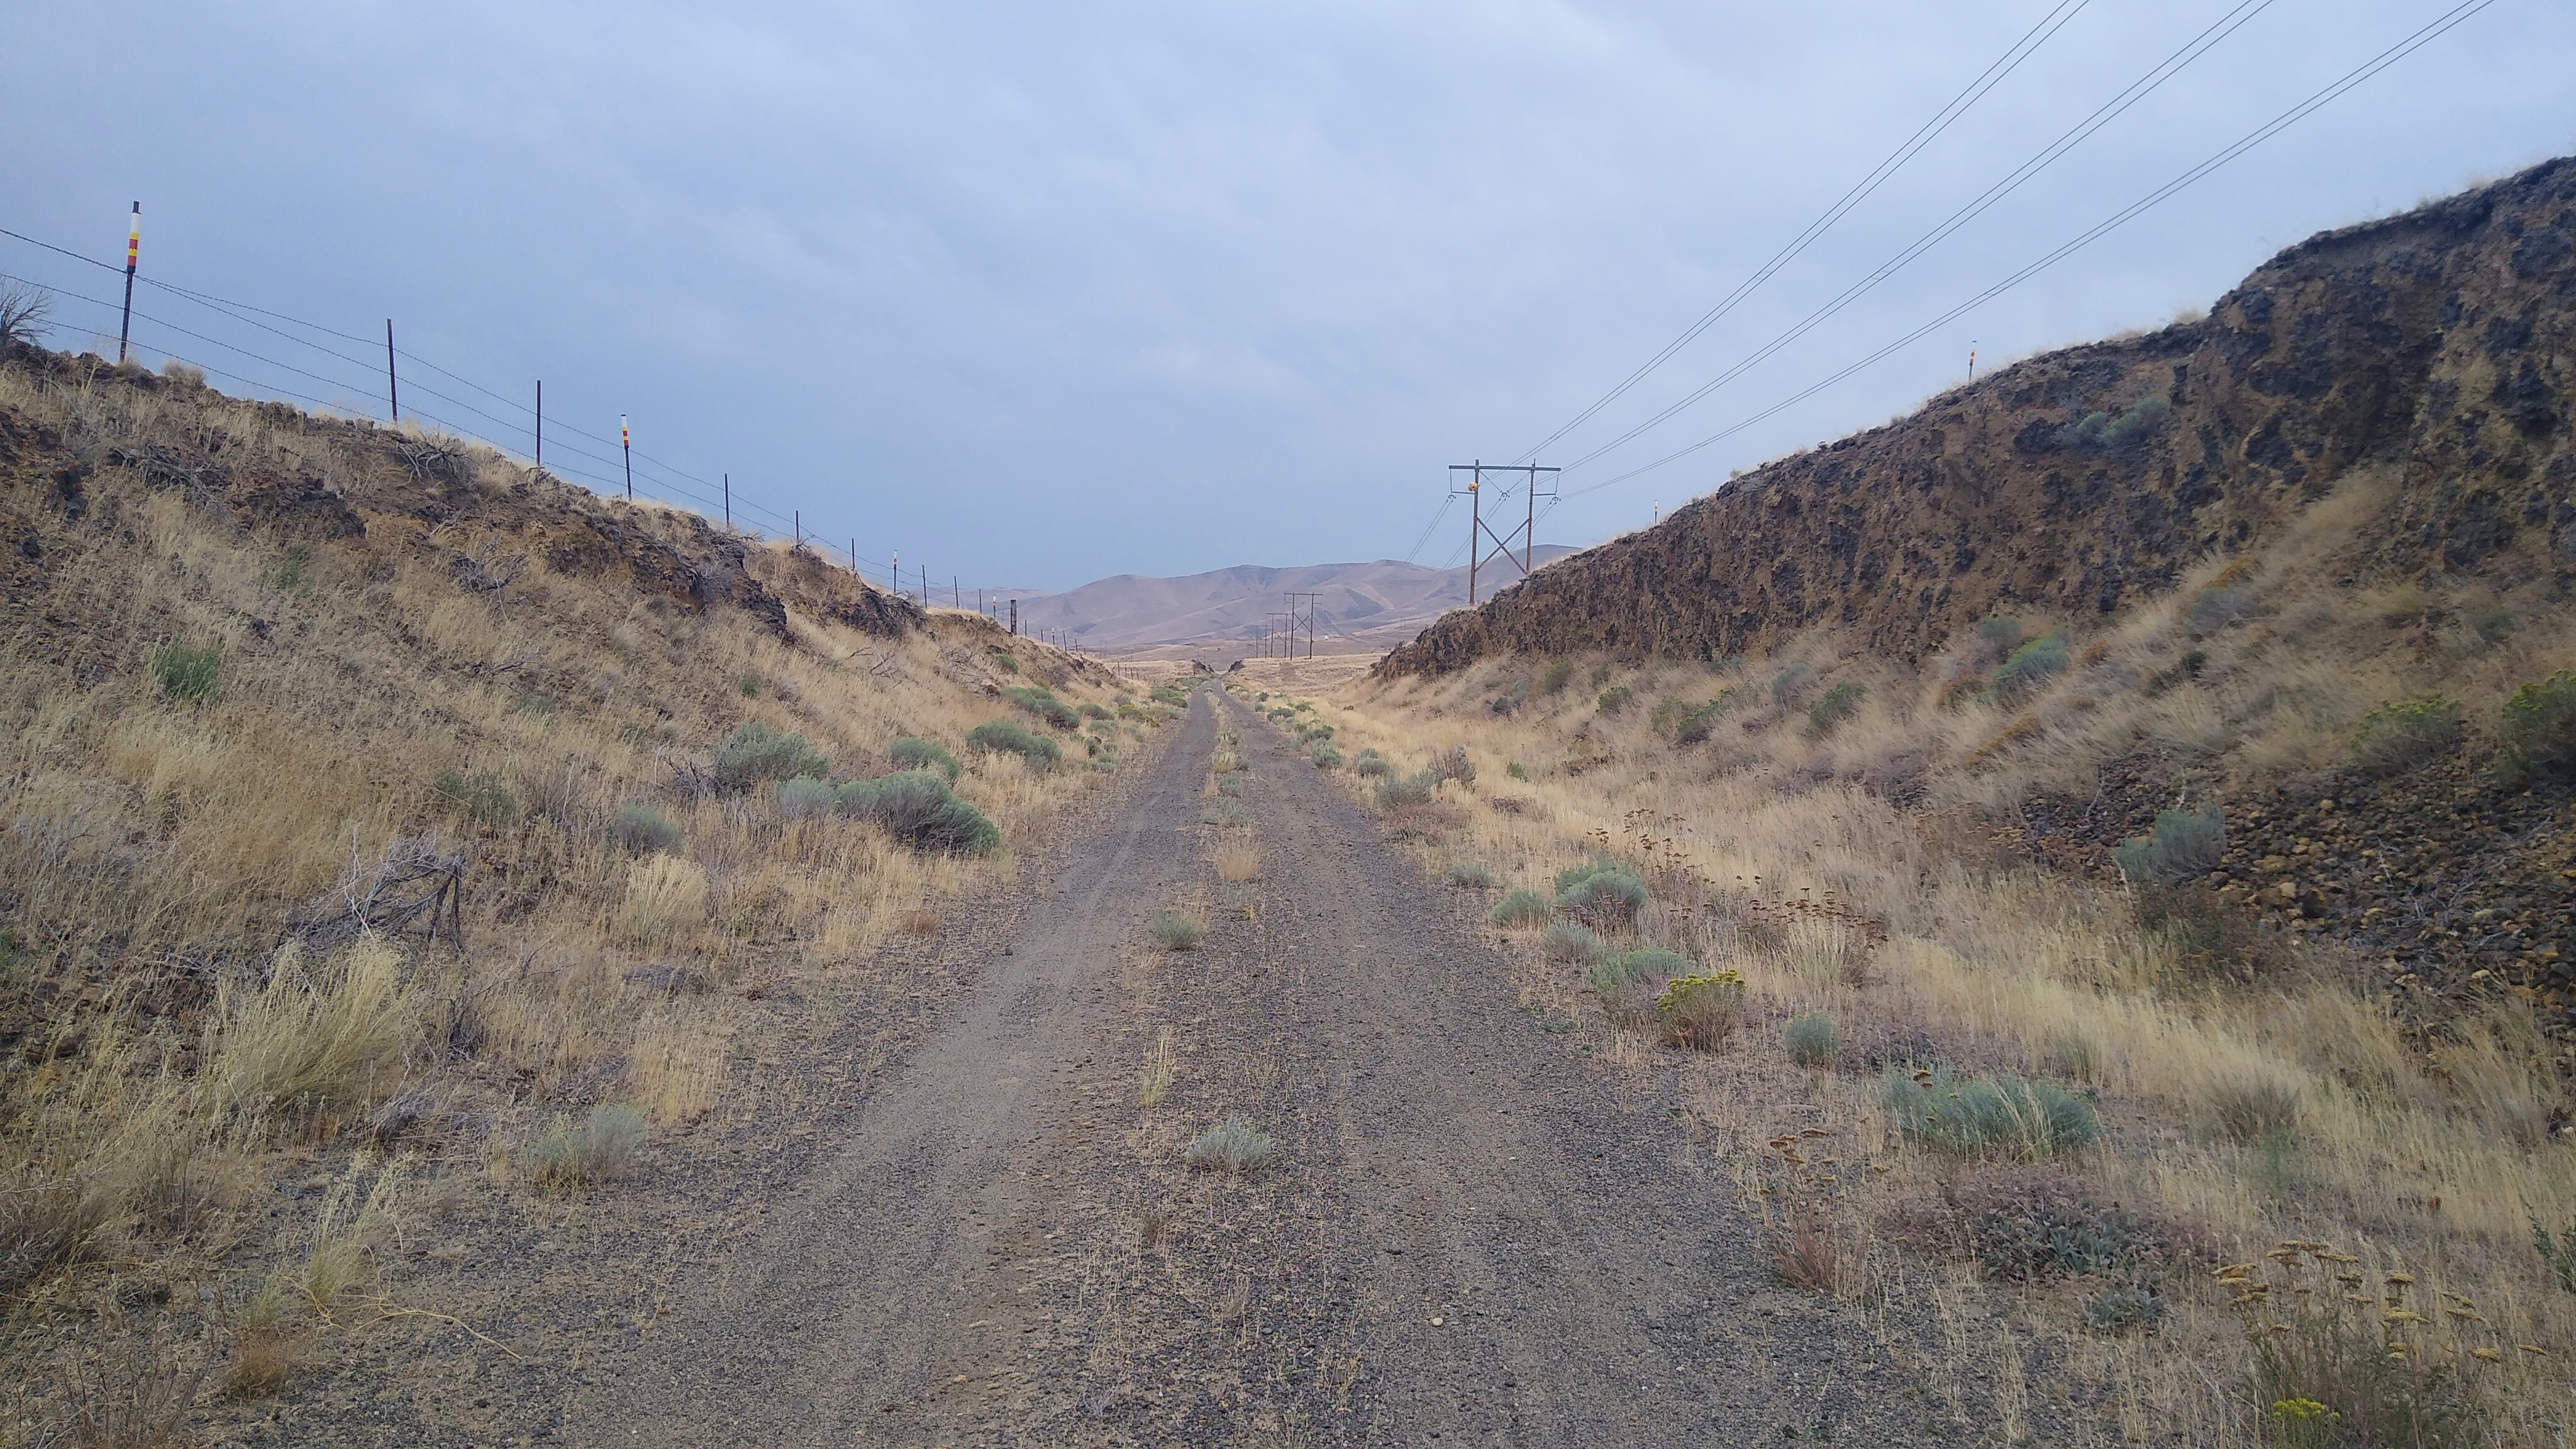
Our start point was at 4800′ MSL. The way we rode, we started along the dirt/gravel road on a long gradual climb. This was nice because it was cool out and the climbing kept us warm so we didn’t need to bring jackets that we would only doff later and carry all day. At mile 12 we reached the paved road (Hwy 313) which is near the peak elevation of about 6000′. We turned S towards the park. After entering the park, a short distance more put us at the top of the Shafer grade with 20 miles on the odometer.

The Shafer descent is just rugged and steep enough to keep you on your toes. If you slide out and miss a turn it could lead to a fatal fall. It was no problem on my full suspension bike but you would not want a gravel bike or skinny tires. It’s incredibly scenic. A short distance and about 1000′ of descent later, you’re in the canyon on the trail. To call it scenic is a grave understatement. It’s stunning.

Here (red marker) is where we had lunch, around mile 55:

For the next 43 miles or so you ride along the rims of canyons, weaving in and around following the contours. Then you reach one of the big steep climbs at Murphy Hogback Canyon. Some parts of this are too steep to ride. It just goes up and up. The top levels off for less than a mile then you go down an equally steep opposite side.

The next 20 miles or so is a gradual downhill, but don’t let the word “downhill” fool you. It’s got long sections of soft sand which sucks down tires, forcing you to pedal hard at slow speed despite the downhill grade.

At this point I encountered nutrition difficulties. I brought Kind bars to eat throughout the day, because they are low sugar and worked great for me in all-day rides over the years. Yet starting around mile 65 I couldn’t keep them down; as I ate them I got a strong urge to barf them back up, so I had to stop eating them. Fortunately, Stefan had some spare Fritos and I had no problem eating those. I never considered chips to be an ultra-endurance food, but sometimes during adversity we learn new things about ourselves. In hindsight it makes sense: Fritos are simple carbs (but no sugar), plenty of salt, and calorie dense. I don’t think the problem was electrolyte loss because I had Nuun mineral tablets in all my water.

Then you reach the second big climb, Hardscrabble Bottom. It’s every bit as tough as the Murphy Hogback climb, ultra steep with some sections too steep to ride. Ride along the top for about 2 miles or so, rolling up and down varying from decent to rough technical conditions. Then back down the other side takes you to around 4000′ MSL about the level of the Green River.

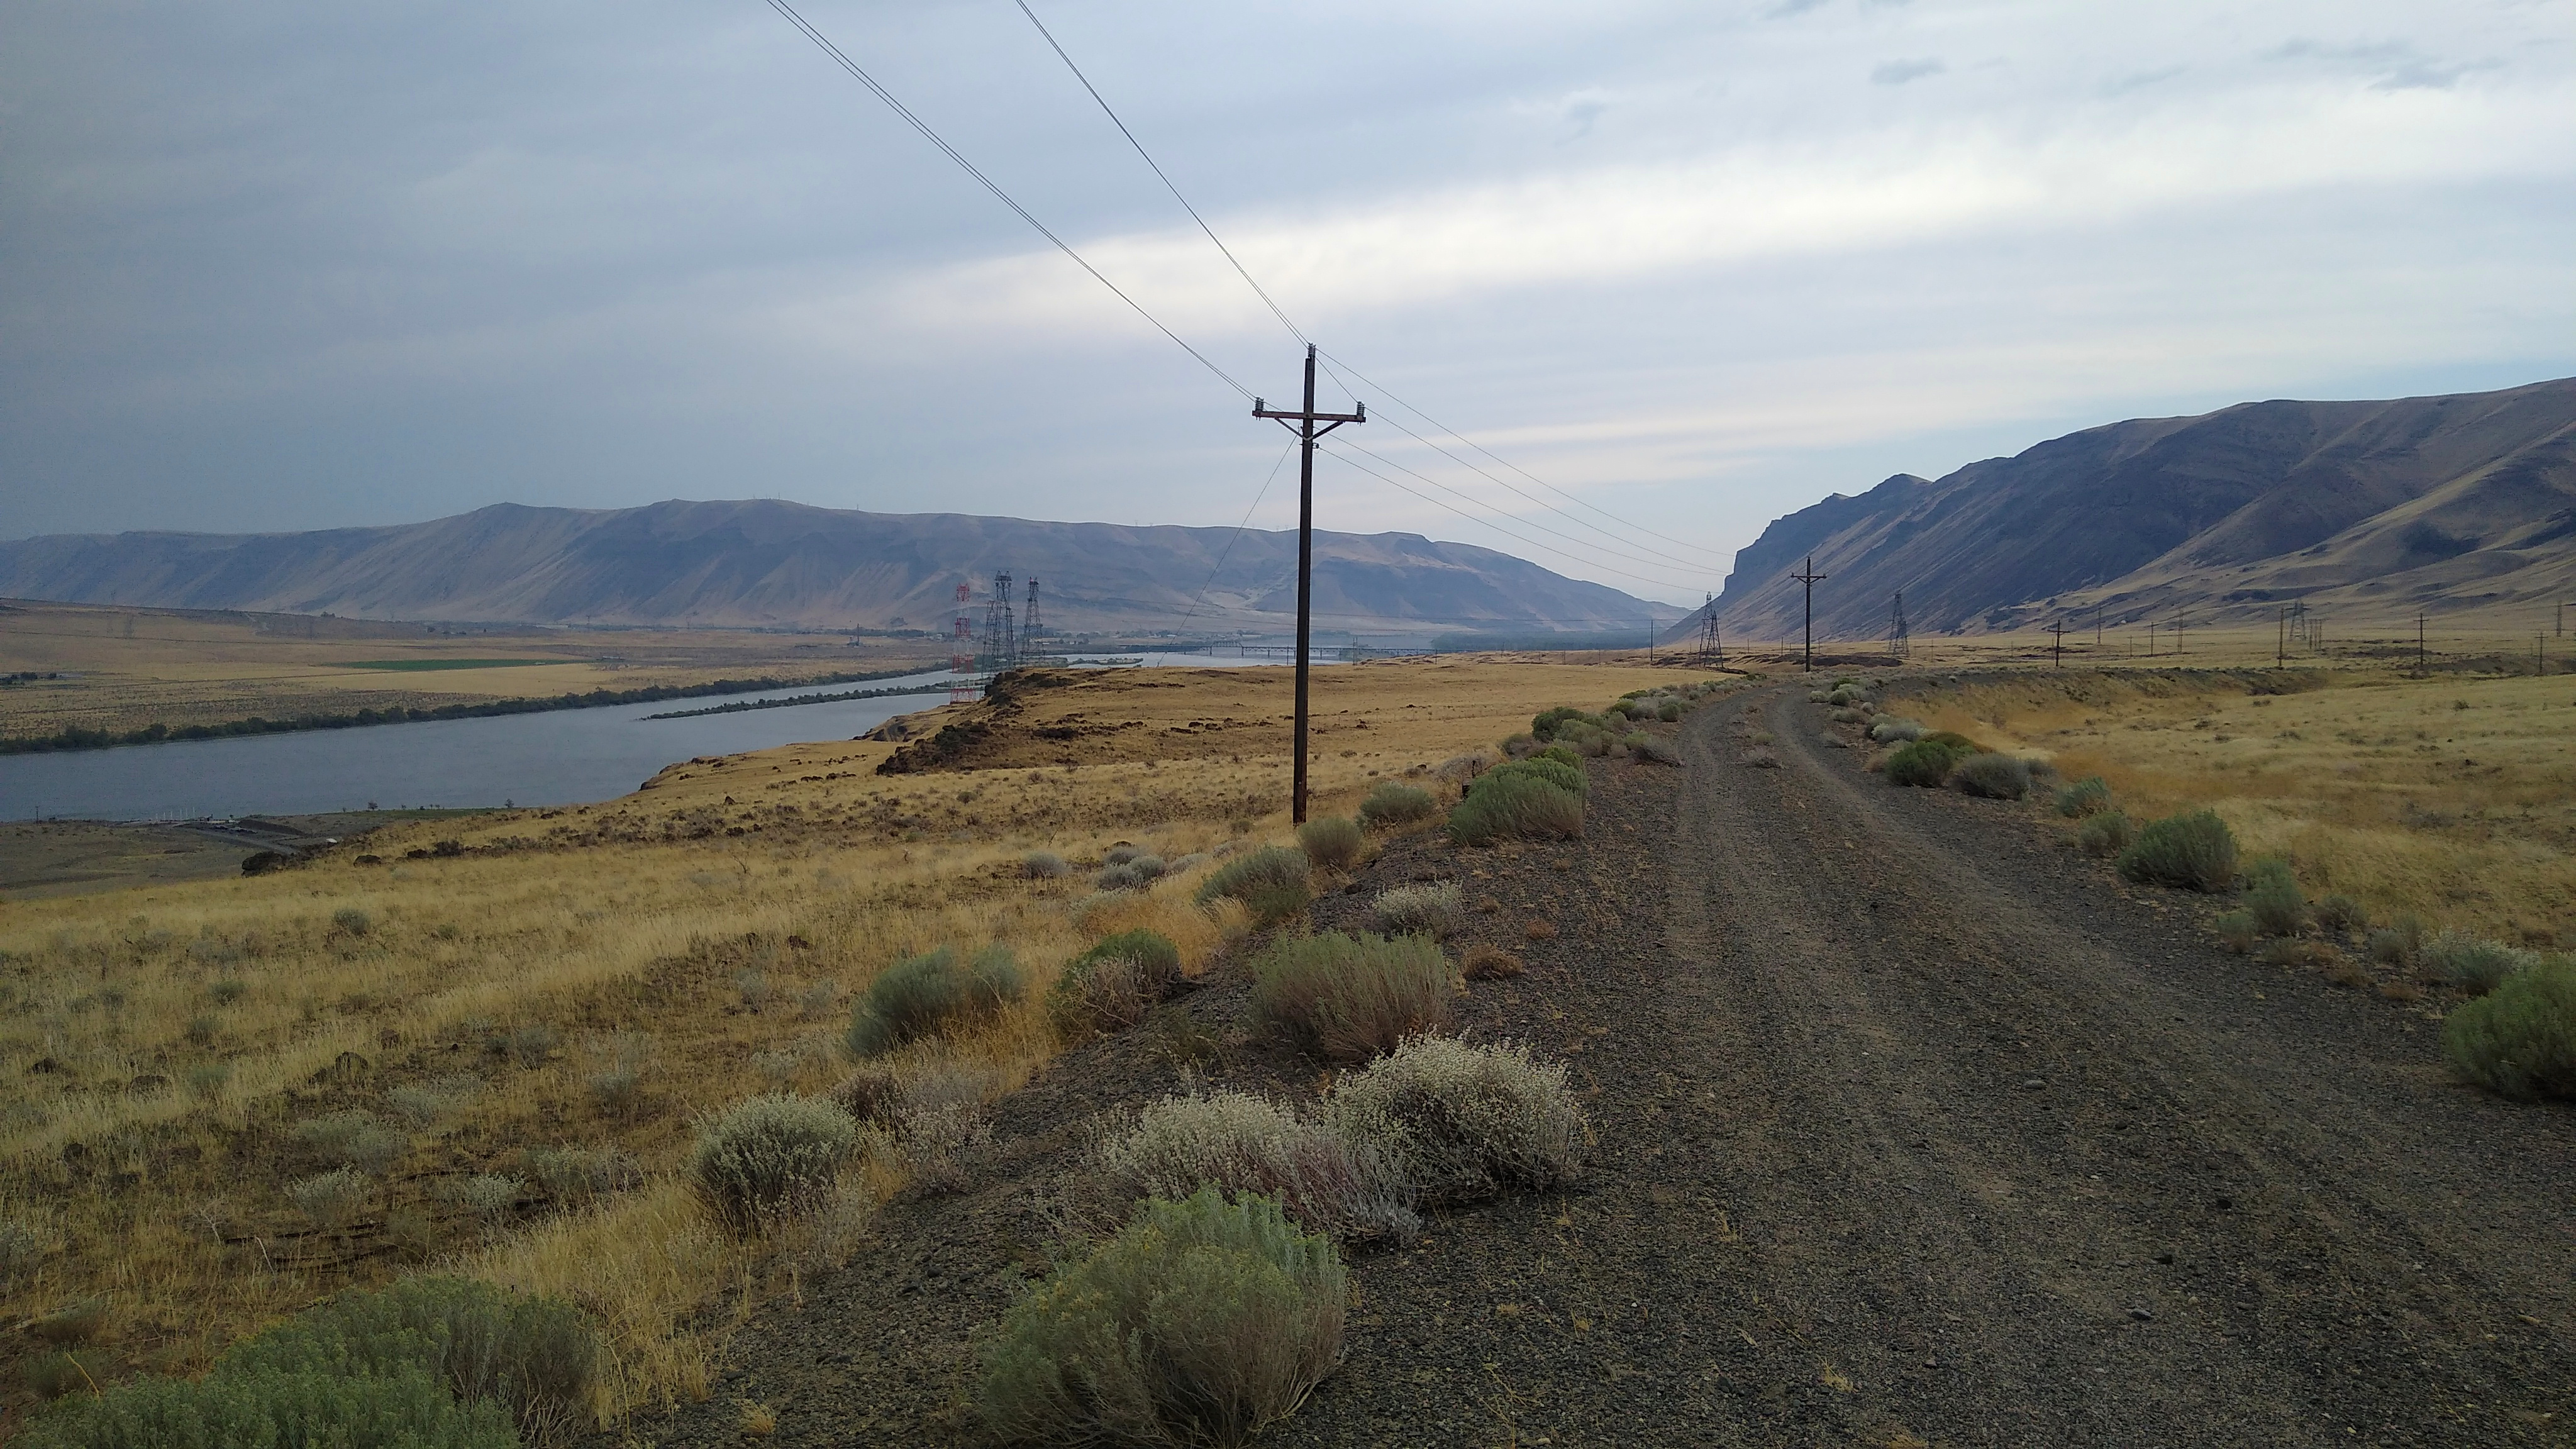
Now ride along a decent quality trail following the Green river for about 15 miles or so, mostly flat. Then around mile 99 you reach the right turn to go up Mineral Bottom. Only 1 mile to go, but it’s very steep, nearly 1000′ climb.

At the end of the ride I didn’t feel right – eating or drinking would have triggered vomiting. I think it was temporary over-exertion because over the 1st post-ride hour I slowly sipped 12 oz of water and kept it down, and over the next hour I felt fine. An hour later we ate a big dinner in town, no problem.

Conclusion

WRIAD was a bucket-list ride for me. The preparation and execution consumed nearly a year of my life. I got into the best physical condition I’ve ever been, similar to doing La Ruta over 20 years ago. Even so, it was one of the toughest rides I’ve ever done, if not the very toughest. I’m pretty sure I’ll never do it again, but big rides like this come with satisfaction and confidence equal to what you put into them. Thanks Stefan for suggesting this one! It was an epic adventure.

John Wayne / Palouse Trail, Columbia River, Beverly Bridge

For years I’ve thought about riding this trail from Seattle to Idaho. This presents 2 challenges. First, how to cross the Columbia River? The bike/walk bridge south of the I-90 bridge was condemned and closed, and there is no other way to cross the river on foot or bike. Second, it’s over 300 miles which means multiple days of planning, logistics to get back home, and availability of hotels/motels east of Othello is virtually non-existent, and camping would mean carrying a bunch of extra gear.

The WA state Dept. of Transportation solved the first challenge. They rebuilt the Beverly bridge and it re-opened earlier this year. This put the trip entirely into my own hands.

Planning: A Short Route

A short route of only 1-4 days out and back seemed the simplest approach. I planned trip legs from Seattle to Idaho, each day covering 60-80 miles. Since there is no lodging available east of Othello, that would be the eastern-most point for my short route.

Ellensburg to the Columbia River / Beverly bridge along the JWT is about 35 miles. And it’s another 38 miles to Othello. This gives 2 equal distance options:

1-day: Ellensburg to Beverly and back (70 miles). Just cross the river and return.

2-day: Ellensburg to Othello, stay overnight in Othello, then return the next day. 73 miles each day for 146 total.

I opted for the 2-day trip.

This would require overnight parking in Ellensburg. I discovered CWU has a free all-night parking lot at 18th & Alder. For lodging, I recommend the Othello Inn & Suites. Not fancy, but as I was soon to discover, they have very good service. East of Beverly the JWT requires a permit that I got here: https://www.parks.wa.gov/521/Palouse-to-Cascades. It’s free and you’re supposed to carry a hardcopy with you.

Due to unknown trail conditions, I figured on averaging 11 mph which would make 6.5 – 7 hours of cycling. I brought 124 oz. of water with Nuun tablets (all electrolyte, no sugar or calories). This consisted of my 100 oz. Camelbak bladder with a 24 oz. water bottle. For food, I aim for about 240 calories / hour. I had 18 energy bars (Kind bars with only 5 grams of sugar each), which should be enough for both days.

I also had fresh cycling clothes for day 2, street clothes, sandals, toiletries and a charger in my under-seat bag. And in my Camelbak I keep tools for just about everything that can break on the trail: spare tube (even though my bike is tubeless), pump, oil, multi-tool, derailleur hangar, and more.

The Start

It’s about a 2 hour drive from Seattle to Ellensburg along I-90. Upon arriving, I could not park at the CWU lot. It was inaccessible due to a bunch of street closures, due to a labor day weekend parade going through town. I found street parking nearby, which was not posted “no parking”, let along “tow-away”. Ellensburg is a small sparse town and parking is not hard to find.

I rode across town to find the JWT trailhead at the S end of Alder street. After waiting for a long line of parade horses to cross, I started pedaling E along the trail.

The bike, ready to go:

The JWT in Ellensburg is about 1600′ elevation. The first 8 miles or so is pretty flat. Then it starts a gentle, gradual climb to 2600′ about mile 18.

The JWT passed through a few houses and ranches, then got more remote. About 1 hour into the ride is a bridge crossing the freeway:

The trail surface varied between gravel and dirt, mostly hard packed and fast, with a few sections that were softer (sand or loose gravel) and slower, harder effort to overcome the tires sinking into the surface. I recommend having at least 45 mm wide tires, wider is better. My tires are Maxxis Ardent Race 27.5×2.2 or 584-56. They slid and sank a bit, but were manageable. I wouldn’t want anything narrower.

About 1 hour later I stopped for another bite and took a few more photos.

The trail:

The bike:

The rider:

Columbia River / Beverly Bridge

Leaving Ellensburg, the JWT climbs from 1600′ to a peak of 2600′ at about mile 18. From mile 18 to mile 35, where you reach the Columbia River, it gradually descends to about 500′. That’s a 17 mile gradual descent, very fun going East, especially since prevailing winds are from the West, and today was very windy, 20-30 mph. When the trail turned N or S, the wind gusts would exceed my tire traction and start blowing me across the road! But it was mostly a tailwind.

30 minutes later, or about 2.5 hours into the ride, I got my first glimpse of the Beverly bridge in the distance:

Still feeling great!

The bridge closer up, ready to cross:

It’s about 1/2 mile across and the wind just rips down the river, so one is riding in a straight line while leaned over. Looking back after crossing:

Beverly is not much of a town. No motels, no stores. Just a few residents who drive to nearby towns for any services.

My Bike Breaks (again)!

I continued East for another 15 miles. Then, upon reaching mile 50, my pedals suddenly felt like they hit something. I backpedaled a bit then they worked again. I figured a small rock jumped up into the chain and hit the derailleur. But then the derailleur wasn’t shifting right either. I stopped to check it out.

Long story short: the bike’s rear axle snapped in half! It has a through-axle, and the hub axle (12mm inner diameter) snapped in half, while the quick release (12mm outer diameter) that goes through it was still in 1 piece. The derailleur hanger’s end stop was also sheared off, so the derailleur was trying to swing forward. I had a replacement hanger in my bag, but I couldn’t install it because the inner bolt that secures the derailleur to the hanger, which looked like an allen, was actually a torx, which I didn’t have. I was able to jerry-rig it in place with the “b” screw. I was also able to line up the broken halves of the axle and reassemble the wheel with the quick release holding it all together. The wheel spun properly with no play, the freewheel worked, it was rideable. Of course, the broken axle put the quick release shaft under greater stress, and with both the axle & derailleur MacGyvered, I knew it wouldn’t be many miles before one of them broke permanently. At that point I would be walking.

Othello is a real town with some services, but it was 25 miles ahead. Beverly has nothing, but it is only 15 miles back. I opted to go back. That was one of the longest 15 miles I’ve ridden: into a 20-30 mph headwind, on soft dirt/gravel, anticipating the sudden snap of the quick release or derailleur breaking, at which point I would be walking.

Along the way back, I finished the 100 oz of water in the Camelbak and switched to my water bottle. I arrived in Beverly around 2:45pm. At least my phone worked (thank you T-Mobile!). First I rode by the fire dept. but nobody was there. Then I stopped by the residence of some locals and asked them about services. No Uber, no Lyft, nearest taxi service is in Pullman. I called Othello to cancel my room, told them what happened. Due to my circumstances, they waived the cancellation fee. I called my wife in Seattle and she agreed to drive all the way out there to pick me up, as a plan B if I couldn’t wrangle a ride from locals. At the residence, the dad (Reynaldo) who only spoke Spanish gave me some water and his son (Jerry) was talking to me about my bike. It looked like they were just relaxing for the afternoon, not too busy, and he had a small pickup truck, so I asked the dad if I could pay him to drive me to Ellensburg. He said sure, as long as I paid for the gas. I told him thanks, and also I’d pay him $100 too for his trouble. So Reynaldo, Jerry and I drove back to Ellensburg and they dropped me off at my car.

So that’s why I rode only 65 miles instead of 146 this weekend. And got stranded by my bike breaking in yet another new way.

The Aftermath

The route, with elevation profile. The red marker is the peak elevation (2600′).

The broken axle

The sheared derailleur hanger

The new axle that Reynolds shipped me a year or two ago (it came with the pawls I had to replace), which doesn’t fit because it’s made for traditional quick-release not through-axle.

New Bike Day!

Summary

I’ve been riding the same road bike for over 20 years. I decided it was finally time to get a new road bike. My research and prior experience led me to pick a Fezzari Empire.

20211025_121845.jpg

20211031_123620.jpg

The Old: Trek 2200

I bought this Trek 2200 back in 2000. Aluminum frame, Shimano 105, Rolf Vector wheels. The reason I’ve been riding it for so long is because it’s such a great bike. Over the years I’ve serviced (cleaned & repacked) every bearing (wheels, headset, bottom bracket), replaced the chain & rear cassette (wore out a couple), and of course gone through several sets of tires & brake pads. I’ve also had to rebuild the wheels due to failed spoke nipples. What’s most surprising about this bike is that everything else is still original: frame (of course), hubs, rims & bearings (serviced but never replaced), front chainrings, shifters/brake levers, even cables!

Early on, I installed a suspension seat post because this Al frame is so rigid you almost need a mouthpiece to ride it <g> This helped quite a bit, though it needs to be disassembled, cleaned and re-greased every year. I also replaced the original 12-25 cassette with an 11-28. Otherwise it’s bone stock. The bike weighs 21.5 lbs. ready to ride pedals and all.

Why?

Why get a new bike, especially if this one is so great?

  • Gearing: the Trek’s original lowest gear was 39-25 or 1.56:1, about 41.2 gear-inches. This always felt a bit high, even when my legs were 20 years younger. The front crank BCD doesn’t allow a smaller front chainring. The rear derailleur can take a max 28, so when the cassette wore out I replaced it with an 11-28, giving a 12% lower first gear, 1.39:1 or 36.7 gear inches. This helped but still I’d prefer a lower 1st gear, which is impossible with this bike. While keeping the same top gear (52-11, or something close to that).
  • Comfort: the Trek is so rigid I installed a suspension seatpost. I’d like a bike that is just as efficient yet naturally more compliant. And the Trek has racing geometry with a steep fork angle and short 38″ wheelbase. This is responsive yet twitchy. I love the handling of our Santana tandem, which is more stable and relaxed. It doesn’t slow us down in the twisty curves.
  • Performance: who doesn’t want higher performance? Better aerodynamics and lighter weight. And better brakes.

What?

Once I articulated the reasons why, I could now start to define what, or derive requirements:

  • Carbon frame: the ultimate for efficiency, compliance, and weight
  • Carbon wheels: enables deeper aero profile without adding weight
  • Disc brakes: necessary for carbon wheels
  • Mechanical shifting: because electronic is an expensive solution in search of a problem that doesn’t exist

Mechanical shifting was hard to get in bikes with carbon frames & wheels. So I had to consider the requirements as guidelines. I found the following bikes that meet most of these requirements.

CompanyModelPriceFrameWheelsGroupset
CanyonEnd CF SLX Disc 8 eTap$6000CarbonCarbon Reynolds AR41SRAM Force eTAP
TrekDomane SLR6$6800700 OCLVAeolus CarbonUltegra Manual
CannondaleSynapse Carbon$4400CarbonFulcrum AlloyUltegra Di2
GiantDefy Adv Pro 2$4550CarbonSLR-2 CarbonUltegra Manual
FezzariEmpire Elite$2900CarbonDT E1800 AlloyUltegra Manual
FezzariElite Race$4300CarbonVision SC40 CarbonSRAM Rival eTAP
FezzariCustom$4100CarbonVision Metron 40 CarbonUltegra Manual

Fezzari had the least expensive bikes, $1500 to $2500 less than comparable alternatives. The closest/best alternative was the Giant. Yet they were backordered for 6+ months and have only a 2 year warranty. Fezzari had a lifetime warranty and estimated delivery at 8-10 weeks. Fezzari didn’t have exactly what I wanted, but I called them and they could do the custom bike described in the last row of the table. Take the “Elite” model with Ultegra manual, and replace the Swiss DT E1800 alloy wheels with Vision Metron carbon (bottom row of the table). A full carbon bike with the same wheels Peter Sagan used in the Tour de France for $4100 is an unbeatable value.

Fezzari Experience

Past

7 years ago I bought a Fezzari mountain bike, their top of the line model called the Timp Peak. Carbon frame, 27.5″ Reynolds carbon wheels, dual suspension (Rock Shox Pike front, Fox CTD rear) with remote, SRAM XX1 groupset, carbon handlebars, hydraulic dropper seatpost. It cost about $6300, where comparable bikes from Trek and Cannondale were around $9k. I rode it on some big rides: Kokopelli’s trail (Bikerpelli), all around Boulder CO, the Oregon Trail Gravel Grinder, and local rides like Tiger Mountain. Over the years it has proven to be a fantastic bike. But nothing is perfect.

When it first arrived, some of the frame’s accessory attachment points had their thread barrels spinning freely inside the frame; they had delaminated. Defective frame, no way to fix it, I sent it back. Fezzari handled it well, paid shipping both ways and did some other minor mods to the bike for me. But it did cause a 5 week delay in getting the bike.

This is a fantastic bike: light (27 lbs. with heavy knobby tires, 25 lbs. with gravel tires), efficient, full suspension, totally rugged and durable. Yet it hasn’t been perfect. Here’s a summary of issues, excluding normal maintenance. Details here:

  • The brake levers (SRAM Guide) developed the “sticky brake lever” problem where the internal pistons expand and get stuck tight inside the lever cylinders. First, I disassembled them and ground them back down to size. But a few months later the problem recurred. Then I replace them with aftermarket metal pistons — problem fixed for good.
  • The rear hub’s internal freehub pawls sheared down and had to be replaced. This stranded me in the middle of the Moab desert. I got the pawl & driver rebuild set from Reynolds and did this.
  • The rear carbon rim delaminated and Reynolds replaced it under warranty. They sent me a replacement rim and I rebuilt the rear wheel. This actually turned out to be an upgrade as the new rim is nicer than the old one.
  • The rear hub shell distorted from the pawl pocket forces when climbing hills. Reynolds would not warranty this defect so I bought set of new DT350 hubs and rebuilt the wheels.

Observe that none of these problems are due to Fezzari. Their frame has been solid and has a lifetime warranty. And the overall setup: geometry, components, etc. all works together well. Over the years I’ve emailed Fezzari a few questions, they always are responsive and helpful. Because of this, I felt confident getting another bike from them.

Present

Pre-Order to Delivery

I placed my Fezzari Empire order on July 20. One difference I noted is that 7 years ago, there was no tax or shipping. This time there was, which added up to about $500. Even so, it was still a good deal so I paid a 20% deposit to reserve a bike when parts became available. I was skeptical of their 8-10 week delivery estimate, due to COVID related supply chain disruption, but it’s faster than any other bike company was offering, and it is refundable.

A month later Fezzari slipped the delivery estimate from mid-late-Sep to late-Sep-early-Oct.

On Oct 11, Fezzari called to say the frame and parts were in stock and they were ready to build my bike. This was 2 weeks after the original delivery date.

A few days later they called to say the Vision Metron 40 wheels did not fit the Ultegra parts for my bike, but they had SC40 wheels that did fit. What’s the difference between Metron 40 and SC 40? They’re mostly the same, both carbon rims with 40mm depth, bladed straight-pull spokes with brass nipples, and disc brakes.

Differences between Metron and SC:

  • Metron 40 wheelset is 30 grams lighter
  • Metron 40 has 3 fewer spokes on the front wheel (21/24 instead of 24/24)
    • Note: this probably accounts for the 30 grams
    • Note: I want that extra spoke more than the 30 gram weight savings
  • Metron 40 has preload adjustable hubs
  • Metron 40 is about $750 more expensive ($1800 vs. $1050)

However, the price Fezzari quoted me was only $200 cheaper. Why? They said the difference is based on the prices they pay, which are different from the retail prices.

Even with the price discrepancy it was still a great value, so I said OK.

On Oct 20, Fezzari said the bike is ready to ship, so I paid the rest of the invoice. They gave me a tracking #. My new bike was on its way!

Delivery and Inspection

After some FedEx delays, the bike arrived on 10/25, 1 day short of 14 weeks since I ordered it. That made it 4 weeks late. I didn’t think that was too bad, considering what’s been happening with supply chains and shipping lately.

I’m an experienced bike mechanic and wheel builder, so you know I checked it out from top to bottom.

Tires

It comes with Maxxis High Road 700×28 tires. They’re decent tires but too wide and heavy for my road bike preferences. But 700×28 is the tire size I use on our tandem, which needed a new set of tires. So I was going to install these new tires on the tandem and replace them with a new set of Continental GP5000 700×25 tires.

As I removed the tires from the Empire I noticed it was set up as tubeless. Fezzari does this optionally for customers who want it. I didn’t want it or ask for it. Tubeless is great for mountain bikes since you can run much lower pressures to get better traction. But it has no benefit on road bikes, where I prefer to run clinchers with latex inner tubes. This is simpler and cleaner with no sealant mess or hassles. I wonder if one reason the wheels were more expensive than expected is because they charged me for a tubeless setup that I never asked for?

Anyway, converting to clinchers with latex tubes was quick and easy, and the new tires were great on the tandem.

Front Wheel

As I reinstalled the front wheel, I heard a quiet rustling sound as it spun. Sounded like there was debris inside the carbon rim. I removed the wheel, tire, tube and rim strip, and tapped the side of the rim with the palm of my hand all around its circumference to locate it. Using needlenose pliers I fished a wad of scotch tape and a small rubber grommet out from inside the rim, through a spoke hole. I reinstalled the tire and wheel, it was dead quiet now, perfect and ready to ride.

Rear Hub

As I removed the rear wheel to replace the tire, I noticed that the through-axle was very loose, not even finger tight. As were the axle nuts. As I turned the axle nuts finger tight, the cassette locked up and would not freewheel! I loosened the nuts and it freewheeled normally. Something was wrong with this hub.

Long story short, the hub was improperly assembled without a critical part. It was missing the spacer that goes on the axle, between the hub bearing and the freehub/driver. This spacer bears the side load of the pressure from the axle nuts and through-axle, keeping the freehub/driver properly positioned. Without it, the pressure from the nuts squashed the driver body’s dust seal lip against the hub. There is no bearing here, as it shouldn’t make contact let alone bear a load.

Aha! I thought, this explains why the axle nuts and through-axle were so loose. Whoever assembled this bike must have noticed that the cassette would not freewheel when the nuts were tight, so instead of troubleshooting the problem, they just loosened everything up until it could spin. This of course is improper and unsafe. It leaves the wheel so loose on the hub that it wobbles, and could damage the wheel, hub, derailleur, and even the frame, possibly locking up the rear cassette and causing a crash.

I contacted Fezzari and explained the problem, with photos. They agreed that was the problem and said they would look for a matching part. Meanwhile I called Vision, who makes the wheel. They confirmed that the wheel should have this spacer and they had some in stock. So I got Vision in touch with Fezzari. The next day I called Vision to follow up. They had not yet mailed the part to me, and their HQ and factory is just a few miles up the road from me, so I drove up there and picked it up in person.

Wheel fixed and ready to ride!

Derailleurs

The front derailleur was mounted too high, with at least 5 mm of gap between its outer edge and the big chainring. Shimano recommends a 1-3 mm gap. The smaller the gap, the better it shifts. I repositioned the derailleur and set its angle, cable tension, stop points, etc. Incidentally, with bikes these days using internal cable routing, there’s no way to easily adjust the cable slack tension, like the threaded barrels that bikes of old had. Shimano took care of that with a clever design, an adjustable pivoting derailleur cable clamp. I noticed that the 2 mm hex adjust screws were all pretty loose, likely to shift during rides, so I applied blue lock-tite.

The rear derailleur was OK but not quite perfect. The outer (smallest cog) stop was a bit too far in, so the chain occasionally jumped trying to get to the next bigger cog. Easy fix, no problem.

Wheels/Rims

After the 1st shake-down ride (about 13 miles including a 16% climb) the wheels settled and weren’t perfectly true. This is normal. I put them on my truing stand and took about 15 minutes to get them perfect. If my experience with the carbon wheels on my MTB is any guide, they’ll go a thousand miles before they need it again.

Inaugural Ride

After all of the above, the bike was ready for a real ride. I rode the Flying Wheels 45 mile route with a couple of friends. This includes cruising on the flats, plenty of steep climbs, and a couple of fast (50 mph) downhills. The bike performed great. Comfortable, fast, nice wide gear ratios, perfect quick shifting, and the brakes are powerful with good modulation. The handling is stable and confident, though more quick and responsive than the term “endurance bike” led me to expect.

The stock seat is high quality but a bit too wide for me personally. I replaced it with the Origin8 Axion from my old road bike. Incidentally, I saved 34 grams doing so (314 vs. 280 grams).

The bike weighs 18.7 lbs. ready to ride with Shimano PD-ES600 pedals. That’s decently light for a full carbon bike with the disc brake Ultegra groupset.

Ride report: this is a fantastic bike and everything I wanted and expected. And it looks clean with full internal cable routing.

Conclusion

The Fezzari Empire is a fantastic bike having great value and one of the best warranties in the business. However, while Fezzari’s customer support is quite good, their quality and safety checks are inconsistent. If the bike has issues, they will take care of you. But it may be up to you to figure that out. So make sure you’re confident doing quality & safety checks when the bike arrives, or you know someone who can.

Bicycle Tires and Efficiency / Rolling Resistance

Introduction

I’ve seen a lot of articles and videos about how “wider tires are faster”. This is incorrect. Yet like many commonly believed falsehoods, it springs from a thread of truth. It’s a misleading interpretation of how tires are tested for rolling resistance.

I’ll describe the testing and the truth of what it really means.

The Testing

This site has excellent info about bicycle tires: https://www.bicyclerollingresistance.com

Equal Pressure Testing

In many of the tests, wider tires have lower rolling resistance. However, in these tests they inflate the tires (both wide & skinny) to the same pressure. This is unrealistic and misleading, since nobody actually runs wide and skinny tires at the same pressure.

If you inflate a wide tire to the same operating pressure as a skinny tire:

  • You exceed the wide tire’s maximum pressure, which is unsafe.
  • The wide tire will be much more rigid and uncomfortable to ride, with poor traction.

If you inflate a skinny tire to the same operating pressure as a wide tire:

  • The skinny tire will be soft and sloppy, with poor traction.
  • You will get pinch flats when you hit bumps.

So equal pressure testing is purely a theoretical educational exercise, completely useless for pragmatic purposes.

Equal Comfort Testing

Often, the tests inflate the tires to pressures that give the same yield or squish measured in absolute terms. That is, under the same load, the wide tire and the skinny tire both flatten or squish by the same fixed distance (say, 5 mm). This should make the tires feel the same when riding, hence the name “equal comfort”.

When tested this way, tires of different widths tend to measure the same rolling resistance. That is, all else equal (same brand/make of tire, same load, etc.). So one could say that width doesn’t matter.

However, in order to make the yield distances the same, the skinny tire must be underinflated, and the wide tire overinflated, relative to each other. This is a variation of the same mistake that the equal pressure test makes: inflating the tires to pressures you would not actually use when riding.

So, like the equal pressure test, it is interesting and educational, but impractical.

Proportional Displacement Testing

Another way to test tires is to inflate them so that each tire yields or squishes a distance proportional to its width, under the same load. 15% is a typical value, so a skinny 23 mm tire squishes .15 * 23 = 3.45 mm, while a wide 32 mm tire squishes 4.8 mm.

Not coincidentally, the pressures that give this result are near or equal to each tire’s recommended operating pressures. This makes the test representative of actual real-world conditions. And not surprisingly, this testing shows that skinny tires have less rolling resistance than wide tires (all else equal).

But Wait, There’s More!

So when we inflate tires to the recommended pressures, what exactly are the characteristics that depend on tire width?

Wider tires…

  • Have more comfort
  • Have more traction
  • Have higher weight
  • Have higher rolling resistance

Another factor in rolling resistance is compliance: does the tire absorb uneven road surfaces, or does it transmit it through the wheel & frame? On rough surfaces, more compliance is not only smoother but also faster. So the ideal tire width and pressure depends on the surfaces (trails or roads) that you ride on.

Conclusion

Key take-aways for cyclists:

  • Articles & videos saying wide tires are faster, are incorrect and misleading.
  • However, while wide tires are slower on smooth surfaces, the penalty may be smaller than you think, which could make it worth paying for increased comfort and traction.
  • For maximum speed, choose the skinniest tire that provides the comfort and traction that you need, for the surfaces you ride on.

The Ideal Road Bike

What is the ideal road bike?

  • Efficient (fast)
    • If you don’t care about this, you might as well ride a mountain bike as they can traverse any kind of terrain, roads or trails.
  • Comfortable
    • Comfort = fun, especially on long rides.
  • Handling
    • If you’re going fast, it needs to be responsive and predictable in the turns.
  • Brakes
    • The faster you go, the more important this is

Requirements

  • Gearing: wide range
    • A wide range is essential: at least 1:4 from low to high
    • Examples
      • My ’99 Trek had low 39-25 = 1.56, high 52-12 = 4.33, range = 4.33/1.56 = 2.78:1
        • This is not enough. The high is about right but the low is much too high
      • Modern: low 34-34 (1:1), high 50-11 (4.54:1), range = 4.54/1.00 = 4.54:1
        • This is great – much lower 1st gear and roughly the same high gear.
    • Modern bikes offer much smaller front chainrings which solves this problem
    • How many gears is irrelevant: 8, 9, 10, 11, 12, whatever.
      • This is marketing bullshit.
      • It’s the range, not the number of gears, that matters.
    • Electronic shifting is irrelevant.
      • Mechanical cable shifting has been perfected for decades and works perfectly
      • Mechanical doesn’t need batteries, is lighter, cheaper, more reliable, simpler, and user serviceable
      • Electronic shifting is a solution in search of a problem
  • Frame: carbon
    • Must be both stiff (efficient) and comfortable.
    • Aluminum is stiff but uncomfortable, transmitting vibration to the rider which gets painful and fatiguing on long rides
    • Steel is comfortable but too heavy, and it is not as strong or durable as people think
    • Carbon fiber is the best frame material: the efficiency of aluminum with the comfort of steel, and very strong and durable
  • Wheels: carbon
    • Must be stiff (efficient), light, and aerodynamic
    • Aluminum allow rims cannot be both light & aerodynamic – choose your poison
      • When you make them deep enough for good aero, they get very heavy
    • Carbon rims give the best of all worlds, and good ones have lifetime warranty
    • BUT Carbon rims
      • should not use rim brakes – poor braking and can melt the rims
      • should not use alloy spoke nipples – need to use brass to avoid redox
      • Make sure the spokes are exposed so you can true them without unsealing the tire
  • Tires: clinchers with latex tubes
    • Clinchers with latex tubes are faster and more comfortable than tubeless
    • Use the narrowest tires that provide sufficient comfort
      • Much has been said that modern tires can be wide without increasing rolling resistance.
      • This is incorrect, misleading and mis-interpreted: wide tires are not faster.
      • All else equal, a narrower tire run at its recommended pressure has less rolling resistance.
      • All else equal, a wider tire run at its recommended pressure is more comfortable
    • Don’t use tubeless tires.
      • Tubeless is great on MTB, where they enable you to run lower pressures without getting pinch flats. These lower pressures increase traction.
      • On road bikes, tubeless tires are neither faster (rolling resistance) nor lighter than tubed tires
  • Brakes: hydraulic disc
    • Rim brakes are a bit lighter, but less effective and can’t be used with carbon wheels
    • Hydraulic brakes are better than mechanical: lighter touch and self-adjusting

Maxxix Rambler Review & Road Test

Read here for background. I love my MTB, it is a fantastic bike with great knobby tires for rough technical riding. But for long gravel rides I needed a tire that is lighter with less rolling resistance. The Schwalbe G-One allrounds did not work, having multiple failures that made me walk back from rides. So I tried the Maxxis Rambler.

It comes in 2 styles: EXO/TR with 120 TPI, and Silkshield with 60 TPI. The latter is a bit heavier and more rugged. I opted for the former. They are size 650-47, which fits 27.5″ wheels. They have a directional tread pattern, but the directional arrows on the sidewalls are subtle and could be easily overlooked. They weigh 550 and 551 grams on my scale, which is a bit heavier than their specification. By comparison, the DHR/DHR weigh 900 / 820 grams respectively, and the G-One allrounds weighed 626 grams each. The 47mm width means you’ll probably have the widest tires of anyone showing up for that gravel ride. But it’s perfect for typical MTB rims; any narrower may cause problems with fit or tire shape. And for light weight and minimum rolling resistance, you don’t need it any wider.

They mounted easily on my Reynolds AR carbon wheels. I used 2.5 oz of Stan’s in each tire, and I also apply the sealant between the tire bead & rim. But they didn’t want to seat, not only requiring a compressor, but also removing the valve stem core to increase airflow volume. Once seated, fit & seal were perfect.

I rode them a couple of hundred miles, a mix of pavement & gravel. No flats or other problems, and I could feel that they were a bit lighter and faster than the knobby tires. I tried a few different pressures and ended up with 37 rear, 30 front being about ideal. After this initial success, due to their generous 47mm width, I wanted to test them on more rugged terrain, so I rode them on Tiger Mountain. That turned out to be a mistake!

Tiger is a steep, rugged, network of trails for intermediate & advanced riders. My route is only 13.5 miles, but it’s over 2,000′ of climbing. For the first half, things were going well. The Ramblers did great on the uphill, including 25%+ grades where lesser tires might have slipped. They lost traction a few times in downhill turns and obstacles where the knobbies would have gripped. But they were predictable and controllable, no crashes. About 9 miles into the ride, I heard the dreaded shwoosh of a tubeless tire going flat.

I stopped and inspected the rear tire. It had a gash over an inch long, on the sidewall running radially from the bead to the tread. The sealant spewed out within seconds. The tire was too damaged to remove the valve core and put a tube inside. It was destroyed. So I walked the last 4.5 miles, pushing my bike.

Lesson learned: Maxxis Ramblers are good for converting your MTB into a gravel bike. But don’t let their width & tread fool you into thinking they can be used on rugged MTB terrain. OTOH, perhaps the heavier Silkshield version would have held up.

Schwalbe G-One Allround Tire Review & Road Test (Garbage!)

In early 2020 I was preparing to ride the Oregon Trail Gravel Grinder, a 5-day stage ride based in Sisters, OR. My road bike won’t make that gravel ride, and with 7 bikes in the garage I did not want yet another bike. So I decided to ride it on my mountain bike. However, the heavy knobby tires that work so well on rough terrain are not optimal for gravel. They are just not efficient enough, especially for doing 350 miles in 5 days.

Note: these are tubeless wheels, Reynolds Carbon AR, size 27.5″ / 650 / 584.

Gravel rides are a “thing” now, so there are lots of tire options. After reading a bunch of reviews I opted for Schwalbe G-One Allround tires. They make 2 sizes for my bike: 40-584 and 57-584 (note: 584, 650 and 27.5″ are all the same wheel size, just different ways of measuring it). One seemed a bit too skinny (40mm = 1.6″), the other a bit too fat (57mm = 2.24″). I wasn’t sure which would be best so I ordered a set of each.

First, I installed the wide ones. They installed and sealed neatly without the need for my compressor. Rode them around the block, pumped them up to 5 PSI below max. They held pressure overnight and I rode them the next day on a gravel road (John Wayne Trail from Rattlesnake Lake toward Snoqualmie Tunnel). Ran about 35 PSI rear, 30 PSI front. They did fine and I could feel how much lighter and faster they were.

Failure the First

Next ride, I hit the Snoqualmie Valley Trail. About 40 miles in, I could hear the rear wheel losing air. It had a puncture with sealant spraying out. The sealant eventually did its job and I finished the ride (10 more miles) and made it home. I inspected the tire from the outside, there was no obvious damage, so I removed the valve stem and added another ounce of sealant to replace what it had lost.

Failure the Second

The OTGG was cancelled due to COVID, so I flew out to Moab to meet Stefan for some biking. On day 1, riding the easy Bar M Loop Trail, the front tire flatted. Sealant spewed out, then after a long moment it did its job. I used my hand pump to replace some of the lost pressure and we finished the ride.

Failure the Third

Now it was 2021 and I was preparing to ride the Cascade Gorge Grinder that had been cancelled the prior year. So I installed the skinny G-One Allround tires. At least, I tried to. After completing the first and inflating it to 5 PSI below max pressure, I set it aside to work do the second. About 10 minutes later, BANG! The tire I had set aside blew off the rim. Upon inspection, the bead had ruptured internally without any exterior evidence of cuts or damage. I use only smooth plastic tire “irons”. Chalk it up to manufacturing defect.

So I reinstalled the fat ones.

Failure the Fourth

Next ride, I went out on the same pavement that I ride my road bike. After a few miles I heard the familiar dreaded sound of the rear tire losing pressure and spewing sealant. This time, it never sealed. I stopped and rotated the rear wheel so the puncture was at the bottom so the sealant could gather there. All the sealant (I use 2 full ounces) spewed out and it went completely flat. I had to walk home.

Conclusion

Schwalbe’s G-One Allround tires are so fragile they repeatedly puncture, even on paved roads that my road bike can handle with 700×23 tires. They seem to impair sealant from doing its job, and I also encountered a manufacturing defect that caused one to blow off the rim even when seated and sealed, and below its max recommended pressure.

Needless to say, I’m never buying Schwalbe tires again. I’ve never had these problems with Maxxis tires (knock on wood!).

Note: I’m now using Maxxis Ramblers size 47-584 on this bike, for gravel rides. Fingers crossed!

For knobbies I’ve used Maxxis Ardents, and now use the DHF / DHR combo. Both have been great; good traction, easy installation and no flats. Of course, they’re heavy with higher rolling resistance. But when you need rugged knobbies, those aspects are less important and these are great tires.

MTB / Mountain Bike: Fezzari Timp Peak

I’ve been riding bikes of all kinds since the 1980s and done some big rides. But the Fezzari Timp Peak I bought in late 2014 was the first really good mountain bike I owned. I got this bike to ride Kokopelli’s Trail with Bikerpelli in 2015. Great ride! This bike has also proven itself on some of the biggest, hardest rides in the country, like the Oregon Trail Gravel Grinder, 350+ miles and 30,000′ of climbing.

Carbon frame, carbon wheels, SRAM XX1, dual suspension, dropper seat, weighing 25-26 lbs. ready to ride. It’s been a great bike but no bike is perfect and they all require maintenance. Here are some of of the problems I’ve encountered and how I solved them.

Some of these issues are basic recurring maintenance. Others are caused by using aluminum or weak alloys in critical parts instead of appropriate materials like steel or brass.

SRAM Sticky Brakes

The first problem was the dreaded SRAM sticky brakes. The brake lever pistons gradually grow (yes they physically get larger!) and get stuck in the cylinder. In my case it took a few years to happen. Here is my fix. That worked for a year or so, then they got sticky again. At that point instead of sanding down the pistons again, I replaced them with aftermarket metal pistons. These have perfect fit & function, came with the o-rings, and fix the problem permanently.

Since then I’ve overhauled the levers with the complete rebuilt kit. This includes all-new seals and pistons, among other things. It made a big improvement so I’ll be repeating this every 3-5 years.

Frame Suspension Pivot Bushing

After a few years, the frame developed a bit of play. Most of the frame suspension pivots use bearings, which I serviced (cleaned, re-greased). But one of them uses a bushing, and that’s where the play developed. Over time the bushing wears and needs replacing. I contacted Fezzari and they told me:

The bushings at the main rocker pivot are IGUS L289 sleeve bushings. The part number for them is LFM-1012-06. The “-06” part of this part number is in reference to the bushing length which is 6mm.

However, what I would recommend trying is a bushing with a 10mm or 12mm bushing length (part no. LFM-1012-10 & LFM-1012-12, https://www.igus.com/product/?artnr=LFM-1012-10). It will allow for a bit more overlap with the frame and should help reduce the play.

I ordered that part, 12mm size. It fit perfectly and the frame is like new again. Actually, better than new!

Another issue that gradually develops is side-to-side play. The frame pivot that meets the bushing has a shiny black surface (paint?) that gradually wears down, allowing this play. The solution is to place thin spacer washers around the bushing’s core, “inside” between the bushing face and the frame. This pushes the bushing faces slightly outward to eliminate the play. The best washer size is 1/2″ inside diameter, 3/4″ outside diameter, and 1/32″ thick.

Rear Hub Failure

The last problem I encountered was a severe ride-stopper. It stranded me out in the desert near Moab and I had to walk my bike out. Going up a hill, the bike suddenly made a horrible clacking sound and the pedals were free-spinning. The chain was completely intact. I took apart the rear hub by the side of the road to discover that pawls that engage the freehub ratchet had worn down and were slipping.No way to fix that by the side of the road. And after I hiked back to the car and drove to town, none of the bike shops in Moab could fix it either.

Fezzari connected me to Hayes/Reynolds where I contacted a guy named Dan and ordered the parts:

Part 21290 "Reynolds XD Driver Body" replaces the cassette ratchet gear.

Part 20702 "2015-2016 Attack Assault Strike Hub Rebuild Kit" replaces the hub pawls (and other things).

When I told Reynolds this unusual and catastrophic failure happened to a bike that was only a few years old, equipped with some of their best carbon wheels, and left me stranded having to hike out of the desert pushing my bike, they gave me a 25% discount. The above parts fixed it. The pawls were the essential part; they were visibly and obviously worn down and rounded off. The freehub ratchet wasn’t obviously worn, but I replaced it anyway since it could have had non-visible damage from the damaged pawls slipping over it.

After just over a year, I inspected the new pawls to find that they had visible wear, though they were still working. I ordered another set of pawls, installed them, and kept these as emergency replacements.

It’s frustrating to note that if these pawls were made of steel, they’d last forever and the wheel would only be a few grams heavier. But they’re made of some kind of lightweight alloy.

Bottom Bracket Crank Arm Spindle Bolt

After servicing the bottom bracket (cleaning & re-greasing bearings) I was re-assembling it. These SRAM cranks have a single bolt on the left (non-drive) side that holds everything together. The spec says tighten to about 52 Nm, or 38 ft.lbs. As I was tightening it, well before it got that tight, I felt it give. I removed it and discovered 2 things:

  1. The head had sheared off the bolt
  2. The bolt was made of aluminum (or alloy) — not steel ?!

This is a high torque, high stress bolt. It should be made from steel! Making it from a softer, weaker aluminum alloy is a total fail in design. I’ll gladly pay a weight penalty of a measly 12 grams for the confidence of knowing my cranks won’t fall off the bike. Apparently I’m not the only person who thinks so. Shout-out to one of my LBS, Gregg’s Cycles, who had a replacement bolt in stock. I bet I know why they keep these bolts in stock… <groan>

Details:

  • Truativ GXP M15 Crank Bolt
  • CR2193
  • 11.6900.002.140
  • M15/M26

Sadly, it is alloy like the broken one. So it is probably “single-use”. I’m still looking for a steel one, but this one will serve until I find it.

Alloy Spoke Nipples

Descending Olallie, I heard a “ping” from the front wheel so I stopped. A spoke was loose; the nipple head had sheared off. I smoothly bent the free spoke to weave it through adjacent ones so it couldn’t flop around. Fortunately, the wheel is strong enough and with disc brakes I was able to finish the ride slowly.

The Timp Peak came with Reynolds AM 27.5 carbon wheels. Apparently, carbon fiber causes a redox galvanic corrosion reaction with alloy nipples. It starts slowly and progresses incrementally over time, so the wheels may go 5 years or so before it weakens the spoke nipples enough for the heads to shear off. I replaced that spoke with a brass nipple and re-sealed the wheel.

After the OTGG, another spoke nipple head popped off while I was truing the wheel–actually loosening the spoke, not tightening it! At this point I unsealed the wheel and replaced all of them with brass. While doing so, I found 4 others that were already cracked just waiting to break.

<rant>
No carbon wheel should use alloy spoke nipples. Brass will last forever and a set of 28 only weighs about 20 grams more. Alloy may be appropriate for super light road bike wheels, but the weight savings is immaterial on a MTB, considering we typically run 800 gram tires. This is an example of the race to the lightest wheelset at any cost. Reynolds confirmed that their wheel builders use only brass spoke nipples when servicing wheels, even though their OEM wheels come with alloy nipples.
</rant>

Rear Rim

The rear wheel rim delaminated near the outer edge; structure failure. Fortunately, I noticed it after a ride so it didn’t fail while riding.Reynolds replaced it under their lifetime warranty. Normally, this means mailing them your broken wheel, they rebuild a new rim onto your old hub and charge you $150 for the parts (spokes, sealing tape). It takes 6 weeks.

But 6 weeks wouldn’t work. This happened 1 week before the OTGG, a 5-day stage ride I had been training for 18 months. I asked Reynolds support to simply mail me a new rim, I would rebuild the wheel myself. And they did! They don’t make the AM wheels anymore, so now I have the closest match, a Blacklabel 287 (which has off-center spoke holes to equalize spoke dish angles). It arrived 1 day before the big ride, I built the wheel that afternoon (using DT 14 gauge straight-pull spokes and brass nipples) and it all worked out. Now that is just-in-time warranty service!

The new rim has a deeper profile, so the ERD is 9mm smaller, which meant I needed shorter spokes. Split the ERD difference in half means 4mm shorter on each side. But the original spokes didn’t fully protrude from the nipple heads, so I added 1mm (3mm shorter). This way the spokes would pass all the way through the nipple heads which makes it a bit stronger.OTGG was this new wheel’s first break-in ride. It performed flawlessly.

Rear Axle

In Sep 2022 riding the John Wayne / Palouse trail, the rear axle broke between Beverly and Othello. This is normally a critical failure that makes the bike un-rideable. At the same time, the derailleur swung forward and sheared off the end stop of the hangar. I was able to MacGyver both the axle and the derailleur in order to ride back to the nearest town and hitch a ride.

Rear Wheel Bearings

While I was replacing the axle I decided also to replace the bearings. They were still in serviceable shape, but not perfectly smooth anymore. I ordered a set of NSK bearings (size 6902) since they’re supposed to be excellent. I cleaned out the rat piss that they use for OEM grease and packed it with Schaeffer’s 221 #2. The bearing was smooth as butter. After installing it (smoothly with a proper bearing press, not whacking it in), it was rough & notchy. I pressed it out and it was smooth again. Weird. So I bought a generic 6902 at the LBS. Same procedure: cleaned out the OEM grease, packed with Schaeffer’s 221 #2, installed. It was smooth as butter installed.

Perhaps the hub’s bearing socket wasn’t perfectly round? Maybe, but 2 other bearings were butter smooth as installed, so seems unlikely.

Perhaps somehow the compression/squeeze forces of the press-fit install, eliminated the bearing’s internal tolerances? Maybe.

Perhaps it was due to the generic bearing being cageless, combined with an imperfectly round bearing socket? The NSK is a caged bearing, which is normally better. Yet perhaps cageless bearings are more tolerant of imperfectly round sockets?

Rear Through-Axle

After riding the bike 15 miles with a broken axle, the through-axle showed metal fatigue right at the point where the axle had snapped. Apparently, this put more stress on the through-axle. It was still serviceable, but due to the visible metal fatigue I replaced it anyway. It’s 12mm OD, 142mm rear dropout spacing, 174mm total length, 20mm of threads at the end, with a 1.75 pitch.

Rear Hub Shell

When the 2nd set of replacement pawls showed signs of wear in only 5 months, I sent Reynolds a photo and asked for a warranty replacement. They studied the photo and found that the pawl pockets machined into the hub are worn & distorted. I took a close look and they’re right! The distortion is only slight and the hub is still serviceable, but its days are numbered.

Looks to me, and to a friend with experienced eyes, Reynolds should have used a harder grade of aluminum alloy. Not only for the hub shell, but also for the pawls, and for the axle (all of which have failed on me).

They offered to warranty the hub shell, which means mailing them the wheel, the rebuild it onto a new hub shell and send it back, charge me $200 for parts (spokes, axle, bearings, freehub) and labor. I asked if they had a parts list because I prefer to do my own work and build my own wheels. They said no, it’s only a service. Which is different from last year, when they mailed me a warranty replacement rim for me to build myself.

That doesn’t sound like a great deal because I can buy top quality parts for less and build the wheel myself. But I do appreciate their sharp eyes in detecting a problem that I overlooked. I suspect they knew what to look for, as this isn’t the first of their hubs that has had this problem. Indeed, after all the problems this rear wheel has given me, I’m not inclined to use another Reynolds wheel. In summary:

  • OEM spoke nipples cracked and failed, due to aluminum/carbon redox reaction. I rebuilt the wheels with brass spoke nipples
  • Freehub pawls sheared, stranding me in the Moab desert.
  • Carbon Rim delaminated; Reynolds sent me a new rim under warranty and I rebuilt the wheel (again).
  • Axle broke, stranding me on along the John Wayne Trail.
  • Hub shell pawl pockets wore out of shape.

Road Biking: Vashon Island

Vashon Island is a fun road bike ride. It’s rural and scenic, and hilly making a great workout. Here you will find suggestions to make this ride a smooth experience.

Ride Overview

The full ride is about 42 miles with 3900′ of climbing. The hills are steep and there’s lots of them, making it feel more like a 50-60 mile ride. Here is a GPX of the full route. Here is a picture:

On the route you can see 2 black dots. These are decision points to change the ride.

Decision point 1: about mile 13; whether to ride down to the Tahlequah ferry terminal at the S tip of Vashon Island. This is an out-and-back 3.7 mile round trip descending 350′ then back up.

Decision point 2: about mile 22; whether to ride the Maury Island loop. This is 11 miles with about 1100′ of climb. It has scenic sections, and the toughest climbs on the route.

Here are some photos from a ride in Oct 2020.

Getting There (and Back!)

From Seattle, the easiest way to get to Vashon is the WA state ferry. Here’s the schedule. It’s different on weekends & weekdays. You’ll depart from and return to Fauntleroy. As of March 2023, the fare is $7.25 for a walk-on with a bike and is paid only westbound. Masks are no longer required. As you approach the Fauntleroy ferry terminal, if you are on the walkway, then walk (don’t ride) your bike. If you want to ride your bike, take the car lanes. If your forget this, the ferry workers will chide you when you arrive.

Parking: you can park a car at Lincoln Park parking lot 1. This is about 1/4 mile up the street from the ferry terminal. There are no fees for parking. From there, ride down to the ferry terminal to walk onto the ferry.

Ride Notes

Vashon’s pavement is often rough. Autumn leaves fall onto the road, get rained on and decompose, making the corners slippery. Debris also washes into the roads, and some of the downhills are steep. So take extra care!

Most Vashon roads don’t have bike lanes, but most cars drive slow. It’s similar to biking the San Juan Islands.

The ride starts with a 1 mile climb from the ferry landing that is sure to warm you up on a cold morning (on a good day you can hit 40+ mph on the way down at the end of the ride). Then the road levels off for a while before you enter the rolling hills of Vashon.

For typical riders in decent physical condition, due to road conditions & hills, plan on lowish average speeds around 14 mph which makes 3+ hours of riding. Bring food & water accordingly. Close to halfway through the ride there’s a little town with a coffee shop, hotel, and a deli called Harbor Mercantile, where you can get food & water. Near the end of the ride you’ll pass through Vashon’s downtown which has several good coffee shops and restaurants.

Ride Scenario

Here’s a typical scenario for a Vashon ride in Spring 2023:

  • Meet @ 7:45am @ Lincoln Park
  • Park, prep, ride to Ferry
  • Pay fare & walk onto 8:15am ferry
  • Disembark on Vashon around 8:45am
  • Bike: 4 hours (full route, with extra time to eat or fix a flat)
  • Walk onto return ferry: 12:40 or 13:30
  • Ride back to Lincoln Park

SRAM Bike Brake Stiff Lever

Update: 1 year later

The levers got slow again. Not as stiff as before, just slow to return. On disassembly, the problem wasn’t the pistons, but the seals, which had swelled. Maybe because I put a drop of oil on them when I reassembled them, and oil can have seal swelling additives.

Anyway, all I needed was new seals. But new seals alone are not available, as far as I can tell. You have to buy an entire brake lever rebuild kit! However, I did find replacement pistons that come with new seals, and the pistons are machined aluminum, and they only cost $5-$10 each. Better than OEM quality, and perfect fit.

The brake levers on my MTB have been gradually getting stiffer to operate, more friction in the brake pull with a weaker return upon release. I bought this bike in late 2014 and have bled the brakes and replaced the pads. The lever stiffness has been gradually increasing. On my most recent ride on Tiger Mtn, the brakes were dragging pretty hard because the levers wouldn’t return. This was an incredible PITA on the steep uphills, and risks overheating the brake pads & rotors.

At Tiger summit, one of the other riders mentioned this was a known problem with SRAM hydraulic brake levers. When I got home I checked it out and found that was indeed true. Some people had returned their levers to have SRAM replace under warranty. But they said it was a PITA and took a long time because SRAM support dragged their heels not wanting to admit there was a problem. So I figured it was worth at least trying to fix it myself.

There are several YouTube videos about this. Here is one I found useful: https://www.youtube.com/watch?v=Ex882BIH-Fo

Here’s a summary of the problem and fix. Each brake lever has a small master cylinder inside, a piston with rubber seals. The piston is made of plastic and the cylinder is metal. Inside the master cylinder there is also a spring that pushes back against the piston to help it return to the neutral position. When the entire assembly gets warm/hot, the piston expands more than the cylinder, scuffing against the inside of the cylinder, increasing friction and getting stuck. It gets stuck so hard that the spring can’t push it back.

The solution is to remove the master cylinder piston and use fine (600#) emery paper to scrub off edge material (gently, smoothly, evenly), making it slightly smaller in diameter. To do this you must remove the brake lever from the hose, drain the brake fluid from the lever, disassemble the lever, remove the piston and its rubber seals, sand it down until it freely slides back & forth in the cylinder, clean everything up, reassemble it, then re-bleed the brakes. The procedure is tedious manipulating some tiny parts, and requires an experienced touch sanding down the pistons. But it doesn’t require any special tools, just the usual stuff: torx wrenches, brake bleed syringes, fresh DOT 4 or 5.1 fluid, etc.

The procedure was successful; my brakes are like new again. This took me almost all day, but I hadn’t done it before. I could do it again in less than half a day.

The problem is definitely not about the piston’s rubber seals. I removed those before sanding it, and the piston was super-tight in the cylinder even with the rubber seals removed and the cylinder cleaned. I sanded the piston until it was loose in the cylinder, easily sliding back & forth from gravity just tilting the assembly up and down.

The piston’s rubber seals are tight and one-directionally facing. Remove with care, ensuring you don’t scratch or score them, and ensure they’re facing the right direction when you reinstall. Before reassembling, make sure everything is scrupulously clean. You don’t want sanding dust from the piston or other crud inside your brakes!

I can’t figure out how or why this problem took 4-5 years to manifest. The piston was not deformed in any obviously visible way. Why didn’t this happen during the first year of ownership?