Introduction
Years ago, I owned and used a Denon DRM-740, one of their best cassette tape decks. It was about as transparent as a tape deck can be (not very) and I recorded a lot of material on it. Recently I bought this piece of retro 1990s audio gear on eBay as a little blast from the past. I was curious if I could restore it to its original specs and performance.
Description
The DRM-540 is a standard 2 head cassette tape deck with electronic transport controls, Dolby B and C, HX Pro, and fine bias adjustment. You can Google it for details.
This unit arrived with a dirty, scratched heavily used exterior. Cosmetically, I’d rate it 2 of 5. This belied its interior condition. The heads looked fresh, no scratches or grooves. The inside was clean and all the service adjustment pots turned smoothly. Mechanically, it worked.
Restoration
The first thing I did was physically clean the heads, capstan and rest of the tape area with Q-Tips and isopropyl alcohol. It had years of oxidation and gunk. Next, I demagnetized the heads and metal transport parts. Now it was ready to play tapes. I connected the deck’s input & output to my PC sound card (an ESI Juli@).
First: speed adjustment. I played my calibration tape, which has 3 kHz on side A, 8 kHz on side B. The deck ran about 2% slow. That’s WAY off. I opened the top to get access to the motor speed adjustment screw. For coarse adjustment, I played the 3 kHz tone and listened with my phone and Spectroid app. It was quick & easy to get it within 1%. Then I recorded tape playback with Audacity and did an FFT / Spectrum Analysis. Back and forth a few times. Eventually I got the speed within 0.3%. That’s about as close as I could get, given the resolution of the adjustment screw.
Here’s a closeup of the spectrum playing a 1 kHz tone. You can see sidebands near the center frequency, which show the frequency stability is imperfect. If this were a DAC we’d call that jitter:

Here’s the full spectrum for that same tone. You can see the 2nd & 3rd distortion harmonics are just under -60 dB. Not bad for a cassette tape deck.
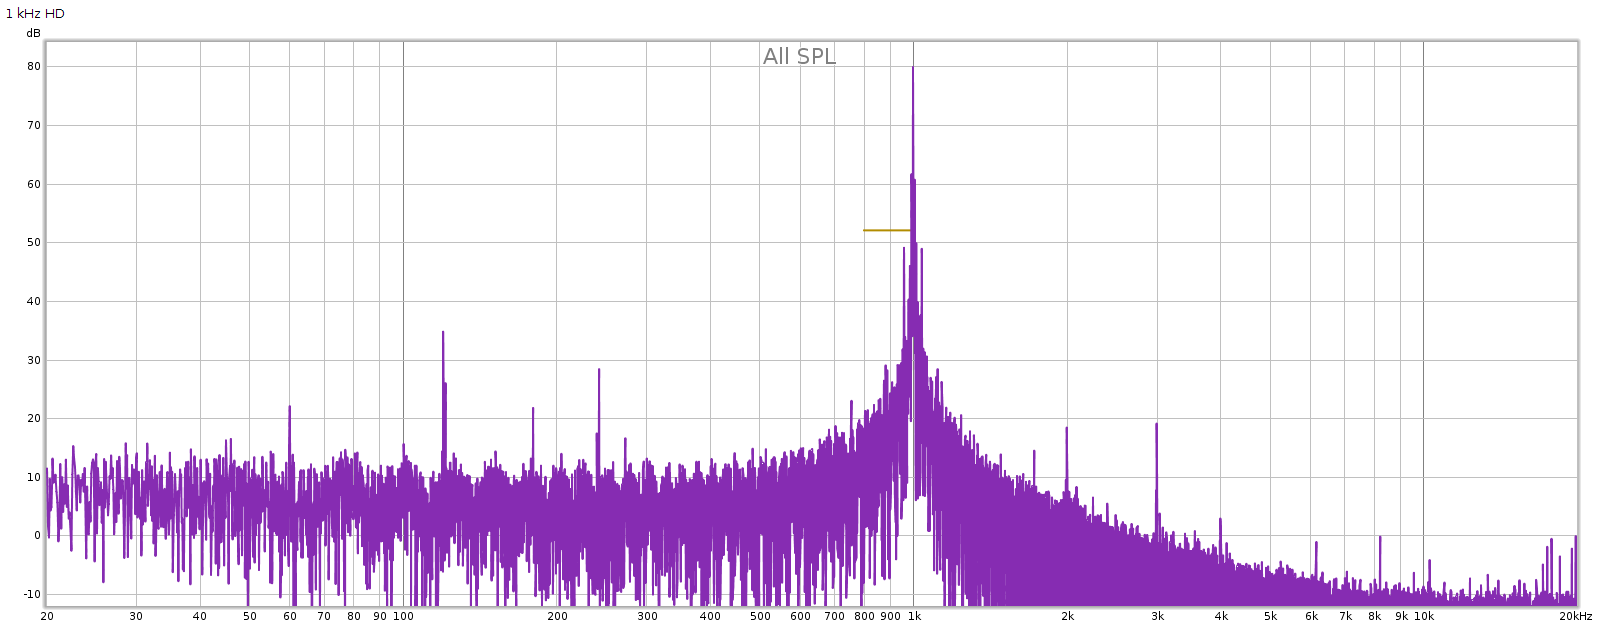
You might notice that harmonic distortion from this tone is lower than the power supply harmonics at 60, 120, 180 and 240 Hz. It looks like this deck could be improved by better filtering the power supply. The power supply doesn’t appear faulty, it’s just that there’s no reason to spend a fortune making a super clean power supply, since the device will be limited by cassette tape performance.
Next: azimuth adjustment. This is a screw next to the playback head that changes the angle of the head to align it with the tape as perfectly as possible. I don’t have a scope, so I played the 8 kHz tone into the sound card while recording in Audacity. Slowly turned the screw back & forth to maximize the output level, until the screw was in the middle of the range of maximum output. This changes the channel balance, so I turned those internal pots to equalize them, then readjusted the azimuth. I went back and forth a few times until it was as close as I could get. The azimuth ended up in a very different position from where it started, so it was quite a bit off.
Then I went back to 3 kHz and adjusted the internal playback gain pots to equalize the channel balance, then to 8 kHz, which had slightly different balance. Back and forth a few times to minimize and equalize the difference.
Next: recording. I played REW frequency sweeps on the PC and recorded them. I used BASF Reference Maxima II tape, one of the best back in the old days. The L-R channels weren’t equal when recording, so I adjusted the internal recording gain pots to equalize them.
Dolby B is ubiquitous, so that is what I used for all the following measurements.
Here’s the frequency response measured at different recording levels: -20, -10, -3 and +3 dB. As expected the best (most linear) frequency response is at -20 dB, which is why that is the level used for its specifications. Frequency response tapers as we increase the level, yet it does so smoothly.
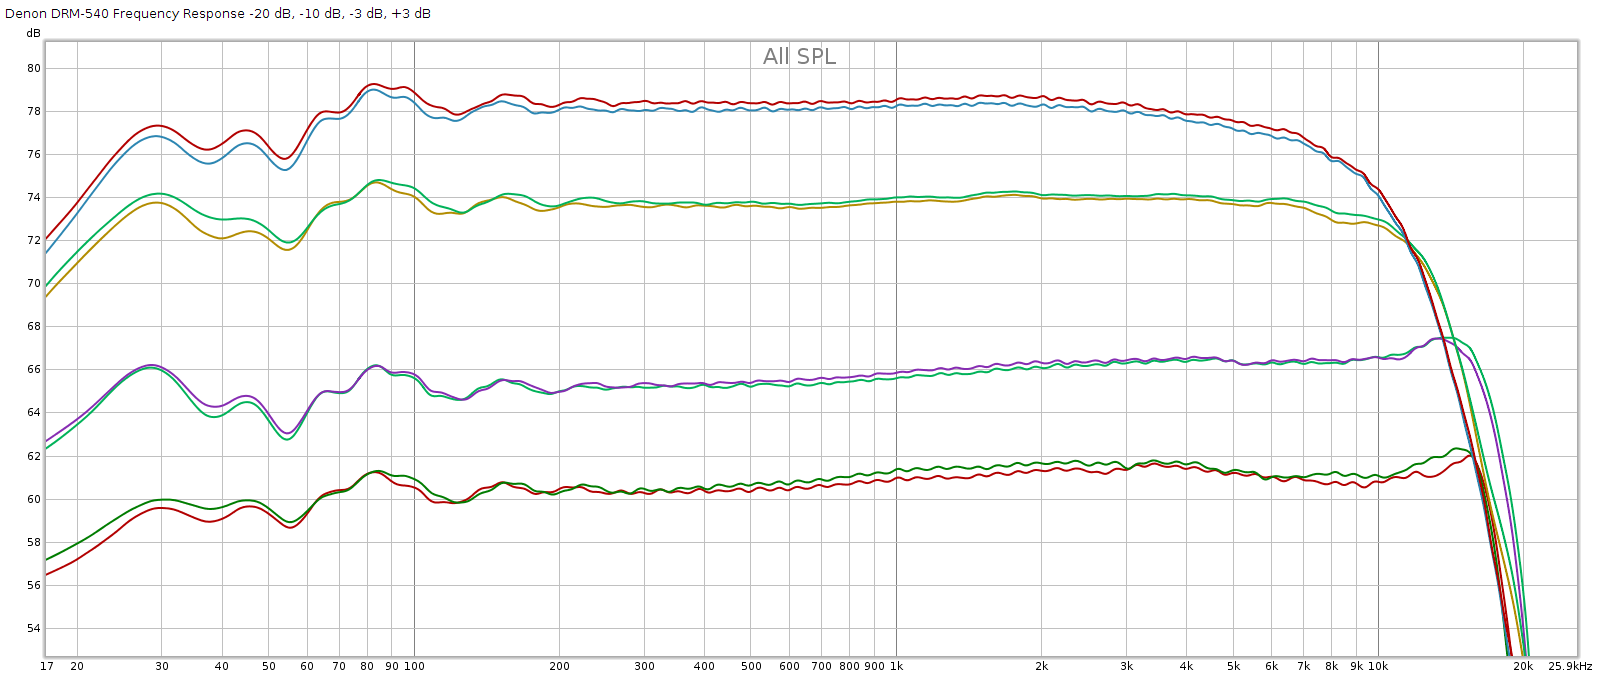
This deck meets or exceeds its specification, which is 20 Hz to 18 kHz, +/- 3 dB at -20 dB.
Next: bench testing: frequency response, distortion, SNR. I used the deck to record and play back the REW frequency sweeps and analyze them in REW. I did this at different settings: no Dolby, Dolby B and Dolby C. And I also did this while turning the external user-settable fine bias control to see whether it worked and how much impact it had.
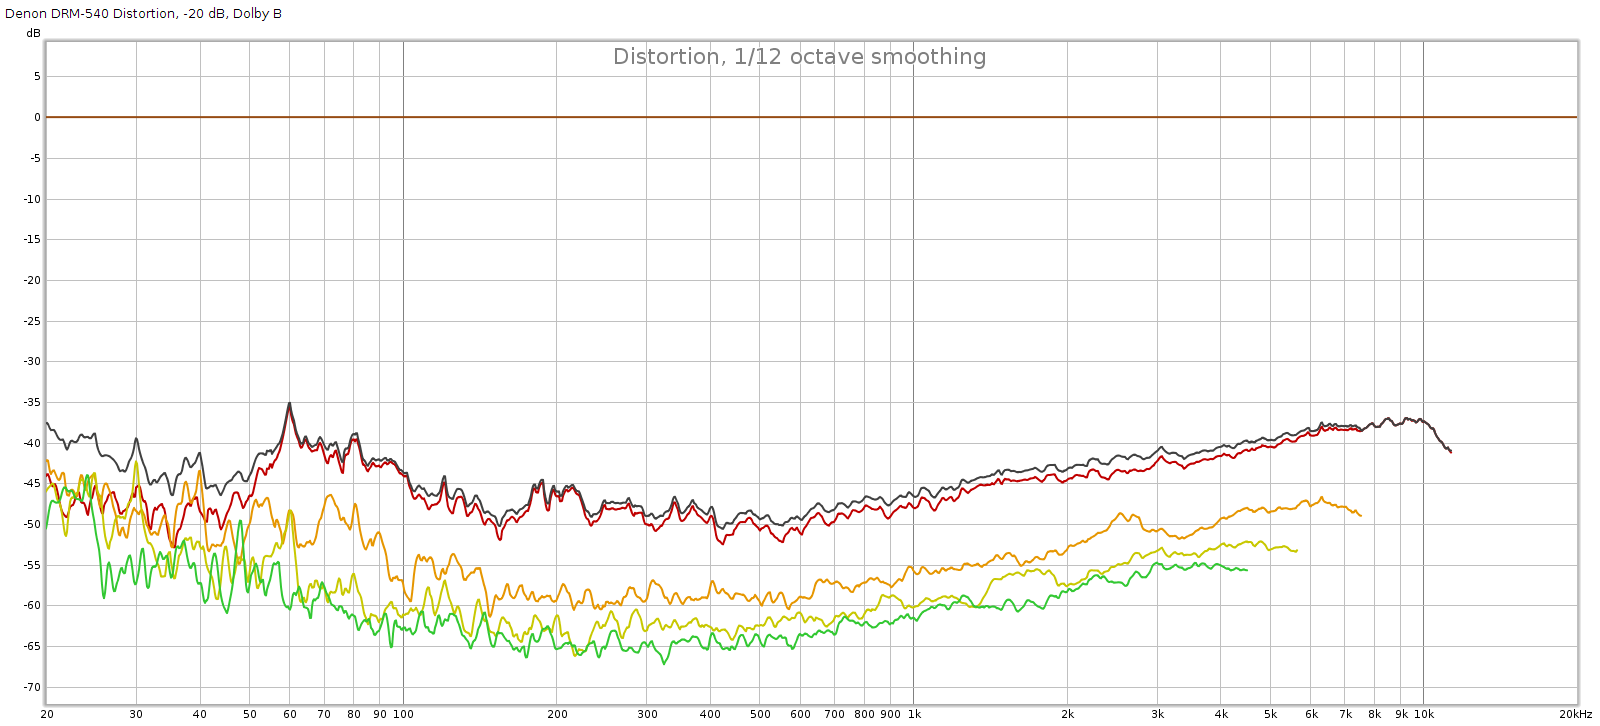
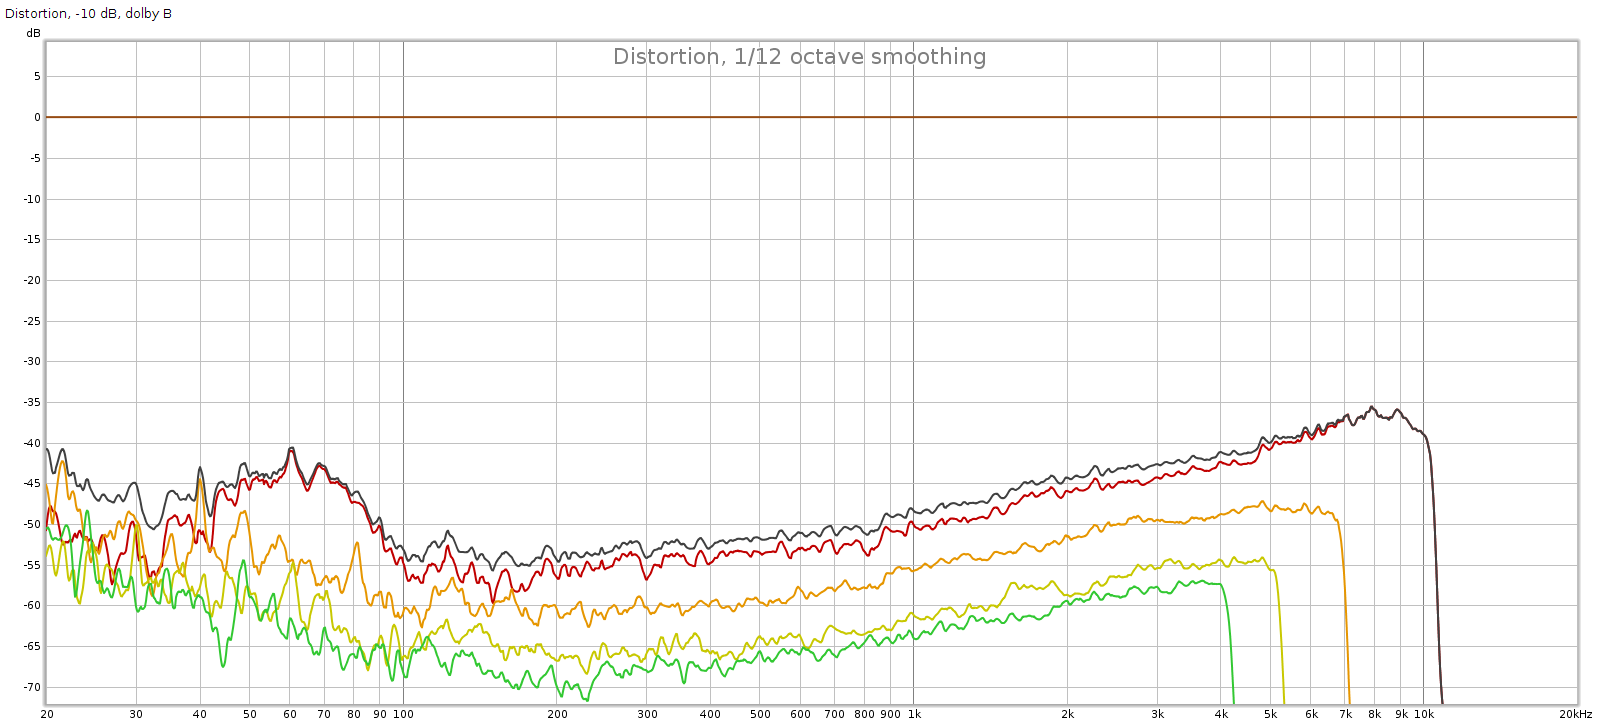
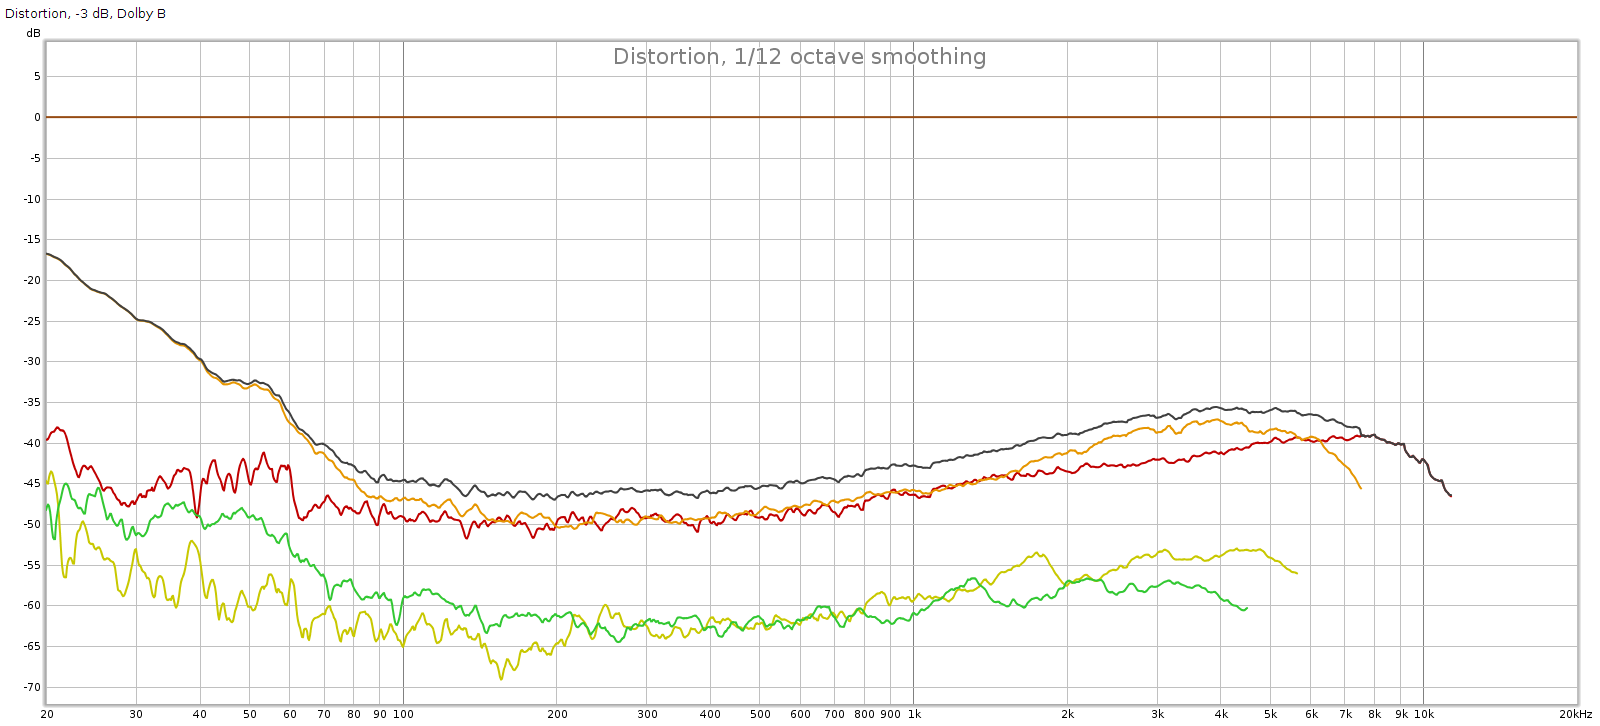
Here are some distortion graphs made at different recording levels. This is measured after recording and playback, so it includes total distortion from the deck itself, and from the tape used for recording. Thus it overstates the deck’s distortion and represents real-world results.
Distortion at -20 dB
Distortion at -10 dB
Distortion at -3 dB
Distortion at +3 dB
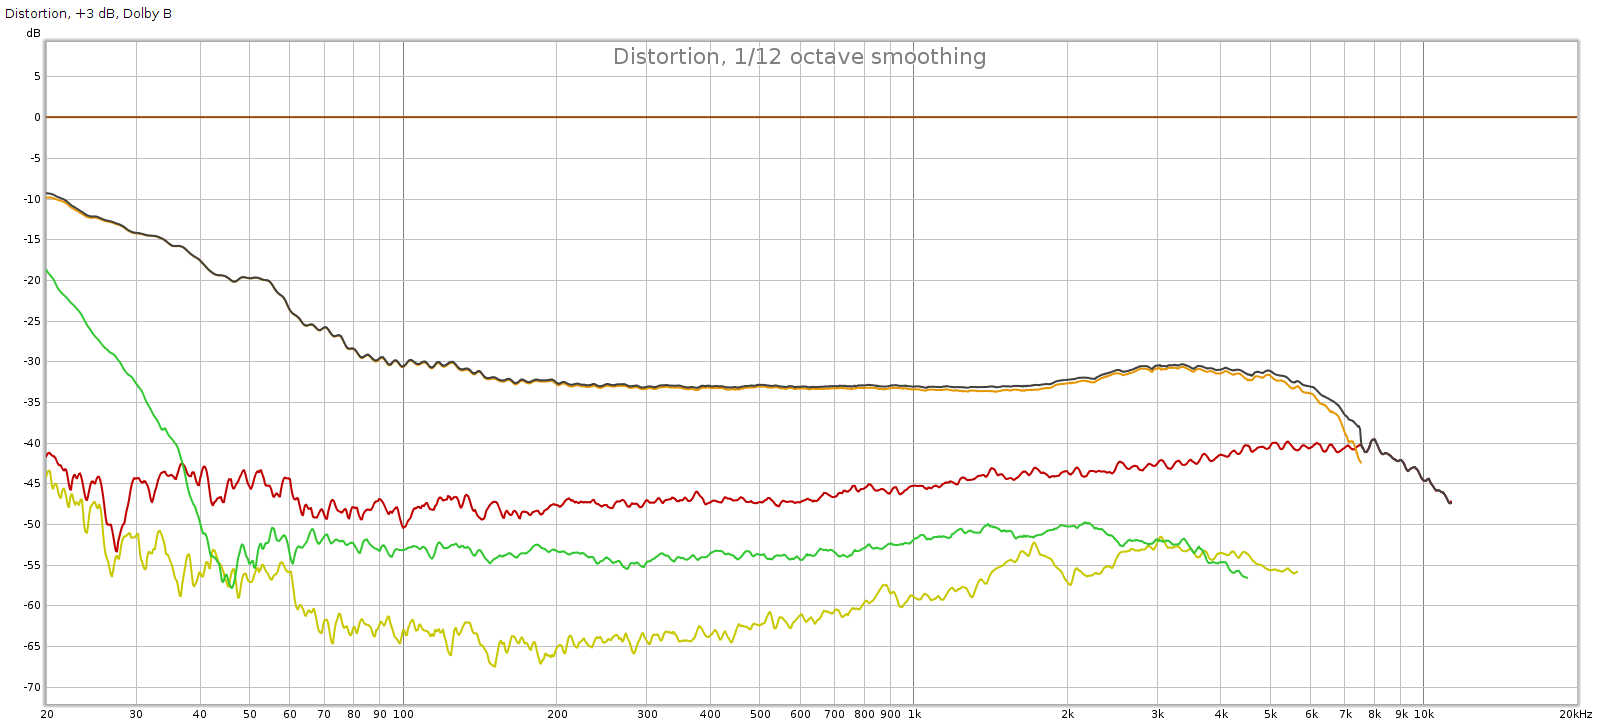
Above, we see what we’d expect from a new deck. Distortion rises at high at high levels due to saturation, and it rises at low levels due to noise. The sweet spot for lowest distortion is around -10 dB recording level.
Another problem this deck had was that the recording level lights didn’t match between recording and playback. That is, record something with the levels just reaching 0 dB but when you play it back the lights indicate higher (or lower). I fixed this by adjusting the internal input and output level pots. Now the lights match between recording & playback.
Also, the drive motor developed an occasional squeak. I used a syringe to apply a tiny amount of low viscosity oil to the motor driveshaft/bearing interfaces. This eliminated the squeak. Then I had to readjust the speed again.
This deck has a fine bias knob on the front panel. The reason for this is that different types and brands of cassette tapes have different frequency response, so this enables you to fine tune the frequency response to each individual tape. I tested the effect of this knob, results below. Note that the graph uses 1 dB per division, so the frequency response is flatter than it looks.
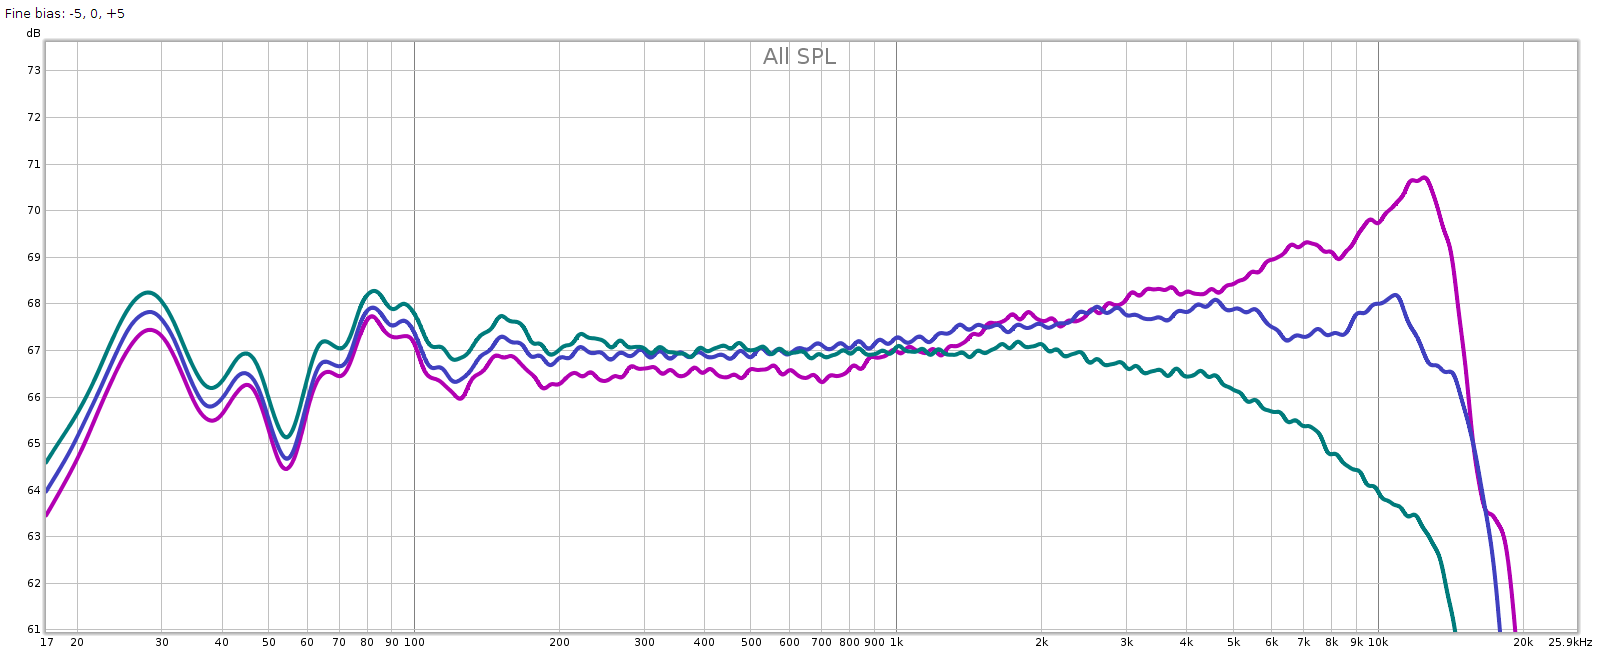
The blue line is with the fine bias knob in its center position.
The magenta line is with the fine bias knob turned full left, CCW, the -5 position.
The green line is with the fine bias knob turned full right, CW, the +5 position.
The above graph shows that fine bias is like a tone control that tilts the frequency response like a see-saw whose center pivot is around 1 kHz.
Summary
Results: to my surprise, the deck performed on par with the specs from the manual.
- Frequency response: 20 Hz to 18 kHz, +1 / – 3 dB
- Distortion (with Dolby B)
- At level -10 dB, THD at -50 to -55 dB (0.25%), with 2nd & 3rd harmonics at -60 dB
- At level +3 dB, THD at -30 dB / 3%
- Fine bias: -4 to +2 dB @ 10 kHz
Remember this is with a 20 year old blank tape that had been recorded on a few times. If anything, it understates the actual performance.
Finally, I did some subjective testing. Recorded a clean 96-24 digital album (Diana Krall & Tony Bennett), played it back and compared with the original. The differences are audible, but not as obvious as one would expect, given this vintage equipment and cassette tape limitations. It actually sounds pretty decent.
The original: http://mclements.net/audio/clip1-orig.flac
Recording: http://mclements.net/audio/clip1-rec.flac
The original is a high-res download resampled to 44-16 in Audacity.
The recording is the high-res download, played through my sound card, recorded on the DRM-540 in Dolby B with BASF Reference Maxima II tape, played back on the DRM-540 to the sound card’s analog inputs and recorded at 44-16.
Conclusion
Cassette tape is the vintage sound of the 1980s. It’s nowhere near as good and transparent as the modern digital equipment we have. We are so spoiled today! But, it’s not as terrible as its reputation and can sound pretty decent especially for casual listening, when the deck is clean and calibrated. And it was fun and educational to calibrate this deck, measure it and see the improvements.