Category Archives: Home

Pentel Orenz Nero

These mechanical pencils automatically advance the lead and the nib slides and retracts as you write, to prevent the lead from breaking. This helps with thin leads like 0.3 mm, and it also has a 0.2 mm size. The automatic advance makes writing with these pencils a smooth flowing experience more like a pen, since you don’t have to pause to click the lead until you’ve consumed the entire stick.

TLDR: to form a car analogy, these pencils are like a vintage classic Triumph or MG. They’re fun to drive with unique road feel. Yet they are also less reliable and require more maintenance, so don’t drive one unless you’re handy with a wrench and enjoy working on your car as much as driving it.

Here’s how the auto-advance works. The clutch in a mechanical pencil is typically 2 or 3 arms arranged in a circle, trapped inside an outer circular ring. The lead goes through the center of the clutch. When you click the pencil, it pushes the clutch arms forward from the circular ring and they open, which advances the lead. When you release the click, a spring pulls the arms back together, grabbing the lead.

The Orenz Nero clutch is one-way. When closed (at rest), the clutch prevents the lead from sliding back into the pencil, but it doesn’t prevent the lead from pulling further out. The tip’s sliding nib is spring loaded to the fully extended position. When you write, as the lead wears down the nib slides down with it (against the spring force). When you lift the pencil, the spring-loaded nib jumps forward, pulling the lead forward with it due to friction in the nib barrel, and the fact that the 1-way clutch allows the lead to slip forward even when closed. This relies on the fact that the nib barrel has more friction against the lead, than the one-way clutch does.

The drawback of this design is its complexity and fragility. It depends on balancing the friction in the nib barrel, with its spring force, and the clutch spring tension and its arm friction. If any of these gets out of wack the pencil stops working.

The most common failure is that when you push down to write (even gently), the entire nib retracts into the pencil. In other words, the clutch slips. Either something (a tiny chunk of lead, too much graphite residue/dust) gets stuck in it preventing it from fully closing, or enough dust/residue has built up on the clutch teeth that even when closed, the lead can still slip both forward and back. Also, if you re-load a lead stick that has already been pulled through the pencil, it is more likely to slip – a small amount of lead rubbed off when it went through the pencil the first time, and the one-way clutch tolerances are so precise that even that tiny amount is enough to make it slip.

Either way, the solution is the same: disassemble the pencil and clean it. This is easy, especially if you’re familiar with mechanical pencils. Make sure to blast both nib and clutch with clean compressed air from both sides. Even if it’s not jammed, you need to clear out graphite dust/residue that will make it slip.

If you’re in the middle of writing and don’t have time to do this (which happens more often than one would like), there’s a workaround: click the pencil a few times to manually extend the lead a few mm beyond the tip, then break that lead off. This draws a fresh section of the lead stick into the clutch; it often happens that fresh section is not worn and is just a touch thicker so the clutch can grab it.

Some people say that harder lead (HB or B instead of 2B) reduces clutch slip and makes the pencil more reliable. My experience indicates this is not a complete fix but has some merit. My pencils (both 0.3 and 0.2) experience clutch slip almost as often with HB as with 2B lead – but not quite as often. Also, using high quality lead (such as AIN Stein or Uni NanoDia) does help and is a must, as it reduces the amount of dust/residue that builds up in the pencil.

A less common failure symptom is lead in the pencil not feeding into tip. I’ve seen leads stick to the inside walls of the internal plastic feed tube instead of falling into the load port. Even if the feed tube is perfectly clean, this can happen due to static electricity. The solution is to ground and demagnetize the pencil. I’ve had this happen only with the 0.2 mm pencil, because those leads are so thin and light. Thicker leads seem to have enough mass to overcome static cling.

Mike’s take: The Orenz Nero is more of a mechanical curiosity than a real pencil. Normal daily use becomes frustrating because they are so fragile and unreliable. And they are finicky about lead type and brand, which limits one’s choices. They also waste your valuable lead due to the frequent failures, disassembly and cleaning.

A better choice is the Pentel Orenz (not the Nero). It does not automatically advance the lead, and consequently its clutch grabs the lead firmly – no slipping. And it has a sliding nib, which has 3 benefits. First, it fully retracts which protects the fragile nib when not in use. Second, it protects the lead as you write, so even thin leads don’t break. Third, it reduces how often you need to click to advance it – each click gives you about 4mm of lead.

Another good alternative is the Kuru Toga Advance (or Advance Upgrade). It’s similar to the Orenz in function and price, with one advantage and one disadvantage. The advantage is that it rotates the lead as you write, keeping it sharp. This makes it comparable to a pencil having one grade thinner lead – 0.5 writes like 0.3, 0.3 writes like 0.2. The disadvantage is that the articulated nib – it rotates as well as slides – requires a slightly greater amount of clearance, which means the tip has some “wiggle”. This makes it less precise. The difference is small yet perceptible.

Between these two (Orenz vs. Advance) I prefer the Orenz. It has slightly higher build quality, using metal in places where the Advance uses plastic. This also makes it easier to disassemble for cleaning – though both are so reliable you won’t need to do this. The Orenz also has slightly better precision, since the nib has less wiggle. And it has a 0.2 mm size, which gives the ultra-sharp line that the 0.3 Advance has due to its rotation.
Fixing the Oven

The oven in our house is a Jenn-Air model JJW 3830 about 5 years old with a touch screen interface. It recent showed an error: “F2E0 Keypad disconnected. Error enumeration 0x9.” The oven stopped working and said it needed service. It seems that modern appliances have so much delicate electronics they have become less reliable and serviceable.

I looked it up and this thing costs $7,200 ?!?! WTH !?! I couldn’t believe my eyes !?!? For that price, there is no way I’m replacing this thing before I at least try to fix it.

Before diving into the repair I did a little research. A web search on this revealed that the error message indicates a failing panel control and heat damage is common. They last 3-5 years until this problem happens. You can get a replacement board for about $800 (parts only – even more if you want Jenn Air to fix it for you) but after a while it will fail again due to heat damage.

Disassembly

After throwing the oven’s dual-pole 40 amp breaker I pulled it out from the wall with the goal of disconnecting and removing the top horizontal display controller. It turns out this was easy to do. A total of 6 screws on the unit, then unplugging 3 wires, and it was sitting on my counter. I’ll call this the “control box”. That wasn’t bad at all, a pleasant surprise, +1 for serviceability.

The safety shutoff thermistor measured 0 ohms, so it wasn’t blown. The root cause lay elsewhere.

When removing the control box, I noticed a vent for hot/moist oven air that exhausts out the front, left side, above the oven door and below the control box. The control box had been installed incorrectly with the vent inside its bottom edge. Instead of venting out below the control box, it vented directly into the control box! All that hot moist air was venting directly onto the circuit board. Ouch!

I don’t know whether this error was from the factory or from the installer – depends on how the oven is shipped and what assembly is done on site. Either way, it’s a serious mistake and an obvious root cause to the problem.

Cleaning

The circuit board was slightly heat discolored brown right where the exhaust vent hit it. Obvious heat damage, and no visible corrosion but all that moisture didn’t help it. But not melted or blown, and maybe fixable. I unplugged all the connectors on the board, sprayed them with electric contact cleaner, wiped them dry, plugged and unplugged them a few times to scrape off any light corrosion, made sure everything was clean.

Hopefully, this unplugging and cleaning would clear any corrosion that the vent caused and trigger the oven’s logic to reset itself and start working again.

Robustifying

Routing the exhaust vent properly should fix the problem. Yet despite its ridiculous price, where one might expect “price is no object” design, this oven does not have sufficient heat shielding inside between hot vents and its circuit boards. Since the control box board was already compromised, I wanted to ensure it was better protected from further heat damage.

Even when properly routed, the host moist air of the exhaust vents just below the control box. That’s better than venting directly into it, but even so, it will still get the control box toasty warm when the oven is on. Not the best design.

I bought a sheet of heat shielding that consists of a thick yet flexible aluminum reflecting surface with about 1/4″ thick fiberglass insulation glued to one side. It’s made to wrap car exhausts and protect nearby surfaces from the heat. I cut it to shape with tin snips (the kind made to cut aluminum roof gutters). I installed this shielding in two places:

  • Inside the oven, laying flat just above the exhaust vent to protect the circuit board directly above it. This sheet was about 10″ x 9″.
  • Inside the control box, along its inside bottom edge below the circuit board to protect it from the hot vent below. This sheet was about 2″ x 8″.

Note: remember to use PPE like a mask and gloves when cutting & handling fiberglass.

Conclusion

After reassembling, the oven started up and works fine. No more error messages, both top & bottom ovens work. Only time will tell whether this is a permanent fix, but I’ve at least addressed a known design deficiency and postponed a crazy expensive and premature replacement.

Coffee Emergency

My 6 year old Delonghi ESAM330 failed me this morning. When the coffee machine breaks it’s a household emergency requiring immediate attention.

The symptom: when it turned on, the pump was working but water would not come out of the coffee dispenser nozzles, nor out of the water/steam nozzle. But water did flow into the drip pan.

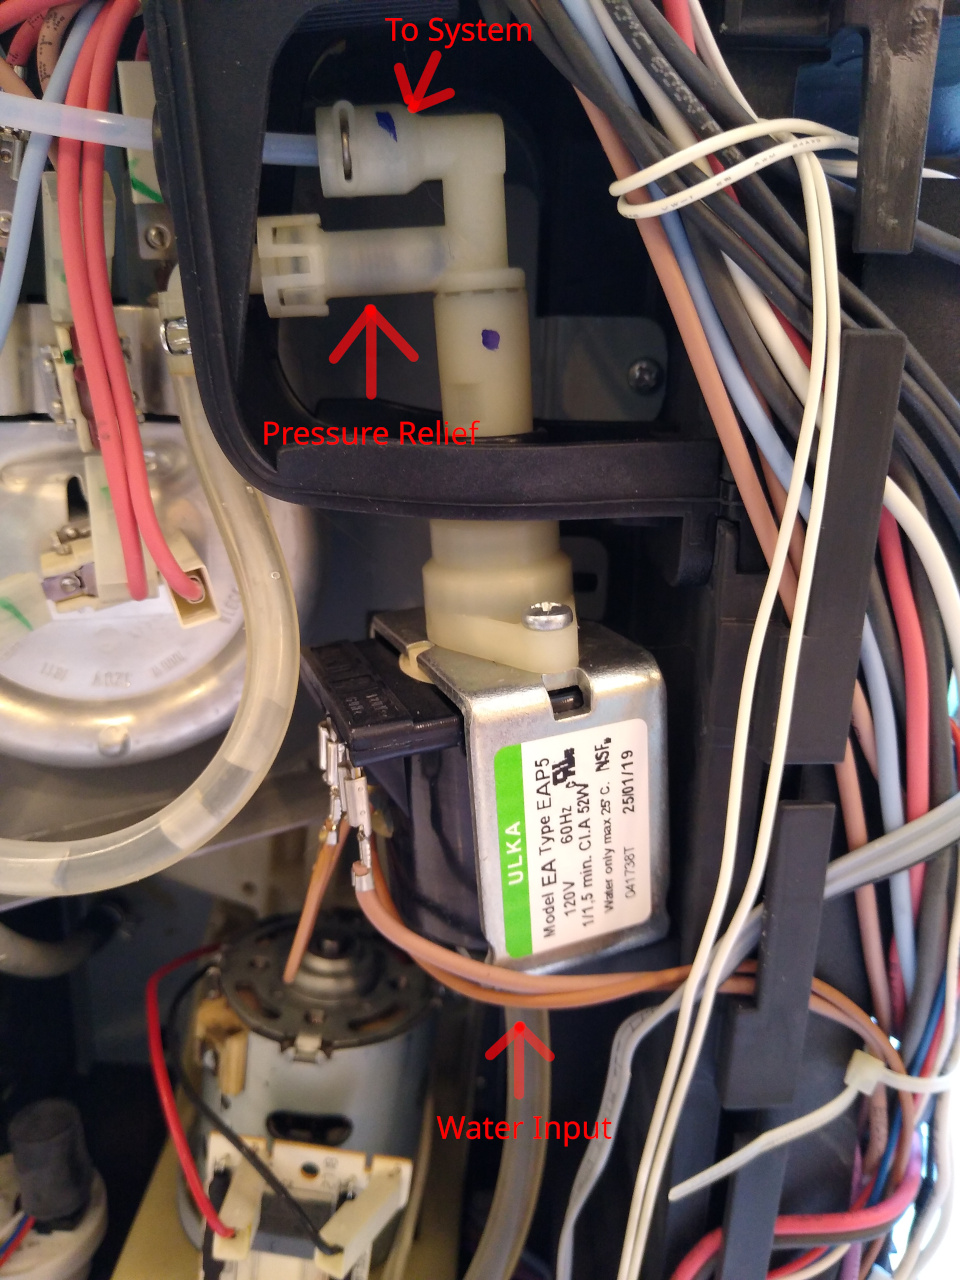
The root cause: the high pressure side of the pump has 2 pipes. One goes to the system, the other is a high pressure safety bypass that works similar to the oil pressure relief valve in many cars. It has a spring pushing on a valve seat. If the system pressure gets too high (for example a pipe is clogged), the pressure works against the spring to open the valve and allow water to drain into the drip tray.

A picture’s worth 1,000 words:

You can see the spring inside the pressure relief line pushing to the right, on a little piston having a rubber seat on its face that blocks the high pressure port. That piston got stuck and wasn’t pushing against the valve, so the pressure relief valve was always open.

I removed the entire pump from the ESAM3300, then removed the large vertical white tube assembly that passes through the metal section, then removed the 2 valves at the top (the top double-U section unscrews from the rest of the white plastic). I removed the o-rings, disassembled the part including the spring and piston and soaked all the parts in 30% vinegar. Then rinsed them off, blasted out the lines with water and air pressure, applied Trident silicone grease (food grade, the same stuff I used to service SCUBA regulators) to the o-rings and seals, and reassembled everything.

When I turned it on and did a function test, the pump made a horrible metallic clacking sound. Oops! Looks like the pump must be primed. I filled a syringe with water and inserted it into the water input hose to the pump. I applied pressure to the syringe plunger until the line was pressurized, then turned on the ESAM3300. As the pump actuated, the line pressure I was applying with the syringe primed it.

It’s working like new again. Coffee emergency resolved!