Category Archives: Tech

Topping EX5 Review: DAC+ Preamp + Headphone Amp

Introduction

When it comes to audio, we are spoiled with an abundance of riches. DACs, amps, headphones have gotten so much better over the past 15 years, it’s hard to imagine that this was sometimes considered a “solved problem”. At the same time, prices have gotten incredibly low.

For example, 15 years ago if you wanted a DAC + headphone amp having studio reference quality, the Benchmark DAC or Grace M920 were two of your only options, both cost $1 – $2 kilobucks which would be about 50% more in today’s dollars. Back in ’99 I bought a Headroom Maxed out Home amplifier that cost $1000. It was the best headphone amp of its time, both in measurements and subjective listening. Today for $150 you can get amps having even cleaner measurements and more power. That’s only 1/10 of the inflation adjusted equivalent price.

Summary

TLDR: The Topping EX5 is functionally comparable to those Benchmark and Grace devices, and equal or superior in terms of measurements. It retails for $350, I bought it on sale for $300, which is about 1/10 of their equivalent price. This is my first piece of “Chi-Fi” (Chinese Hi-Fi) equipment. Here are my impressions having used it daily for a few weeks, including bench testing with Room EQ Wizard.

Good Stuff

  • Excellent measured performance
  • Great subjective sound quality: clean, detailed, neutral
  • Solid build quality
  • Low price

Bad Stuff

  • The manual has serious errors (mislabeled digital filters)
  • Factory support is poor to entirely lacking (no responses to support queries)
  • It has obvious software bugs (the display shows the wrong sampling rate)

Those last 2 are double-threat. I can live with software bugs if the company has great support, as they will fix the bugs. I can live with poor support if the device works seamlessly, as I won’t need support. But a buggy device combined with poor support is a “no-go” for me.

Overview

First, check out Amir’s detailed review & measurements on ASR. The EX5 is a well engineered device having excellent measured performance.

What is the EX5?

  • DAC supporting PCM and DSD formats
  • Select between 4 inputs
  • Volume control
  • Line-level preamp
  • Headphone amp

Inputs:

  • SPDIF Coax
  • SPDIF Toslink
  • USB
  • Bluetooth

Outputs:

  • Line: Balanced XLR and SE RCA
  • Headphone: Balanced 4-pin and SE 1/4″ plug

Key EX5 features

  • Compact all-in-one device: DAC, preamp, headphone amp
  • Reference quality audio: digital & analog
  • Internal power supply: no wall-wart
  • Digital volume control
    • Perfect channel balance at all levels
    • Preserves high SNR even at low volumes: 90 dB SNR @ 50 mV
  • User-selectable digital filters: choose from 7!
    • linear vs. minimum phase
    • sharp vs. slow attenuation


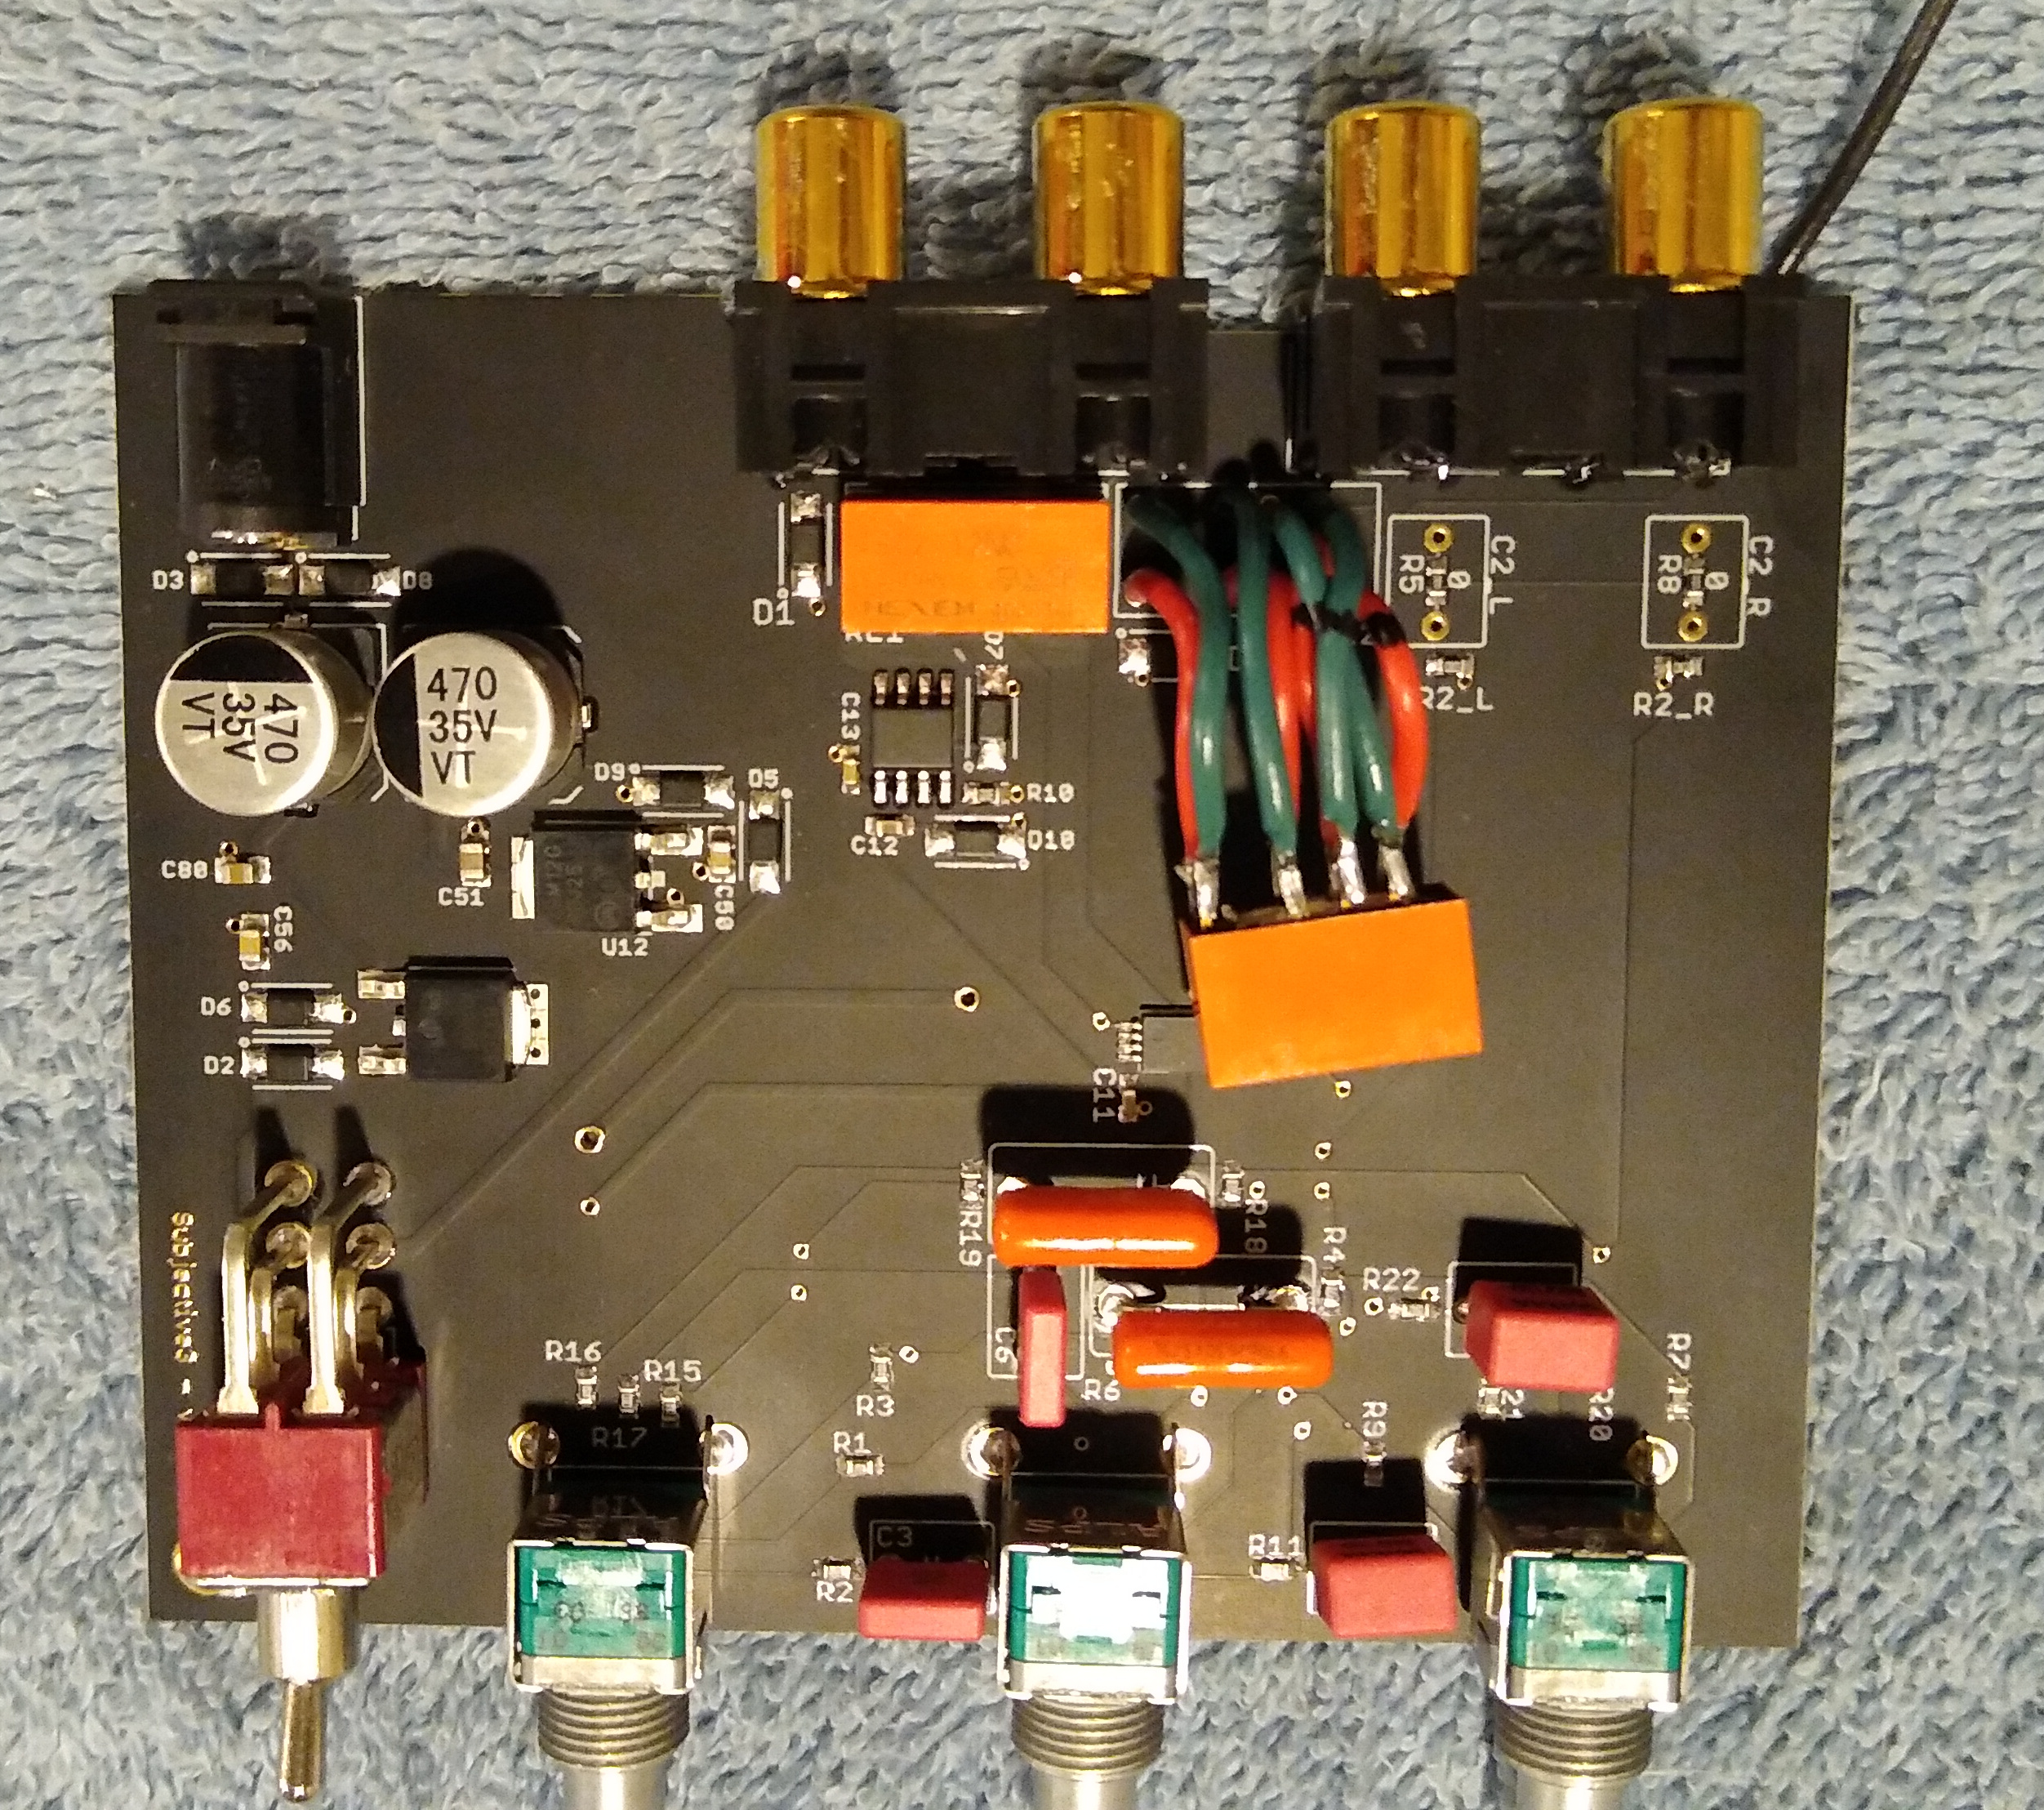
Case, Knobs & Quality

Overall the EX5 feels like a high quality piece of kit. The case is heavy & neat, the connectors feel solid, the display is evenly lit, the volume knob has a smooth clicky feel.

The volume knob is a rotary encoder that also serves as a push-button. I’ve seen rotary encoders start to fail in other equipment I own. After a few years their click action became glitchy, as you turn it up it sometimes turns down, etc. Cleaning the internal contacts with electrical spray helps but is temporary as the problem eventually recurs. I hope the EX5 rotary encoder does not suffer the same fate.

The display has 3 brightness levels and is always on. It has an auto-dim feature in which the display goes mostly dark after 30 seconds, showing only the selecting input. This is my preferred mode, as it hides the incorrect display of sample rate.

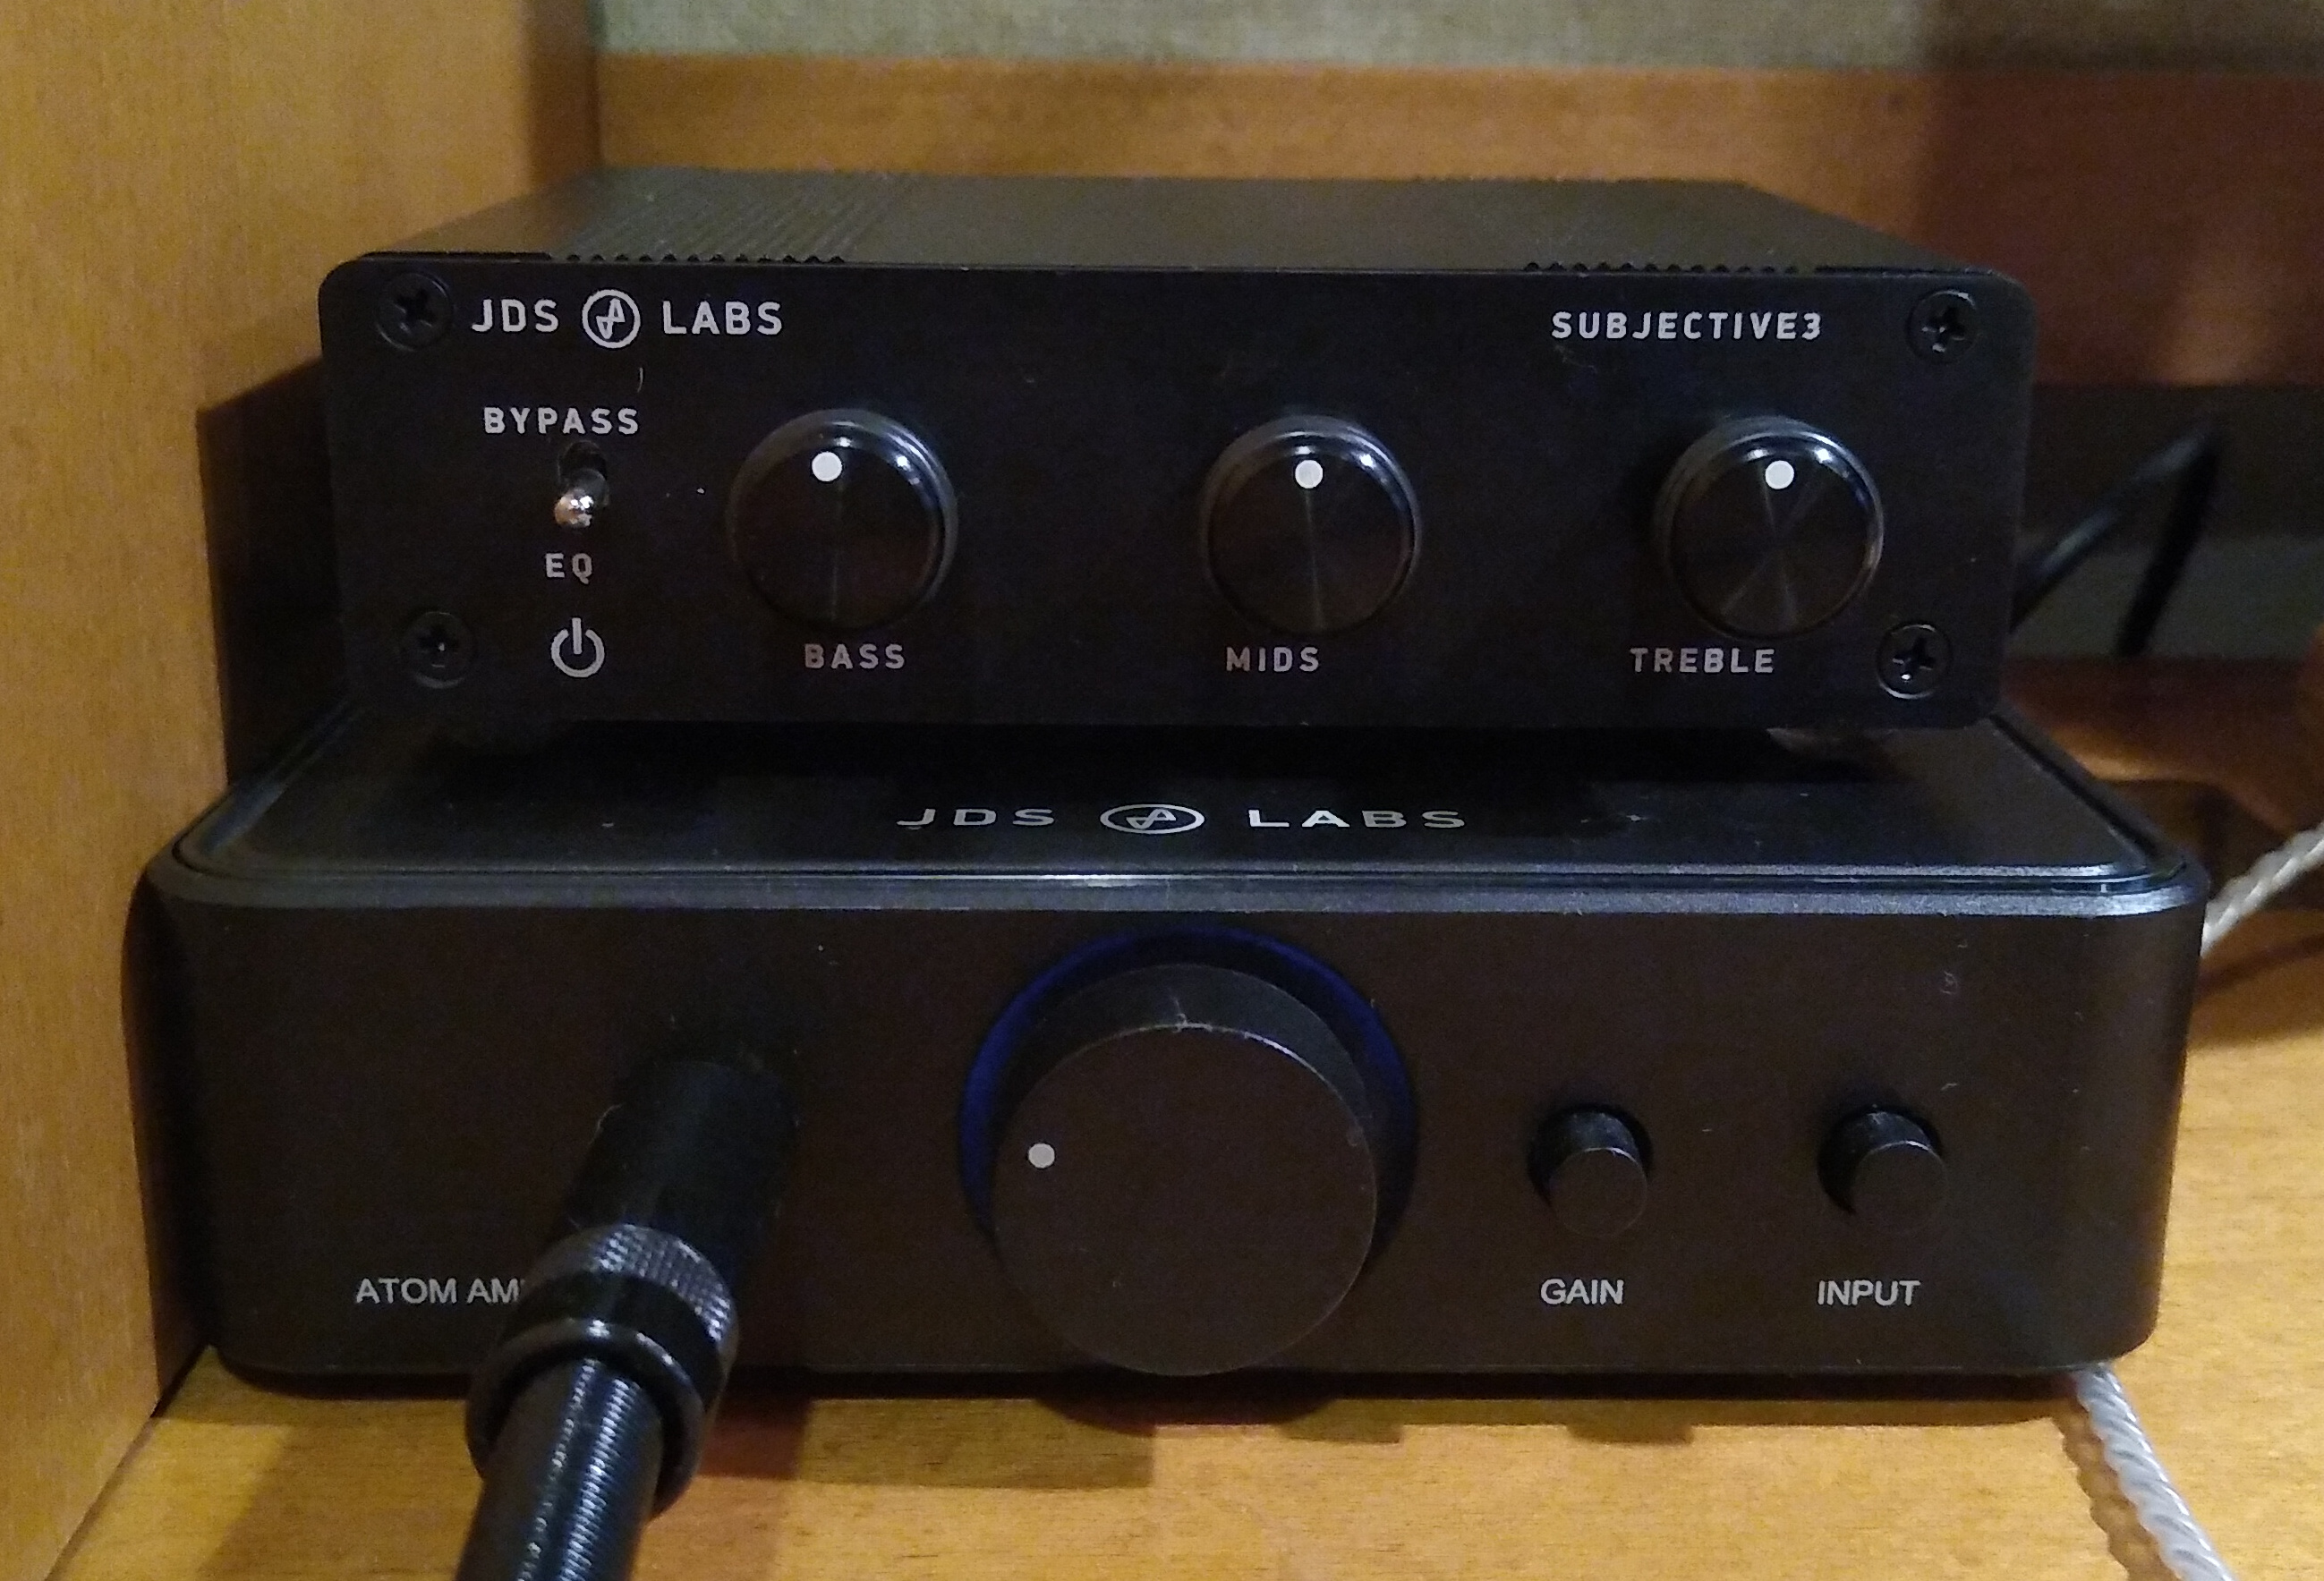
In use, the EX5 gets warm but not hot. Just a touch warmer than my JDS Atom amp. The EX5 case is solid metal with no vents on the bottom, sides or top. It feels like the solid metal case serves to dissipate its internal heat.

Volume Control

The EX5 has 2 gain modes: low (standard) and high, which is 10 dB louder. Its volume control has 100 steps. To assess how the steps interact with volume level, I measured the output level using white noise:

  • 100: max
  • 60: -20 dB
    • From 60 – 100, each step is 1/2 dB
  • 30: -50 dB
    • From 30 – 60, each step is 1 dB
  • 20: -68 dB

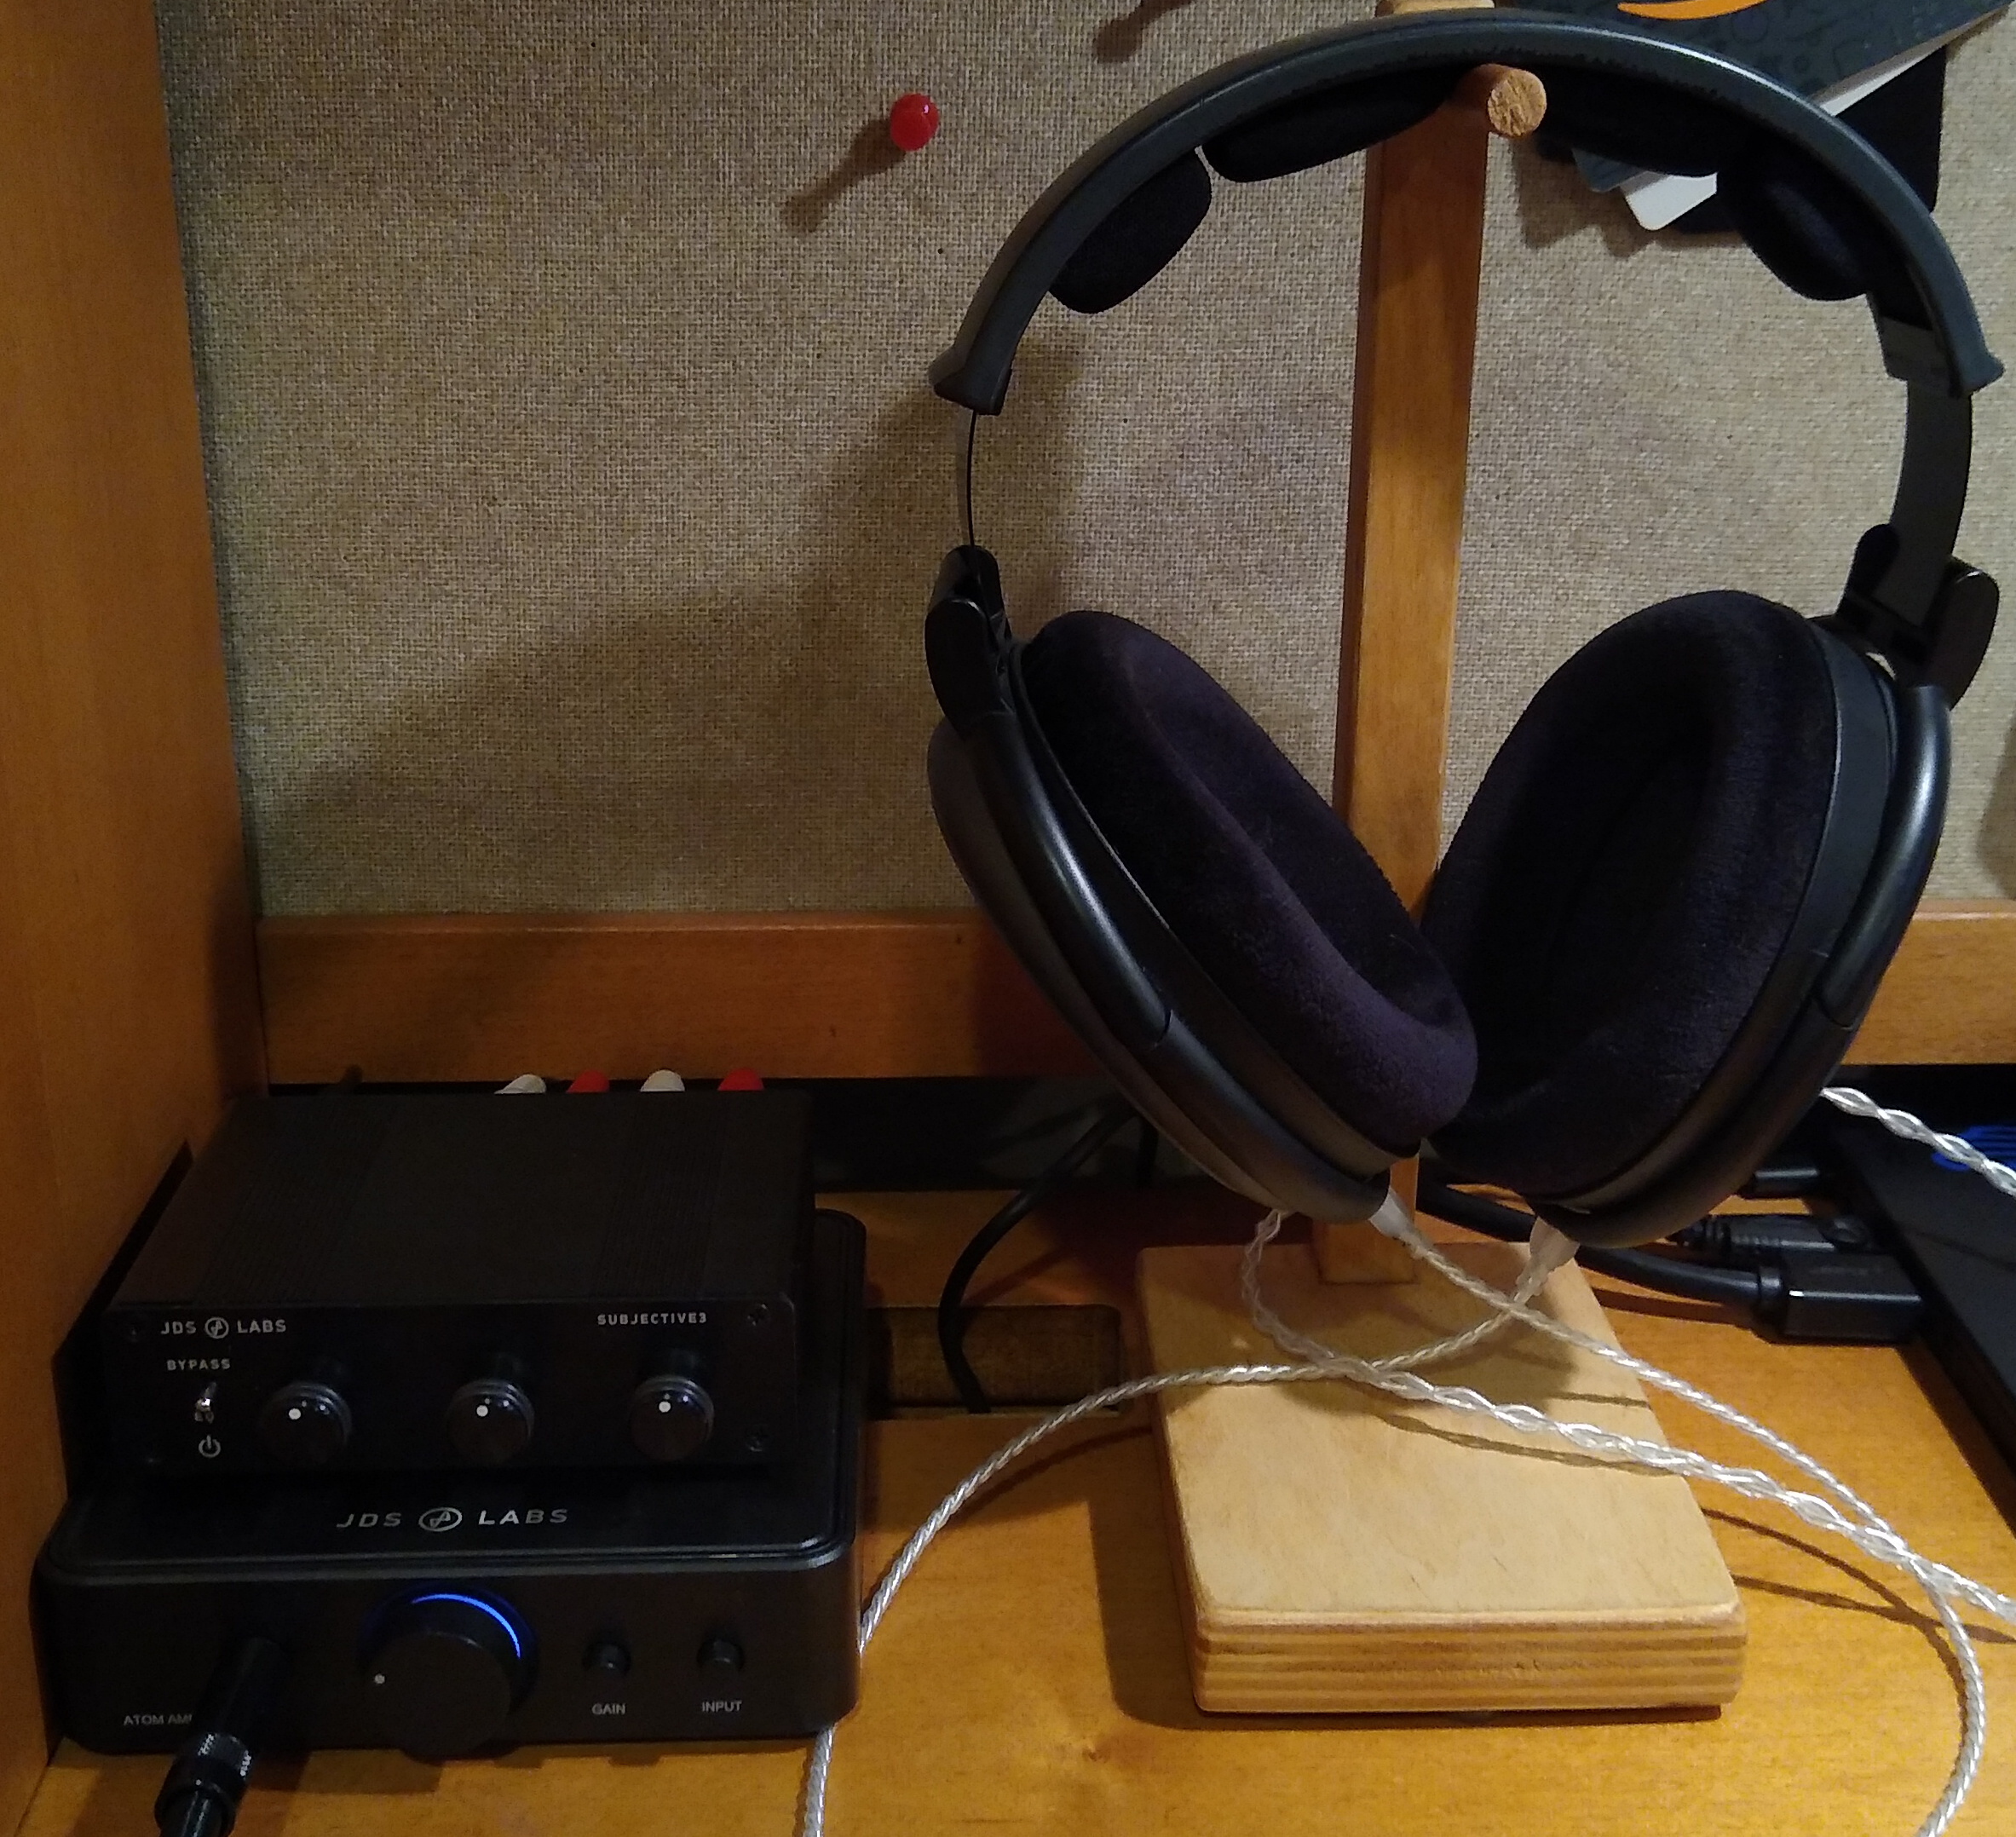
Low gain has plenty of volume for my HD-580 and LCD-2F headphones. I typically listen around setting 50-60 with high dynamic range music having low average levels. This is about 30 dB below max. So I’d be using lower levels for rock or modern music which is dynamically compressed having louder average levels.

Note: at low gain, 0 dB is 4.1 Vrms. Volume setting 50 is 30 dB quieter, which is 3.16% of that, or 130 mV. This drives the LCD-2F to 87.5 dB SPL for the loudest peaks of the music. But it’s really 6 dB quieter because my DSP for EQ drops the overall levels by 6 dB. So my typical listening puts the loudest musical peaks at around 82 dB SPL.

Wish List

The EX5 packs a lot of functionality in a compact box. Yet the challenge of single-box audio devices is they can work so well they leave me wanting just a bit more. Here’s what I wish the EX5 also did…

DSP

It would be great to have parametric EQ and crossfeed for headphones. Of course, it would take some creative thinking to do this with the EX5’s single knob/button. Without it, you must find a way to apply whatever DSP you want, upstream from the EX5.

Analog Input

The title speaks for itself. The EX5 has a great little built-in preamp / headphone amp and it would be really useful to have an analog input. Yet I understand why they didn’t do this. Since the EX5 has a digital volume control, they would have to significantly change the device in order to accept analog inputs.

Bugs / Problems

No device is perfect. Here are the issues I found with the EX5.

Sample Rate Display

The biggest problem I found with the EX5 is the display. When using SPDIF input over toslink or coax, the display always shows 44.1 (sometimes 48) regardless of the actual sample rate. Sometimes it shows the right sample rate, usually it does not and gets stuck at 44.1. For example, I measured the EX5 at 44.1, 48, 88.2, 96, 176.4 and 192. For the entire time the display showed 44.1 even when it was clearly operating at these other rates. As I type these words I’m listening to Sibelius Symphony #1 at 96 kHz yet the EX5 display is showing 44.1. One when I played 96k content the display showed 48.

This happens over digital coax or toslink from my Juli@ sound card, and over the toslink output of my Behringer DEQ2496. My other DACs (Oppo HA-1 and Corda Soul) show the proper sample rate from these devices.

I reported this to Topping on their support web site and got no reply. And tagged them on the ASR forum, no reply. There is essentially no factory support for this device.

I speculate that Topping designed this device to be plugged into Windows or Mac computers, and they rely on their custom device driver to set the displayed sample rate. In other words, the EX5 doesn’t show you the actual sample rate at which it is working, it shows you whatever rate the driver tells it to display, and defaults to 44.1 or 48.

Auto-Mute

The EX5 auto-mutes if the digital audio input has a quiet L channel. The delay depends on sample rate: about 5 secs at 192k, about 25 secs at 44.1k. This is not documented and could cause frustrating lost time chasing down ghosts if you don’t know about it.

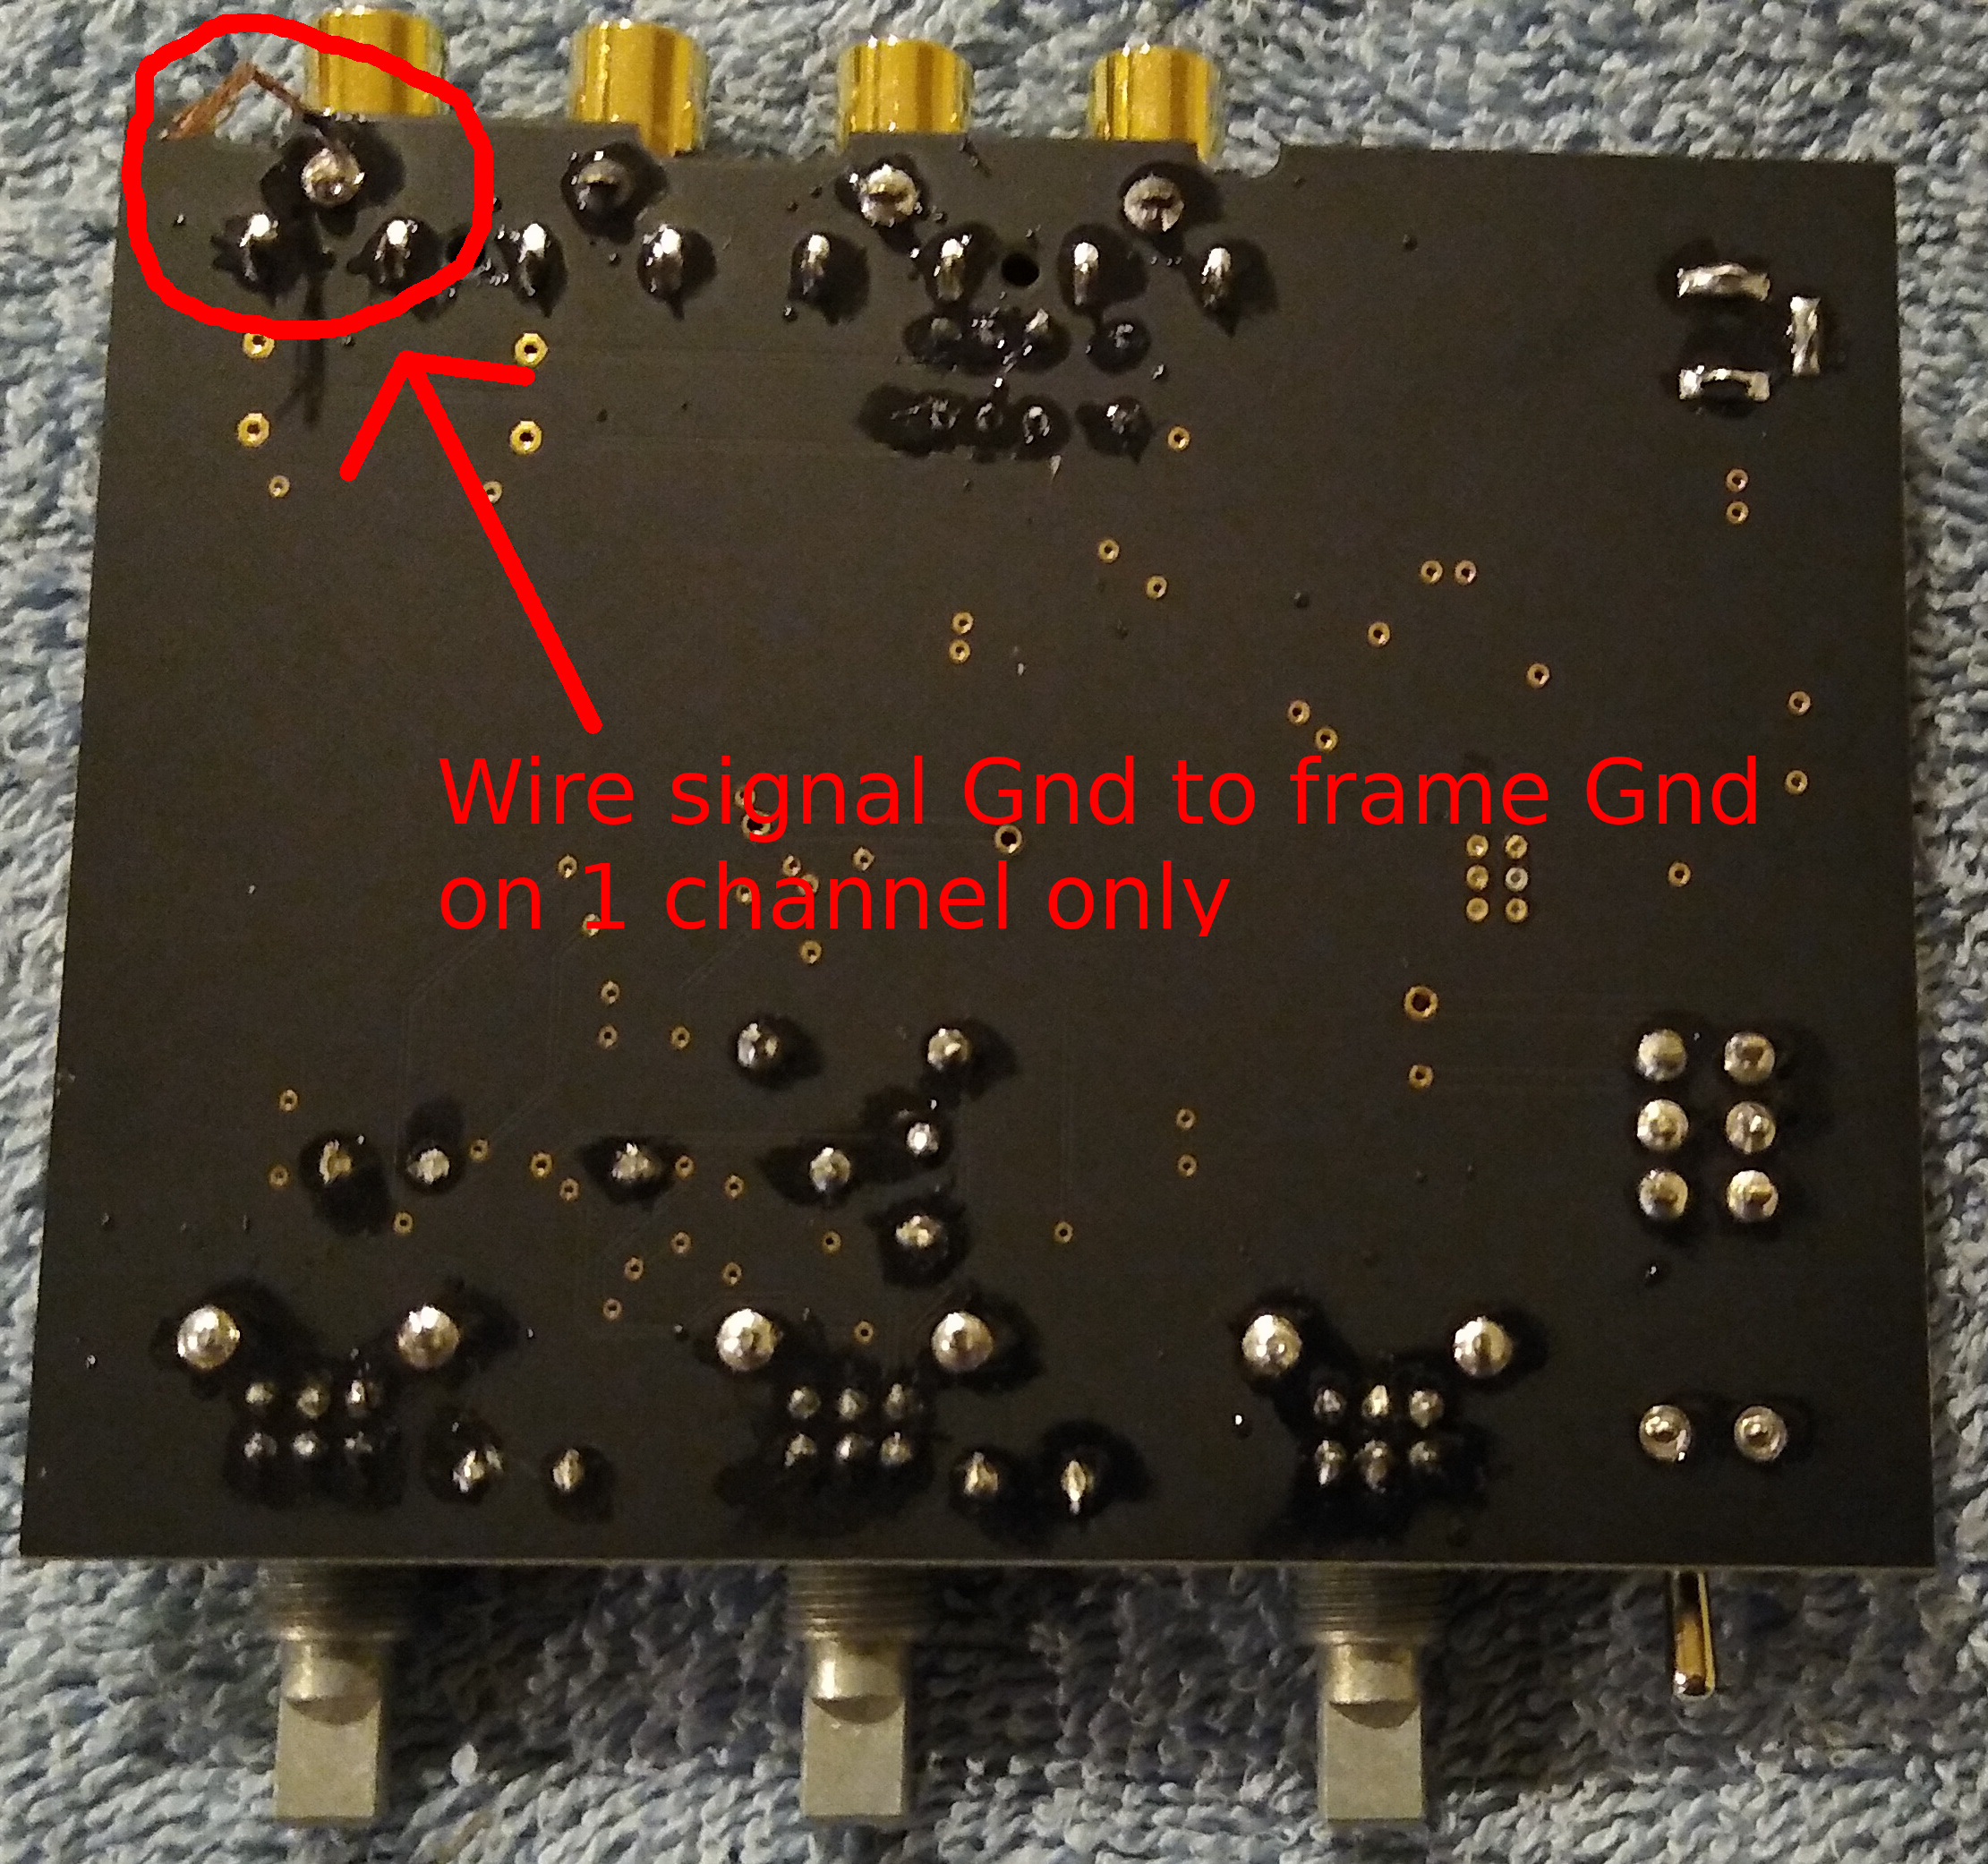
Balanced – Not Really

The EX5 has balanced outputs, both line (XLR) and headphone (4-pin). The XLR line out has twice the voltage of the RCA (4.3 Vrms vs. 2.1), so it appears to be fully balanced (differentially signalled). But the headphone output has the same voltage output on either (5.9 Vpp with low gain, 18.3 Vpp on high), so it’s not fully balanced. The balanced headphone outputs probably use separate grounds for the L and R channels, as the balanced channel separation is higher (99 vs. 88 dB).

Note: the headphone output is given as Vpp, so multiply by 0.7 to get Vrms. Thus for low gain, 5.9 Vpp –> 4.1 Vrms and for high gain, 18.3 Vpp –> 12.6 Vrms.

Measurements

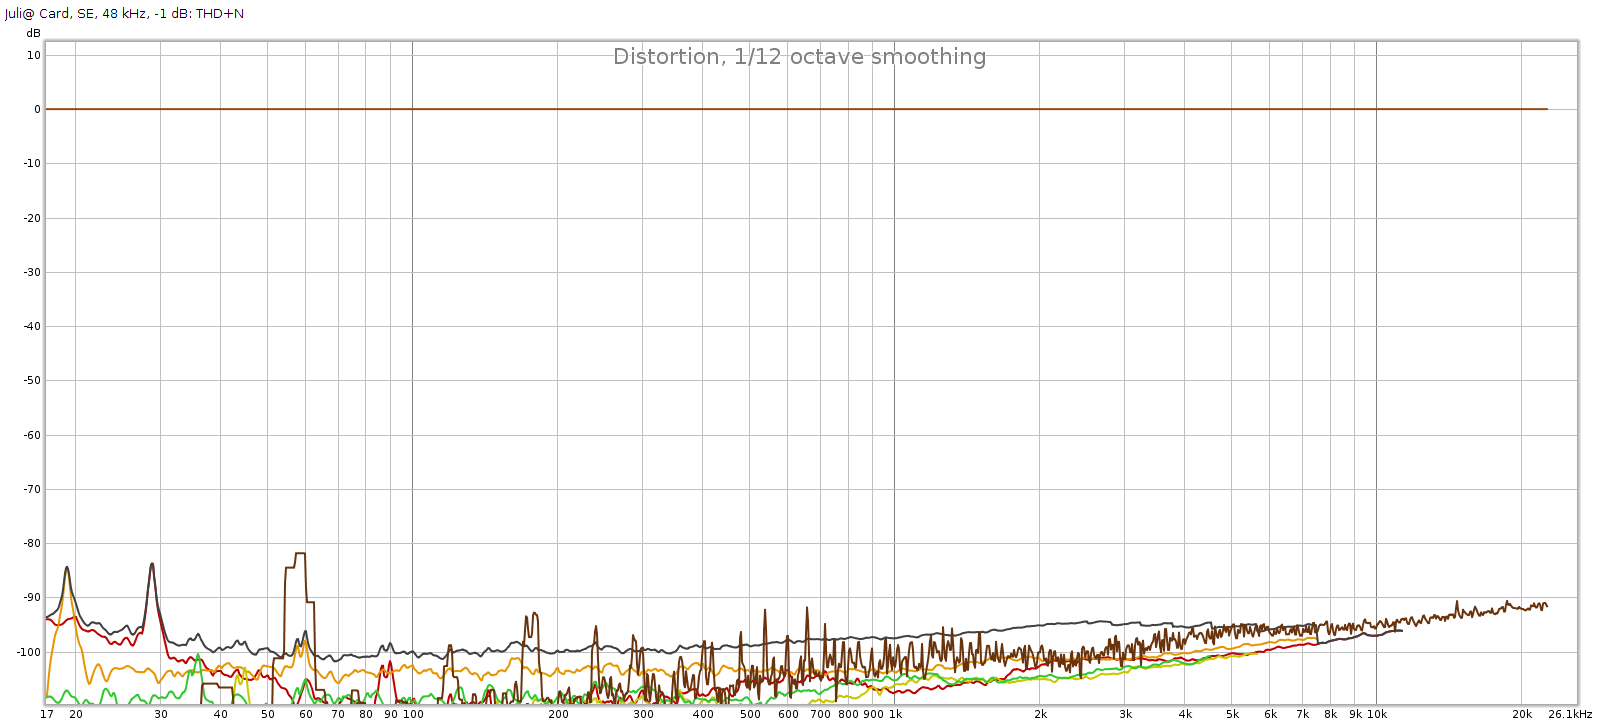
I measured the EX5 using Room EQ Wizard and my Juli@ PC sound card. This equipment is pretty basic so I can’t measure the full extent of the EX5 sound quality. But it does enable me to test some of the basics.

Here I will focus on frequency response and the digital filters. This is for 2 reasons:

  1. The EX5 manual is wrong
  2. This is easy to measure

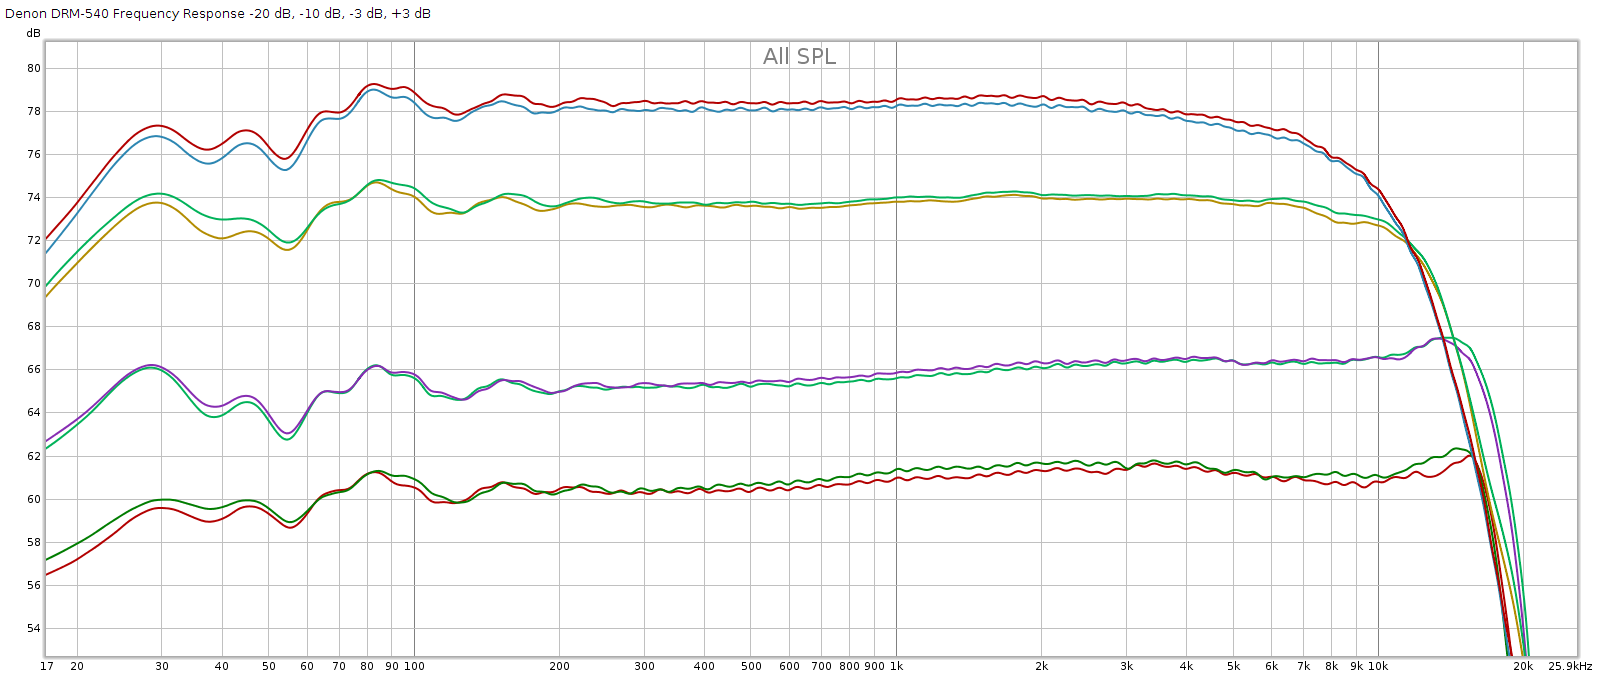
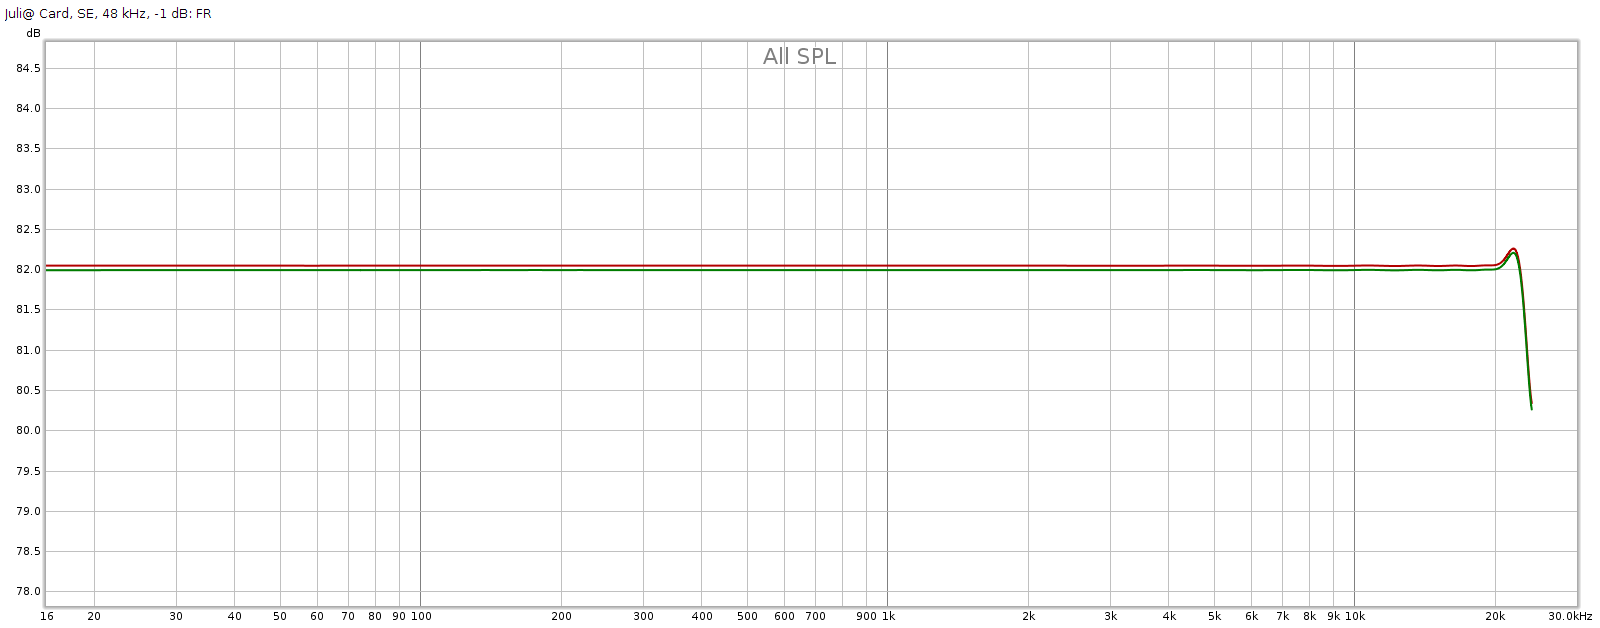
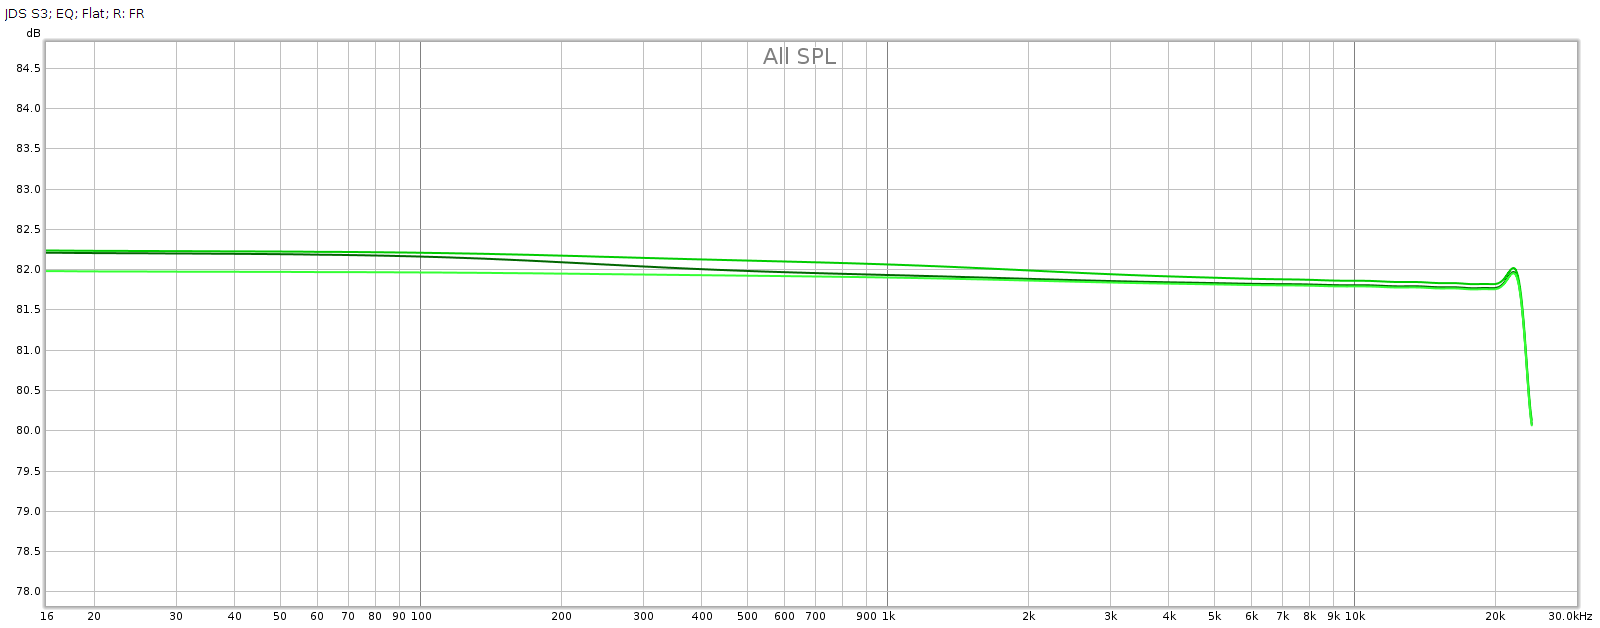
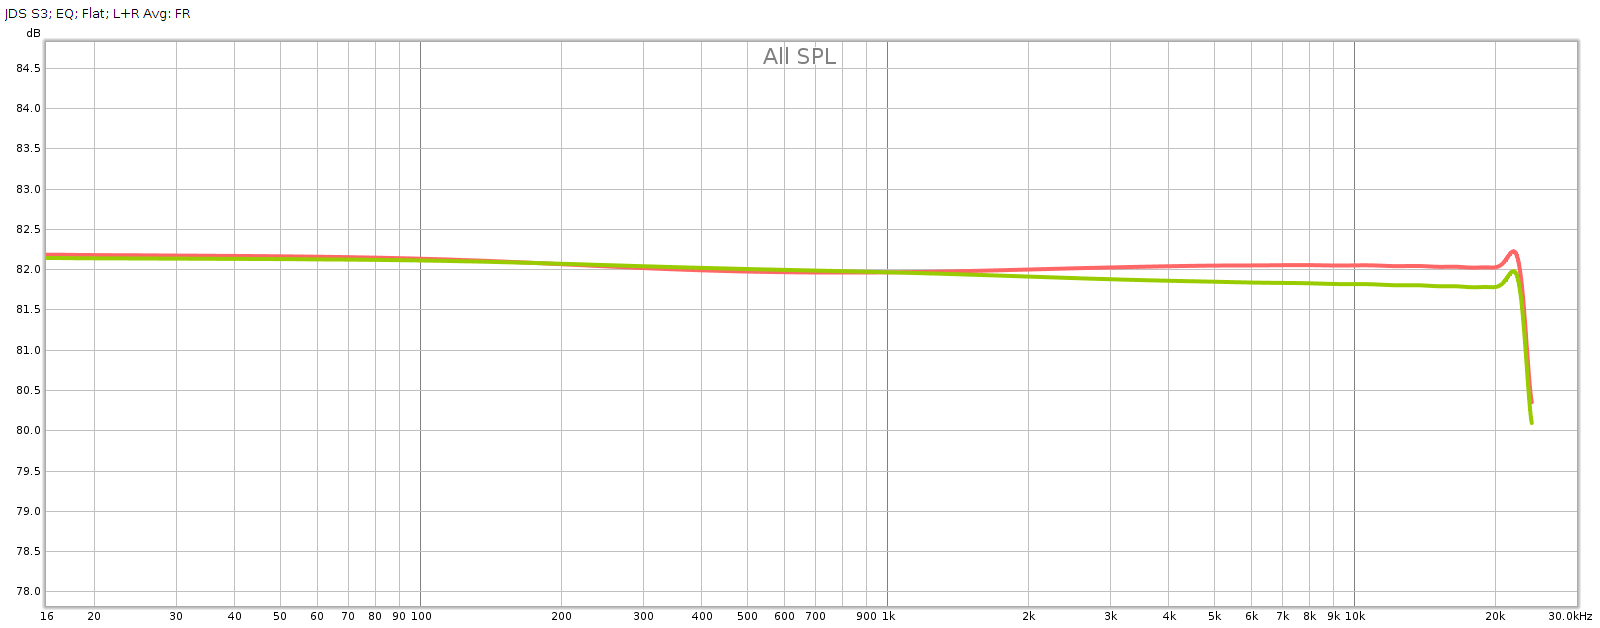
Here’s the frequency response of the EX5 digital filters at 44.1 kHz sampling:

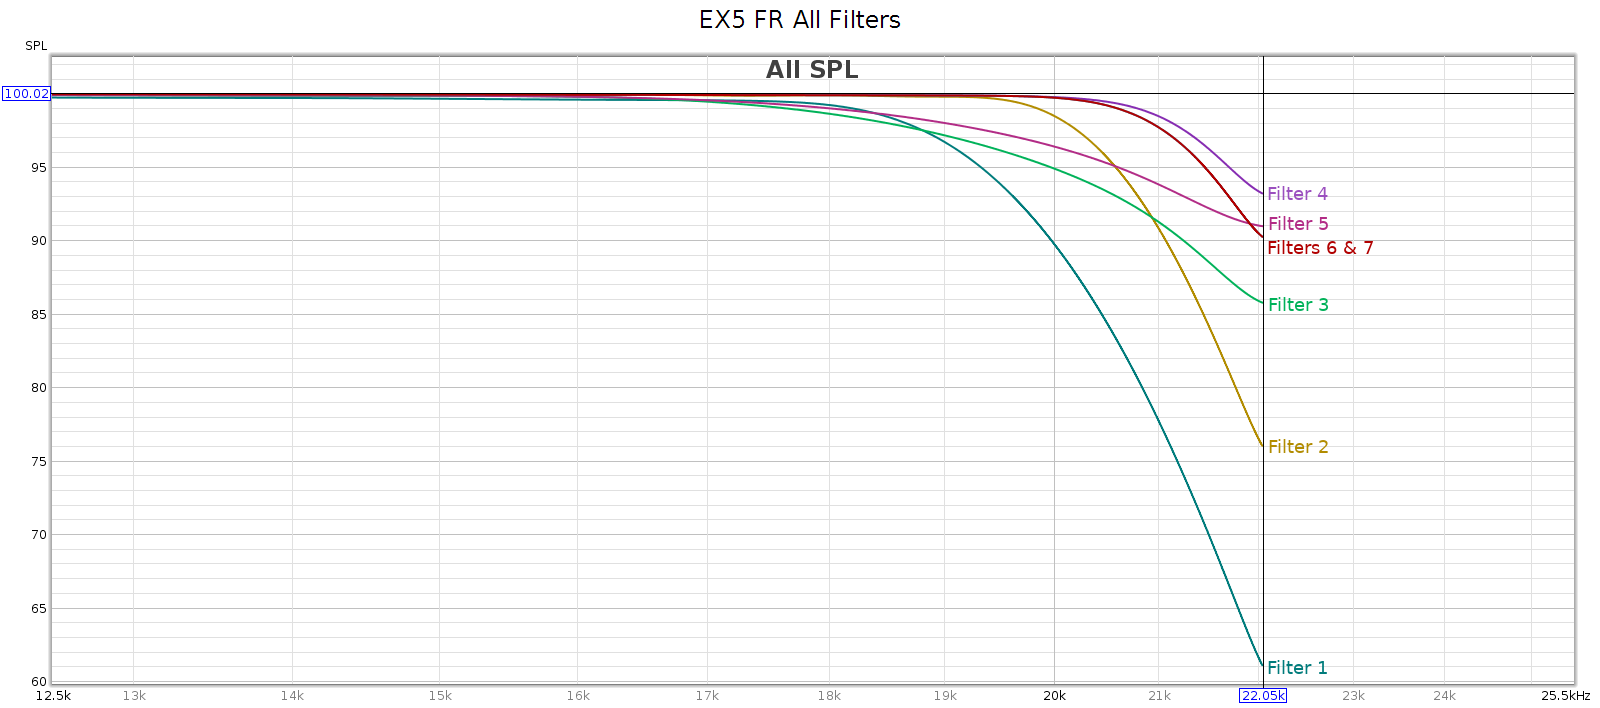
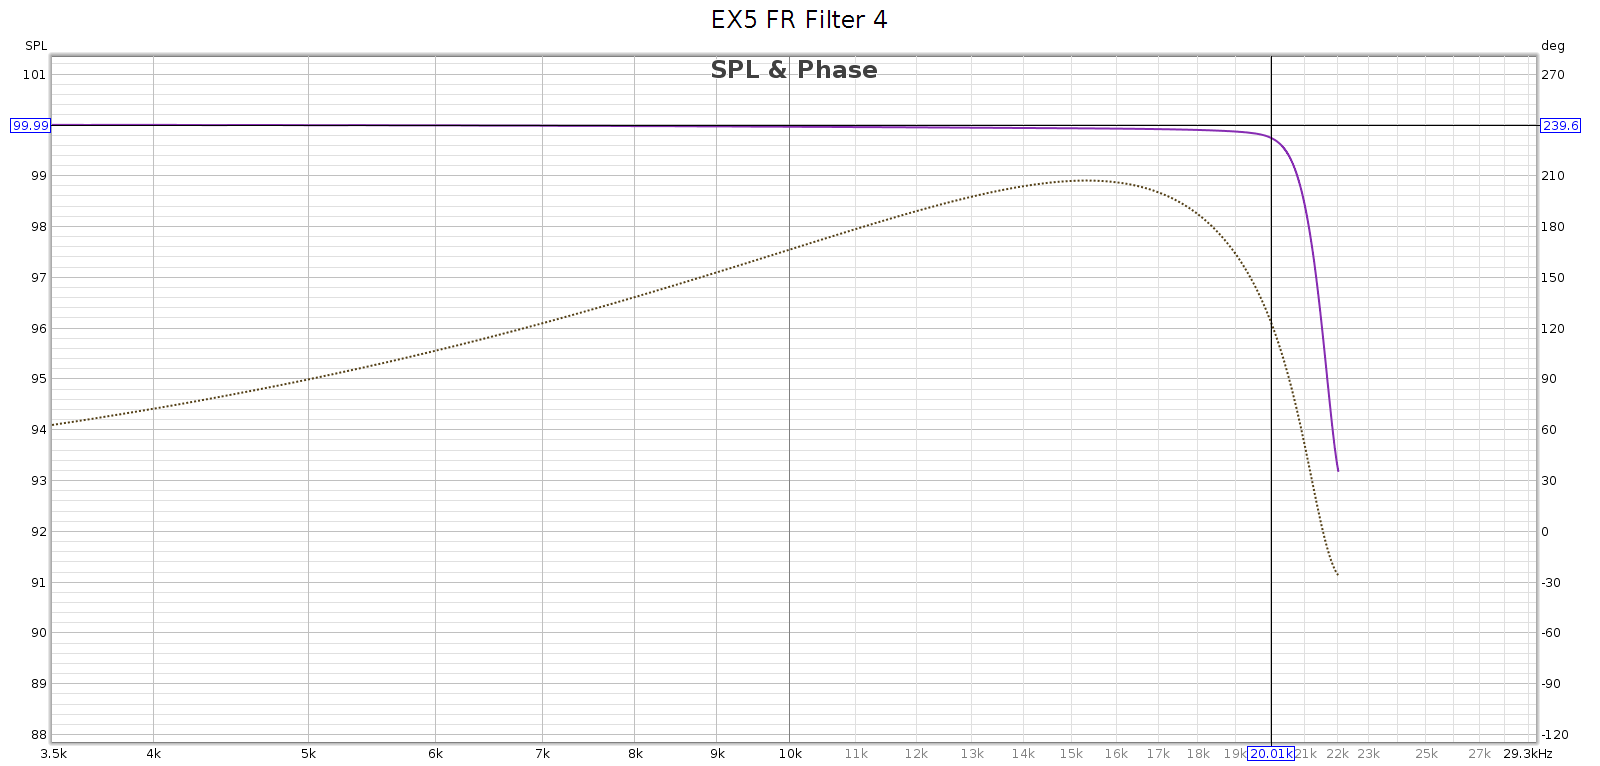
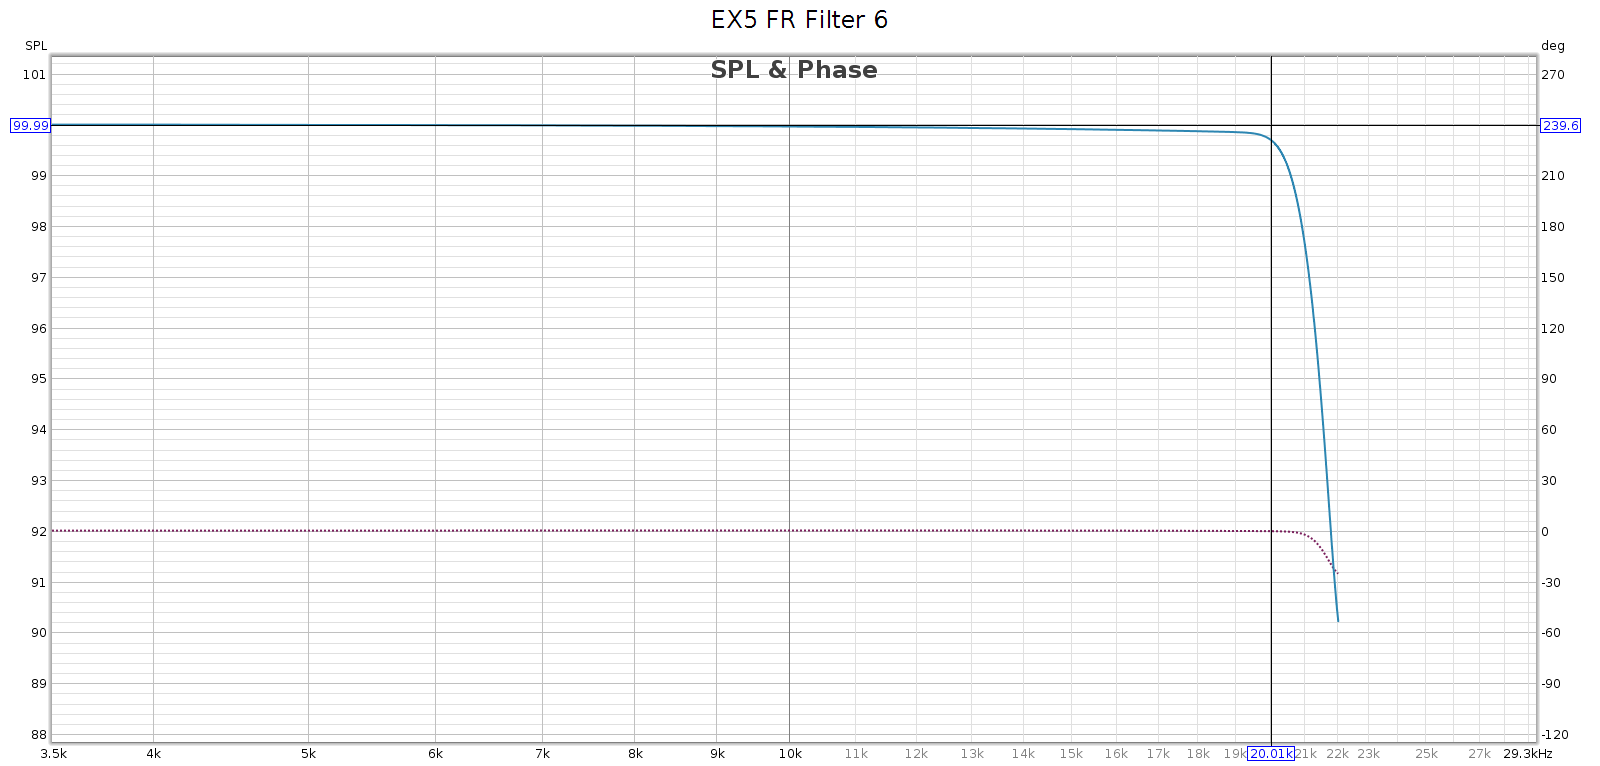
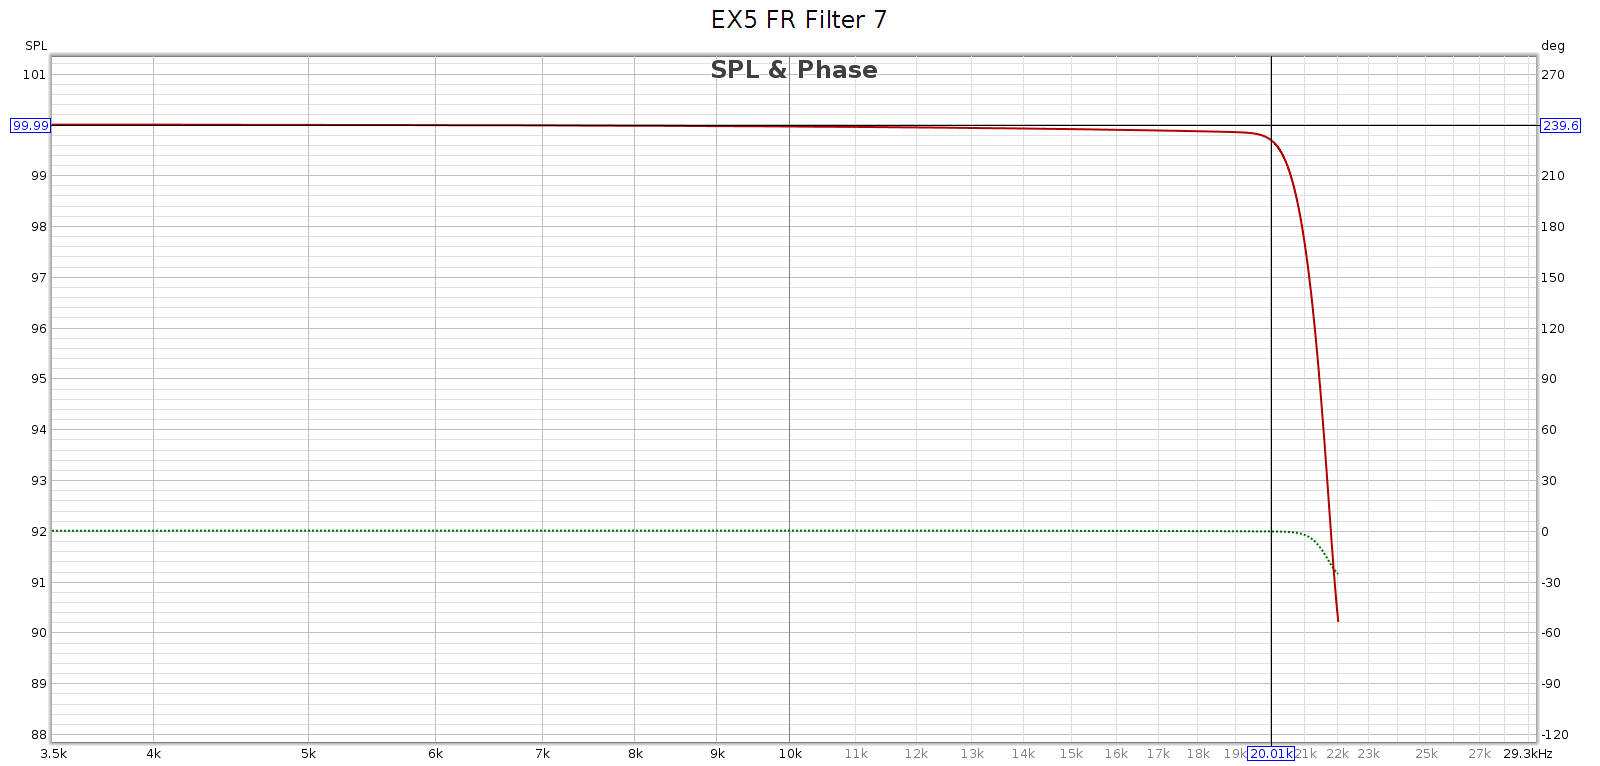
Filters 4, 6 and 7 are a bit lazy and don’t fully attenuate until 24.1 kHz. This is incorrect, yet benign.
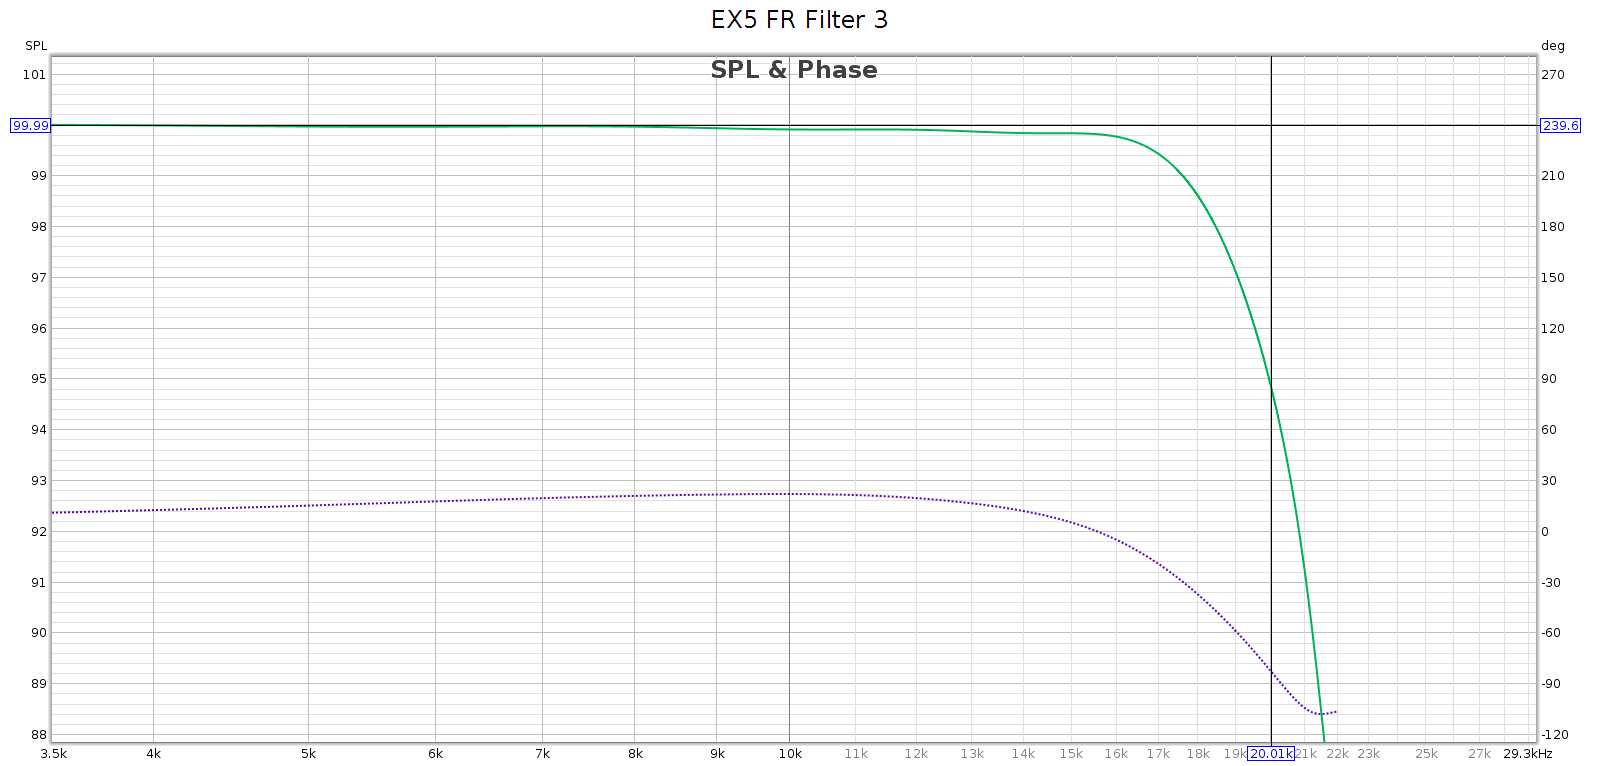
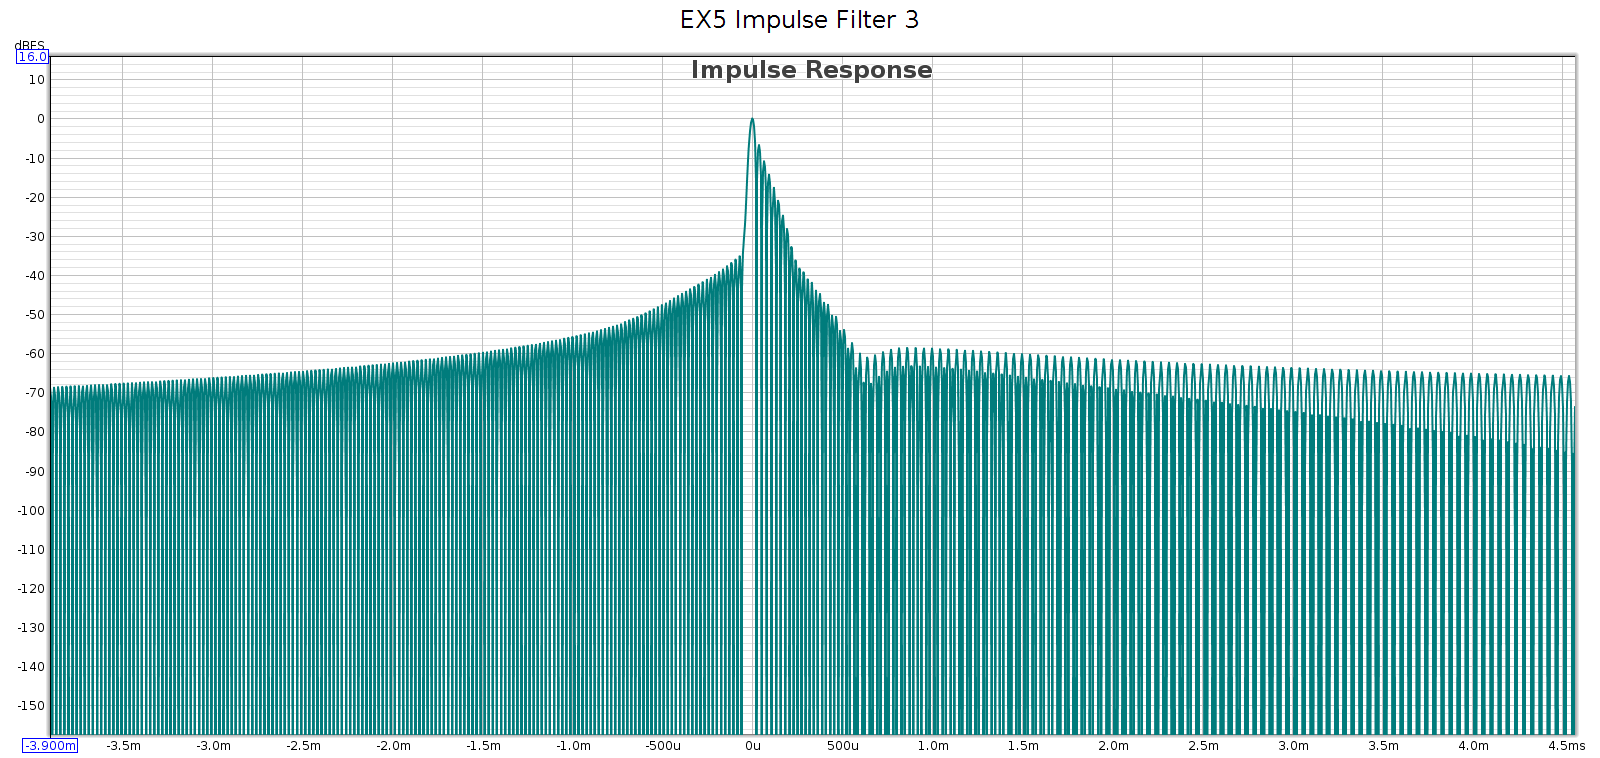
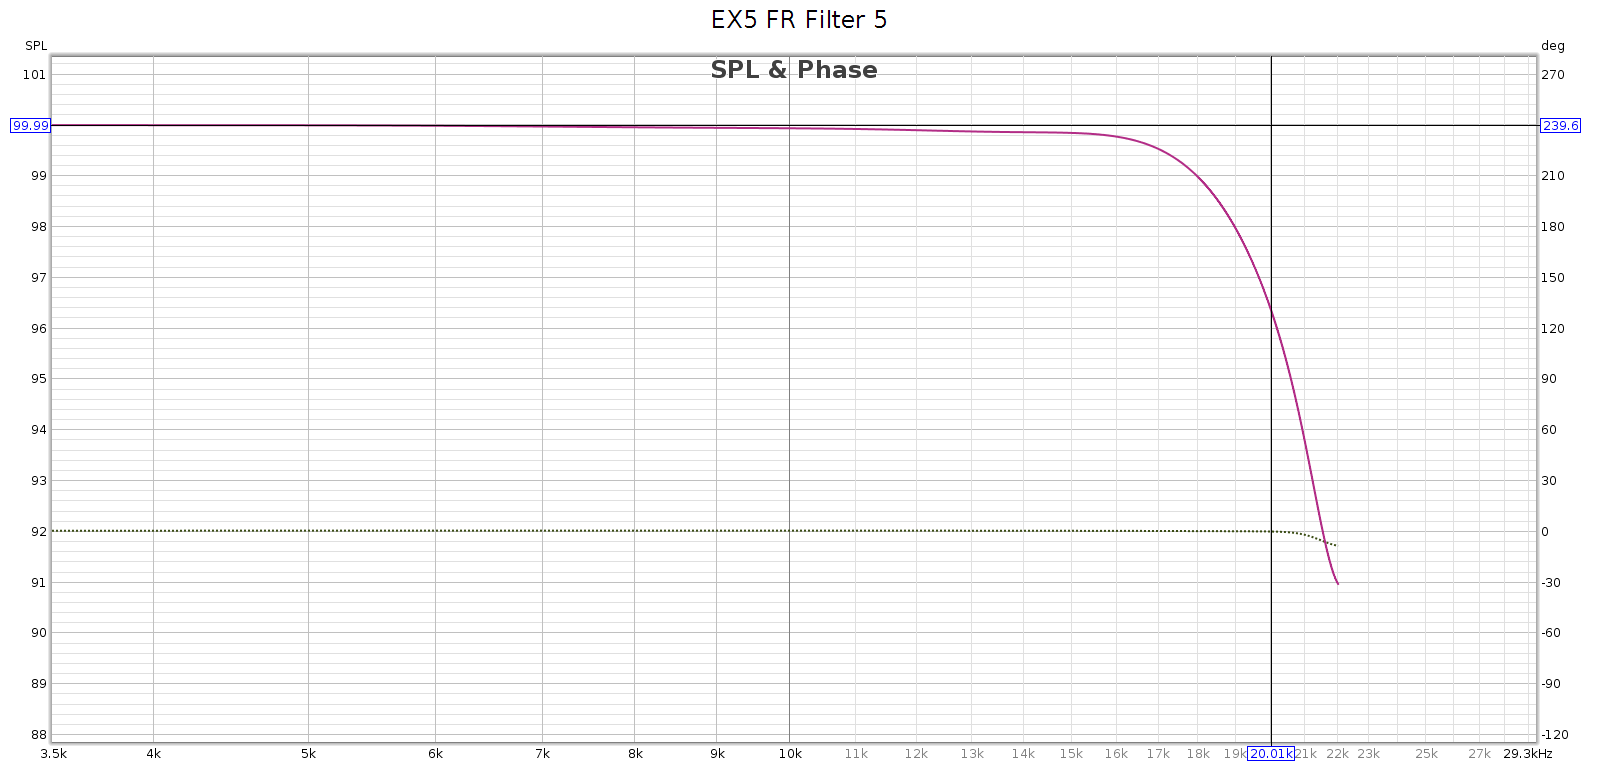
Filters 3 and 5 are very lazy and don’t fully attenuate until 28 kHz. This can be a problem.
Filters 1, 3 and 4 are minimum phase.
Filters 2, 5, 6, 7 are linear phase.
Filters 6 and 7 are identical in my measurements (both response & phase).

In summary:

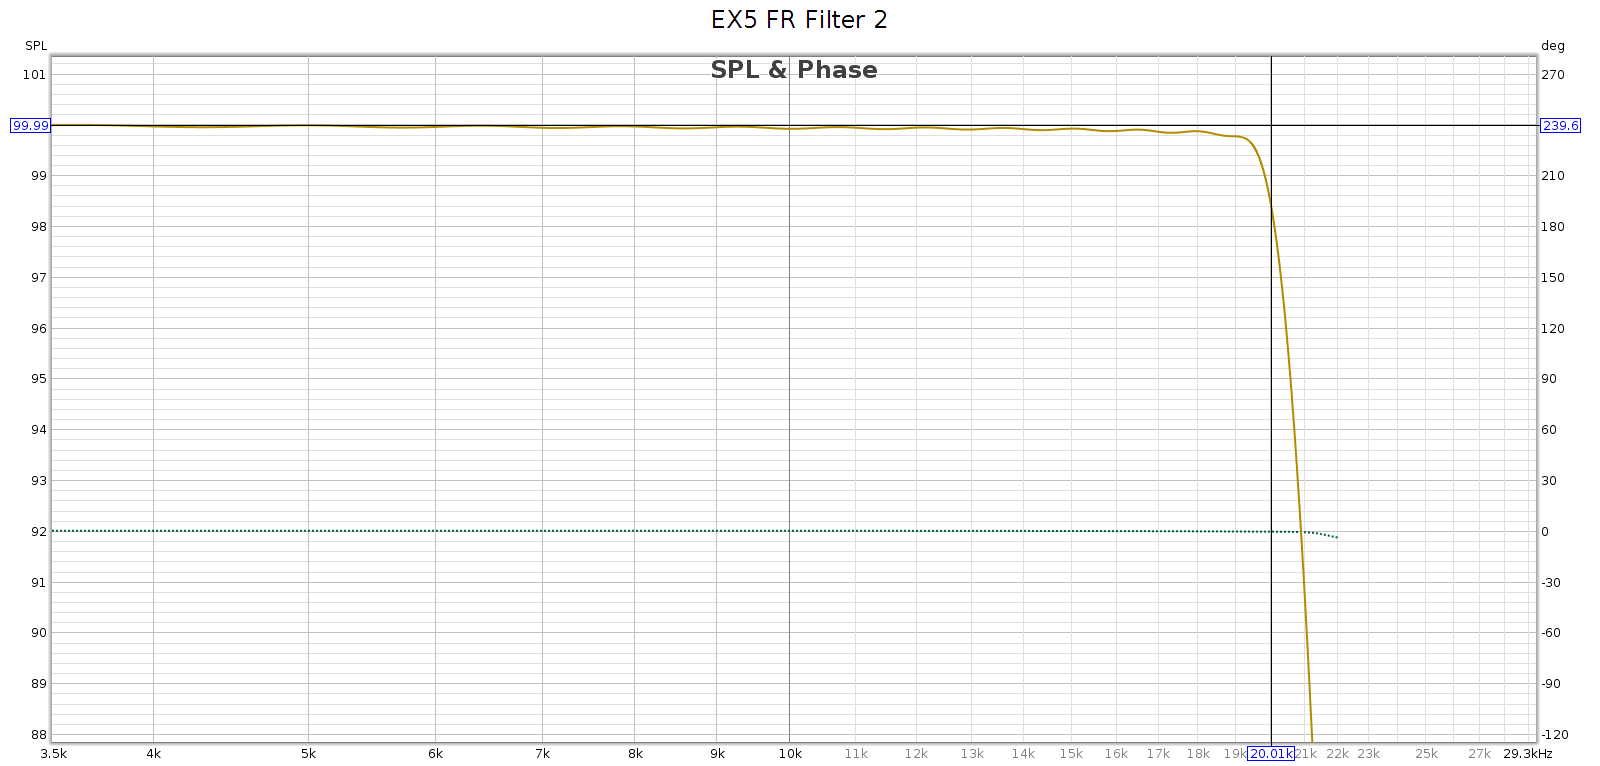
  • Filter 2 is the most correct, but it is not perfect
    • Fully attenuated by Nyquist (surprisingly rare, but welcome)
    • Linear phase (flat phase vs. frequency)
    • It has a bit of ripple, not perfectly smooth
    • It has just a tad of passband attenuation: -1.5 dB @ 20 kHz
  • Filter 6/7 is as good as #2, with different tradeoffs
    • Fully attenuated by 24.1 kHz, thus any aliasing is above 20 kHz
    • Linear phase (flat phase vs. frequency)
    • No ripple – perfectly smooth response
    • No passband attenuation: -0.3 @ 20 kHz
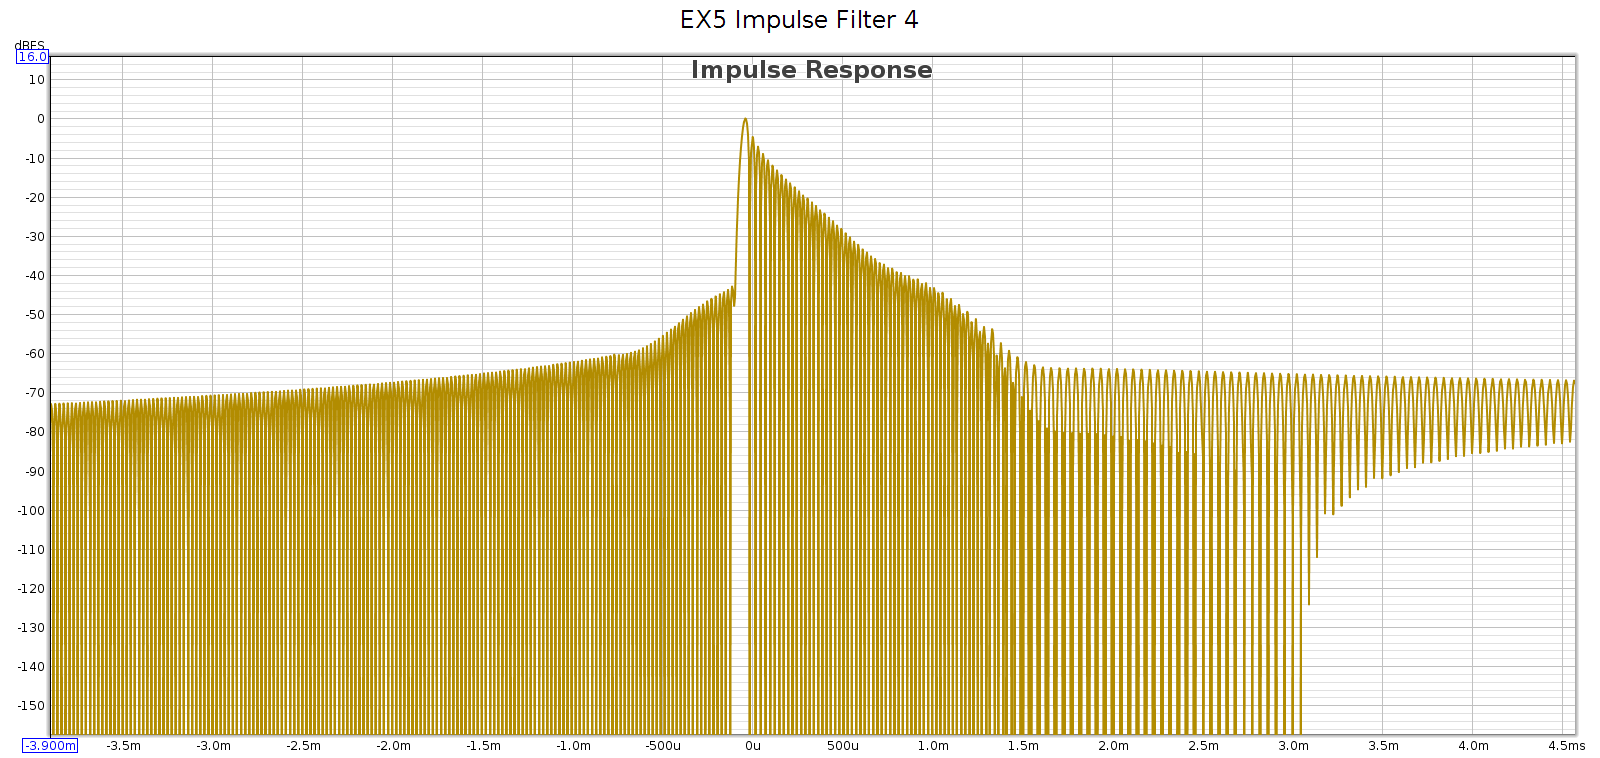
  • Filter 4 is the best minimum phase filter
    • Fully attenuated by 24.1 kHz, thus any aliasing is above 20 kHz
    • Phase rises smoothly to +210* at 15 kHz, then drops to 0* at 21 kHz.
    • No ripple – perfectly smooth response
    • No passband attenuation: -0.2 @ 20 kHz

Put in reverse, why not use the other filters?

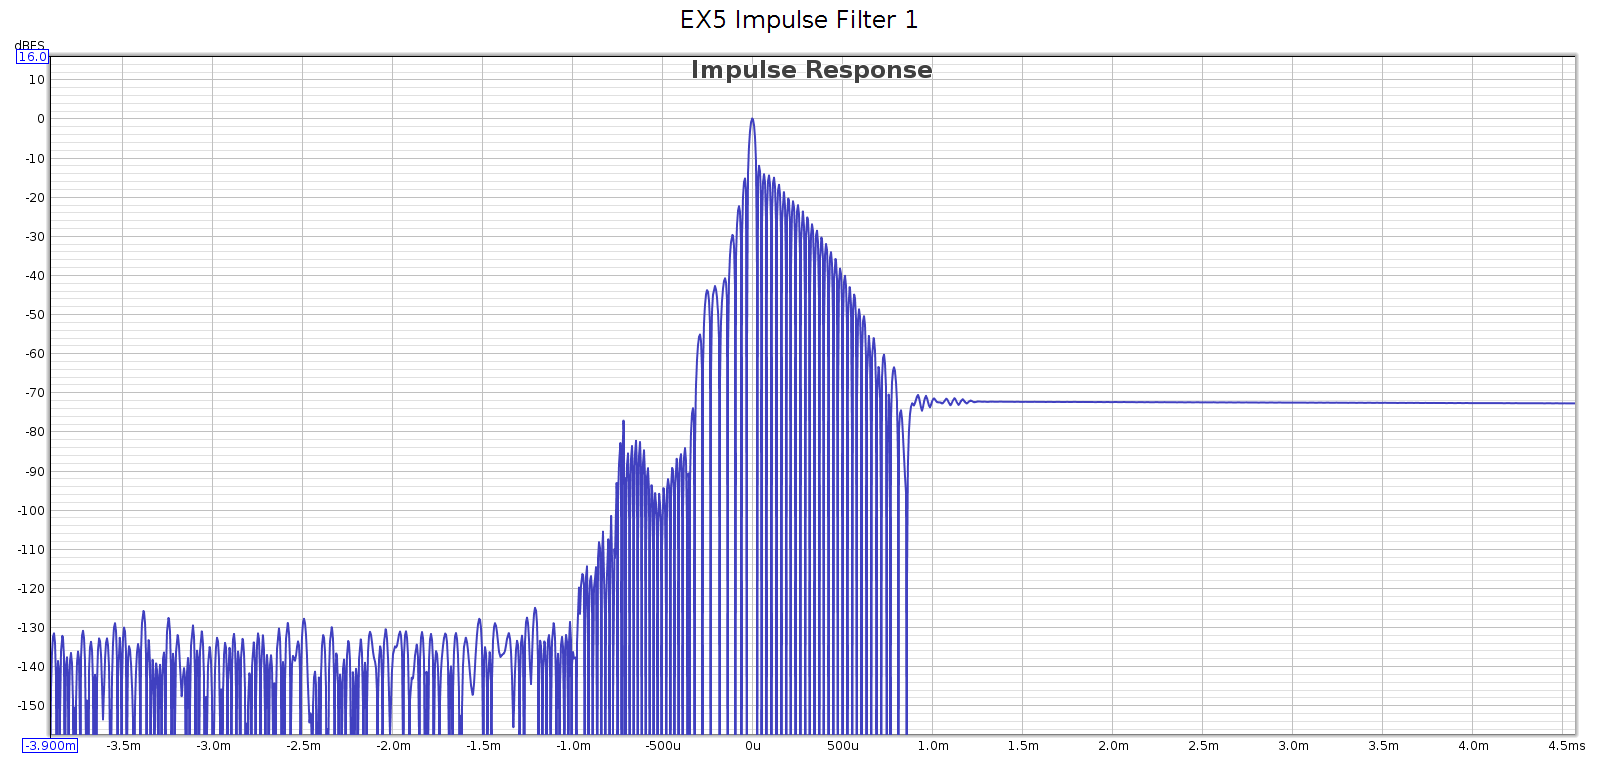
  • Filter #1 has significant passband attenuation: -10 dB @ 20 kHz
  • Filters #3 and #5 don’t attenuate until 28 kHz, thus leak high frequencies that can alias down to 16 kHz

How is the manual wrong? It gets 6 of the 7 filter descriptions wrong.

  • It labels #1 as fast rolloff apodizing, which is wrong
    • It rolls off slowly with significant passband attenuation, -10 dB @ 20 kHz
  • It labels #2 as slow rolloff minimum, which is wrong
    • It rolls of sharply with almost no passband attenuation
    • It is linear phase, not minimum phase
  • It labels #3 as fast rolloff minimum, which is wrong
    • It rolls off slowly with significant passband attenuation: -5 dB @ 20 kHz
  • It labels #4 as slow rolloff linear, which is wrong
    • It rolls off sharply with no passband attenuation
    • It is minimum phase, not linear phase
  • It labels #5 as fast rolloff linear, which is wrong
    • It rolls off slowly with significant passband attenuation: -3.6 dB @ 20 kHz
    • It does not fully attenuate until 28 kHz
  • It labels #6 as brick-wall, which is correct!
    • It has no passband attenuation, fully attenuates by 24.1 kHz, and is linear phase
  • It labels #7 as fast rolloff corrected minimum, which is wrong
    • This filter is identical to #6, and is linear phase

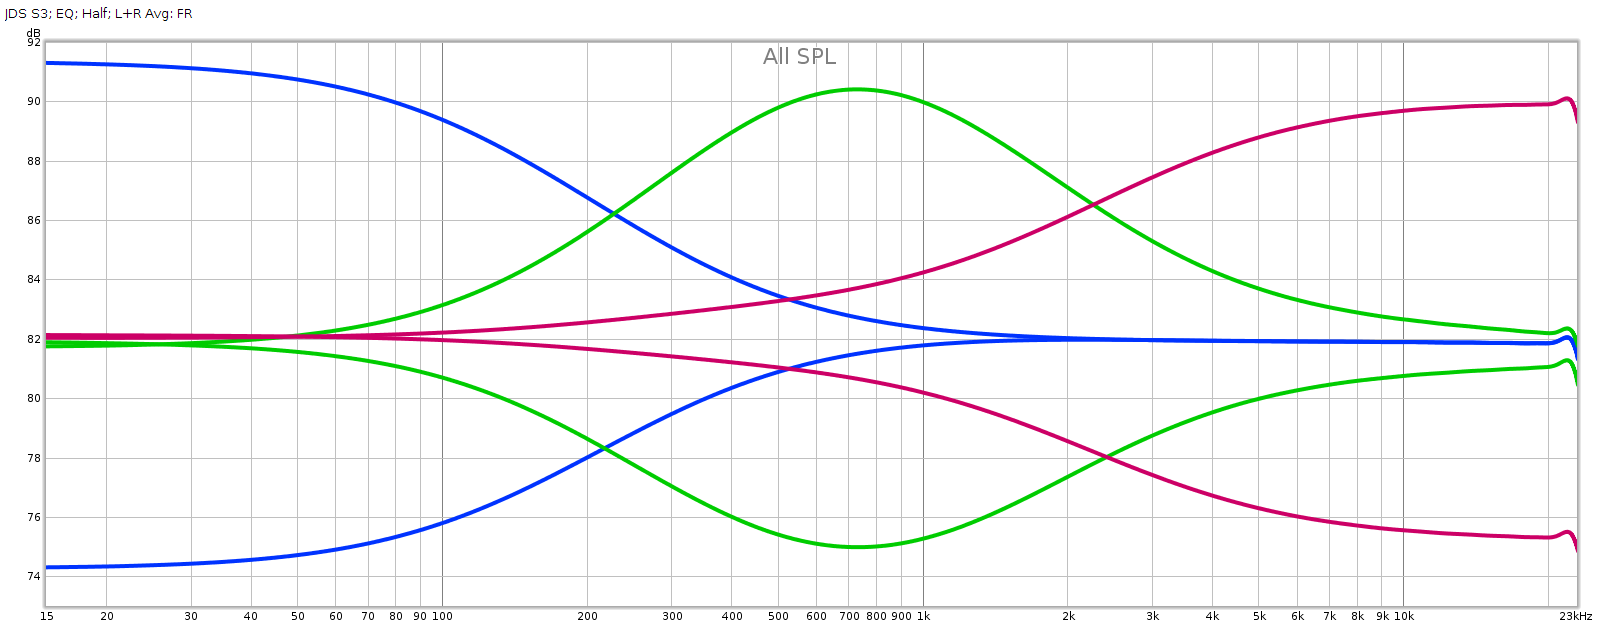
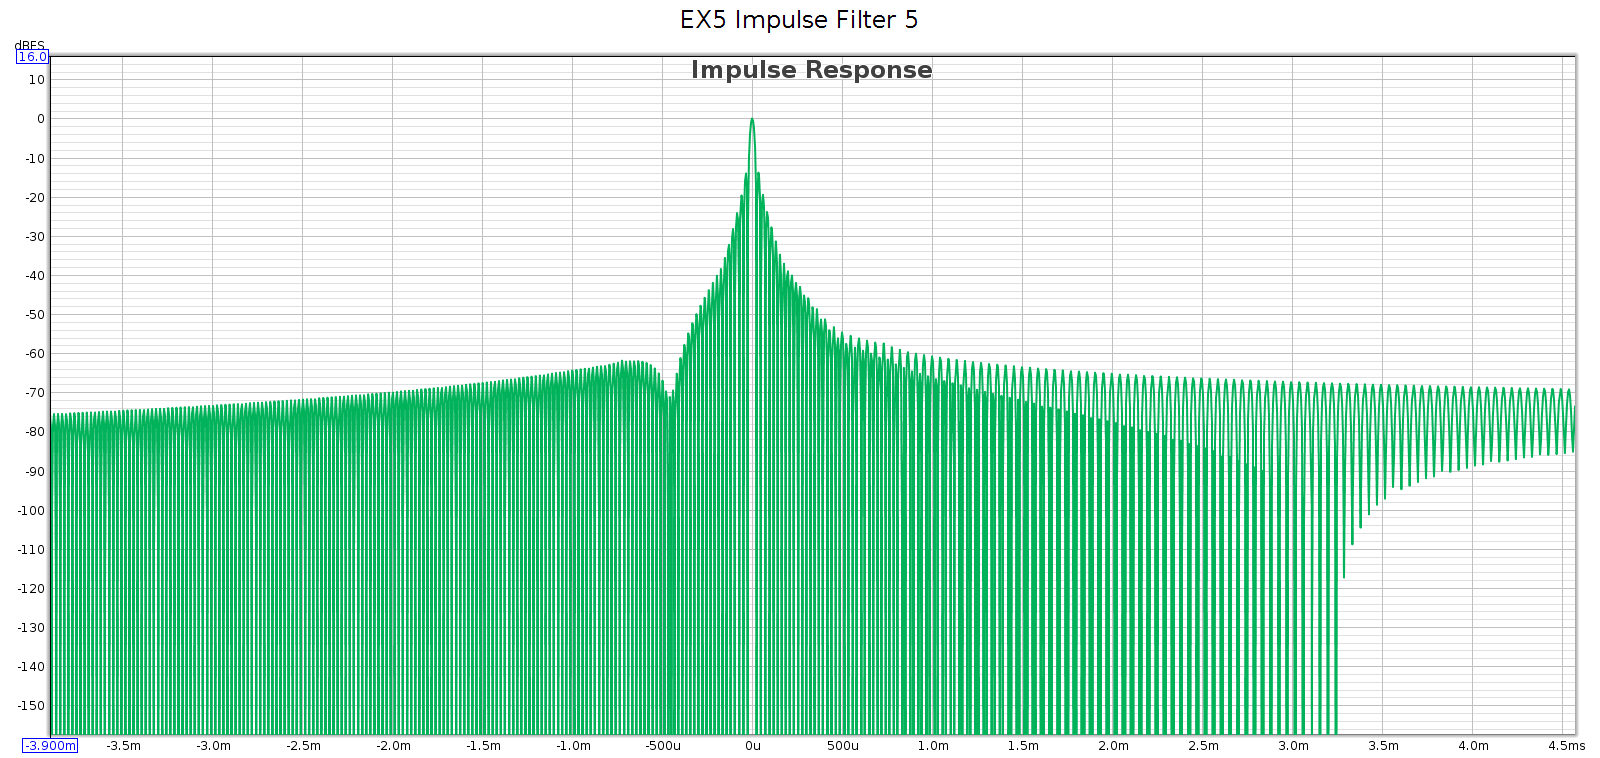
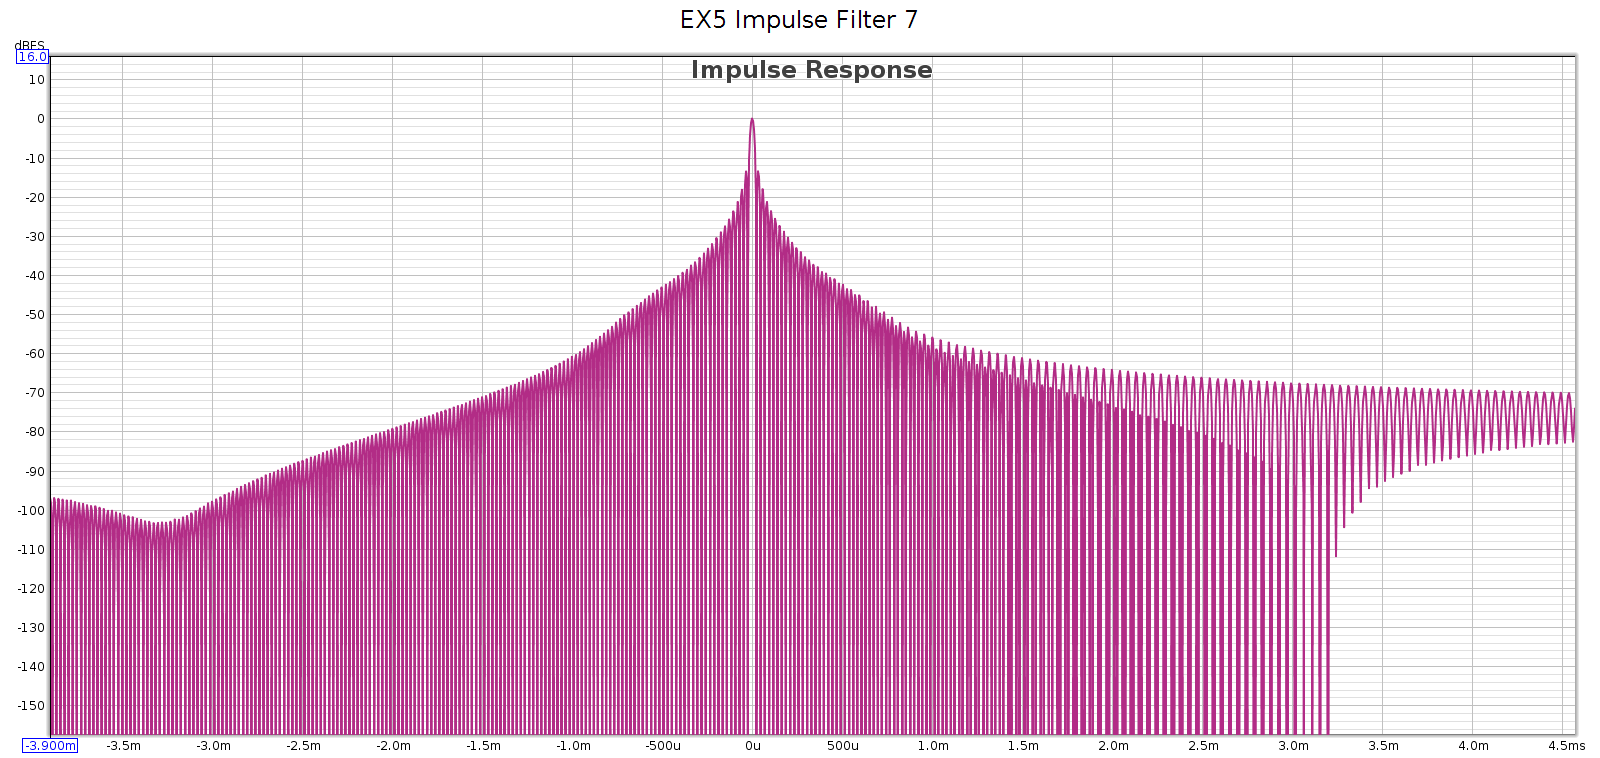
Measured at 44.1 kHz, here are the frequency response, phase, and impulse response of each of these filters. In each graph, the cursor marks the flat response corner @ 20 kHz. Below, note that the minimum phase filters have non-flat phase and asymmetric impulse response.

Filter 1

Filter 2

Filter 3

Filter 4

Filter 5

Filter 6

Filter 7

Comparison

The EX5 is such a great little device I couldn’t resist comparing it with my Corda Soul.

Frequency Response

The Soul has 2 user-selectable filters. Here’s how they compare with the EX5:

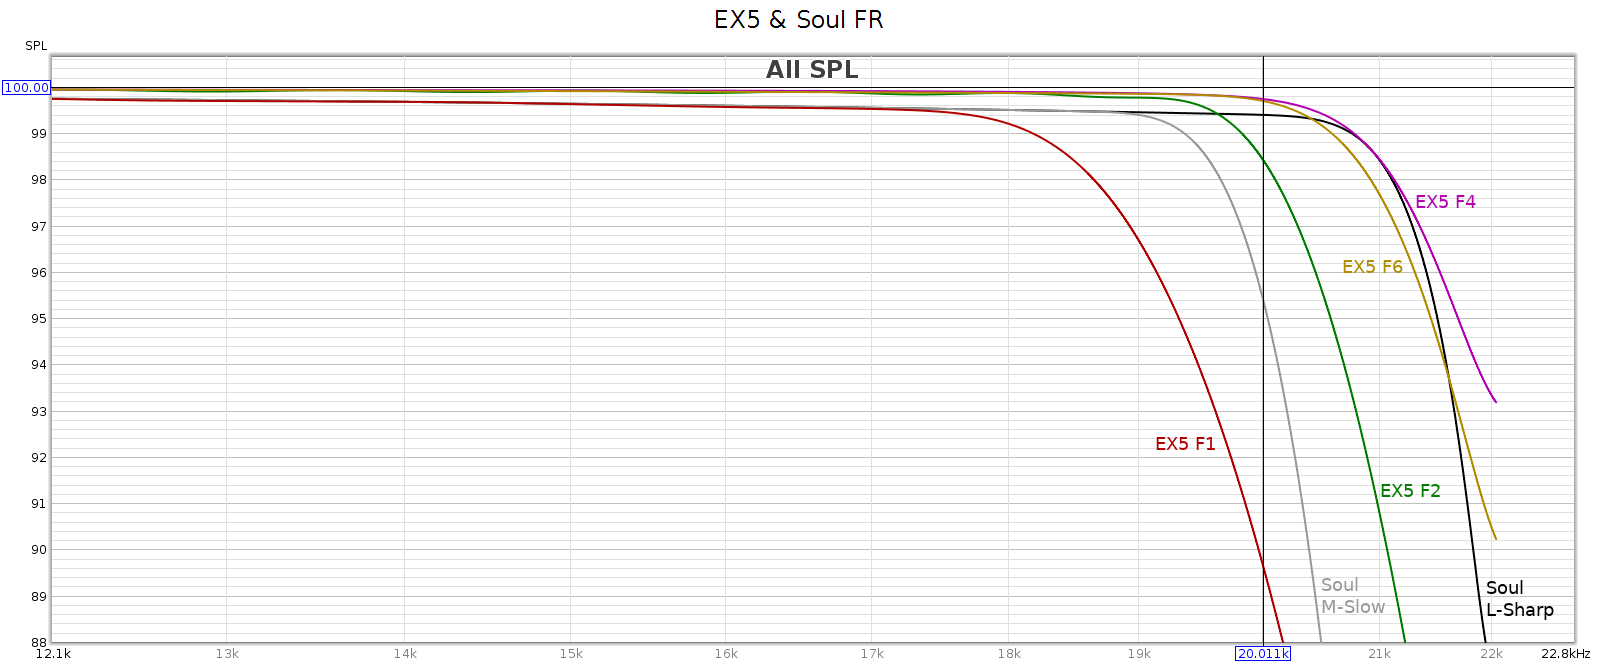
The Soul’s linear phase filter (L-Sharp) is the best shown. It is the flattest in the passband, perfectly smooth with no ripples, and fully attenuates by 24.1 kHz faster than EX5 #6.

The Soul’s minimum phase filter (M-Slow) is between the EX5 #1 and #4.


Keyboards: Cherry Blue vs. Buckling Springs

I’ve seen a lot of reviews of these keyboards, but they’re not that useful. They usually record what they sound like when typing and talk about how they look and feel. I’ll try to provide a bit more objective info here.

The keyboards I’m comparing are a Durgod with Cherry Blue switches, and a Unicomp Mini M with buckling springs. Both are 87-key layouts (tenkey-less). I find this more ergonomic, as it puts my right hand closer so I don’t have to stretch to reach the trackball. More on that here.

Sound

I recorded both keyboards with my Rode NT1A mics while typing the sentence, “Now is the time for every good man to come to the aid of his country.”

Here are the cherry blues

Here are the buckling springs

They sound quite different. Cherry blues go “click-tick-click-tick” with a thin high pitch while buckling springs go “clock-tock-clock-tock” with a thicker lower pitch. Perceptually, the buckling springs sound louder but the difference is belied by the recordings. According to the recording. peak levels for the buckling springs are only 0.3 dB louder than the cherry blues. Perceptually, it’s hard to compare relative loudness of sounds having such different frequency profiles.

Next, frequency spectrum analysis of these sounds:

Here are the cherry blues

Here are the buckling springs

If you look closely you can see differences that are consistent with subjective perceptions. The buckling springs have more energy at lower frequencies: 50-70 Hz, 310 Hz, and 750 Hz. They have less energy at high frequencies, as the cherry blues have bigger spikes at 1200 and 9500 Hz.

Compatibility

Like every other keyboard I’ve used, the Unicomp works on both Linux & Windows, and through my IOGear electronic KVM switch. However, it behaves differently with Numlock.

Most 87-key TKL keyboards don’t have Numlock, and they ignore the Numlock signal. Not the Unicomp. It supports Numlock! The ScrLk key becomes NumLk when you use Shift. It has 12 keys dedicated to the keypad: 7-9, u-o, j-l, m-.. It seems nice to have even though I would never use it. However, it can also cause problems.

Most computers’ system BIOS have a setting to set the Numlock state when the computer boots. By default, this is ON. This doesn’t work well with an 87-key like the Unicomp, because it changes important alphanumeric keys into numbers. So you may need to alter your BIOS to set the default state to OFF.

Furthermore, Linux enables Numlock when it boots and when you log in (even when you set the BIOS state to OFF). So you’ll have 2 more places you need to reverse the Numlock state. The Linux command “numlockx” is useful for this.

At first I thought this was an annoying bug in the keyboard firmware, as the Numlk got enabled every time I booted my Linux system, and every time the desktop timeout lock kicked in. But as sometimes happens, it turns out to be a feature. Once I figured out how to set the default state to OFF, this is no longer a problem.

Typing Speed

An accurate way to assess typing speed is to look at the keyclicks in the sound waveforms as I typed the same sentence. So here they are:

cherry blues

buckling springs

You can see from the clicks in the waveform that my typing speed was almost exactly the same: about 6.5 seconds to type that sentence (distance from first to last click).

The sentence has 68 characters and 16 words. For typing speed, nominal word length is taken to be 5 characters, so this sentence is only 13.6 nominal words. This amounts to 125 words per minute. That is, form the ratios 13.6/6.5 = X/60, then X = 13.6*60/6.5 = 125.5.

As typing speed is the same, one might assume the difference between these keyboards is purely subjective: which do you think feels or sounds better? Yet such is not the case. We must consider typing accuracy.

Typing Accuracy

Here, the Unicomp wins, and it’s not even close. And it’s not for what might perhaps be the most obvious reason: mechanical switch accuracy. Neither keyboard’s switches produce missed or double characters. The reason is more subtle. It’s about the key switch actuation force and the shape of the keycaps.

Key Actuation Pressure

Blues are not the heaviest cherry switches (greens are). Blues are heavier than the popular Browns, yet still much lighter than buckling springs. The difference is not subtle; it is big and obvious. The Cherry switches are so light, I find that they actuate with incidental finger movement. Just lightly resting my fingers on the keys to find the home keys, I sometimes accidentally press a key. And while typing, if my finger is even slightly misaligned from the exact center of the keycap, if my finger even slightly brushes the key next to it, that key also activates.

Thus, the cherry blues require more finger placement precision when typing, which means either (A) making more mistakes, or (B) slowing down. Because the buckling springs are a bit heavier, they are more forgiving. If your finger is slightly off the exact key center, and gently brushes a key next to it, they key doesn’t actuate. This enables faster typing.

Keycap Shape and Feel

The buckling spring keys feel like they are further apart from each other, slightly bigger spacing. Yet they measure the exact same dimensions, so I assumed this was just my imagination. But the feeling was so persistent that I took additional measurements, and discovered that the keycaps are the same overall size but they have slightly different shapes.

Here I’ll call them “Unicomp” and “Durgod” rather than “buckling spring” and “cherry blue” because we’re talking about the keyboard’s keycaps, not the switches.

Unicomp’s keycaps have slightly smaller top faces and slightly more taper to the base. In comparison, the Durgod keycaps (which are the same shape as the standard keycaps we get on any keyboard that uses cherry switches) are a bit more squarish: the top face is slightly bigger with slightly less taper to the base.

In millimeters, the Unicomp keycap tops measure 11×11, vs 12×12 for the Durgod. Of course, if the keycap tops are slightly smaller while the overall key spacing is the same, the gaps between keycap tops must be slightly larger. And this is true. That spacing measures 7 on the Unicomp, vs 6 for the Durgod.

Both keycaps top faces are curved so you can feel when your fingers are perfectly centered. But the key actuation force of the cherry blues is so light, I can’t actually feel that curvature because doing so incidentally presses the key. To avoid incidental presses, I must hover my fingers just above the keys instead of on them. This reduces the precision I can get by feel.

How does this affect the feel of the keyboard when typing? With the Unicomp you can tell if your fingers are slightly off the keycap center, and keep them centered as you type. I find I do this automatically, probably from all that time typing on original IBM keyboards all those years ago. In comparison, the Durgod keycaps feel the same whether you hit direct center or are slightly off.

Typing Accuracy: Conclusion

These two factors combine to make my typing less accurate with the Durgod keyboard. First, the cherry blue switches are so light, I get accidental strikes on adjacent keys when my fingers aren’t positioned exactly right. Second, the shape of the Durgod keycaps make it harder for me to tell when my fingers are perfectly centered.

In contrast, the Unicomp is more forgiving of sloppy finger positioning when typing, and the keycaps give better tactile feedback to improve that positioning by touch as you type.

Postscript: Cherry Greens

Greens are just like blues, but with a heavier spring / actuation force. Only slightly heavier, the difference is subtle. Many keyboards with blue switches use a green for the spacebar. As mentioned above, the (slightly) stronger force protects against accidental strikes and boosts accuracy. However, greens still feel lighter than buckling springs, and less tactile. Also quieter, but with a less satisfying higher pitched click.

I use greens (with o-rings) at work and buckling springs at home. I prefer the buckling springs but the greens are the best compromise I can find that won’t torture my co-workers with the noise.

Postscript: O-Rings

Installing small o-rings around the stem of each keycap is a popular mod. I’ve seen them available in 2 hardnesses and thicknesses:

  • Hardness: 40A (soft) or 50A (firm)
  • Thickness: 0.2 mm (thin) or 0.4 mm (thick

What the o-rings do:

  • They make the keyboard quieter, especially if you bottom-out the keys (which I always do).
  • They soften the bottom-out so it’s less jarring on your fingers.
  • They don’t make blues or greens less clicky or tactile.

I find these effects subtle and easy to exaggerate. They make a difference for sure, it’s just not a huge one. They are not necessarily “better” or “worse” — it’s just different and a matter of taste. O-rings are inexpensive, you can get a 200 pack for around $5 – $10. And they can easily be removed if you don’t like them. So if you’re curious then jump right in – there’s no real reason not to try them.

Audio Review & Measurements: Denon DRM540 Cassette Tape Deck

Introduction

Years ago, I owned and used a Denon DRM-740, one of their best cassette tape decks. It was about as transparent as a tape deck can be (not very) and I recorded a lot of material on it. Recently I bought this piece of retro 1990s audio gear on eBay as a little blast from the past. I was curious if I could restore it to its original specs and performance.

Description

The DRM-540 is a standard 2 head cassette tape deck with electronic transport controls, Dolby B and C, HX Pro, and fine bias adjustment. You can Google it for details.

This unit arrived with a dirty, scratched heavily used exterior. Cosmetically, I’d rate it 2 of 5. This belied its interior condition. The heads looked fresh, no scratches or grooves. The inside was clean and all the service adjustment pots turned smoothly. Mechanically, it worked.

Restoration

The first thing I did was physically clean the heads, capstan and rest of the tape area with Q-Tips and isopropyl alcohol. It had years of oxidation and gunk. Next, I demagnetized the heads and metal transport parts. Now it was ready to play tapes. I connected the deck’s input & output to my PC sound card (an ESI Juli@).

First: speed adjustment. I played my calibration tape, which has 3 kHz on side A, 8 kHz on side B. The deck ran about 2% slow. That’s WAY off. I opened the top to get access to the motor speed adjustment screw. For coarse adjustment, I played the 3 kHz tone and listened with my phone and Spectroid app. It was quick & easy to get it within 1%. Then I recorded tape playback with Audacity and did an FFT / Spectrum Analysis. Back and forth a few times. Eventually I got the speed within 0.3%. That’s about as close as I could get, given the resolution of the adjustment screw.

Here’s a closeup of the spectrum playing a 1 kHz tone. You can see sidebands near the center frequency, which show the frequency stability is imperfect. If this were a DAC we’d call that jitter:

Here’s the full spectrum for that same tone. You can see the 2nd & 3rd distortion harmonics are just under -60 dB. Not bad for a cassette tape deck.

You might notice that harmonic distortion from this tone is lower than the power supply harmonics at 60, 120, 180 and 240 Hz. It looks like this deck could be improved by better filtering the power supply. The power supply doesn’t appear faulty, it’s just that there’s no reason to spend a fortune making a super clean power supply, since the device will be limited by cassette tape performance.

Next: azimuth adjustment. This is a screw next to the playback head that changes the angle of the head to align it with the tape as perfectly as possible. I don’t have a scope, so I played the 8 kHz tone into the sound card while recording in Audacity. Slowly turned the screw back & forth to maximize the output level, until the screw was in the middle of the range of maximum output. This changes the channel balance, so I turned those internal pots to equalize them, then readjusted the azimuth. I went back and forth a few times until it was as close as I could get. The azimuth ended up in a very different position from where it started, so it was quite a bit off.

Then I went back to 3 kHz and adjusted the internal playback gain pots to equalize the channel balance, then to 8 kHz, which had slightly different balance. Back and forth a few times to minimize and equalize the difference.

Next: recording. I played REW frequency sweeps on the PC and recorded them. I used BASF Reference Maxima II tape, one of the best back in the old days. The L-R channels weren’t equal when recording, so I adjusted the internal recording gain pots to equalize them.

Dolby B is ubiquitous, so that is what I used for all the following measurements.

Here’s the frequency response measured at different recording levels: -20, -10, -3 and +3 dB. As expected the best (most linear) frequency response is at -20 dB, which is why that is the level used for its specifications. Frequency response tapers as we increase the level, yet it does so smoothly.

This deck meets or exceeds its specification, which is 20 Hz to 18 kHz, +/- 3 dB at -20 dB.

Next: bench testing: frequency response, distortion, SNR. I used the deck to record and play back the REW frequency sweeps and analyze them in REW. I did this at different settings: no Dolby, Dolby B and Dolby C. And I also did this while turning the external user-settable fine bias control to see whether it worked and how much impact it had.

Here are some distortion graphs made at different recording levels. This is measured after recording and playback, so it includes total distortion from the deck itself, and from the tape used for recording. Thus it overstates the deck’s distortion and represents real-world results.

Distortion at -20 dB

Distortion at -10 dB

Distortion at -3 dB

Distortion at +3 dB

Above, we see what we’d expect from a new deck. Distortion rises at high at high levels due to saturation, and it rises at low levels due to noise. The sweet spot for lowest distortion is around -10 dB recording level.

Another problem this deck had was that the recording level lights didn’t match between recording and playback. That is, record something with the levels just reaching 0 dB but when you play it back the lights indicate higher (or lower). I fixed this by adjusting the internal input and output level pots. Now the lights match between recording & playback.

Also, the drive motor developed an occasional squeak. I used a syringe to apply a tiny amount of low viscosity oil to the motor driveshaft/bearing interfaces. This eliminated the squeak. Then I had to readjust the speed again.

This deck has a fine bias knob on the front panel. The reason for this is that different types and brands of cassette tapes have different frequency response, so this enables you to fine tune the frequency response to each individual tape. I tested the effect of this knob, results below. Note that the graph uses 1 dB per division, so the frequency response is flatter than it looks.

The blue line is with the fine bias knob in its center position.
The magenta line is with the fine bias knob turned full left, CCW, the -5 position.
The green line is with the fine bias knob turned full right, CW, the +5 position.

The above graph shows that fine bias is like a tone control that tilts the frequency response like a see-saw whose center pivot is around 1 kHz.

Summary

Results: to my surprise, the deck performed on par with the specs from the manual.

  • Frequency response: 20 Hz to 18 kHz, +1 / – 3 dB
  • Distortion (with Dolby B)
    • At level -10 dB, THD at -50 to -55 dB (0.25%), with 2nd & 3rd harmonics at -60 dB
    • At level +3 dB, THD at -30 dB / 3%
  • Fine bias: -4 to +2 dB @ 10 kHz

Remember this is with a 20 year old blank tape that had been recorded on a few times. If anything, it understates the actual performance.

Finally, I did some subjective testing. Recorded a clean 96-24 digital album (Diana Krall & Tony Bennett), played it back and compared with the original. The differences are audible, but not as obvious as one would expect, given this vintage equipment and cassette tape limitations. It actually sounds pretty decent.

The original: http://mclements.net/audio/clip1-orig.flac
Recording: http://mclements.net/audio/clip1-rec.flac

The original is a high-res download resampled to 44-16 in Audacity.
The recording is the high-res download, played through my sound card, recorded on the DRM-540 in Dolby B with BASF Reference Maxima II tape, played back on the DRM-540 to the sound card’s analog inputs and recorded at 44-16.

Conclusion

Cassette tape is the vintage sound of the 1980s. It’s nowhere near as good and transparent as the modern digital equipment we have. We are so spoiled today! But, it’s not as terrible as its reputation and can sound pretty decent especially for casual listening, when the deck is clean and calibrated. And it was fun and educational to calibrate this deck, measure it and see the improvements.

Review: JDS Labs Subjective 3 Equalizer Kit

Summary

No Jedi’s training is complete until he constructs his own light saber. Audiophiles can benefit from this advice, as building audio gear is fun and educational, and improves our understanding and appreciation of this hobby. When it comes to building I’m very much an amateur, but I have some experience, having designed & built a passive attenuator and constructed a phono head amp in years past.

JDS Labs has a simple 3-band EQ they call the Subjective 3; they sell it as a product, and as a kit. The kit saves you $20 and gives you the fun & satisfaction of building it yourself. I couldn’t resist. Here’s a review.

My System

My desktop audio system is decent but not SOTA. My desktop PC (Ubuntu 18) is the player; it has an ESI Juli@ sound card, whose coax digital output goes to an SMSL SU-6 DAC, whose analog output goes to a JDS Atom amp. I listen on my 20+ year old Sennheiser HD580s, sometimes on Audeze LCD-2F.

Why not use DSP EQ like PulseEffects? I do in fact use this software. But sometimes I am capturing the audio stream to a file and want a bit-perfect copy without PulseEffects messing with it (resampling, applying DSP). And while the PulseEffects multi band parametric EQ is a precision tool for accommodating the response to rooms and headphones, sometimes all you need to do is tame an overly bright or dull recording, in which case a simple old fashioned 2 or 3 knob equalizer is simpler & easier to use.

JDS Subjective 3 Kit

I ordered the kit and it arrived in 2 days (that was the cheapest shipping available). JDS says it is simple and a good first kit for those who want to dip their toe in the DIY water. I agree with this assessment, with caveats that I’ll mention below.

Here’s how the kit arrives:It includes all parts including the power supply (not shown), and the parts are of high quality: Alps RK09 potentiometers, Vishay and WIMA capacitors.

Installing the Parts
Soldering

Assembly is straight-forward. The instructions simply say, “insert all capacitors, solder and trim”. This may sound daunting for noobs, but each part is bagged with a part number that is also printed on the circuit board where it plugs in. Find each number on the board and plug in the corresponding part.

The key here is to use a soldering iron with a very fine tip and relatively low power (12 W). Avoid cold solder joints. That is, heat up the parts to be joined until the solder melts when touching those parts — not the soldering iron tip itself. Use just enough solder to sink and seep through the hole, but not so much that it makes a glob.

Here’s what it looks like after installing the capacitors and power switch:

Position and Fit

Some of the parts soldered to the board must match holes in the case when assembled: knobs and switches. If they ride too high or low on the board, the case won’t fit. When I was checking this alignment, I noticed that the case is asymmetric. It looks symmetric at a glance and the asymmetry is subtle, so this would be worth mentioning in the instructions. A picture’s worth 1,000 words, and I reversed the faceplate and case to highlight the difference:

At first, I didn’t notice this and when I checked alignment, it looked like I needed to solder the power switch and potentiometers in a position slightly above resting flat on the board, in order for them to line up with the holes in the case. But it turns out this is not necessary. Solder them flat to the board and use the faceplate as your clue that the “long” distance is the bottom of the case.

Installation: Complete

Here’s the board with installation complete: two views of the top and one of the bottom:

The above photo shows 2 important things: fine soldering, and grounding.

Fine Soldering

Each potentiometer has 8 contacts, 6 of which are in a tight grid. Soldering these can be tricky for those wielding an iron for the first time. Start with the middle contacts and work your way outward. Hold the iron near vertical so it doesn’t accidentally contact other stuff on the board. Be careful to use just enough solder to fill the hole without forming a glob that could touch the nearby pins.

Grounding

In the above left you can see that one (but not both) of the signal grounds is wired to the frame. This is something I discovered years ago through trial & error troubleshooting pesky ground loops when I was building a passive attenuator, and also on a phono head amp that I built. If neither signal ground is connected to frame, you can get a ground loop causing a “hum”. Also, if both are connected to frame. But if only 1 is connected to frame and the other is not, it helps break ground loops.

Assembly: Complete

Here’s what the completed kit looks like up close, with my JDS Atom amp:It’s quite small, even smaller than the JDS Atom which itself is a small amp. Here’s what it looks like with the headphones (you can see the wooden headphone stand I made years ago):

Listening

I powered it up, no smoke — great! I played some music with the tone knobs in the center detent, switching back and forth between “EQ” and “Bypass”. There should be no difference in the sound. Indeed they were almost identical. But there seemed to be a very slight difference. In Bypass mode I heard just a hint of “grain” or “edge”, especially in the upper mids / lower treble where our hearing perception is most sensitive. This was the opposite of my expectation, which was that if there was any difference at all, bypass mode would be more transparent. I was playing a very high quality recording of 5 voice ensemble, which highlights midrange purity, revealing distortion quite well.

Our hearing perception is not reliable enough to trust, but it’s not wrong often enough to ignore. So I put the EQ in a loop with my Juli@ card and used REW to take some measurements. Maybe I’m just hearing things, it’s not really there. Or maybe I made a mistake in the build. Either way, measurements would give a helpful baseline.

Measurements
Baseline

My Juli@ card is the baseline and it is not perfect, so let’s look at its FR and distortion. I played 48 kHz sweeps in REW at digital -1 dB for this:Frequency response is flat with << 0.1 dB variation. The bump above 20 kHz seems to be an REW anomaly. It has a slight channel imbalance which at < 0.05 dB is immaterial. Distortion and noise are mostly -90 to -100 dB, which is the limit for 16-bit.

Subjective 3 EQ: Bypass

Against this baseline, let’s see what the Subjective 3 looks like. First, bypass mode:Frequency response is perfect, no difference from the loopback. But we have quite a bit of distortion and noise! At about -60 dB it is likely inaudible, but it is approaching thresholds where it might become audible under ideal worst-case conditions.

Subjective 3 EQ: Frequency Response

Now let’s flip the switch the EQ mode with all the knobs in their center detents.

Here are 3 measurements of the L channel. In between measurements, I rotated each of the tone control knobs several times through its full range then re-centered it to the detent for the measurement. This reveals how consistent it is.

Note: the Y scale is 0.5 dB per division in order to reveal small differences. Red is left, Green is right, just like a boat or airplane.Here are 3 measurements of the R channel, taken the same way:Each shows variations around 0.25 dB. I’m pretty happy with that, it’s about as good as analog potentiometers get. These differences in consistency should be inaudible. Here are the average responses of each, shown together.Channel balance is essentially perfect below 2 kHz, at which point it gradually increases to a max of about 0.25 dB at 20 kHz with the L being slightly stronger.

So the consistency of the knobs, and the L-R channel balance, are each within about 0.25 dB.

Subjective 3 EQ: THD+Noise

Now let’s see if that increased noise we measured in bypass mode, is also there with EQ enabled:Nope! That’s good news. In EQ mode, it doesn’t add any distortion or noise. Of course, no device is perfect. But whatever it does add is below the levels of my sound card and thus masked and inaudible. JDS Labs publishes a THD+N specification of .0022% which is about -93 dB. We have at least that here.

Subjective 3 EQ: Response Curves

Now let’s see what the tone control knobs actually do to frequency response. I measured each knob at its half-way positions, negative and positive. This is approximate, as I can only eyeball the half-way position. So in the graph below, the curves + and – variations aren’t quite the same, but the important thing is the shape of the curve which shows the frequencies each of the knobs changes:

Obviously, blue is bass, green is midrange, and red is treble. And of course I had to zoom out the Y-axis, which is now 2 dB per division in order to keep the curves on-scale. These curves match nicely to the documentation.

Conclusion

The JDS Labs Subjective 3 EQ is a nice little kit. It is inexpensive, uses high quality parts and is easy to build with clear instructions. It sounds and measures clean and transparent in EQ mode. It has good consistency and channel balance. The knobs have a lot of range; just turning from 12:00 (center detent) only “1 hour” to 11:00 or 1:00 makes a noticeable difference. This makes the knobs quite sensitive and the full range is far more than I’ll ever use.

The only real drawback is that bypass mode introduces a fair bit of distortion. At -60 dB it’s close to thresholds of inaudibility, but may become perceptible on certain kinds of well engineered recordings on very high quality playback gear. That said, this issue is unique to bypass mode; the S3 EQ is consistent and clean enough to simply leave powered on in EQ mode all the time.

Note: I contacted JDS Labs in case the distortion in bypass mode was due to a mistake I made in building or measuring this device. They confirmed that it is known, and they’re revising the board to fix this. As I write this update it is Feb 2022 and they just sent me the revised board and parts so I can build another one. I’ll report back soon…

The problem is fixed. The S3 in standby mode now measures the same as a loopback connector, as it should. No more added distortion. In active mode (turned on) it is the same as before. JDS will be shipping this revised version soon.

Here’s the new board. I couldn’t simply solder the 2nd relay into the board, because 2 pairs of pins had to be reversed. So I wired it individually in order to cross pins 4-5 and 8-9. That was tricky for someone with only moderate soldering skills like myself. In production boards, this relay can be soldered directly into the board just like the one next to it, much easier.

Firefox and Audio Streaming

I use my desktop computer as an audio source for music listening. Listening to high quality (lossless) music over the browser, I’ve explored different browsers and how they deal with audio. This is on Ubuntu 18 Linux with Pulseaudio. I’ve set up the audio to avoid resampling as much as possible.

I tried about 10 different browsers on Ubuntu. Every one but Firefox resamples audio to some fixed rate, either 44.1 or 48 kbps. Firefox is the only one that passes audio through unmolested. Or, at least it used to. Primephonic is a classical music streaming service that passes audio uncompressed at whatever rate the albums were recorded (from 44.1 to 192 kHz).  I could listen to different albums and watch Pulseaudio change the sampling rate to match whatever rate each was recorded. At least until some time in Feb 2021, when Firefox’s behavior changed.

Here’s a summary of the changes:

Firefox now ignores the audio stream’s native rate and attempts to stream it at the highest rate the system will support. This means it will resample the audio rather than play it at its native rate.

If Pulseaudio’s avoid-resampling is set to true, then that rate will always be the highest rate the system supports. For example, with my Juli@ sound card it is 192 kHz. Otherwise (avoid-resampling set to false) that rate is the highest rate Pulseaudio is configured to use. That is either default-sample-rate or alternate-sample-rate, whichever is higher.

So in order to listen to music on Firefox without resampling, you must:

  • Set both of Pulseaudio’s rates to the native rate of the stream you are playing.
  • Set Pulseaudio avoid-resampling to false.

Essentially, you are forcing the system to play all audio at a single rate that exactly matches the audio you are playing.

And indeed, the irony is that in order to avoid resampling, you must set avoid-resampling to false!

Incidentally, why the irony? I can only speculate. Cubeb, the audio engine in Firefox, asks Pulseaudio what is its highest sampling rate. If Pulseaudio is avoiding resampling, then it reports its highest rate to be the highest rate the audio card supports. But if Pulseaudio is resampling, then it reports its highest rate as whatever rate it is resampling everything into. Seems logical. But it ironically leads the reverse of the intended behavior. The root of the problem is cubeb. It should pass audio to the system at its native rate, and let the system deal with it. Cubeb is being too smart by half, trying to deal with that itself.

High Res Audio on Ubuntu: Part 3

Once we’ve got it all set up, we want to test it while playing audio. It’s the only way to know for sure it is working as expected. To do this, we’ll be using the Linux Pulseaudio command-line tool pacmd.

If you jumped directly to this page, you may want to read part 1 and part 2.

Once you’ve tested your setup, possibly made adjustments, and confirmed they are working, you may want to read about streaming audio from a browser.

Basic Audio Device Info

To start, enter this command:

pacmd list-sinks

A “sink” is an audio output device. Even if you only have 1 sound card in your system, it may support multiple sinks. And you may have multiple cards. So you may see a lot of output here.

Let’s use grep to shrink the output to only the fields most useful to us:

pacmd list-sinks | grep -e 'sample spec:' -e 'channel' -e 'buffer' -e 'latency:' -e 'name:' -e 'alsa\.card'

On my system, it returns this:

name: <alsa_output.pci-0000_04_02.0.analog-stereo>
current latency: 0.00 ms
sample spec: s32le 2ch 176400Hz
channel map: front-left,front-right
fixed latency: 185.76 ms
alsa.card = "1"
alsa.card_name = "ESI Juli@"
device.buffering.buffer_size = "262144"
device.buffering.fragment_size = "70560"

This tells you I have an ESI Juli@ sound card that is currently set to 176.4 kHz sampling and 32-bit signed. My Pulseaudio configuration uses sample rates of 176400 and 192000, so this is the default sample rate. This is 4x oversampled for normal CD quality (44.1 kHz) and 4x oversampled for normal DVD quality (48 kHz).

Now I play an audio file that happens to be sampled at 96 kHz. While it’s playing I run the above command again and it returns this:

name: <alsa_output.pci-0000_04_02.0.analog-stereo>
current latency: 170.65 ms
sample spec: s32le 2ch 192000Hz
channel map: front-left,front-right
fixed latency: 185.76 ms
alsa.card = "1"
alsa.card_name = "ESI Juli@"
device.buffering.buffer_size = "262144"
device.buffering.fragment_size = "70560"

You can see that Pulseaudio has changed the sample rate to 192 kHz. Why? I have “avoid resampling” enabled, so it should play at the audio file’s native rate of 96 kHz. But Pulseaudio will never use a sample rate lower than what you configure. Since it can’t use 96 kHz, it uses the next best thing, which is an integer multiple of the native rate. That is why it switches to 192 kHz.

Resampling

The above command showed us the current state of the audio device. We can also use pacmd to get the current state of any audio being sent to or processed by that device.

First, ensure no audio is playing on your system and then enter this command:

pacmd list-sink-inputs

You should see this response:

0 sink input(s) available.

Now, try the prior command again:

pacmd list-sinks| grep -e 'sample spec:' -e 'channel' -e 'buffer' -e 'latency:' -e 'name:' -e 'alsa\.card'

You will see something like this:

name: <alsa_output.pci-0000_04_02.0.analog-stereo>
current latency: 0.00 ms
sample spec: s32le 2ch 192000Hz
channel map: front-left,front-right
fixed latency: 185.76 ms
alsa.card = "1"
alsa.card_name = "ESI Juli@"
device.buffering.buffer_size = "262144"
device.buffering.fragment_size = "70560"

This tells you that the audio card is in a certain state, but there is no data or input being sent to that card.

Now play an audio file of any kind, and while it’s playing, repeat the above commands. In my case, I played a CD file (44.1 kHz, 16-bit) and get the following:

First, the card itself:

pacmd list-sinks| grep -e 'sample spec:' -e 'channel' -e 'buffer' -e 'latency:' -e 'name:' -e 'alsa\.card'

This returns:

name: <alsa_output.pci-0000_04_02.0.analog-stereo>
current latency: 185.75 ms
sample spec: s32le 2ch 176400Hz
channel map: front-left,front-right
fixed latency: 185.76 ms
alsa.card = "1"
alsa.card_name = "ESI Juli@"
device.buffering.buffer_size = "262144"
device.buffering.fragment_size = "70560"

You can see the card switched to 176.4 kHz sampling, because the source is 44.1 kHz and it wants to use an integer multiple for resampling.

Now let’s check the status of the audio being sent to the device:

pacmd list-sink-inputs

Now you see a bunch of output. As above, let’s use grep to filter it down to the essentials we care about:

pacmd list-sink-inputs | grep -e 'sample spec:' -e 'resample method:' -e 'application\.name'

Now we see something like this:

sample spec: float32le 2ch 44100Hz
resample method: soxr-vhq
application.name = "VLC media player (LibVLC 3.0.8)"

Here we see that the source is coming from VLC (my media player), sampled at 44.1 kHz and the system is resampling it using the soxr-vhq method.

Now let’s play an audio file that happens to exactly match one of our system’s sampling rates (in my case, 176.4 kHz or 192 kHz). And then re-run this command. We get:

sample spec: float32le 2ch 192000Hz
resample method: copy
application.name = "VLC media player (LibVLC 3.0.8)"

Look at the resample method: copy. This means Pulseaudio is not resampling the audio, but is directly copying the stream from the source to the sink without resampling it. This is an important test: it tells you when the system is resampling audio.

Conclusion

So, now we know how to test our audio settings, see how the audio card is currently configured, and also check the audio stream being played. Also, whether audio is being resampled, and if so, using what resampling method, and the source and target sample rates.

As a general guide to resampling:

  1. No resampling is always best
  2. Resampling at integer multiples is better (faster, more transparent) than fractional
  3. Up-sampling is more transparent than Down-sampling

Conclusions we can draw from this

  • In Pulseaudio, set your primary and secondary rates to 44100 and 48000
    • This enables all rates from low (CD / 44100) to high to play without resampling
    • These rates are minimums, so if you set them higher, low rates (like CD) will be up-sampled
  • Avoid resampling wherever possible
  • If you must resample, upsample by integer multiples
  • If you must resample by a non-integer multiple, sample up rather than down
  • All resamplers are not created equal. Use the best quality resampler your system supports.
    • First choice: soxr-vhq
    • Next best: speex-float-10

Meier Audio Corda Soul

The Soul is a DAC, headphone amp and preamp. It’s the best preamp I have owned and a unique piece of kit. It has the transparency of a passive attenuator and the flexibility of a DAC and active preamp. This page summarizes the info I have on it.

So what’s the deal? DACs, headphone amps and preamps have improved a lot over the past 20 years and nowadays SOTA sound quality is commodified. What’s so special about the Soul? Jan Meier incorporates both engineering and psychoacoustics into his designs. Without getting into subjective impressions, here are some its engineering features.

  • Stepped gain-volume control
    • The volume knob is a stepped attenuator that sets the analog gain ratio, instead of attenuating a fixed gain ratio. In other words, it swaps the resistors in the gain-feedback loop.
    • Benefit: lower noise & distortion and perfect L-R channel balance, especially at low-medium volume settings
  • 100% balanced/differential both D and A
    • The Soul is fully balanced/differential from the DAC chip to the analog outputs.
    • Benefit: lower noise and distortion.
  • Dual WM8741 chips in mono mode
    • The Soul uses a pair WM8741 chips, each in mono mode, one for each channel (instead of using a single WM8741 chip in stereo mode).
    • Benefit: lower noise and distortion
  • Switching power supplies
    • The Soul has 4 separate power supplies, all switching at about 70 kHz
    • Benefit: lower noise, eliminates 50/60 Hz hum
  • Maximum oversampling at all rates
    • The Soul sets the WM8741 chip in “OSR high” mode which oversamples all data to the chip’s max rate (44.1k is 8x, 192k is 2x).
    • Benefit: lower noise & distortion, smoother high frequency response
  • FF internal feedback pre-emphasis
    • The Soul applies internal pre-emphasis to minimize distortion in the frequency range where human hearing is most sensitive
    • Benefit: pyschoacoustically shaped (perceptually lower) noise & distortion, improved clarity and detail/resolution
  • Top quality parts: Neutrik, Alps, Lorlin, AD797 opamps, BUF634, WM8804, Nichicon caps, etc.
    • The Soul uses top quality parts and build quality, made by Lake People in Germany.
    • Benefit: reliability, durability, longevity

The Soul’s maximum output level is 8 V and 600 mA. Eight volts is what you get for a full-scale digital signal with the volume knob maxed, and it has enough current to support that down to about 14 ohm loads. This gives the following max power levels (of course, you can interpolate using V=IR, and P=IV):

R (load)V I (mA) P (mW)
1485714600
2084003200
3582291830
708114910
140857.1457
350822.9183

In the above you can see that the Soul is not current limited for most headphones; its 600 mA max current capability is enough to support its 8 V max output voltage down to 14 ohms, where it can deliver 4.6 watts of power. For example, consider the HifiMan HE-6 (one of the least efficient, most power-hungry headphones). The Soul can deliver 8 V, 160 mA and 1.28 W of power to this headphone. The HE-6 voltage sensitivity is 1.25 V for 94 dB, so 8 V is 16 dB louder, which gives 94 + 16 = 110 dB.

Social Media and Section 230

Section 230 refers to US Code, Title 47, Chapter 5, Subchapter II, Part 1, Section 230. This is an important part of federal law that essentially says two things:

  1. (c) (1) No provider or user of an interactive computer service shall be treated as the publisher or speaker of any information provided by another information content provider.
  2. (c) (2) No provider or user of an interactive computer service shall be held liable on account of any action voluntarily taken in good faith to restrict access to or availability of material that the provider or user considers to be obscene, lewd, lascivious, filthy, excessively violent, harassing, or otherwise objectionable, whether or not such material is constitutionally protected.

Part (1) makes internet social media possible. Without it, companies could be prosecuted (criminally or civilly) or held responsible for the content their users publish. No company could risk that liability, so it would destroy social media as we know it.

Part (2) enables companies to filter or censor content without losing their liability protection granted by part (1). Without it, internet social media could become a cesspool of illegal and offensive material. You think it’s bad today? Just imagine if part (2) didn’t exist!

The $64,000 question: what exactly does part (2) protect? That is, how much filtering can companies apply before they lose their liability protection?

Surely, if they use too heavy a hand, cherry picking only certain kinds of content, they are effectively defining the platform’s content and it is “user-generated” in name only. The platform no longer represents the views of users, but of the platform owners themselves. For example, 3 months before an election they suppress all content promoting candidate A and allow only content promoting candidate B. In this case, for all practical purposes they have become the content publisher and should lose their part (1) liability protection. Clearly, part (2) was never intended to allow this.

If, on the other hand, they use too light a hand, then they lose control of their platform. It would be impossible to create certain types of socially beneficial spaces, whether family friendly, or forums for discussing religious, political, personal, economic or other sensitive yet important and relevant topics. Section 230 specifically allows filtering and censorship for this purpose.

The problem with today’s discussion about section 230 is that it is treated as an all or nothing thing. Either section 230 allows any amount of filtering and censorship (ignoring its own words that it is limited), or section 230 should be rescinded entirely. In my view, these views are both wrong. Section 230 is necessary and beneficial. Deciding exactly how far part (2) goes in allowing filtering and censorship is messy hard work whose outcome will never please everyone. But real-world application of law is never clean or easy, and Section 230 is important enough that this work is worth doing.

Ubuntu Upgrade: 16 to 18

Introduction

My upgrade from Ubuntu 16 to 18 was anything but smooth. Here’s the story, in case others find it useful or I need to refer back to what happened.

Why Upgrade?

If it ain’t broke, don’t fix it. My desktop had been running Ubuntu 16 for years and was happy. Since one of the things I use it for is listening to music, I wanted the later version of Pulseaudio that can play music at its native bit rate. Ubuntu 16 resamples everything to one of 2 system bit rates.

The Upgrade

The upgrade itself went smoothly. In short, these commands ran just fine:

sudo apt updatesudo apt dist-upgradesudo do-release-upgrade

After that, all hell broke loose.

Problem 1: No Boot

The system failed in the Grub boot loader and dropped the Grub rescue prompt:

Error: Symbol 'grub_calloc' not found. 
Entering rescue mode...
grub_rescue>

To fix this, I used Ubuntu Boot Repair. I flashed its ISO to a USB stick, booted to that stick, then ran the standard boot repair, which reinstalls Grub on the PC.

Problem fixed: the computer now boots!

Problem 2: Laggy Desktop

The mouse pointer lagged by a second or two, reminding me of using a mouse on my old 4.77 MHz IBM XT years ago. Turns out the upgrade hosed my video driver, making it not entirely the Nvidia driver, not entirely the open source driver, but some kind of zombie hybrid of the two.

I uninstalled the Nvidia driver and rebooted. But I couldn’t do that, because apt-get was broken. I had to fix that first.

Problem 3: Apt-Check

After every Ubuntu install or upgrade I always re-enable whatever repos were disabled for the upgrade, then update all the software so it can install new versions. This problem manifested as an error message whenever I ran “apt”:

libdvd_pkg: 'apt-get check' failed. You may have broken packages. Aborting...

This turned out to be caused by the libdvd package not completing its installation steps. To fix this, we can complete them manually:

sudo dkpg-reconfigure libdvd-pkg

After that, make sure apt-get is really fixed:

sudo apt update
sudo apt dist-upgrade
sudo apt autoremove

Done!

Problem 2: Laggy Desktop: Reprise

With apt-get fixed, I can now uninstall & reinstall the NVidia drivers to fix the laggy desktop:

sudo apt purge nvidia*
sudo apt-get check
sudo apt update
sudo apt upgrade
sudo apt autoremove
sudo reboot

Problem fixed! So I reinstalled the NVidia binary driver:

sudo ubuntu-drivers autoinstall
sudo reboot

Problem 4: Python 3 Broken

I use Python virtual environments and virtualenvwrapper. The upgrade broke these and I was getting a virtualenv related error message every time I opened a terminal. To fix this, I had to reinstall pip and virtualenvwrapper:

python -m pip uninstall pip
python -m pip install pip
pip install virtualenvwrapper

I did this in the system default python (python 2) because that I run virtualenv from the command line.

Fixed!

Problem 5: Desktop Crashes

At this point, my desktop was working pretty well in Ubuntu 18. But I was disappointed to find that periodically, from every 10 minutes to every hour, the computer would crash entirely and revert to a text mode screen. After such a crash I could ssh to it from another machine, so the machine was still running, it was just the desktop that crashed. From ssh, I could kill Xorg and the login prompt would appear on that desktop.

I found this bug report, which provides a workaround: add a parameter to the linux kernel when booting

GRUB_CMDLINE_LINUX_DEFAULT="scsi_mod.scan=sync"

This seems to have fixed it, though only time will tell.

Update: the system still crashes. This does not fix the problem. More specifically, the desktop suddenly goes black and I must ssh from another computer, kill Xorg and it restores the login prompt.

As I’m experiencing these Xorg crash/hangs, I’ll list the various things I’ve tried that don’t fix it:

  • adding kernel param “scsi_mod.scan=sync”
  • disabling display power management in XFCE power Manager (screen never powers off)
  • disabling screen saver (screen saver never kicks in)
  • disabling screen blank (screen never goes blank)
    • … PENDING … no crash yet, this might actually fix it!

High Res Audio on Ubuntu: Part 2

In part 1 we saw recommended settings for bit depth and sample rates, why these are recommended, how they work, and how to set them. Here, we’ll talk about glitch-free audio.

If you want to check your configuration, skip ahead to part 3. Or return to part 1.

In Ubuntu you may notice occasional audio glitches. They can be obvious or subtle. For example, here is one I encountered recently that is not quite obvious, but you can definitely hear if you are paying attention:

Clean
Dirty

The higher the resolution of the audio, the increased demand for data flow & processing, the more likely these glitches are to occur. These glitches arise from the way Pulseaudio buffers audio data and schedules interrupts for itself to process and flow that data. Many systems don’t glitch with CD quality and lower, but start to glitch at higher rates. Or they may glitch only when the PC is busy doing other work.

Fortunately, this can be configured so almost any computer can play high resolution audio glitch-free. I’ve experimented with these settings on a 15-year-old PC running Ubuntu 18 that was seriously glitchy even at CD quality, using default settings. By changing settings I got this PC to play local audio files up to 192-24, and stream audio in the browser up to 96-24. Then I applied these settings to a fast modern PC running Ubuntu 16. This PC played CD quality audio just fine with the system defaults, but glitched when playing back high resolution audio. This PC now plays back audio seamlessly at all bit rates.

There are 4 basic settings to configure. You may not need to do them all. Try each individually in turn to see if it fixes the problem.

Pulseaudio Process Priority

The Pulseaudio process normally runs at nice level -11. This gives it priority over normal system processes. But increasing its priority even more can help. That means a numerically smaller number (you’re being “less nice” to the rest of the system).

File: /etc/pulse/daemon.conf

; nice-level = -11
nice-level = -15

Comment out the default nice-level and set it a bit lower. It doesn’t seem like much, but it does make a difference.

Pulseaudio Timer Based Scheduling

A few years ago, Pulseaudio switched to timer based scheduling. This is a better way to reduce audio latency while keeping audio streams running smoothly. But Linux is not a real time operating system; it doesn’t give processes guarantees when they will get CPU time. So timer based scheduling sometimes causes buffer under-runs, which is one cause of audio glitches. The timer based scheduling system is supposed to detect when this happens and increase buffers & latency to compensate. But even if it does, you may still get occasional audio glitches as it detects and compensates.

File /etc/pulse/daemon.conf has settings for audio buffers:

; default-fragments = 4
default-fragments = 4
; default-fragment-size-msec = 25
default-fragment-size-msec = 50

The total buffer is fragment size * count, so the above example is 4 * 50 = 200 ms of audio buffer, which is 200 ms of latency. This is more than twice the default value.

Note: while the setting says milliseconds, it actually sets the buffer size in bytes. The conversion is based on the default sample rate. So if you set it to 200 ms and the default rate is 44.1 kHz, at 96 kHz it will be about 92 ms, as 200 * (44.1 / 96) = 91.875.

However, if you simply increase these values and restart Pulseaudio, nothing will change. That’s because Pulseaudio by default uses timer based scheduling, which ignores these buffer settings. For these settings to take effect — to increase the buffer size — you must disable timer based scheduling.

Open this file: /etc/pulse/default.pa

Look for this section of the file (around line 50):

### Automatically load driver modules depending on the hardware available
.ifexists module-udev-detect.so
load-module module-udev-detect
.else
### Use the static hardware detection module (for systems that lack udev support)
load-module module-detect
.endif

See the line I marked in bold face above? Add a parameter at the end, like this:

load-module module-udev-detect tsched=0

Adding this parameter and setting it to 0 disables timer based scheduling, and makes Pulseaudio use the fragment settings shown above.

Don’t go too crazy with huge audio buffers. Increase it just enough to eliminate audio glitching, and add maybe 50% more to account for system load or high sample rates. Big buffers increase latency which becomes problematic in applications like gaming and video calls.

Resampling

In part 1 we mentioned using the highest quality resampler, soxr-vhq or speex-float-10. You can use a faster, lower quality resampler like speex-float-3.

However, if it becomes necessary to make this change, then there’s no point to high resolution audio because your system is so slow it can’t handle the necessary data & processing. So if you must resort to this, you should also set sample rates back to their defaults (44100 and 48000), and set avoid-resampling to false (its default). This way, Pulseaudio will downsample higher rates to something your system can handle, and it will use a fast lower quality resampling algorithm when doing so.

The benefit is, if your system can’t handle high resolution audio, at least you can configure it to play CD quality audio glitch-free.

CPU Governor

Ubuntu’s default CPU governor is “ondemand”, which sometimes throttles back the CPU when it shouldn’t. For example, playing audio is considered a background task, and it may think the PC is not busy and throttle back the CPU, causing audio glitches.

It’s worth trying the “performance” governor instead. If it doesn’t improve things, you can easily revert back. To try this, first disable the service that always sets the “ondemand” governor, because this will override any other settings you make:

sudo update-rc.d ondemand disable

Next, install package cpufrequtils:

sudo apt install cpufrequtils

Then edit the config file: /etc/init.d/cpufrequtils

Find the commented-out section that looks like this, around line 40

# eg: ENABLE="true"
# GOVERNOR="ondemand"
# MAX_SPEED=1000
# MIN_SPEED=500

After this section, add a line like this:

ENABLE="true"
GOVERNOR="performance

Ensure to comment out or replace any existing lines that set these same settings. Then reboot.

Conclusion

Make sure to restart Pulseaudio after every config change. Use “ps” to ensure only 1 copy of the pulseaudio process is running at a time. When you find settings that work, try them under different conditions of system load to see how robust they are. Sometimes they’ll work when the system is idle then you’ll have problems when it gets busy, as other processes take computing time away from Pulseaudio.

Glitch-free audio is easier to achieve when playing back local files, than when streaming. This is because streaming presents more system load. Thus, you may find settings that work fine for playing back local files but glitch when streaming. If so, try increasing the buffer size.

Note: this method uses bigger audio buffers to ensure smooth playback. This increases latency, which can negatively impact other applications like video calling, movies, and gaming. So, experiment with different buffer sizes and uses the smallest buffers that work reliably.

Above I mentioned an alternative approach. Instead of increasing buffering, you can enable the Linux kernel "threadirqs" feature and increase the IRQ priority of the sound card. This may provide glitch-free playback without increasing latency. I have not tried this approach.

Now, we can jump to part 3, where we check how things work while playing audio.