Category Archives: Tech

LineageOS: Home Screen Setup

LineageOS is the open source version of Android. Combined with OpenGApps, it has all the functionality of Android, without any of the bloat-ware, crapplets or customized skins that manufacturers and carriers add to Android. And, it’s supported by a community of developers so you can get the latest version of Android on your device long after the manufacturer abandons it to planned obsolescence.

The LineageOS home screen launcher is called Trebuchet. It is more configurable than most stock ROMs. There’s a particular setup I like that combines a dark background (which saves battery on OLED screens) with big icons. Setting this up is simple:

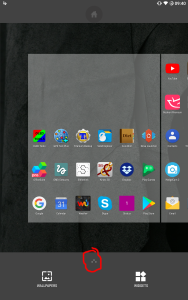
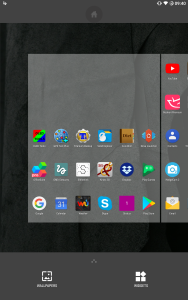
First, long-touch a blank spot on the home screen. The home setup screen appears. Your icons will be different from shown, but the bottom area will be the same with the WALLPAPERS, triple-dot button, and WIDGETS:

1-home-setup

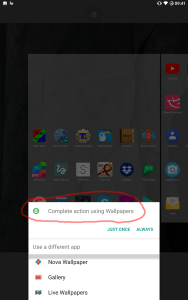
Touch WALLPAPERS in the lower left. A screen like below will appear asking you how you want to pick wallpaper. Pick the one circled in RED:

home-wallpaper-1

A screen like below appears asking which wallpaper you want. Pick the one shown below:

home-wallpaper-2

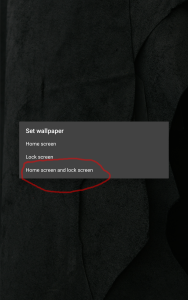
A screen appears asking where you want to use this wallpaper. I usually pick both home screen and lock screen:

home-wallpaper-3

Next, we’ll tell the home screen to use large icons. So go back to the home screen and long-touch a blank spot again to get the home setup screen. Then touch the triple-dot button:

1-home-setup-settings

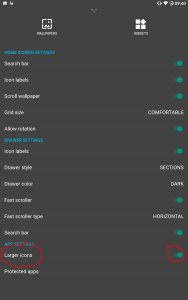
The following menu will appear. You can set a bunch of stuff here; icon size is at the bottom:

2-home-settings

Cool Mouse Stuff with Linux

Linux has built-in tools for programming the buttons on your mouse or trackball. You don’t need any drivers or proprietary software. Just a few simple tools you can install from the repos. I’m doing this on Ubuntu 16 and 18, but it should work on any recent Linux distro.

First, use xev to detect how your system is recognizing the mouse buttons. Start xev from a command prompt, then hover over its window, click each button, and look at the text in the command prompt window. This will tell you the # for each button. The first 3 buttons are always defined the same way: left-click is button 1, middle-click 2, right-click 3. Extra buttons are “non-standard” and can be defined in any way.

To change what a button does, use xbindkeys. Its control script is a file in your home directory called .xbindkeysrc. The app xte fabricates keystrokes and mouseclicks.

For example: here’s an .xbindkeysrc that does 2 things:

  • Single click of button 2 (middle button) causes double-click of button 1 (left)
  • Single click of button 9 causes Control-click of button 1.
# button 2 (scroll wheel) is double click
"/usr/bin/xte 'mouseclick 1' 'mouseclick 1'"
b:2 + release

# button 9 (upper left alternate) is control + left click
"/usr/bin/xte 'keydown Control_L' 'mouseclick 1' 'keyup Control_L'"
b:9 + release

This should work everywhere in all apps. It does work in some apps (like Thunar), but not in others (like Firefox). I wondered – why?

Limitation 1

After experimenting, I discovered that xte is too fast for some apps. I added a few strategically located brief (10 ms) delays and it worked everywhere.

Example: change the above to this:

# button 2 (scroll wheel) is double click
"/usr/bin/xte 'mouseclick 1' 'usleep 10000' 'mouseclick 1'"
b:2 + release

# button 9 (upper left alternate) is control + left click
"/usr/bin/xte 'keydown Control_L' 'mousedown 1' 'usleep 10000' 'mouseup 1' 'keyup Control_L'"
b:9 + release

The usleep param is in microseconds, so 10,000 is 10 milliseconds. This now works in all apps.

Limitation 2

Another limitation: it’s hard to make the same button duplicate itself from xbindkeys. If you do this, it can lead to infinite loops. For example: xbindkeys can easily make a single click of button 2, cause a double-click of button 1. But xbindkeys can’t make a single click of button 1, cause a double-click of the same button. This will fail or cause an infinite loop.

For that, use imwheel. Originally intended to adjust the sensitivity of the scroll wheel, it is also useful for other things. This is because internally, a scroll wheel is just 2 buttons: up and down. To make it more sensitive, imwheel duplicates each click of those buttons. But imwheel can do this with any buttons, not just the scroll wheel. Its config file is .imwheelrc, in your home directory.

Here’s an imwheel config that doubles the scroll wheel sensitivity:

# Apply to all apps (individual apps can be customized)
".*"
# Amplify scroll up/down
None,    Up,    Button4,    2
None,    Down,    Button5,    2
# Amplify scroll left/right
None,    Left,    Button6,    10
None,    Right,    Button7,    10

On my trackball, the scroll wheel is Button 4 and Button 5. The scroll wheel tilts L and R; these are buttons 6 and 7. Yours may be different; check it with xev.

Elecom Trackball, IOGear GCS1102 KVM Switch, Ubuntu 18

My Logitech Trackman thumb trackball is so old it has a PS/2 plug. Its buttons are finally starting to fail and I needed to replace it. But Logitech doesn’t make wired trackballs anymore. I must have wired because (1) I use an IOGear GCS1102 KVM Switch, and (2) I prefer the instantaneous smoother response of wired devices.

I Googled around and discovered the Elecom M-XT3URBK, worth a try. At first it didn’t work. On a whim, I checked my GCS1102 (open a text editor, hit Ctrl-F12, press F4, and it prints its settings) and found it was in mouse emulation mode. I disabled mouse emulation mode (Ctrl-F12, press m) and the Elecom worked perfectly. Xev detected all buttons except the far right, which I don’t need anyway.

Good stuff:

  • Tracks at least as well (smooth, fast, accurate) as the Logitech Marble
  • Switch-adjustable DPI (low is still pretty high and works best)
  • Buttons
    • Standard L and R
    • Scroll wheel clicks like a button (without occasionally moving, like the Logitech did)
    • Scroll wheel clicks L and R to scroll horizontally
    • Two small buttons to the L of the L button
  • It’s comfortable to use
  • Elecom makes a mirror image left-handed version
  • Price: only $40 – half Logitech’s prices!

Bad stuff:

  • The cable is a bit on the short side, but still long enough I didn’t need an extension.
  • It’s a bit small for my large hands

So far, no problem. It works, scroll wheel and all buttons, without any drivers. Just plug and play. But there’s more…

SENSITIVITY and ADJUSTMENT

The Elecom is so much more sensitive than my old Logitech, I had to turn down the settings. But with the GCS1102’s mouse emulation disabled, every time I switch, each computer sees the mouse being un-plugged and re-plugged. When this happens, Ubuntu doesn’t restore the mouse settings. When I switch away and back, the mouse is back to its hyper-sensitive default setting.

I wrote a shell script /apps/bin/setMouse.sh that uses xinput to set the mouse:

#!/usr/bin/env bash
# The UI for setting mouse track speed in Ubuntu 18 is broken.
# Do it manually here
# NOTE: as of June 2018, the mouse was device 12.
# You can check this with: xinput --list --short
# To show device settings: xinput --list-props 12

echo "`date`, $USER, $DISPLAY, $XAUTHORITY" >> /apps/bin/mouse.log

if [ -z "$1" ]
then
    a="0.1"
else
    a="$1"
fi
if [ -z "$2" ]
then
    m="0.4"
else
    m="$2"
fi
if [ -z "$3" ]
then
    d="`xinput | grep Mouse | grep pointer | cut -f 2 | cut -c4-5`"
else
    d="$3"
fi

aprop=`xinput --list-props $d | grep 'Accel Speed (' | cut -f2 | cut -c23-25`
if ! [ -z "$aprop" ]
then
    xinput set-prop $d $aprop "$a"
fi
mprop=`xinput --list-props $d | grep 'Coordinate Transform' | cut -f 2 | cut -c35-37`
if ! [ -z "$mprop" ]
then
    xinput set-prop $d $mprop "$m", 0.0, 0.0, 0.0, "$m", 0.0, 0.0, 0.0, 1.0
fi

echo "`date` Mouse set up $a $m $d" >> /apps/bin/mouse.log
xinput --list-props "$d" >> /apps/bin/mouse.log

But I don’t want to have to run this script every time I switch the GCS1102. The Linux Udev system should do the job!

UDEV RULES

First, I needed a Udev rule to trigger my script. The rule must detect the USB device being plugged in, so I need its vendor and product IDs. To get these, run lsusb:

Bus 003 Device 122: ID 056e:00fb Elecom Co., Ltd

Now add a Udev rule. Mine was /etc/udev/rules.d/61-elecom-mouse.rules:

SUBSYSTEM=="usb", ATTR{idVendor}=="056e", ATTR{idProduct}=="00fb", ACTION=="add", RUN+="/apps/bin/setMouse.sh"

But it didn’t work. The script was running (I could see the log entry it creates). But the mouse sensitivity wasn’t being set.

DELAYED EXECUTION

My first thought was that the Udev event was firing before the device was registered and ready to be configured. So I added a sleep to the command. But, you can’t sleep while Udev is running your command. So I had Udev run a script that returns immediately, while sleeping a few seconds then running setMouse. A command like this:

(sleep 3 ; /apps/bin/setMouse.sh) &

But that didn’t work. It worked from the command line, but when run from Udev, the background was ignored and Udev waited for the entire time. That’s bad for 2 reasons: (1) hangs Udev for 3 seconds, (2) Udev is still waiting, so the sleep is pointless because the device won’t be ready until Udev is done.

In short, Udev is too smart by half. I needed a way to trick Udev into returning immediately, while my script pauses a few seconds then runs. I found this with the at command. First, install it:

sudo apt install at

Then, make the Udev rule look like this:

SUBSYSTEM=="usb", ATTR{idVendor}=="056e", ATTR{idProduct}=="00fb", ACTION=="add", RUN+="/usr/bin/at -M -f /apps/bin/setMouseElecom.sh now"

This tells at to trigger the script to run immediately, but at returns to Udev immediately. The script doesn’t run under Udev but under at. The setMouseElecom.sh script looks like this:

#!/usr/bin/env sh
# Called by Udev when Elecom trackball is plugged in
sleep 2
/apps/bin/setMouse.sh 0.1 0.4

Note: at can only run sh scripts, not bash.

But, it still didn’t work. The script ran, but its xinput commands always failed.

XINPUT AND XSESSION

I guessed it might be that at, running as root, didn’t have permission for my X session. I had to somehow make it join my X session before the xinput commands would work. I made a script called joinXandRun.sh:

#!/usr/bin/env bash

# Get the number of the active terminal (requires root)
TTY=$((`fgconsole`-7))

# Set env vars needed to simulate the user
export DISPLAY=:${TTY}.0
USER=`who -s | grep "(:$TTY)" | cut -d' ' -f1`
export XAUTHORITY=/home/$USER/.Xauthority

echo "`date`, $USER, $DISPLAY, $XAUTHORITY: $1" >> /apps/bin/joinXandRun.log
sudo -H -u $USER bash -c "$1 $2 $3 $4 $5 $6 $7 $8 $9"

This script finds the active X console, and its user and display. Then it sets the critical DISPLAY  and XAUTHORITY environment vars to “join” that X session. Then it runs another script passed into it, as the given user.

Then I made setMouseElecom.sh call this script:

#!/usr/bin/env sh
# Called by Udev when Elecom trackball is plugged in
sleep 2
/apps/bin/joinXandRun.sh /apps/bin/setMouse.sh 0.1 0.4

Guess what — this worked!

The really cool thing about this is that the Udev rule is device-specific, and setMouse.sh takes parameters. I could set this up to auto-detect and configure several different kinds of mice or trackballs. Each would have a different Udev rule, matching different vendor and device IDs, firing different scripts that pass different mouse setting params to setMouse.sh. This will be useful for my laptop, which uses the Elecom at work but another Logitech Trackman at home.

It turns out all the pieces are essential. Lessons learned:

  • When Udev triggers the add event, the device being added cannot yet be configured. So if your Udev script configures the device, it has to:
    • Return immediately to Udev, so Udev can finish its processing
    • Meanwhile, trigger its config processing to run after a few seconds
  • To configure devices that are part of the X session, you need to “join” the session. Otherwise, the X system won’t let your code configure the device.

PS: none of this is specific to Ubuntu 18. It should work on any recent Linux distro.
Calibre, Amazon Books, DeDRM

I’ve been a big reader since I was a kid, all kinds of books from many sources. I was an early Kindle adopter, but as Android tablets came out I found them better for reading:

  • Configurable: you can set a wider variety of fonts, sizes, margins, colors, layouts.
  • Open: you can install any number of reading apps for every eBook format available. You’re not locked into any single book ecosystem.
  • Graphics: books with pictures, diagrams, etc. are much better on a tablet. Even a large eInk reader lacks color and renders slower.

Due to the variety of books I read, no single ecosystem would do the job. Plus, I take a principled opposition to any company that tries to lock customers into its ecosystem. When I buy a book I don’t believe I’ve bought it to read on a particular device, in a particular format, to access whenever some corporation thinks I should be able to. I’ve bought the right to read it on any device, in any format, whenever I want to, forever. Just like a real book. Indeed, eBooks often cost as much as real books even though the marginal cost of the next eBook sold is zero. And, I run native Linux on all my computers.

All of this all led me to start using Calibre to manage my eBooks. Calibre is simply great – it meets all these needs and more. It’s a great organizer, supports all devices, all formats, can convert between them, and has many plugins with an active open source development community.

Without owning a Kindle, how does one buy books from Amazon, store them on your own computer and read them on any device in any format? Here’s how:

Even though I run Linux, I have a VM running Windows. I don’t use it for much, only those few apps that I can run natively on Linux or in a browser. Unfortunately, Amazon Kindle is one of those. In this VM I have the Kindle for PC app registered to my Amazon account.

I’ll assume you already have Calibre running and you’ve installed Apprentice Alf’s DeDRM plug-in.

Next, do a one-time configuration step: capture the Kindle key from your Windows PC and copy it to Calibre so it can DeDRM Kindle books.

  • On Windows
    • Install Python 2.7 and Pycrypto 2.6 for Python 2.7.
    • Unzip the Calibre DeDRM plug-in ZIP file
    • In this zip, find the file kindlekey.py.
      • This zip file has several directories and files in it. In DeDRM_6.6.0, this file is here: \DeDRM_Windows_Application\DeDRM_App\DeDRM_lib\lib
    • Open a command prompt and run this file: kindlekey.py
    • You’ll see something like this:
      • Using Library AlfCrypto DLL/DYLIB/SO
        searching for kinfoFiles in C:\Users\USERNAME\AppData\Local
        Found K4PC 1.9+ kinf2011 file: C:\Users\USERNAME\AppData\Local\Amazon\Kindle\storage\.kinf2011
        Decrypted key file using IDString ‘406xxxxxxx’ and UserName ’63xxxxxx’
    • It creates a new file: kindlekey1.k4i
    • Copy this file to a directory your Linux Calibre app can see
  • On Linux
    • Run Calibre
    • Click Configure, Plugins, File type plugins, DeDRM
    • Click Customize plugin
    • Click Kindle for Mac/PC ebooks
    • Click Import Existing Keyfiles
    • In the file dialog that pops up, pick your kindlekey1.k4i file

You’re done: Calibre DeDRM is configured to be able to DeDRM ebooks you drop on it, so long as they come from your Kindle for PC reader.

After I buy a book on Amazon, I deliver it to my Kindle for PC device.

  • In Windows:
    • Open Kindle for PC, refresh your library. The book should appear.
    • Double-click it to download it.
    • After the book opens, close it and the Kindle for PC app.
    • Open folder Users\USERNAME\Documents\My Kindle Content
    • Your book will be one of these folders named B….._EBOK
    • Sort by date to put the most recent files on top
    • Open the folder and you’ll see an azw file having the same filename as the folder.
    • Copy this azw file to a directory that your Linux Calibre can see.
  • In Linux
    • Run Calibre and drag/drop the azw file on it.
    • Calibre will strip the DRMs and add it to your library

You now own the book. It’s stored on your own hard drive, you can read it on your PC, convert it to any format you want, copy it to any device or app you want to use to read it.

Escape Velocity

Escape Velocity is commonly described as the minimum speed an object must reach to escape the Earth (or other celestial body) into space. But this definition is ambiguous and can be misleading.

You can escape the Earth at walking speed, if you could walk straight up; you don’t need anywhere near escape velocity. Imagine a rocket launch; in the first few seconds just as it starts to move, it’s going up at walking speed. Theoretically, it could throttle back the engines to maintain that slight upward speed all the way into space, so long as it didn’t run out of fuel or become unstable. A space elevator could also leave Earth at mundane speeds.

The key to this ambiguity is escape velocity applies to a free body, an object that is passively moving according to the laws of physics, having no thrust of its own. In other words, if a rocket achieves escape velocity, it could at that point turn off its engines and it would still escape the Earth. Intuitively it seems the higher the altitude, the slower the escape velocity. This turns out to be correct.

Escape velocity is easy to understand and derive mathematically with some creative thinking. Imagine 2 objects in space (a big one and a much smaller one, like the Earth and a stone) surrounded by vacuum, no other objects. So there is no friction and no other bodies exerting gravitational pull. Suppose the stone is at rest relative to the Earth and almost infinitely far away. The gravitational pull is effectively zero. Imagine the stone precariously balanced just on the outer rim of Earth’s gravity well. Then you nudge the stone just a smidge toward the Earth, so it crosses that rim and the Earth starts pulling on it (and vice versa). It starts out slow, but accelerates toward the Earth incrementally faster and faster.

Eventually, when the stone reaches the Earth it will be moving very fast. Escape velocity is the speed it is going just before it smashes into the Earth. Or if it misses the Earth, it’s the speed at its point of closest approach. More correctly and completely, the stone is always traveling at escape velocity at every moment along its path. The escape velocity for that distance from the Earth, is the speed at which the stone is moving when it’s that far away.

Note: the bold face statement above is the nut of this explanation. When you grok its fullness, you grok the fullness of escape velocity.

That’s because of conservation of energy. When the stone was at the rim of Earth’s gravity well, it had a lot of potential energy. At the point of closest approach, all that potential energy has been converted into kinetic energy. Assuming no atmosphere, no losses, the two energies are equal. So as the stone speeds past the Earth, slowing down due to the same gravitational pull that sucked it in, that kinetic energy is converted back into potential energy. So it must reach the exact same distance away when it peters out and eventually stops.

The direction of motion is irrelevant to escape velocity. Normally this seems counterintuitive, but understanding escape velocity with our theoretical example, you can easily see why direction doesn’t matter. At that point of closest approach, it doesn’t matter what direction the stone is moving relative to the Earth. It could be nearly straight up (can’t be exactly straight up, or it wouldn’t have missed), or nearly horizontal. If it’s going horizontal, it has to travel further to escape, but being horizontal, gravity isn’t pulling it as hard. These conflicting factors are equal and cancel each other. All that matters is the altitude (distance of closest approach), because the speed depends only how much energy it’s gained from Earth’s gravity field.

If, at that point of closest approach, the stone were moving any slower, then it would have less kinetic energy, and it will not go as far away. That means it won’t make it to the rim of Earth’s gravity well, so it will still be inside the well, reverse direction and eventually come back to Earth. So escape velocity is the minimum speed a free body can have, and escape the Earth.

Of course, in the real world direction does matter. The Earth has an atmosphere that creates a lot of friction and energy loss at high speeds. If you go straight up, you’re in the atmosphere for a shorter time, less energy loss. If you go horizontal, you’re in the atmosphere longer and will lose more energy.

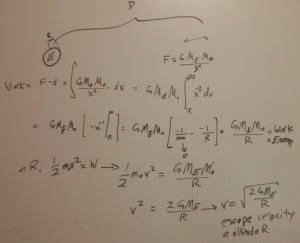
Here is the mathematical derivation:

escapeVelocity

Updating Celestron Telescope Firmware

Here’s how I update the firmware in my Celestron 6SE telescope from my Ubuntu Linux system. There’s another nice guide here, but it didn’t work on my computer until I figured out the trick below of changing the port name.

Kudos to Celestron for writing the software in Java so it can run on any computer, Windows, Mac or Linux!

My scope has a phone-type connector to the handset and came with a cable that is a 9-pin serial on the other end. Plug this cable into your computer’s serial port and into the bottom of the handset. While the scope is off, hold down the handset Celestron & Menu buttons while turning it on. The handset will say Boot Loader Serial or something like that to indicate it’s in firmware update mode.

Now, find the Linux device file for your serial port by entering this command: dmesg | grep tty

My output looks like this; yours may be different:

[    0.000000] console [tty0] enabled
[    0.671956] 00:06: ttyS0 at I/O 0x3f8 (irq = 4, base_baud = 115200) is a 16550A

On my computer, the serial port is /dev/ttyS0

Check this device file’s permissions and ensure you can read & write it. Typically you need to be in the dialout group, or just chmod the device file to 666 to open it to anyone.

Follow Celestron’s instructions to download the CFM software from their web site. You’ll get a file named something like CFM.jar. Once installed, go to its directory and run it with Java: java -jar CFM.jar

When it starts it will tell you it can’t find the serial port. Select Options|Connections from the menu. In the dialog that appears, you’ll notice it says COM4 (or something similar) as the serial port name. Replace this with ttyS0 (or whatever your port’s name is, from above).

Now click Seek Devices from the app main screen and it will find your telescope. Click the main screen Update button and CFM will find and download the latest firmware for your scope and install it.

Audio: Balanced and Unbalanced

The term “balanced” is somewhat ambiguous when it comes to audio. Definitions:

Balanced: means conductors have equal impedance to ground.
Differential: means 2 complementary voltage signals, where complementary means that at every instant in time their voltages are opposites of each other.

Generally speaking, you can have either one without the other. But in audio, they are almost always used together. Thus in the realm of audio, the term “balanced” usually means both differentially signalled and balanced.

Unbalanced Audio

Most audio gear (at least consumer gear) is unbalanced. The musical signal or waveform is a voltage. And a voltage is a potential difference between 2 points – we can’t talk about the voltage at a single point. So the musical signal is carried by 2 wires, + and . The voltage that represents the musical signal is carried on the + wire, and swings back and forth positive and negative relative to the wire. The wire does not carry a signal; its voltage doesn’t change; it is ground.

What exactly do we mean by ground? At least 2 different things! Signal ground is the 0 voltage or “neutral” against which the + wire is compared. Chassis or frame ground is the 0 voltage or “neutral”against which the device power (115 or 230 V) is measured. With standard unbalanced audio, signal and frame ground are the same thing.

The potential problem with standard unbalanced audio is that the terminal isn’t always an unchanging “zero” or “neutral”. It can pick up a varying voltage. In an ideal system this never  happens, but in the real world it does. When this happens, it creates noise because the “music” is the difference between + and , so any variation on the terminal changes the musical signal.

How can the wire pick up a spurious voltage? Imagine a source device (like a CD player) plugged into a different power outlet than the headphone amp. Different power outlets in your house may have slightly different voltage levels on their terminal, and may have small (a few ohms) of impedance between them. This can cause a small current flow through the ground wire. When that happens, that ground current can appear on the wire. If that ground current is alternating (for example at 60 Hz, the frequency of our AC power), then this 60 Hz tone (and additional harmonics) is added to the music. We hear “hum”.

Balanced Audio

A balanced system eliminates this problem by adding an extra wire: each channel is carried by 3 wires. Signal +, signal , and ground. Put differently, balanced separates signal ground from frame ground. In a balanced audio system, the musical signal is the difference between the + and wires. So, if there is a ground current like above, it travels on the separate ground wire and doesn’t affect the signal.

As the musical signal is the difference between the + and wire, we have some options how to use the wire:

  1. Could be a flat “zero” or “neutral”. The wire doesn’t carry any signal, but only serves as a neutral reference for the voltage on the + wire, much like unbalanced audio.
  2. Could carry an inverted mirror image of the + wire. It’s a varying voltage that is the opposite of the + wire at every moment in time.

Most balanced audio systems use option (2) above, which leads to a discussion about differential signalling.

Differential Signalling

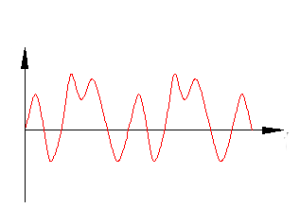
Below is a graph of what an standard unbalanced (single ended) audio signal looks like. The Y axis is volts, the X axis is time. The red line is the + wire, the black horizontal line is the – wire. The + wire carries the musical signal, the – wire is ground. This is sometimes called “single-ended” because only one wire carries the musical signal.

audioSignal-unbalanced

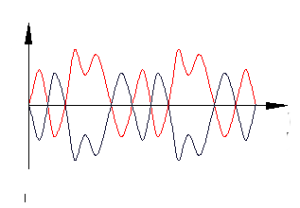
Below is what the same audio signal looks like when balanced (signalled differentially). The red line is the + signal, the blue line is the – signal. Here, neither wire carries frame ground. Each wire carries the same signal, but they have reverse polarity (inverted amplitude). The difference between them is a signal having twice the amplitude of either alone. At every instant in time, the voltage sum of the + and – wires is zero, so the overall cable (containing both + and – wires insulated from each other) has a net field of zero, which makes it immune to interference. Put differently, any external electrical field interference affects both wires the same, so it doesn’t change the difference between them.

audioSignal-balanced

This gives balanced audio 3 advantages

  1. S/N ratio is 6 dB higher (twice the voltage = 6 dB)
  2. Immunity from common interference
  3. Immunity from grounding issues and loops

Balanced audio was designed for microphones, which have low level signals carried on long wires. In this application, noise isolation is important and you need all the S/N you can get. Consumer audio analog line levels are in the range of 1-2 Volts, about 1,000 times or 60 dB stronger than microphones. And cable runs tend to be shorter.

Thus, balanced audio doesn’t make much difference in most consumer audio applications (if your house is wired properly). It’s a superior engineering design, but it doesn’t necessarily make any audible difference especially in top notch gear that already has S/N ratios over 100 dB. It’s nice to have, but I would not choose one piece of equipment over another, for this feature alone. Sound quality comes first, balanced vs. single ended is a secondary concern. All else equal, balanced is better. But all else is not always equal, and some single ended amps are better than some balanced amps.

How to Shrink Virtualbox VDI Volumes In-Place

In my case, Ubuntu 16 is the host OS, Windows 7 is the guest OS, with Virtualbox 5.0.40.

Before starting, ensure your Virtualbox is a VDI file. VMDK files can’t be resized–though they’re useful for other reasons, being compatible with other virtualization software like VMWare.

First, run the guest OS. Delete temp files and clean up the drive. Use the windows Disk Cleanup feature to remove windows update and other garbage files.

Next, defrag the drive. Defragging crams all the files together with contiguous unused space at the end of the drive instead of scattered around.

Then run: sdelete c: -z. You must run this from a command prompt having admin privileges. This step writes zeros across the unused space, which is critical because VirtualBox can’t compact the VDI unless the free space is full of zeroes. The sdelete command takes a long time after reporting 100%, appears to be hung. Be patient and let it finish.

Now shut down the guest OS. From the host OS command line, run: vboxmanage modifyhd file.vdi compact. Here, file.vdi is your VDI file.

Your’e done. The VDI file will be smaller. It will grow automatically as you use more of the guest OS disk space.

Note: don’t use the guest Windows 7 OS file management to shrink the volume. The free space it creates can’t be compacted by VirtualBox.

T-Mobile and Princess Cruises

During our recent cruise to Alaska we were vigilant about not using the ship’s expensive WiFi and mobile cellular. But not vigilant enough! I learned a lesson, luckily not too expensive.

Our TMobile plan includes international roaming at no extra charge. Outside the US you simply enable roaming on your phone. The phone warns you about charges but you can ignore that, TMobile covers it.

However, this doesn’t include cruise ships. While on the ship we didn’t make any calls or use the ship Wi-Fi. But it turns out that some incoming calls arrived to our phones while we were on the ship. We didn’t pick up; the calls went straight to VM. We didn’t even know our phones “rang”. Yet just being called, even if you don’t pick up, was enough to trigger the ship to bill us for each call. The ship bills $6 per minute and the minimum is 2 minutes just to connect. So that’s $12 every time someone calls you, even if you don’t pick it up.

Fortunately we only got 3 calls so our lesson only cost $36.

The lesson: while on a cruise ship, put your phone into airplane mode all the time. If you have international roaming, as we do with TMobile, don’t take your phone out of airplane mode until you’re off the ship.

Tip: Battery Saving for Android 6 and 7

Recently I noticed the location icon sporadically appearing on my Galaxy Note 4 phone for no apparent reason. Something was pinging location. This has a double-whammy on battery: using the GPS (or attempting to without a clear sky), and waking up the phone from sleep. The battery usage screen showed Google Play services as a primary consumer.

The fix took a while to find but it was simple: Google Location History. This is an Android service that periodically checks and logs your location. Google uses this to improve various services like search and maps.

I don’t care about this. Search results and maps work just fine, well enough for me, without having my location history. And I don’t use Google Now. And I don’t like the idea of my phone constantly tracking my location.

Here’s how to disable this, which noticeably extended my battery life:

  • Go to Settings / Location.
  • Scroll down to the Location Services section.
  • Tap Google Location History
  • Tap the slider in the upper right hand of the screen to turn it off.