All posts by Mike Clements

Twin Engine Airplanes

It’s common perception that twin engine airplanes are safer. Any for obvious reasons! Who wouldn’t want an extra engine? Yet the details give a more nuanced perspective.

With passenger jets, twin engines are definitely safer – no doubt about it. But with piston engine small aircraft (e.g. light twins), the safety record is more mixed. It boils down to 3 basic reasons:

  1. Having two engines doubles the likelihood of an engine failure.
  2. When one engine fails, the other produces differential thrust requiring immediate corrective action from the pilot to avoid loss of control.
  3. The single-engine performance of some piston twins is so marginal we sometimes say, “the remaining engine always has enough power to get you to the scene of the crash”.

Many people don’t really consider the first point, but when pointed out, it’s so obvious it doesn’t require further discussion.

Regarding point 2: engine failure in any airplane is an emergency, no matter how many engines it has. Yet with a single engine, the immediate pilot actions are pretty simple: keep the nose down so you don’t stall, and pitch for ideal glide speed. The engine is centered, so when it dies the airplane remains inherently stable and will keep gliding even hands-off. With twin engines, when one engine dies the other produces differential thrust that skews the airplane sideways and will flip it over if not corrected. This differential thrust is a double-whammy: the dead engine’s prop creates drag, pulling that side back, while the operating engine produces thrust, pulling the opposite side forward. Not only must the pilot keep the nose down to avoid stalling, but he must also apply heavy opposite rudder (not aileron) and feather the dead engine’s propeller to keep the airplane flying straight. If the pilot fails to do these actions quickly – within seconds – or does them incorrectly, the differential thrust can cause an uncontrollable spiral or spin.

Regarding point 3: one of the reasons people fly twins is for the superior payload and performance. You can carry heavier loads, and fly faster and higher. Yet if you are actually using that performance, you may operating in a way that cannot be supported by a single engine. So when one engine fails, even if you apply the correct inputs to keep flying, you may not be able to maintain level flight even with the good engine at full power.

Overall, the incident/accident statistics for light twins in general aviation is no better than single engine airplanes. Given this, why are big commercial jets always multi-engine for safety? Commercial aviation mitigates these factors:

  1. They use turbine engines, which are more reliable than pistons.
  2. The pilots are better trained, more frequently, and follow more strict operational limits set by both the FAA and their airline.
  3. The engines have much greater power than pistons, capable of maintaining level flight at high altitudes for extended periods of time, even when the airplane is at max weight.

In summary, light twin aircraft can be safer, or more dangerous, depending on the airplane, the pilot, and the mission or how the flight is operated. Pilots considering light twins should consider these limitations, how the airlines mitigate them, and incorporate that into their flying. For example:

  1. Maintain the aircraft above & beyond required minimums.
  2. Train yourself well beyond the required minimums, stay current.
  3. Don’t load to max weight, and fly missions that give you a healthy safety margin below the aircraft’s max performance.

Even then, in my opinion light twins are not safer and the higher performance is not worth the expense and hassles of the higher cost of fuel, maintenance, insurance and training. Speed is proportional to power cubed and drag is proportional to speed squared, so all else equal a twin burns 59% more fuel to go 26% faster.

Here’s where those figures come from:

  • The cube root of 2 is 1.26, so twice the power is 1.26 times as fast.
  • Drag is proportional to the square of speed, and 1.26 squared is 1.59.
  • Fuel consumption is proportional to drag.

Topping E70 DAC Review

Introduction

After I had to return my 2nd piece of Chi-Fi equipment due to poor build quality and support, I said I was done with Chi-Fi and would stick to other manufacturers. However, after Amir reviewed the Topping E70 on ASR, I couldn’t resist. A fully balanced DAC among the best and cleanest he has ever measured, for $350 would be too good to be true.

My Corda Soul is a DAC, preamp, headphone amp, and DSP processor. Of these functions, most are SOTA quality except for its DAC. It uses dual WM8741 chips which were great for 2007, but DAC technology has improved.

The topping E70 is a line level DAC and nothing more. That is:

  • DAC using ESS 9028 Pro chips
  • Analog outputs: both balanced/XLR and single ended/RCA
  • Inputs: SPDIF (coax and toslink), USB, and Bluetooth
  • Internal power supply
  • Digital volume control
  • Display showing sample rate and output level
  • High build quality with a metal case
  • Excellent measured performance, among the best at ASR

Setup

I measured the E70 and the Soul using my Tascam DA3000, which has excellent DA and AD converters. Better than my Juli@ sound card, but not as good as an APx555. This would later lead to a surprise due to misleading measurements…

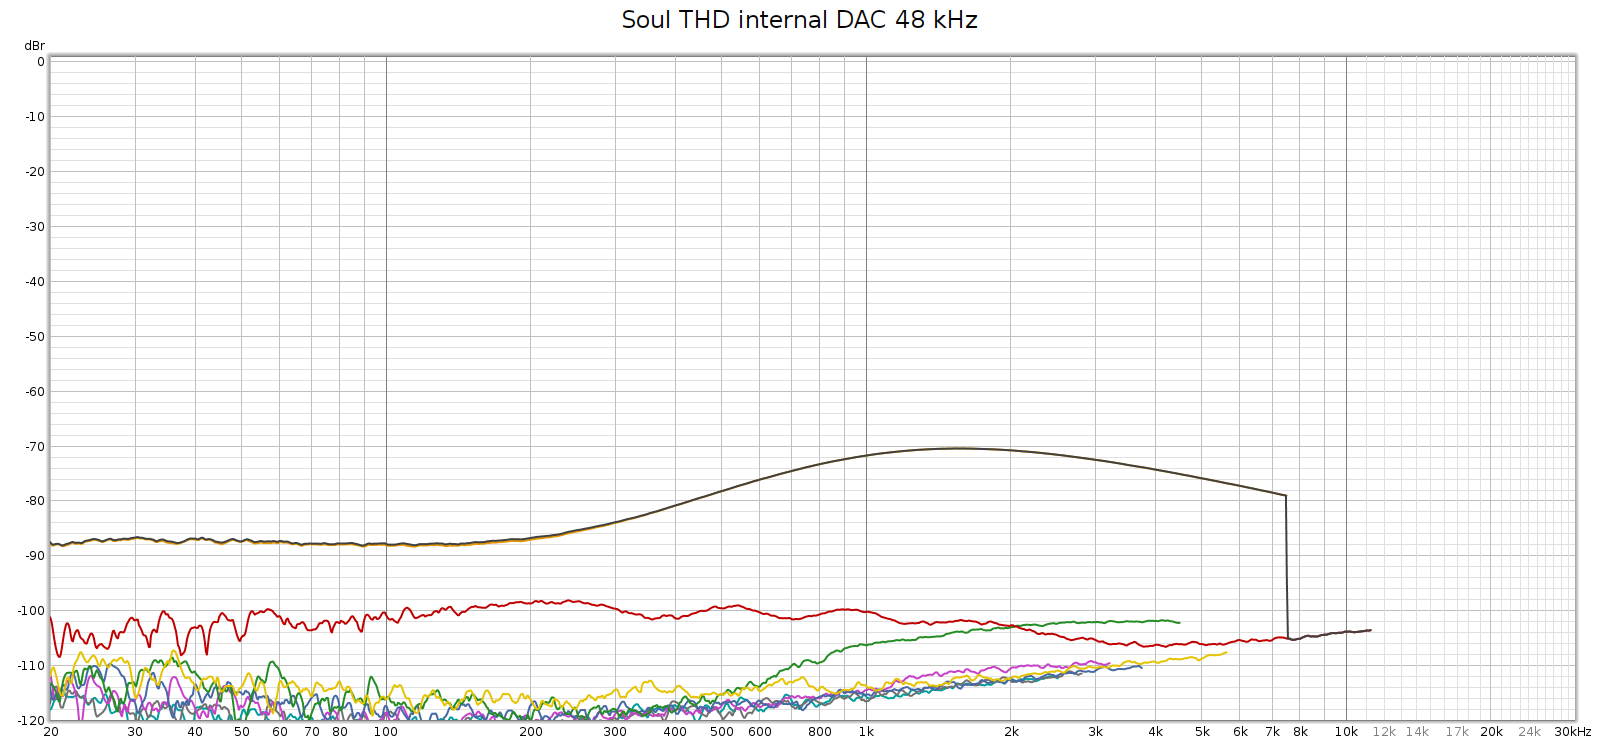
The Corda Soul distortion profile has always looked like this (Room EQ Wizard Sweep at 48 kHz):

You can see above that noise is excellent (too low to be measured) and distortion is generally good at -100 dB, but 3rd harmonic is not so good, rising to -70 dB in the upper mids.

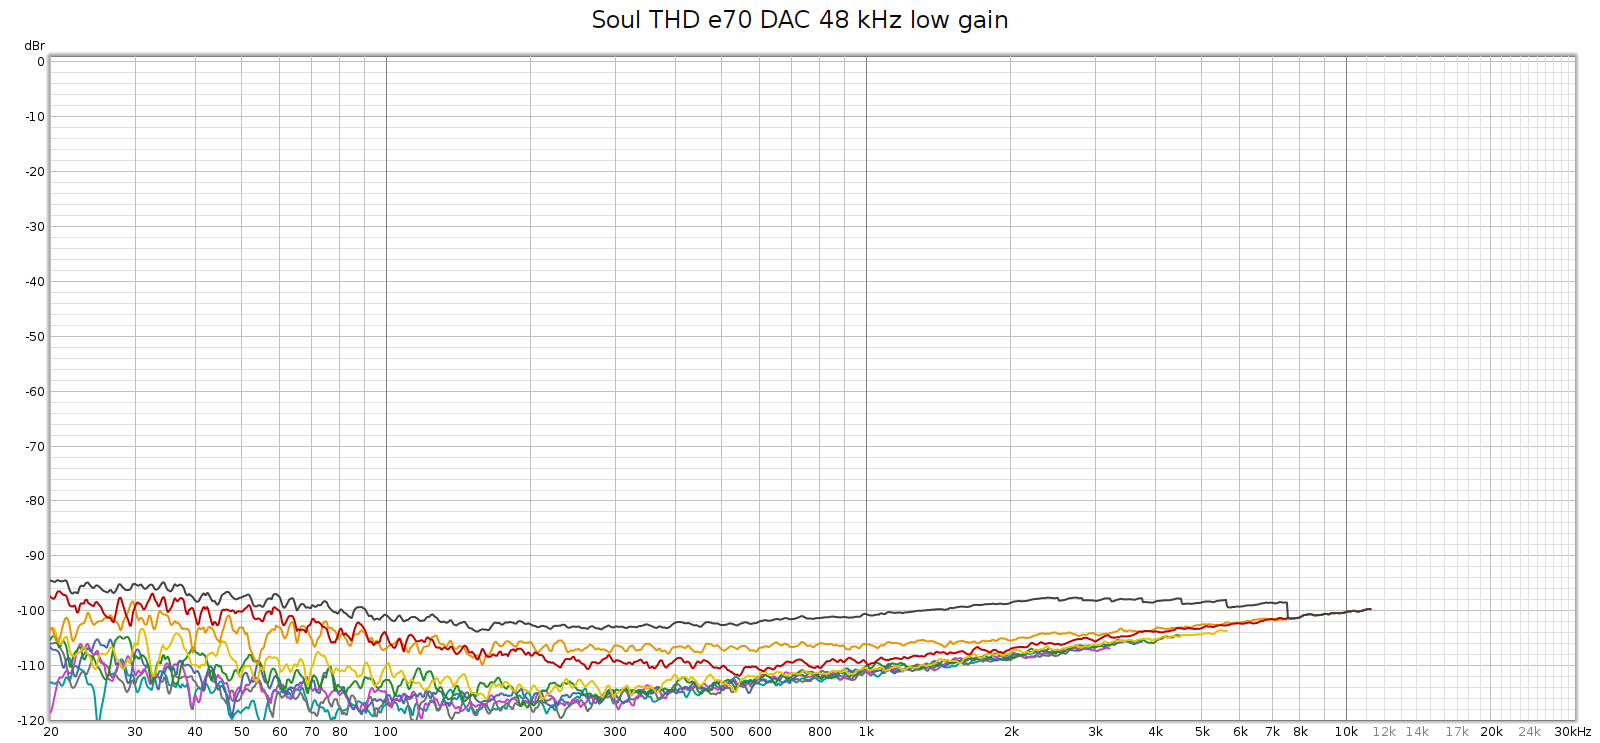
I never knew where exactly this 3H hump came from: the Soul’s digital stage, analog stage, or DA conversion. I recently discovered that it comes from DA conversion. More on that here. I set up the Soul to use the E70 as an external DA converter (it can do that!) and here is how it measured:

So ends the story, right? That’s what I thought, until I measured it at 192 kHz.

High Frequency Noise

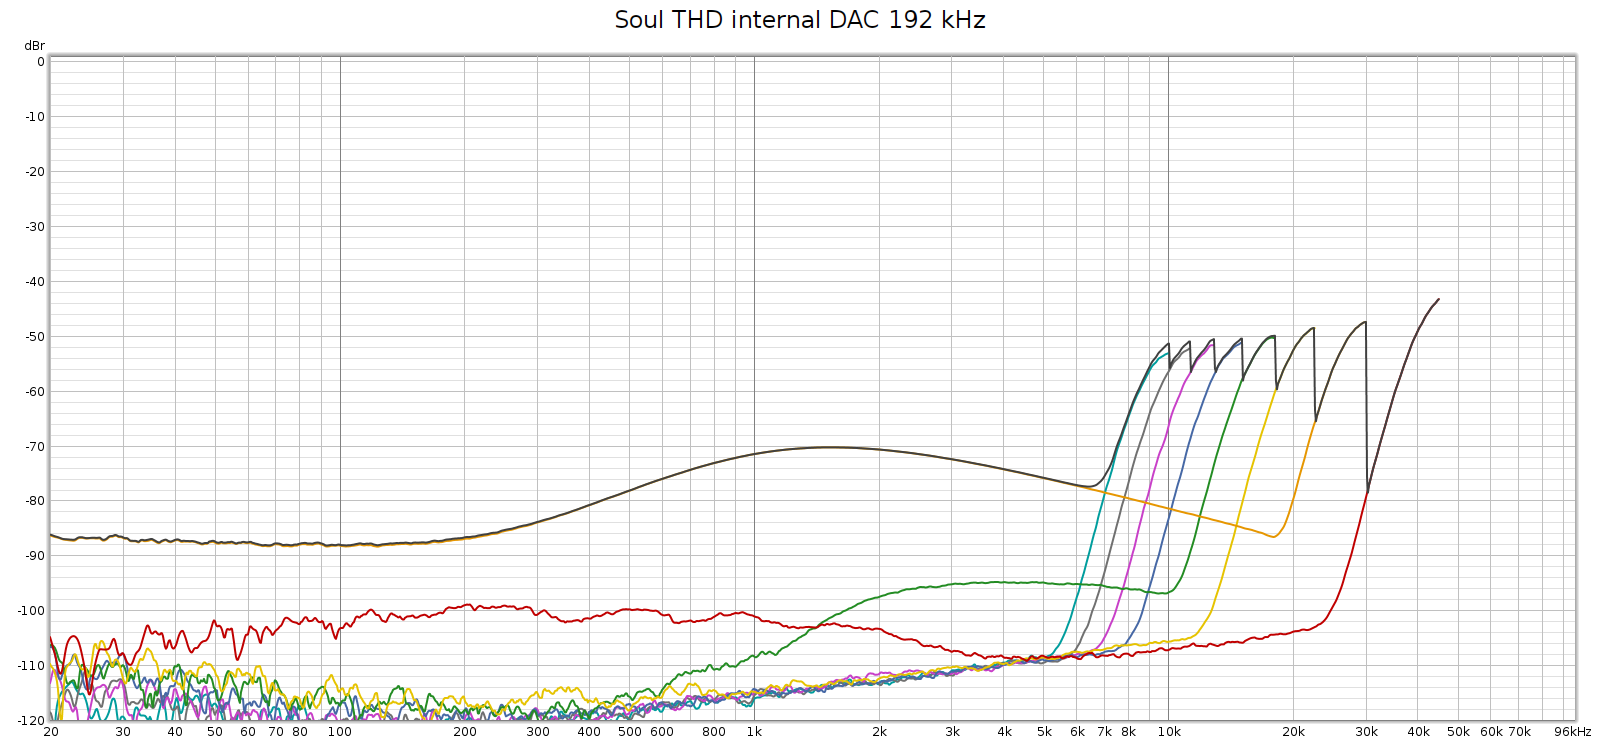
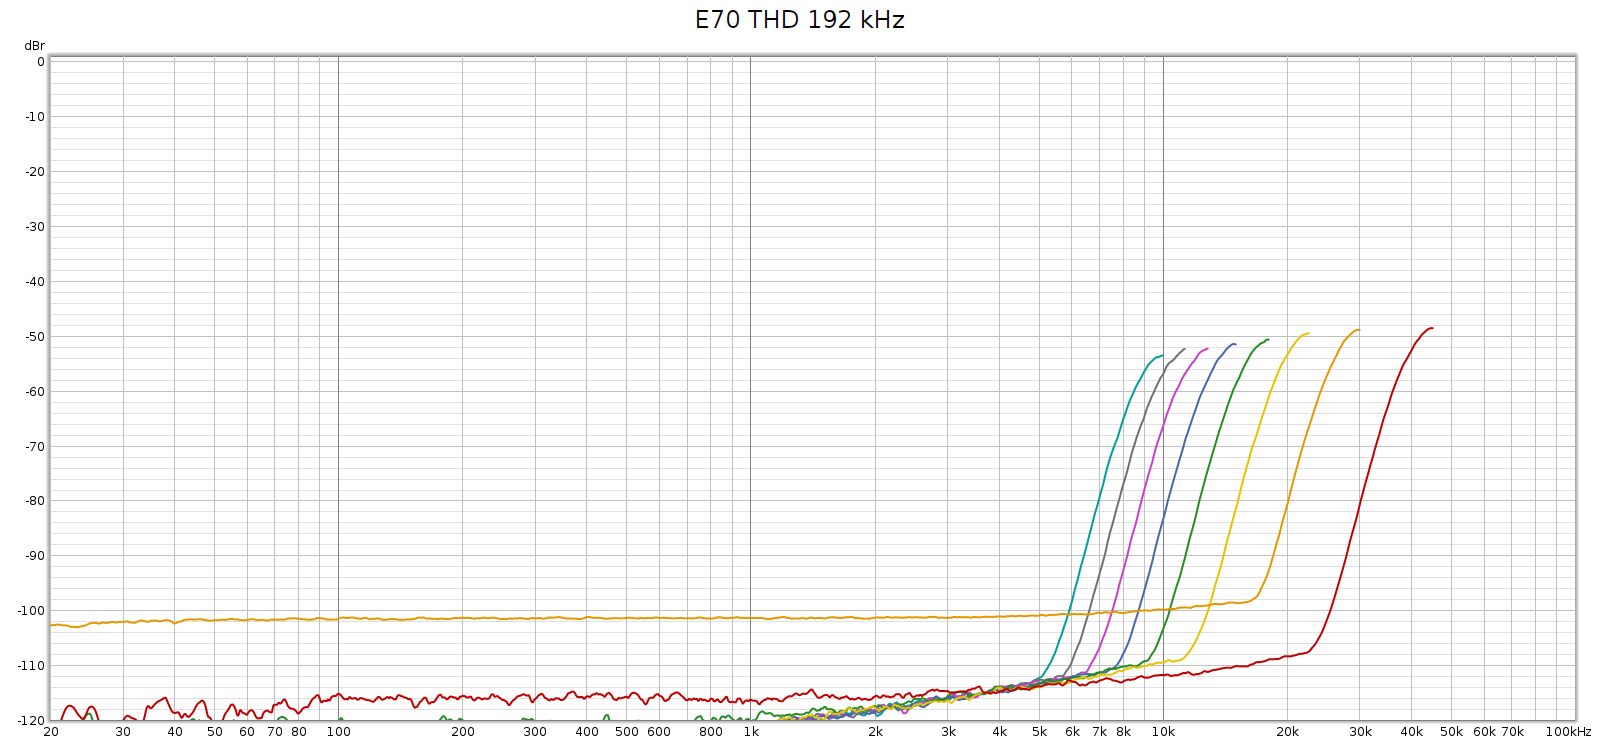
The Soul always had a noisier sweep at 192 kHz, like this:

Each of those distortion plots peaks at the same frequency:

  • 2H (red) at 45 kH, and 2 * 45 = 90
  • 3H (orange) at 30 kH, and 3 * 30 = 90
  • 4H (yellow) at 22.5 kHz, and 4 * 22.5  = 90
  • etc.

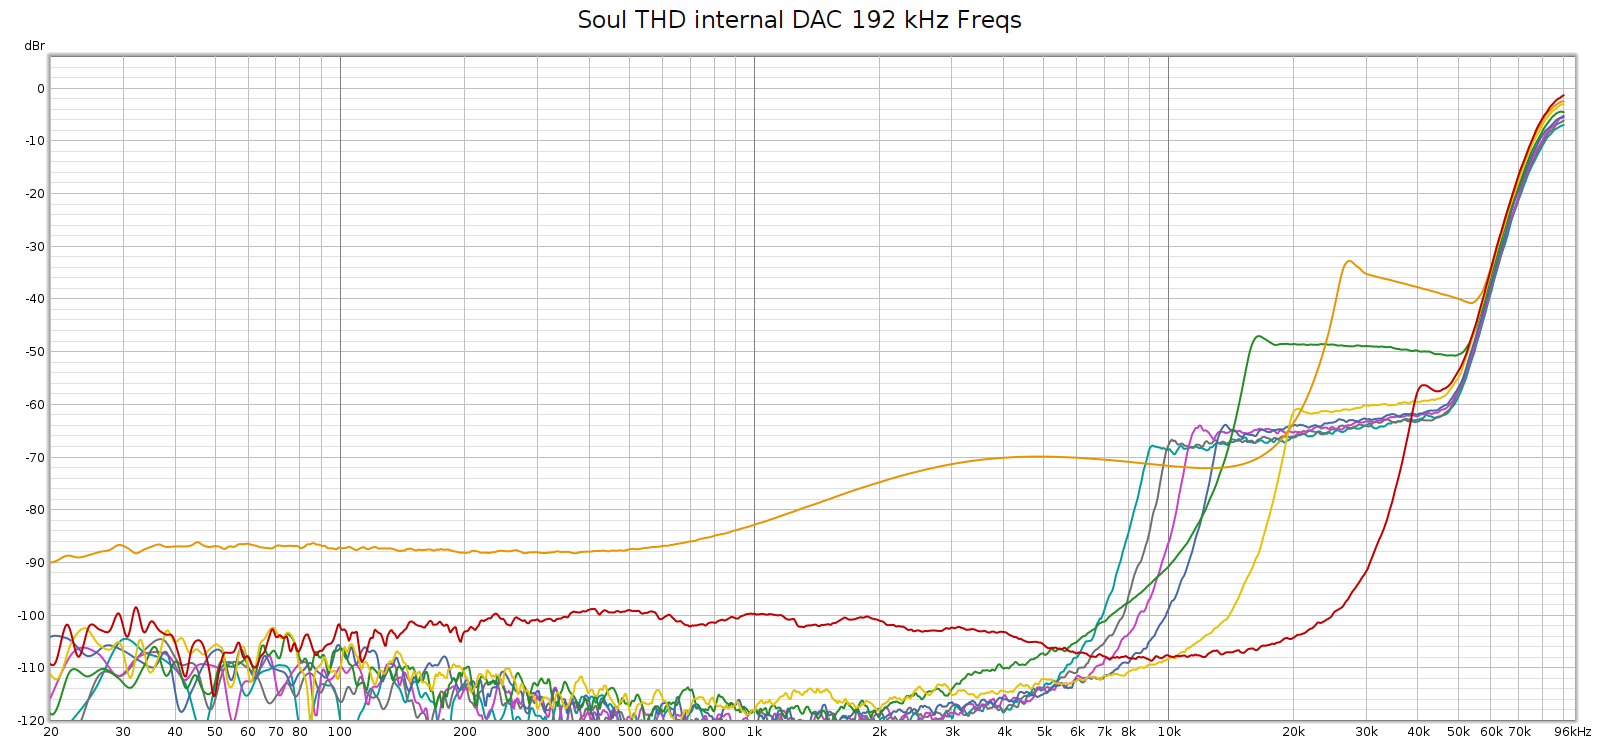
So the plot is misleading. What’s actually happening is that there is HF noise at 90 khz, and the plot is interpreting it as if it were harmonics of lower frequencies – in other words, harmonic distortion. Thus, I assumed this was due to high frequency noise from its switching power supplies not being properly suppressed.

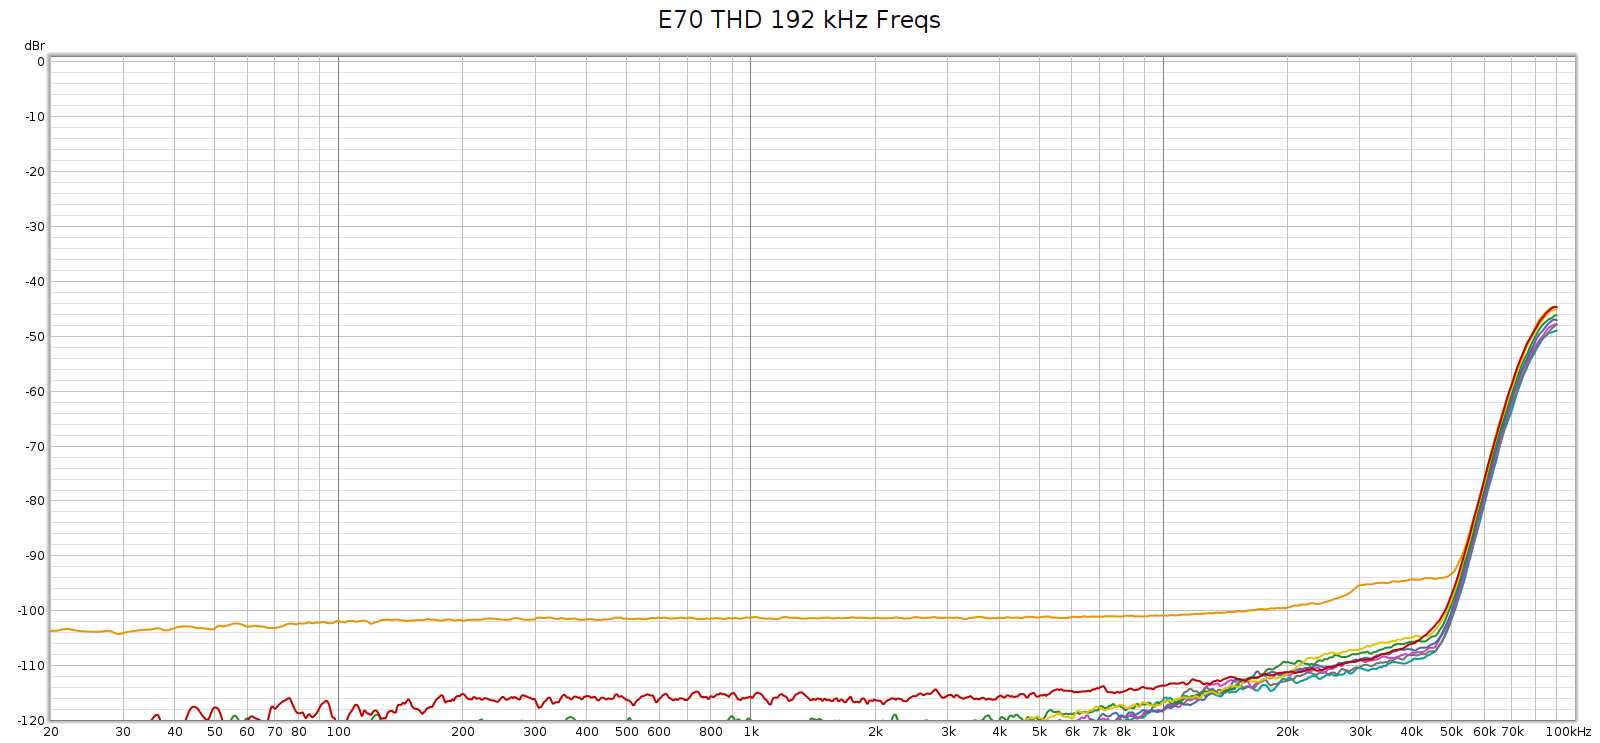
Here’s a different perspective on that same plot, plotting harmonics at their native frequency, which makes the above interpretation obvious:

But, the Soul’s power supplies (Meanwell IRM-20-24) switch at 65 kHz, not at 90 kHz. So where was that noise coming from? Maybe it wasn’t coming from the Soul at all.

Process of Elimination

I connected the E70 balanced analog outputs directly to the Tascam DA3000 inputs and recorded a 192 kHz sweep. Here’s what I got:

Or, looking at this plot the other way:

So that HF noise wasn’t coming from the Soul.

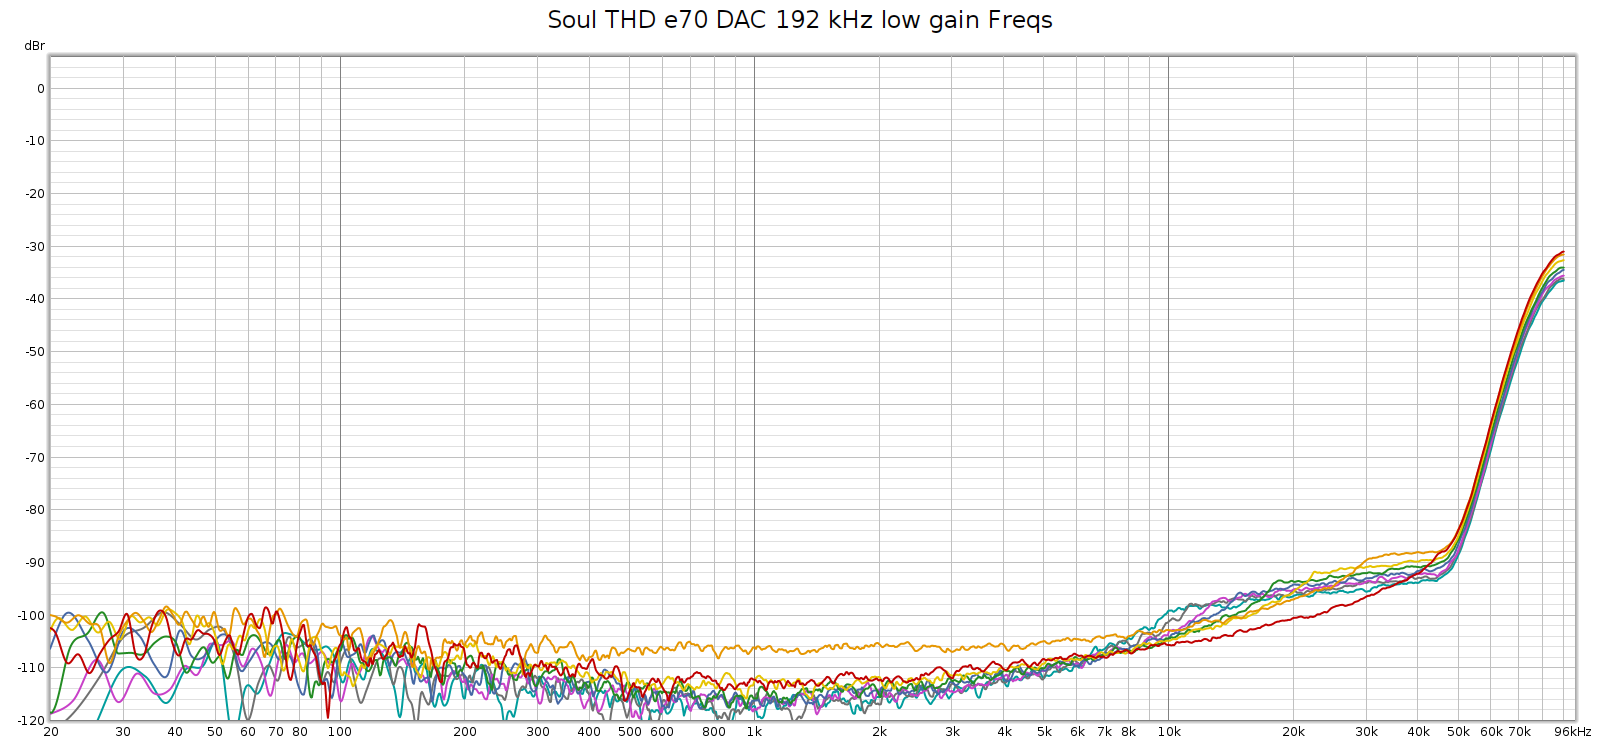
Next, I measured the Soul at 192 kHz using the E70 as its external DAC:

It’s essentially the same as the E70 direct, same shape just a few dB higher as it’s passing through an additional analog stage.

Setup – Conclusion

What I learned is that HF noise around 90 – 100 kHz is created by the Tascam recorder. When you record from its analog inputs, the signal passes through its A/D converters which introduce this noise, probably from a system clock or switching power supply. This noise is only at sample rates of 176.4 kHz and higher, because at lower rates, it’s above the Nyquist frequency so the digital filters kill it.

The E70 DAC is clean at all sample rates including 192 kHz. And the Soul’s analog stage is also clean. The Soul’s internal DA converters are not as clean, adding at bit of distortion at midrange-treble frequencies in the audible band. Thus, the Topping E70 addresses the Corda Soul’s relative weak point, and the combination gives truly SOTA audio reproduction.

One might ask why not simply use the E70 to directly drive my power amp? Why use the Soul at all?

  • The Soul serves as a convenient preamp, having multiple digital inputs.
  • The Soul has unique and valuable DSP functions: tone controls, headphone crossfeed, etc.
  • The Soul’s volume control is an analog stepped attenuator gain switch that is mechanically reliable and ultra clean with perfect channel balance at all settings.
  • The E70’s volume control is software which can glitch or lose memory, causing instant power spikes damaging speakers.
  • The Soul’s analog stage is clean and transparent, so there is no downside to its value and convenience.
  • Reliability and durability: the Soul is built like a rock by Lake People in Germany, well beyond Chi-fi quality standards.
  • Redundancy: if the E70 (or any other external DAC that I use) ever dies, I can use the Soul as a complete system while getting the DAC repaired or replaced.

E70 Review

Setup issues resolved, let’s return to the E70 review. It’s a simple black box with minimal controls:

  • Power switch on the rear left side
  • Rotary knob / button on the front right side
  • Capacitive touch button on the front left side
Features and Observations

You can leave the power switch on all the time and it will automatically power up and down as it detects a digital input signal.

You can set its output level to 4V (standard unbalanced) or 5V, which is about 2 dB louder with consequently higher SNR. 5 Volts may be too much for some devices, so make sure it is compatible. However, if this is the case, I recommend using 5 V anyway and setting the digital volume to -2 or -3 dB for reasons explained below.

I wish its high voltage output supported 16 V which is standard for professional balanced audio (as the Tascam DA3000 has). But it doesn’t.

It has digital volume control set in software. It might seem there is no reason to set it to anything other than max (0 dB). Yet setting it to -2 or -3 dB should give more headroom to better decode digital audio that is recorded too hot with intersample overs or clipping.

When the digital volume control is enabled, the display shows only the volume level, not the current sample rate. When disabled (always output max volume), the display always shows the current sample rate. I wish this were configurable. I’d like to enable digital volume and see the current sample rate.

The display can be configured to go dark and light up only when the knob is used. This is a nice feature yet it has a little bug described below.

The E70 has 7 different digital filters. Here’s how they measured at 44.1 kHz:

Filter #3 is the default, which is a decent choice. But it is minimum phase, so I switched to filter #1 which has the same response and is linear phase.

Drawbacks & Limitations

Whenever the input sample rate changes, the E70 emits a “click” / “chirp” to the analog outputs. Take care to adjust volume when changing recordings.

If while the display is dark you turn the knob to adjust the volume, the first knob click that wakes up the display changes the volume yet the display shows the prior volume before it changed, so the displayed volume is incorrect.

Firmware 1.04 adds the capability to set SPDIF sample rate lock sensitivity with a new setting called DPLL. This was essential for me because the default DPLL setting 5 didn’t handle 88.2 and 176.4 sampling well, so I upped it to 7 and it became clean. Setting 6 also worked but I figured I’d give it one extra nudge just to be sure. But Topping hasn’t yet put this firmware up on their support site. You can get an unofficial copy at ASR: https://www.audiosciencereview.com/forum/index.php?threads/topping-e70-stereo-dac-review.39188/post-1411763

Sound Quality (Subjective)

When level matched, the E70 is virtually indistinguishable from the Corda Soul’s built-in WM8741 DACs. There is no difference in voicing or frequency response. Yet when playing certain kinds of music there is a slight difference. The E70 better resolves layers of subtle detail in complex orchestral music. In recordings with moderate to heavy reverb/echo, such as from a cathedral, where the music can get drowned or saturated with reverb, it resolves the musical line more clearly. These differences are very subtle, audible with only some kinds of music, and easy to over-state. Yet they can be heard.

In contrast, the Tascam DA3000 in DA-AD mode (DAC only) shows a greater difference. It is voiced slightly warmer than the Soul or E70.

Conclusion

The E70 provides truly SOTA sound quality both subjectively and in measurements. It’s not perfect, having some firmware bugs, and Topping is not known for good support. And the build quality seems good yet long term reliability is unknown. But for the price (about $350) it cannot be beat.

Audio: DACs and Revelations

Introduction

It’s commonly held among audiophiles who understand electronics that well engineered and built DACs are audibly transparent. This belief comes from properly conducted double blind tests with well trained listeners, performing ABX testing, learning about how DACs work and how to measure them, reading detailed DAC measurements made by others and performing those measurements themselves.

However, “well engineered and built” is a loaded phrase. Some DACs use a AA filters that start attenuating within the passband (below 20 kHz), or have passband ripple, or non-flat phase response. Some DACs have elevated IM distortion at moderate levels (the ESS IM hump). Others have increasing distortion near full scale. Some modulate power or clock noise into the outputs due to insufficient filtering. All of these limitations can be audible under the right conditions, and have been observed with DACs considered to be well engineered and built.

Also, “audibly transparent” is a loaded phrase. Does it mean musically transparent, or perceptually transparent? Consider the  difference between 96 kHz and 44.1 kHz rate, or a linear vs. minimum phase filter having equal amplitude responses. These differences are considered to be inaudible. I can differentiate them in an ABX test, but only using “appropriate source material”. In this case, a high quality recording of jangling keys or a square wave. Differentiating them with a musical signal is much more difficult, and I’m not sure I could do that. In some cases, I’ve detected these differences with high quality castanet recordings, but is that really music? I consider it on the borderline between music and test signal. We listen to music, not test signals, so while I believe a good audio system should strive for perceptual transparency, some people consider the lower bar of musical transparency to be sufficient.

The Corda Soul is a DAC, preamp, and headphone amp with useful DSP functions. I’ve owned one for nearly 5 years and in some ways it’s one of the best measuring pieces of gear I have seen. Subjectively it sounds fantastic (by which I mean it is transparent, or doesn’t sound like anything – and many DACs and preamps do not achieve this, adding their own coloration to the sound) and I prefer the Soul to other high quality DAC / preamps in direct comparisons. I never expected to encounter a better sounding DAC…

The Setup

I recently replaced my Tascam SS-R1 with the newer model, the DA3000. The SS-R1 still works like new but is limited to 44.1 k and 48 k sampling, where the DA3000 supports every sample rate from 44.1 k to 192 k and DSD 64 and 128. This means I can connect the Soul digital output to the DA3000 digital input, and the DA3000 will simply work regardless of the sample rate. The DA3000 analog output (balanced XLR) goes to the Soul’s analog input.

I tested the DA3000 and the Soul by playing test signals through the Soul and capturing its analog output on the DA3000. The Soul always had a small hump in the distortion curve that peaks at -70 to -80 dB at 1,000 to 2,000 Hz, and appears at every sample rate. Since I now had two recorders – both the DA3000 and the SS-R1 – I was able to narrow down what causes this by bypassing the Soul’s DA converters, using only its analog gain stage. I connected the Soul’s digital output to the DA3000, then sent the DA3000 analog output to the Soul’s input, then recorded the Soul’s analog output on the SS-R1. The hump disappeared entirely!

This means the Soul’s distortion hump was coming from its internal DA converters, or its FF de-emphasis curve which is implemented in DSP (both of which are bypassed when you use an external DAC). This is surprising, since the Soul goes to great lengths to ensure clean DA conversion. It uses well regulated switching power supplies and dual WM8741 DAC chips, each in mono mode, one for each channel, fully balanced. However, the Soul’s analog gain stage measured entirely transparent. Noise was below any threshold I could record. The SS-R1 is only 16 bit, so all I can say is that noise is below -96 dB even at low volume settings. Frequency response was perfectly flat. Distortion measured at -96 dB, the limits of 16-bit.

So: the Tascam DA3000 DA converters measured cleaner than the Soul (here for measurement details). And not slightly cleaner, but a whopping difference: from -70 dB to below -96 dB, at least 26 dB and probably more. And this is in a frequency range where our hearing is most sensitive. But that said, not every difference you can measure, is audible…

The Revelation

The Soul allows the use of an external DAC and has a switch to instantly switch between that and its internal DAC. The difference is readily audible, by which I mean I can hear it not only with test signals but on a wide variety of music. Perceptually and subjectively, compared to the DA3000, I characterize the Soul’s internal DAC as:

  • Slightly edgier, tonally as if adding just a smidge of upper midrange
  • A tad grainier, or less pure
  • Bass is a bit less prominent, but this could be subtle perceptual masking from slightly emphasized upper mids
  • Soundstage is a bit narrower
  • About 0.2 dB louder

In contrast, the DA3000 DAC sounds a touch more pure, more open, with more natural bass and a bigger soundstage.

I call this a revelation because it was so unexpected. It really surprised me. Up to now, the Soul has been less edgy / grainy than other DACs I have owned, such as the Oppo HA-1. Even though the difference is subtle, it is a joy to listen to my familiar recordings with a slightly smoother, more natural perspective.

Note: The 0.2 dB loudness difference is the obvious culprit. It’s small enough to be barely perceptible as loudness, yet perceived indirectly as “richer”, “more detailed”. Yet normally, all else equal, slightly louder is perceived as slightly better. So it’s the opposite of expected. And I hear the same subtle differences even after adjusting for the 0.2 dB loudness difference.

But Wait, There’s More!

Upon further listening I made some other observations. The Tascam DA3000 DAC doesn’t resolve fine detail quite as well as the Soul. It slightly veils some of the subtle background sounds. However, in voicing and soundstage I still preferred the Tascam. So the difference was more of a trade-off.

The Conclusion

The Soul is still a keeper. As an analog preamp, it is unmatched both subjectively and objectively: clean and transparent with noise and distortion so low I can’t measure it, and perfect channel balance at every volume setting. Its DSP functions are useful and well implemented. And it is well built with great support.

However, I am now looking at other DACs to potentially bypass the Soul’s internal DAC. More on this here.

If my opinion isn’t clear by now, I’ll just say it. Well engineered DACs do not all sound the same. Some may sound the same, while others may have audible differences. All audible differences can be measured – if you know what to measure and how to do it right. But most published specifications are only the most basic measurements that don’t cover everything that can be heard. So just because basic specs like SINAD and FR are the same, doesn’t necessarily imply they sound the same.

Flying VFR International

I fly to Canada occasionally and I haven’t gotten fined or arrested, nor even admonished, so I must not have done anything too terribly wrong. This isn’t covered in private pilot training, so I figured it might be helpful to share my checklists. Note: this is for VFR.

Planning (weeks ahead)

  • Passports for every person on board
  • Buy US Customs sticker and apply on pilot side airplane door
  • Create an EAPIS account
  • Have a 3rd or higher class medical (BasicMed not allowed in Canada)
  • Proof of airplane insurance (required in Canada)
  • Radio station & operator license (legally required but nobody ever asks for it)
  • Get Canadian CFS (their AFD book) and charts
  • Proof of COVID vaccination for every person on board
    • COVID tests not required as of March 2022

Pre-Flight (1-2 days ahead)

  • File EAPIS including all people on board, print and bring the email confirmation
  • Pick an Airport of entry for your first landing after crossing the border
  • Figure out where Customs is at your airport of entry (airport diagram, etc.)
  • Call customs at your airport of entry 2-48 hours before landing
  • File international flight plan in the country you’re departing
  • If in Canada returning to the US, call Flight Service an hour before your flight to get your border crossing squawk code

In-Flight

  • Before crossing border, ensure your international flight plan is activated and you are squawking a discrete border crossing code
    • In USA, when in-flight radio flight service 122.2 or nearby RCO to activate
    • In Canada, call flight service 1 hour before departing to file plan & get squawk
    • Don’t cross a border squawking VFR
  • Fly the plan to your destination airport of entry

Flying into Canada

  • Before entering Canada, contact Canadian approach or terminal
    • for example Victoria Terminal 127.8
  • In all Canadian radio communications, emphasize the “N” at the start of your tail number
  • After landing, taxi to Customs, stay inside your airplane and call Canada customs
  • They will usually clear you over the phone without an in-person visit

After flying in Canada, they will mail you a bill for ATC services. The bill has a flat calendar quarterly rate for every quarter in which you fly in Canadian airspace. For example in 2023 I flew to Canada twice, in July and August, and both trips happened to fall in the same quarter. I got a bill for $24.09.

Canada aviation regulations and procedures are similar to the US, though here are a few key differences that will help keep you out of trouble:

  • VFR flight plan required for all flights > 25 nm
    • Call to file before flight
    • Plan automatically activates at filed start time – no need to activate after takeoff
    • Must call to close plan upon landing
  • At busy airports, call clearance delivery before calling ground (even for VFR), to get your taxi/takeoff clearance and squawk code, if applicable.
  • Altitude: 10,000 – 13,000 limited to 30 mins without oxygen
  • VFR over the top is restricted
  • VFR night is restricted
  • MF: mandatory frequency; like CTAF
  • Class “E” airports (untowered) have mandatory reporting before entering their airspace
  • Monitor 126.7 continuously, en route, and make occasional position reports in the blind. Also monitored by FSS.
  • Contacts

An ADS-B Troubleshooting Saga

Introduction

ADS-B is “Automatic Dependent Surveillance Broadcast”. It is an electronic system installed on airplanes that reports their 3-D position in real time. The FAA required all aircraft flying in controlled airspace to have ADS-B by Jan 1, 2020.

My ADS-B system is uAvionix Tailbeacon TSO. I installed it in Oct 2019 and it worked well for about 3 years.

Back in March 2023 I was flying back to KBFI when the tower controller said she didn’t have my Mode C altitude. This sometimes happens even when the transponder is working well, so I reset it. I also reset the Tailbeacon ADS-B just to be safe. The controller then asked if I was ADS-B equipped. This is never good, since it means they aren’t getting my ADS-B data.

The Saga Begins

The next day, a technical representative from the FAA emailed me to tell me my airplane’s ADS-B system wasn’t working, and asked how I plan to fix it. He also provided performance reports from recent flights to show that it was not an isolated case, but a trend. I opened a support case with uAvionix and notified my local airplane shop. My airplane was about to go in for its annual inspection, so I said I’d have them fix during that time. Until then, I self-grounded for a couple of weeks.

When I flew from KBFI to KPLU to drop my airplane off for its annual, the ADS-B performance report (PAPR) was clean. So the Tailbeacon did work properly under some conditions.

Death from Corrosion and Ground Wiring

During the annual, based on uAvionix advice, we improved the fin grounding by running a wire across the hinge to the rudder. We found corrosion on the Tailbeacon circuit board so uAvionix said it should be replaced. Since it was beyond its 2 year warranty, they asked for $400 for the replacement, which is an 80% discount. I asked for a courtesy replacement due to all time, expense, and down-time the failure was causing me. uAvionix granted that and sent it for free.

After annual, the new Tailbeacon worked well enough that ATC did not complain, but it still failed the PAPR. All the data was correct, but the GPS quality flag (NIC) sometimes dropped below minimum required accuracy.

GPS problems are common enough with Tailbeacon that uAvionix has a detailed 16 page manual to troubleshoot it. They sent me a copy. It is marked “company confidential – do not distribute”, so I won’t post it here.

The FAA PAPR is just a summary telling you whether you passed, and if you didn’t why you failed. So if you fail, you know why but you don’t know exactly where. You can email the FAA and they will provide a detailed GPS log in KMZ format, showing every message your ADS-B system sent, color coded GREEN for good and RED for bad. This is essential for troubleshooting ADS-B systems. You can load this into Google Earth and easily see exactly where it failed.

Radio Interference

In the detailed track log, it was mostly green, but red in a few spots. I noticed that one of the spots it turned red was over the rock quarry SE of Boeing Field, exactly where Boeing Tower asked me to report my position. Could my radio transmission have jammed the Tailbeacon GPS? It seemed unlikely because I was transmitting on 118.3 MHz, while GPS is at 1.5 GHz, more than 10x higher frequency.

The uAvionix troubleshooting doc says that radios can jam the GPS from harmonic distortion. Specifically, around the 12th or 13th harmonic. When this happens, you can install lowpass filters on the comm antennas to block that distortion. But those lowpass filters are expensive, and the GPS track also turned red in places I wasn’t transmitting, so I wasn’t sure if that was the problem.

I have 2 comm radios, an MX-385 and an RT-385. I removed one from the panel and made a test flight. Then I reinstalled it, removed the other, and made another test flight. The PAPR for these flights still failed, but it improved. With the MX-385 removed, there were fewer GPS drops.

Next, I tested it on the ground. I turned on the Tailbeacon while monitoring its data with the uAvionix app on my phone. I watched it get a good GPS fix. Then I transmitted on different frequencies on each of my radios. The MX-385 would cause the Tailbeacon to lose GPS completely and instantly. The RT-385 did not. But it would jam the GPS while flying. So ground testing is informative yet not authoritative.  I also made test flights with the Emergency Locator Transmitter (ELT) turned off and antenna disconnected.

So I needed to install filters. But what kind? From what I read, Garmin makes them and so does TED. The TED filters are more than twice the price, but user comments suggested they are more effective. The TED 4-70 is -52 dB at 1.5 GHz. I ordered 2 of them.

The filters should be easy to install: each goes inline and has a BNC connector on each side (one male, one female). So I crawled underneath my airplane panel with a flashlight. I discovered that the comm radio antennas do not have any BNC connectors. They are hard-wired to the back of the radio rack, and the cable runs straight to the antennas on the roof of the airplane. I spent hours removing interior panels to follow those cables looking for a connector, but alas there were none. So the only way I could install the filters was to cut the antenna cables and install new BNC connectors.

I studied to find out what kind of coax cable the antennas use, ordered a set of male and female BNC connectors, a cable stripper, and crimp tool. When they arrived I spent several more hours contorted upside-down under the panel with a flashlight, cutting the cables and installing the connectors. When I finished I ground-tested the radios. One worked, the other didn’t. Apparently, a strand of wire went astray when I installed the BNC connectors. So I did it over again. Finally, both radios worked.

I made a test flight and the PAPR was much improved. The GPS NIC never dropped to zero, but only dropped to 6. It should be in the range of 7-9. So it still failed, but it nearly passed.

I bought another pair of TED 4-70 filters, this time used from eBay to save money. I installed one on the ELT antenna and kept the last as a spare. My next flight still failed the PAPR, but it was still improved.

Switches and Connectors

I mentioned that my flight from KBFI to KPLU with the old Tailbeacon pass the PAPR. Just before that flight I exercised the panel switch for the Tailbeacon about 10 times, to scrape off any internal corrosion and improve the connection. These panel switches are OEM, so they are over 40 years old. I exercised all of them again to see if that would help.

Well, three of them broke while I was switching them back and forth! At home, I wired a shunt from 16 gauge wire with dual male spades, soldered together. Then at the airplane I plugged the nav light direct through the shunt instead of through the switch. The next test flight still failed, but almost passed, a further improvement and closest I had yet come to passing.

Re-Evaluation

At this point I had done everything in the uAvionix guide, and it still wasn’t passing the PAPR. It was working well enough that ATC was not complaining. But it needed to pass the 91.227 requirements, which are more strict.

uAvionix escalated my case to Lou and we spoke for about an hour covering the history, all the things I had tried, and what to do next. We agreed that I would replace the panel switches in my airplane, test it again. If it didn’t pass, uAvionix would send me another warranty replacement unit. But Lou said they were out of stock and it would take 4 weeks.

So, I dropped my plane at Spencer Avionics to get the switches replaced. Spanaflight had new switches in stock and Spencer installed them. My next flight worked as well as the prior one with the shunt, so the new switches definitely helped. And I needed them anyway, since some broke. But it still didn’t pass.

At this point Lou called me and said that even though uAvionix was out of stock, he had one at his avionics shop and he would send me one, via 2 day FedEx.

Another Warranty Replacement

When it arrived I flew back down to Spanaflight and, working alongside Karl, we replaced the old Tailbeacon with the new one. At my request we soldered it instead of using crimp connectors. I turned it on and did the initial set-up. Then on my flight back to KBFI I flew the long way around in order to make the flight long enough (at least 30 mins) to get PAPR. After I landed, I pulled the report and it passed! I forwarded it to the FAA rep, who agreed it passed. Problem solved, case closed.

Happy Ending

So that is the end of the saga. Here’s a summary:

  • Original Tailbeacon developed corrosion on its circuit board, after 3 years of service.
  • It failed intermittently especially in freezing temperatures.
  • The new warranty replacement Tailbeacon also failed, due to weak GPS (low NIC).
  • All other fields (tail #, squawk code, etc.) were correct. The only failure was NIC.
  • We improved the ground by wiring across the hinge from the rudder to fin. This improved things but didn’t fix it.
  • We installed notch/lowpass filters on both comm radios and the ELT. This improved things but didn’t fix it.
  • We replaced the panel switches to the nav light. This improved things but didn’t fix it.
  • We replaced that Tailbeacon unit again, with another new warranty replacement.
  • During installation we soldered it instead of using the crimp connector. And we covered the connection with insulating shrink wrap.
  • The new Tailbeacon passed the PAPR on the very first flight and the FAA representative signed it off.

If this new one had failed, my only other option would have been to stop using uAvionix Tailbeacon and install a Garmin GDL-82 system instead.

Schiit Jotunheim 2 Review: DAC+Preamp+Headphone Amp

Introduction

Note: about a year ago I got an SMSL SU-6 DAC. More on that here.

I’ve always enjoyed listening to music on headphones at work. As we are returning to the office, I want to have high quality audio listening. My Etymotic ER6 IEMs sound great, but (A) they isolate all other sounds, so when people walk by and say “hi” I don’t even hear them, and (B) they don’t reproduce the top half-octave, so while they do sound clean, there’s something subtly missing. I still have my old Sennheiser HD-580 which are still as good as new, but they have low voltage sensitivity so I needed an amp to drive them.

I wanted to play music from my phone (USB Audio Player Pro), my laptop, or my desktop. And most (but not all) my music is on a small external hard disk which occupies the phone USB port, so when playing from the phone I may use its USB output or its analog headphone jack. But when playing from the laptop or desktop, I’ll use USB since their built-in DACs are crappy and don’t handle sample rates above 48k.

So I needed an audio device that is a DAC with USB input, also analog input, with a built-in headphone amp. Furthermore, I have limited power plugs at work so I couldn’t use separate devices having external wall-wart power supplies. I needed this to be a single box with an internal power supply and standard power plug. And of course having excellent audio quality in its DAC and amp, with sufficient power to drive my Sennheiser HD-580. And after my recent experience with Topping and SMSL, made in USA with a good warranty and support. And not too expensive.

The Schiit Jotunheim 2 with DAC module is the only device that meets all of the above requirements, so I ordered one. The Asgard would also meet these requirements, so which to get? I opted for the Jotunheim because:

  • It has both single-ended and balanced outputs and inputs.
  • It has slightly cleaner audio (lower noise & distortion), and more power.
  • It has a better volume knob (Alps RK27 blue velvet) with better channel matching.
  • It has switch-selectable preamp outs.

Amir reviewed it at ASR a few years ago, when it had the prior version of the DAC card that wasn’t so great. He found it to be a great amp & preamp with a crappy DAC. Since then, Schiit revised and greatly improved the DAC. The DAC is a plug-in replaceable internal module/card that costs about $100, so folks who bought an earlier Jotunheim (or Asgard) can also upgrade to the new DAC.

Photos

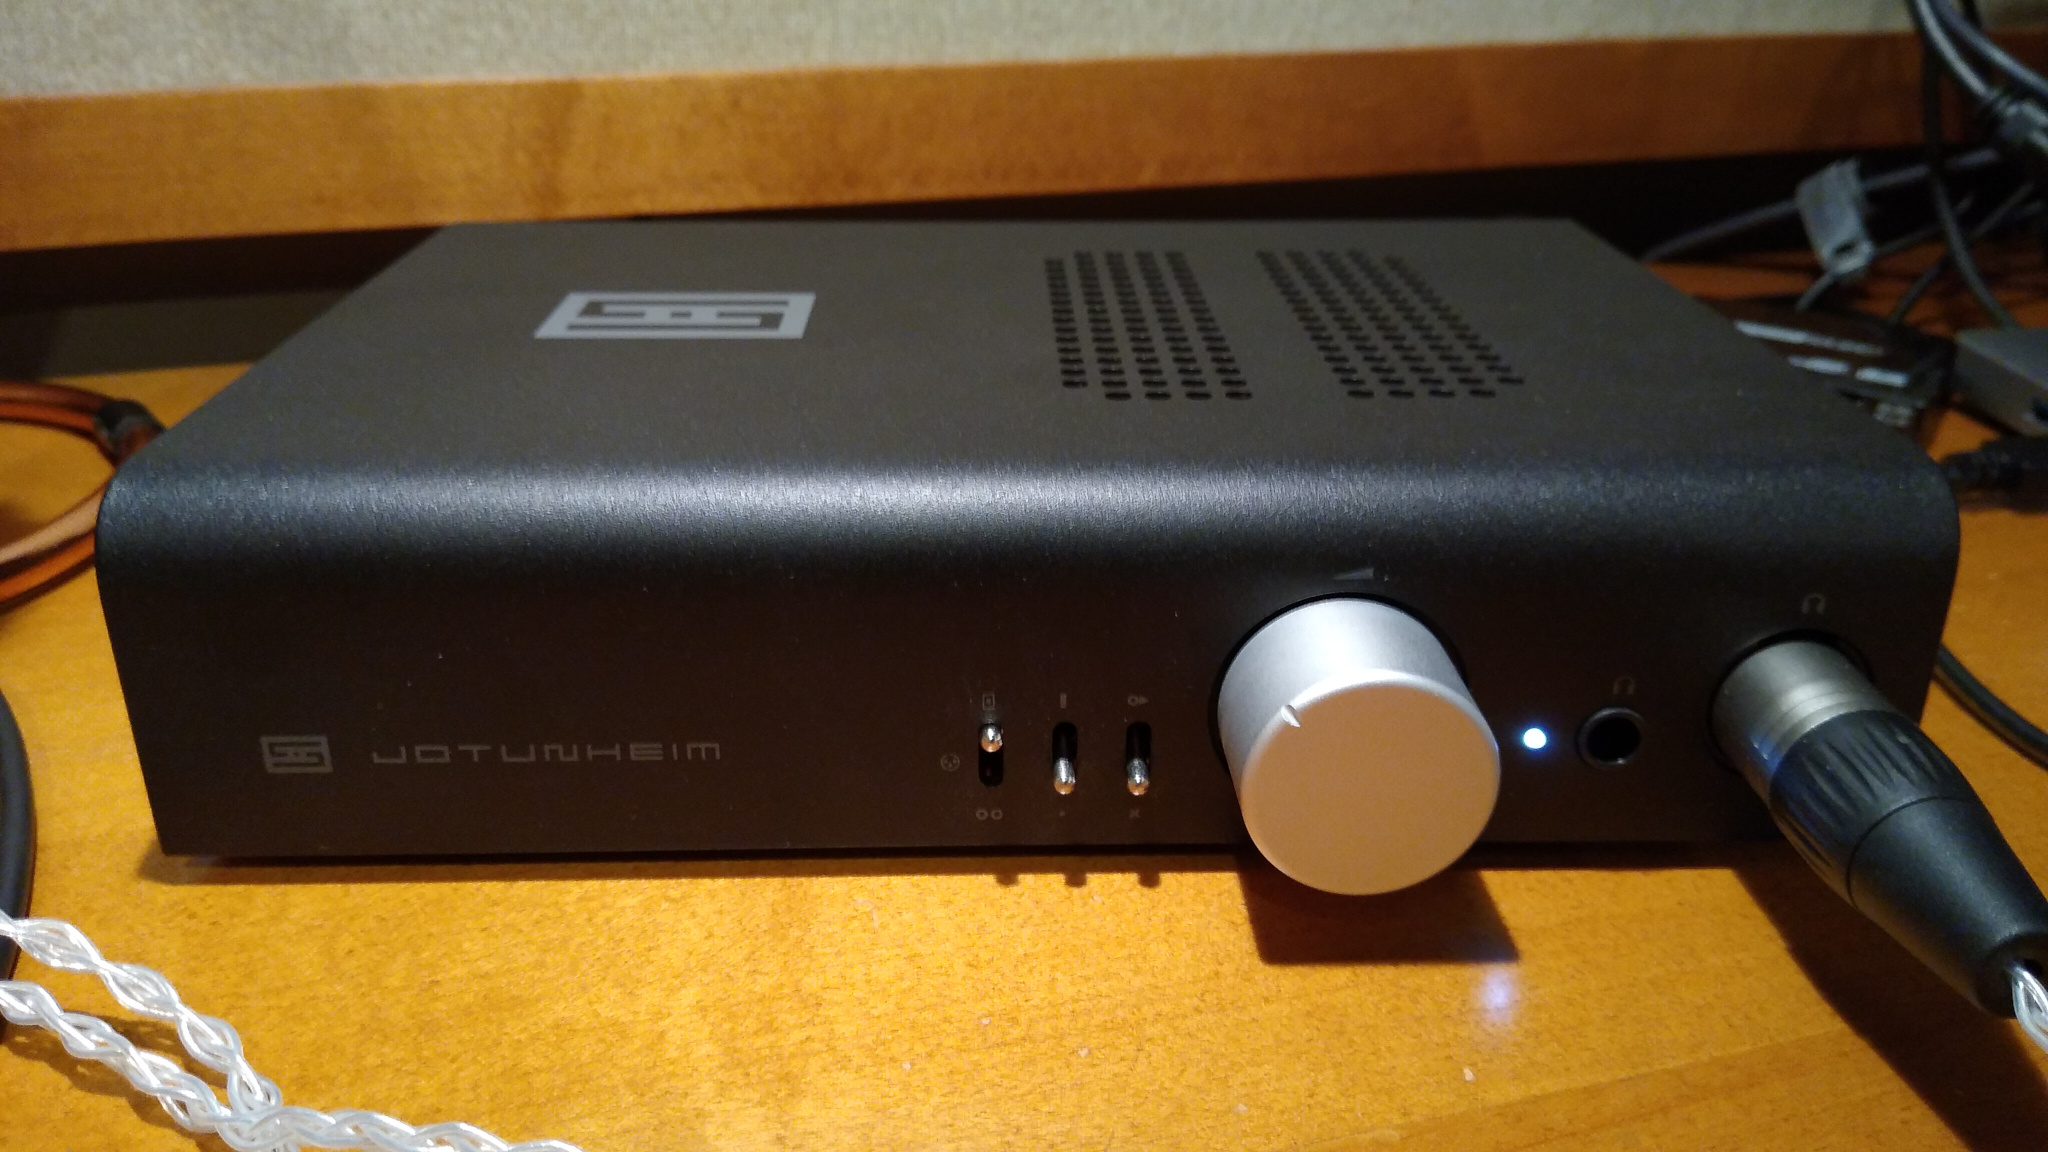
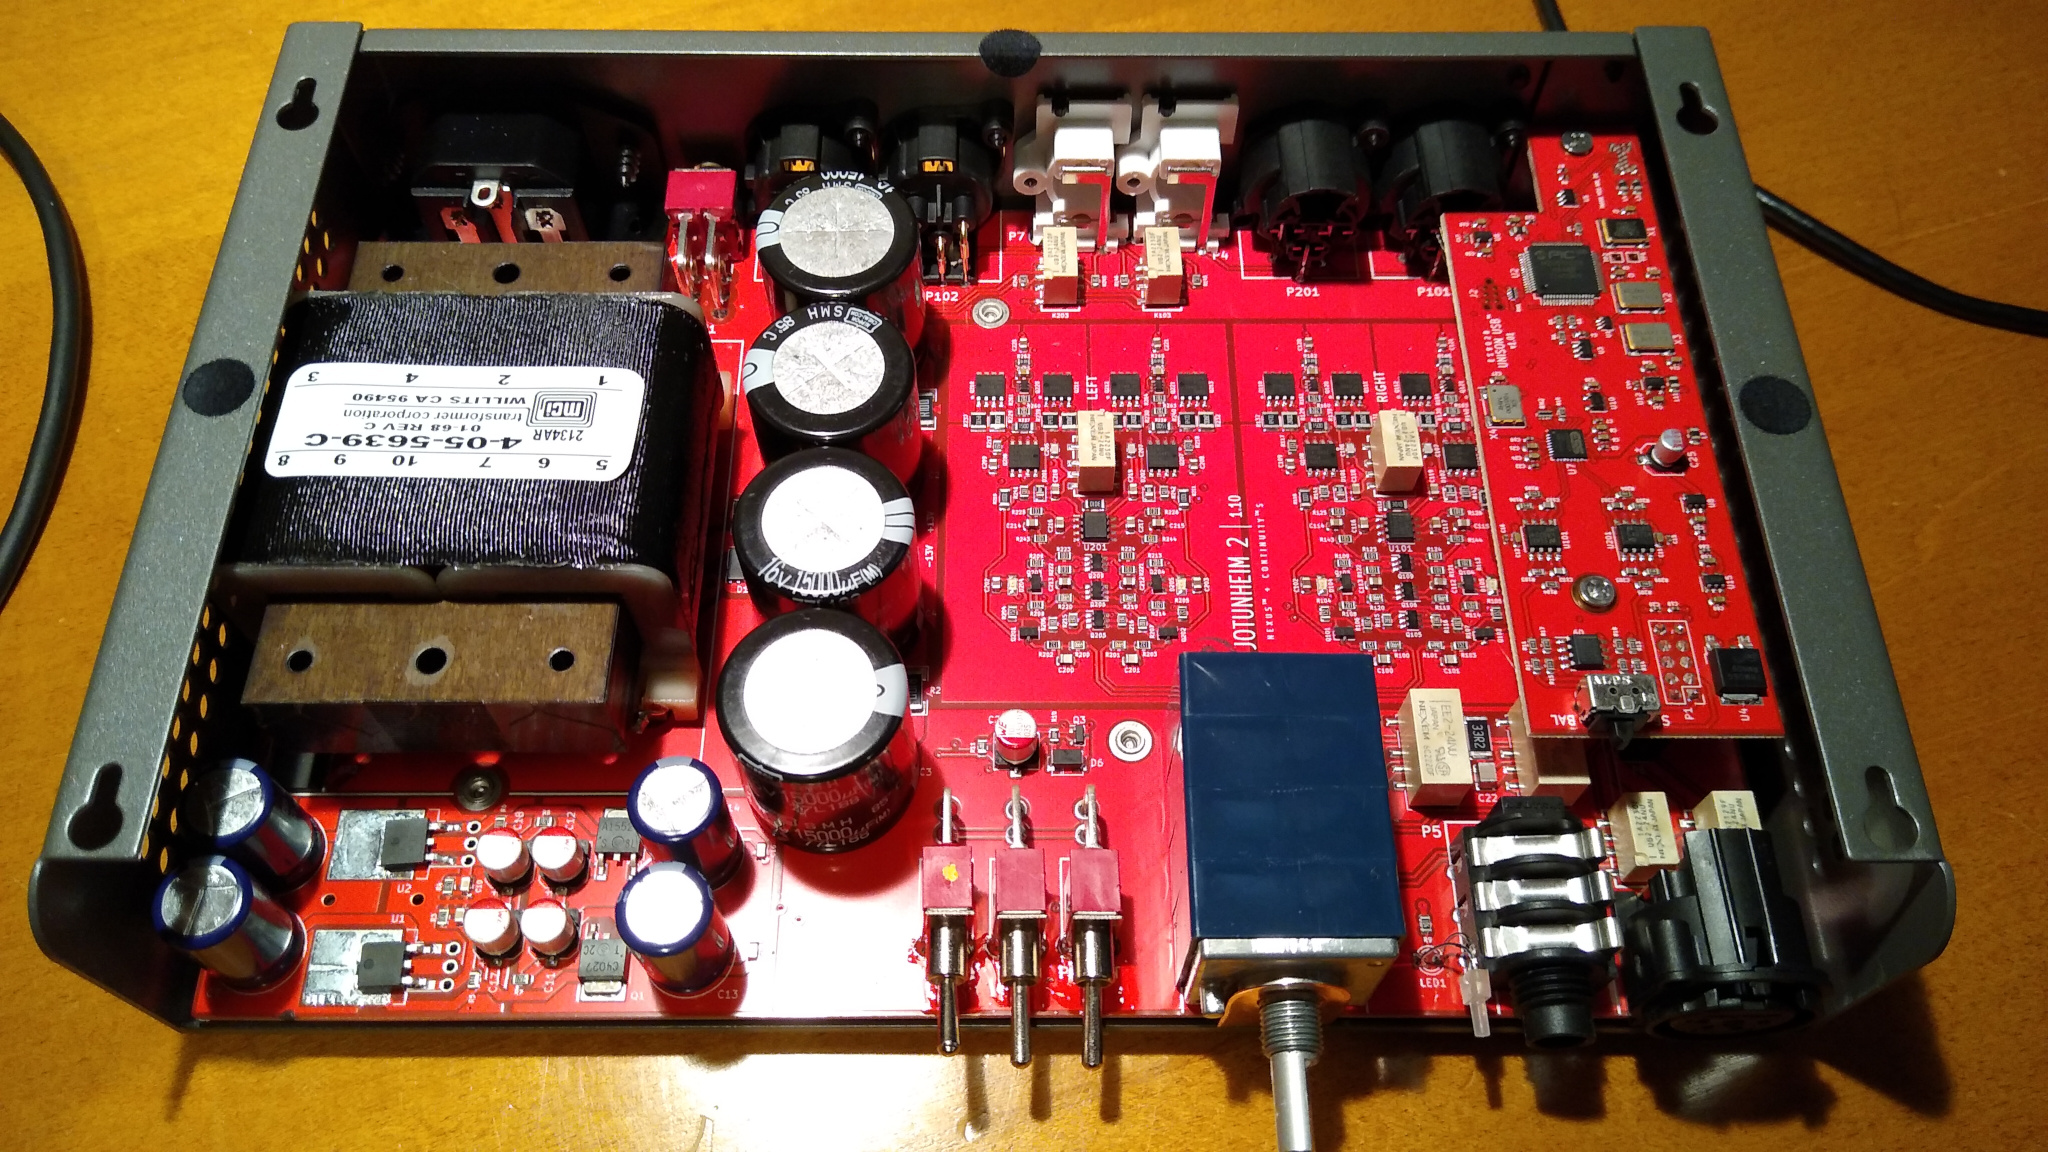
With its all-metal construction, switches and knobs it has a look that says, “tools, not toys”.

Removing the cover reveals clean layout and construction, and that awesome Alps RK27 Blue Velvet volume potentiometer.

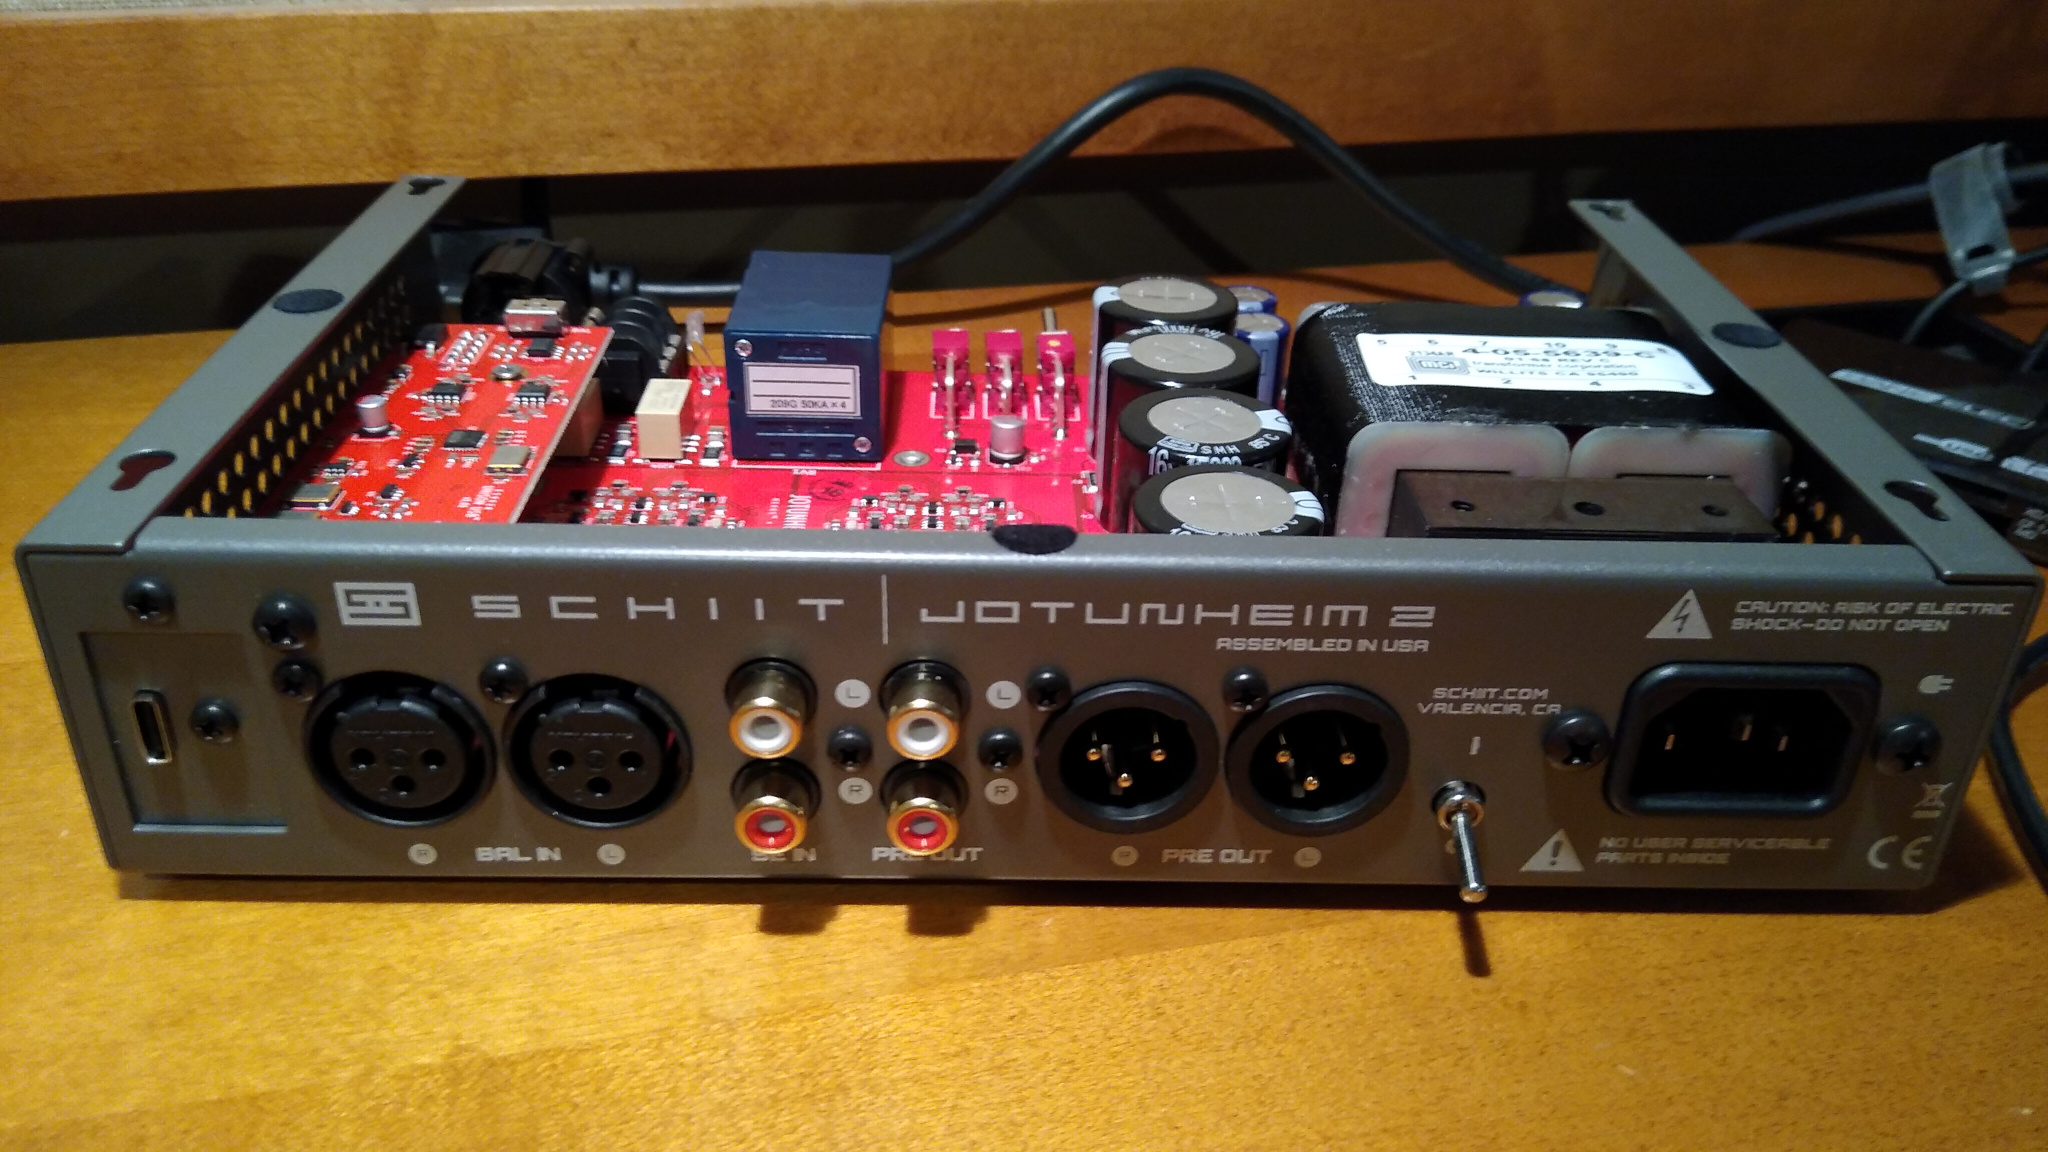
The rear view shows the flexibility of this one-box-does-it-all device:


Summary

The Jotunheim has

  • Internal power supply, no wall wart.
  • DAC with USB C input
  • 2 Analog inputs: RCA and XLR
  • 4 Analog outputs
    • Line level RCA
    • Line level XLR
    • Headphone balanced (4-pin)
    • Headphone unbalanced (1/4″)
  • Switchable gain: low and high
  • Switchable line outputs (the don’t auto-mute when headphones are plugged in)
  • Analog volume control (Alps RK27)
  • High power, low noise and distortion
  • High build quality (all metal construction, knobs, switches)
  • Made in USA with excellent warranty and support

The Jotunheim does not have

  • Digital display: does not show sample rate, bit depth, etc.
  • S/PDIF or Bluetooth digital inputs: it has USB C only
  • DSP algorithms: no tone controls, crossfeed, etc.
  • Perfect channel balance: the Alps RK27 is one of the best, but no potentiometer is perfect

Measurements

I measure using my desktop PC and Juli@ sound card with Room EQ Wizard software. The Juli@ sound card is not up to professional measuring equipment standards, but it is one of the best PC sound cards. My measurements are good enough to detect any flaws that might be audible, and some others below audibility.

I connected the Jotunheim to the PC (running Ubuntu 18) via USB, connected the Jotunheim’s analog RCA (single ended) outputs to the Juli@ inputs, disabled PulseAudio, and let Room EQ Wizard do its thing.

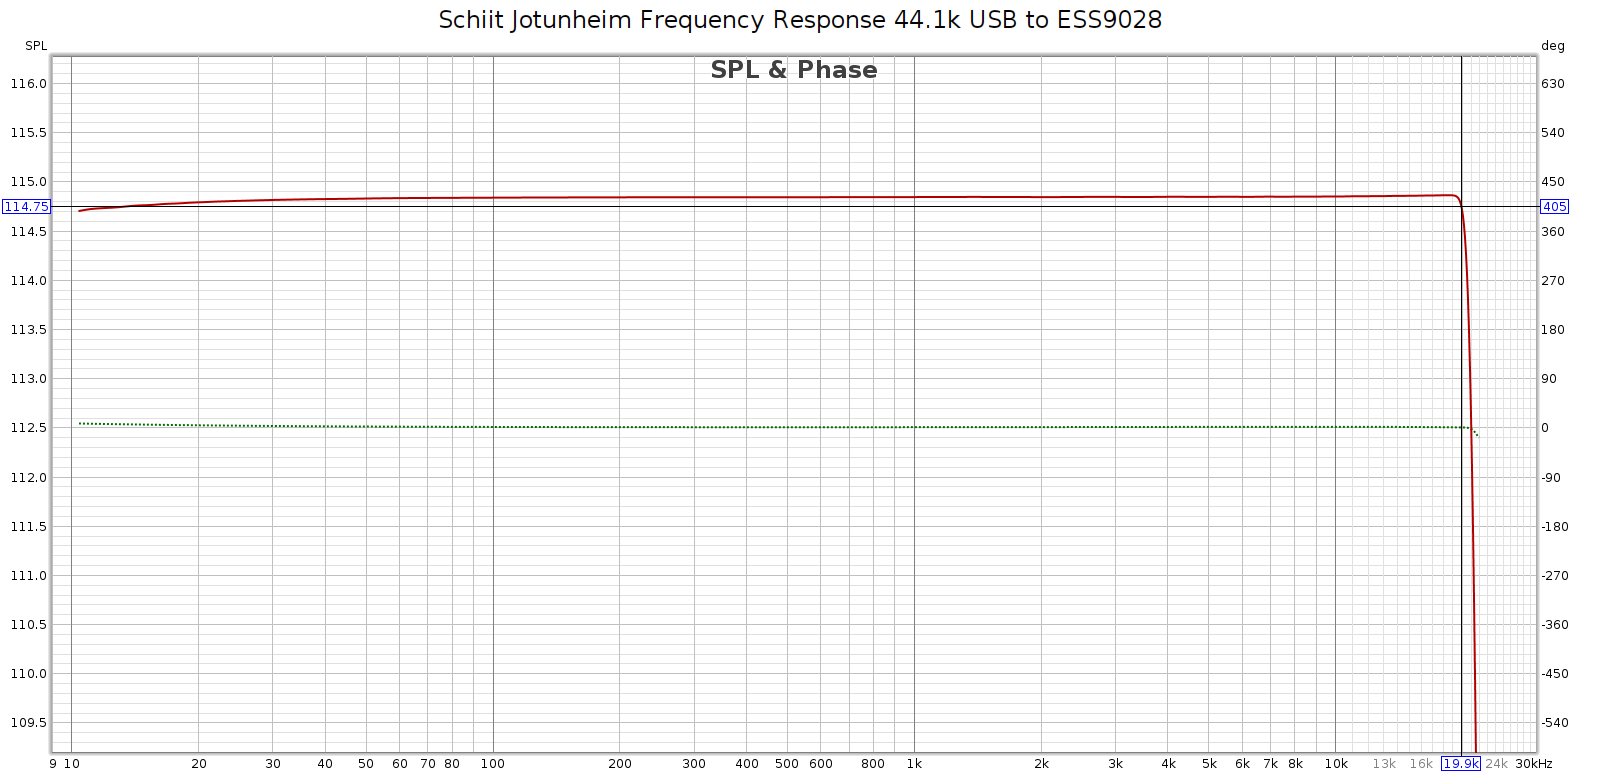
First I ran frequency sweeps. Each was -1 dB digital level at every common sampling rate: 44.1, 48, 88.2, 96 and 192. All were ruler flat. The most difficult is at 44.1k since the transition band is so narrow. Many DACs have ripple or roll off before 20 kHz. Here’s the Jotunheim:

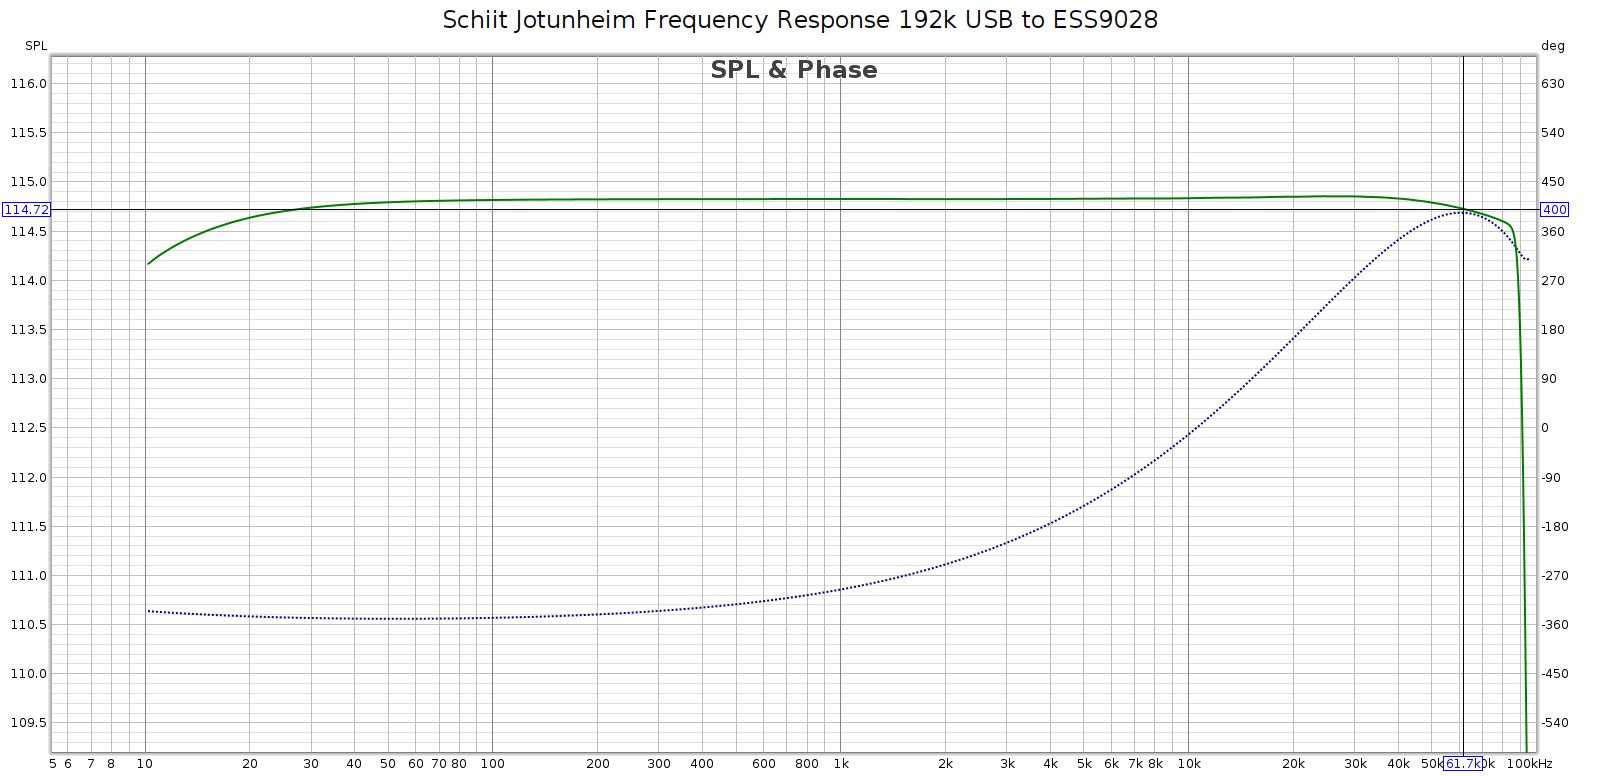
It is down -0.1 dB at 14 Hz and 19,900 Hz. There is no ripple and the phase response is dead flat, which tells us it uses a linear phase digital filter. This is great for 44.1k sampling. The only drawback at 44.1k is that it doesn’t fully attenuate until 24.1 kHz, which is above Nyquist. This leaks HF noise, but it should be benign as all aliases must be > 20 kHz (inaudible). Higher sample rates are flat to much higher frequencies and fully attenuate by Nyquist. For example here is the Jotunheim at 192k Hz:

Here the low frequency roll-off and phase shift is in the Juli@ card (it also appears in loopback mode). The Jotunheim is down 0.1 dB at about 62 kHz. I would prefer to see a more gradual filter that uses the entire transition band (20k – 96k), but it doesn’t seem to suffer from this sharp attenuation.

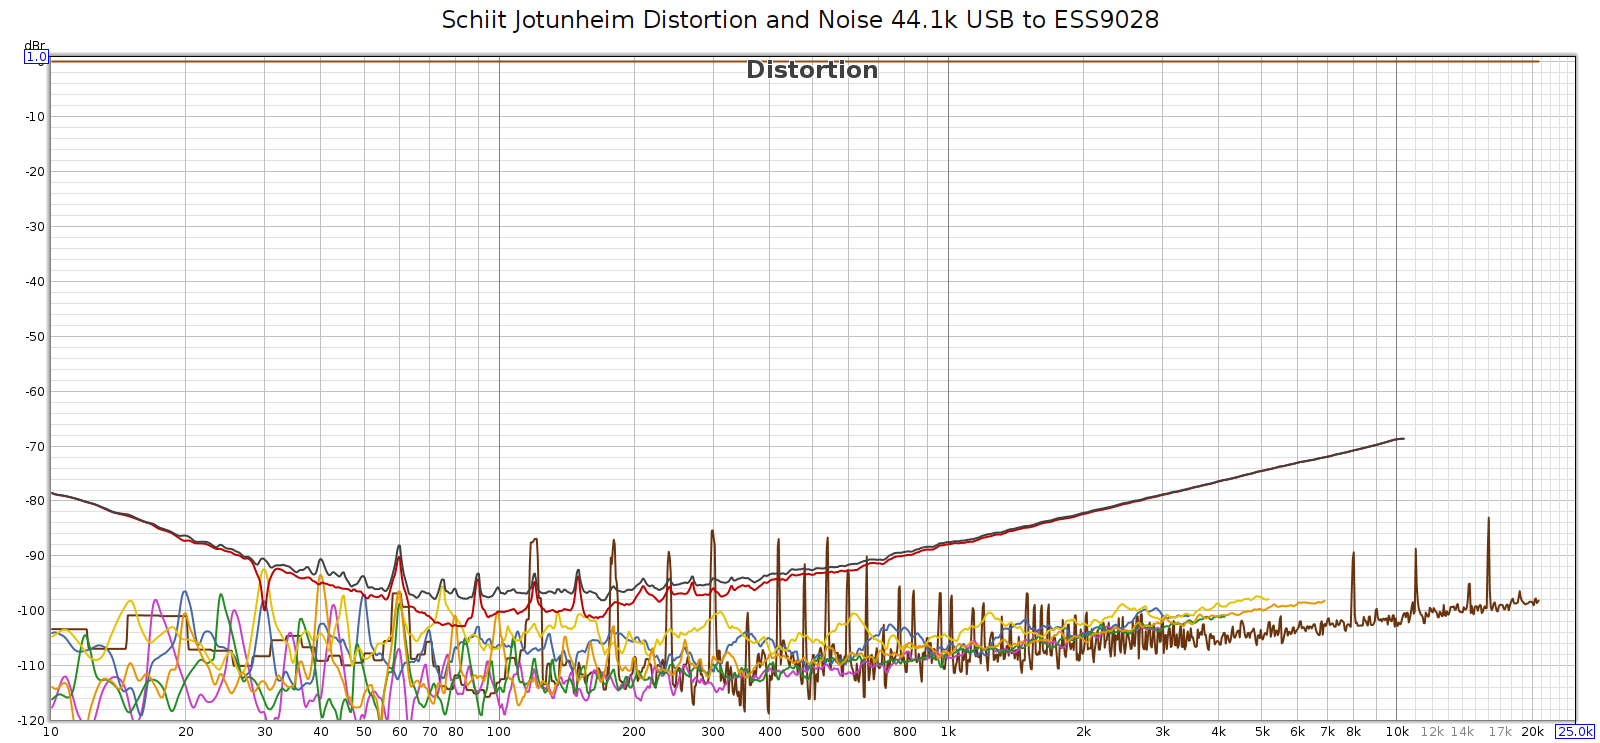
Here is distortion & noise at 44.1k at max volume, low gain:

We’ve got something interesting going on here: surprisingly high 2nd harmonic (2H) distortion. It’s below 70 dB which should be inaudible, but could become audible for low level signals. For example if the music was at -30 dB, at 3 kHz where our hearing is most sensitive, this distortion is only 48 dB lower which could be audible to some people under the right circumstances.

Note: this measurement is not an anomaly. It matches Schitt's specs, which quote THD on single ended outputs at .03%, which is -70 dB. The Jotunheim is optimized for balanced outputs, which measure about 100x or 40 dB cleaner.

This smiley shaped 2H distortion appeared at every sample rate, at the same level. I suspect it comes from using the Jotunheim’s single ended RCA outputs. It’s optimized for the balanced outputs and if I read Schiit’s description correctly, it converts to single ended by ignoring the inverted polarity signal instead of differencing it. Differencing would eliminate 2H distortion. Some balanced circuits are so clean they don’t need to be differenced, but others require it.

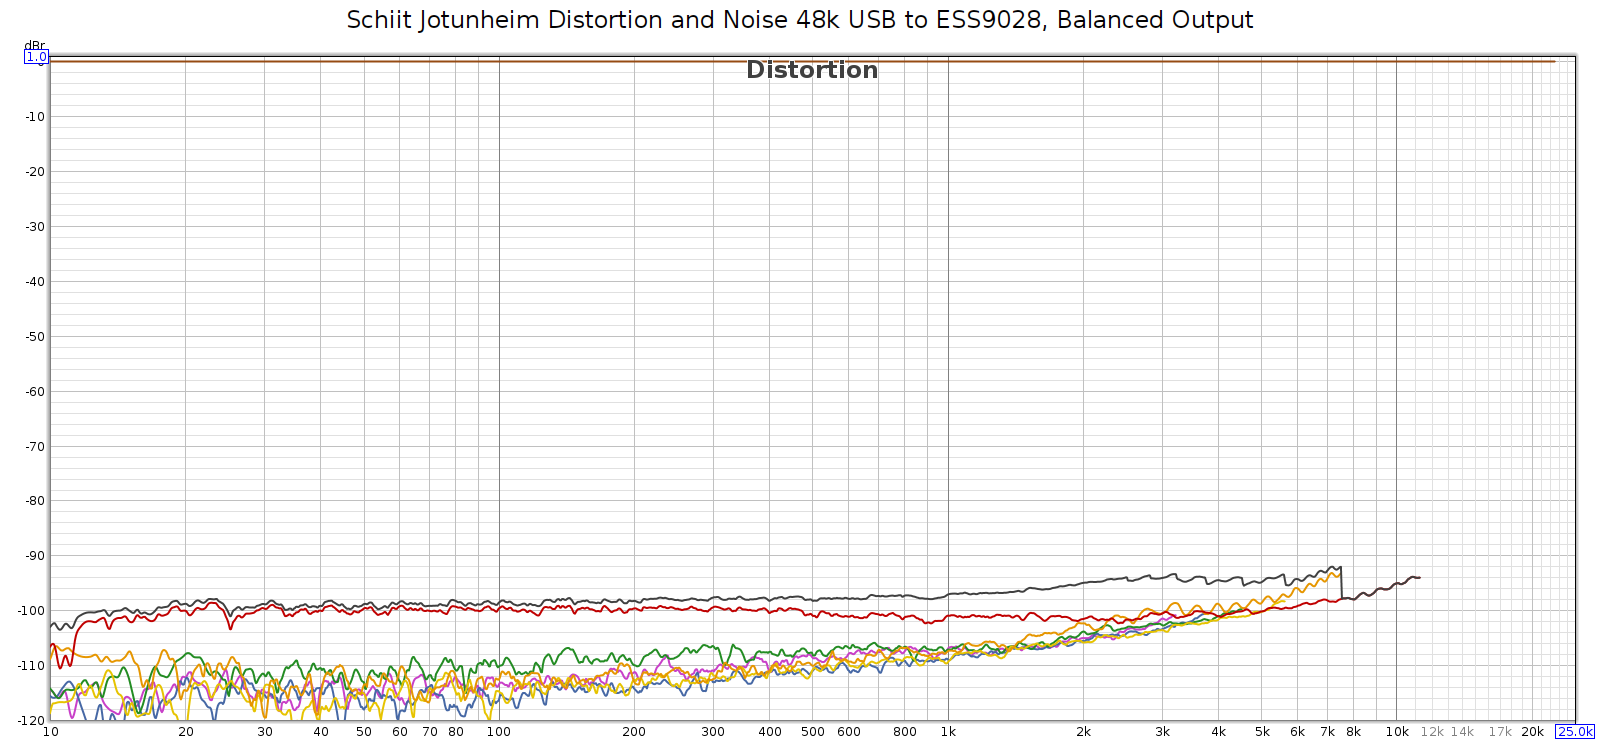
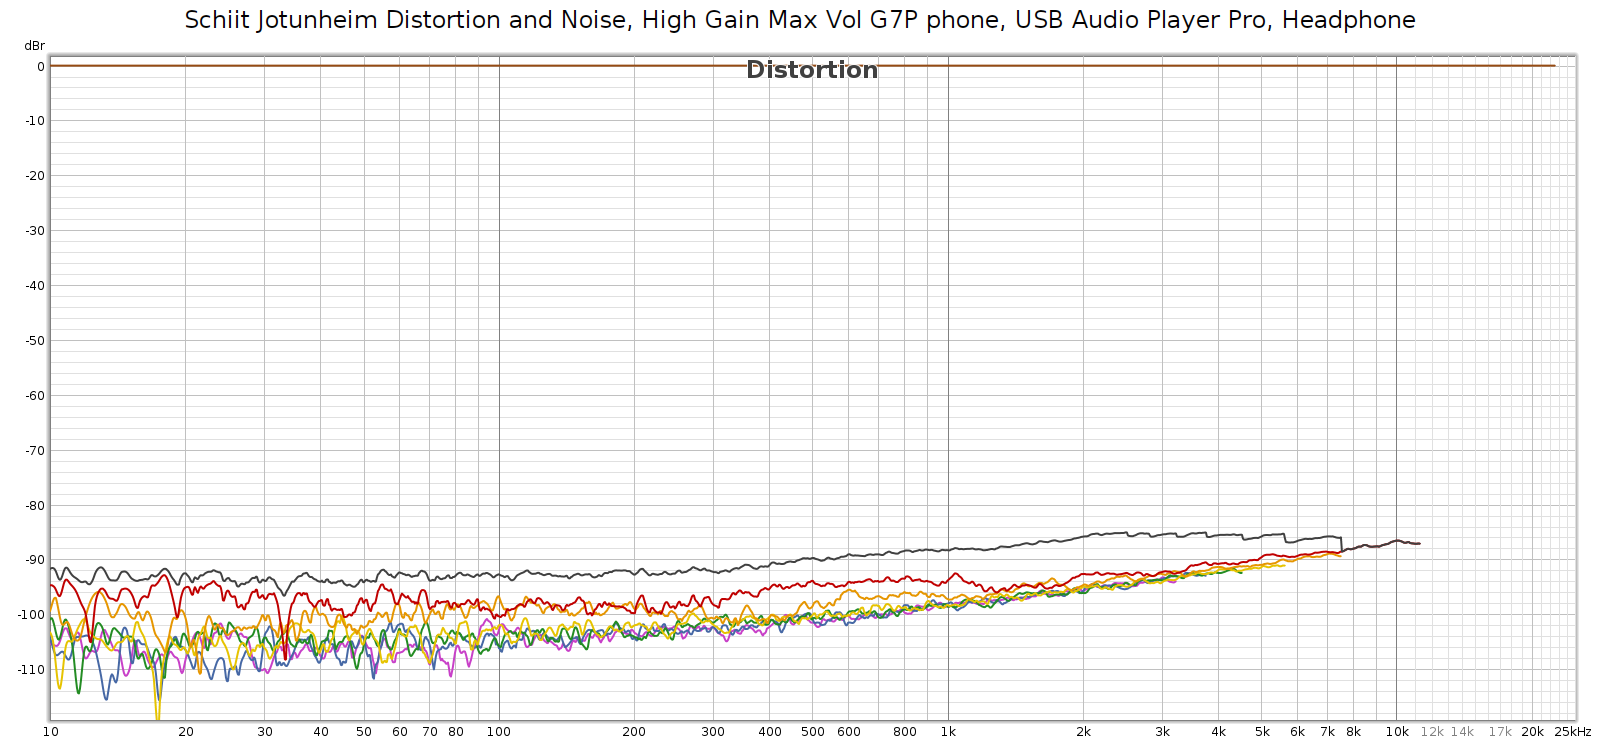
I tested this theory by playing a frequency sweep from my phone using USB Audio Player Pro in bit perfect mode, connecting the phone’s USB output to the Jotunheim, and the Jotunheim’s balanced XLR line level outputs to my Tascam SS-R1 recorder. Here’s what I got:

Ah, this is more like it! Noise and distortion around -100 dB in the bass to -92 dB in the treble. This uses the Tascam SS-R1 recorder’s balanced analog input and A/D converter, so it’s truly excellent.

Gain and Output

The Jotunheim has two gain settings: low and high. Low gain at max volume is unity. High gain is 12.7 dB louder than low gain, or about 4.3x the voltage, which is about 18.5x the power. I find low gain more than sufficient even for my insensitive Sennheiser HD-580 headphones when playing from digital sources having -6 dB pre-attenuation.

The Jotunheim is a truly balanced, differentially signalled amp. The 1/4″ headphone jack output level is about 6 dB quieter than the balanced headphone jack.

Volume Knob

The next thing I measured was the volume knob. Analog potentiometers are a common weak point in any preamp or headphone amp. They never have perfect channel balance, especially at the lower knob settings which we use most often.

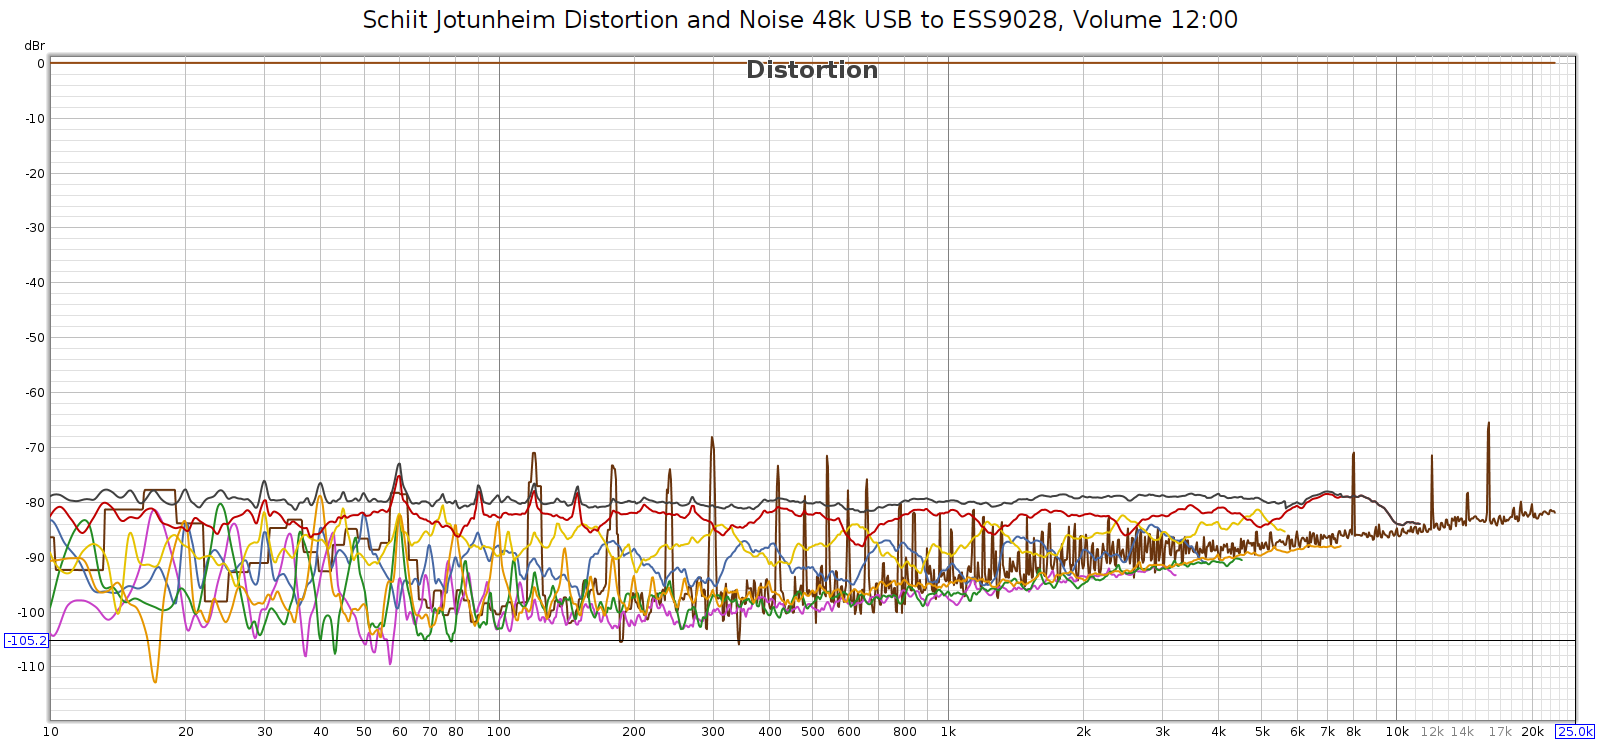
Here’s a frequency sweep using the Jotunheim’s single-ended RCA outputs, on low gain with the volume at the 12:00 position:

The smile shaped distortion curve is gone. Turning down the volume eliminated it. This appears related to the Jotunheim’s internal amp, which Schiit calls “continuity”. If I read Schiit’s description correctly, “continuity” means a class AB amp, but it’s biased high enough to operate in symmetric class A up to about 500 mW output (according to Schiit). I suspect that when you turn the volume down to 12:00 it’s below the output threshold, and symmetric class A (even though single ended) which eliminates that 2nd harmonic distortion. I didn’t expect a transition from class A to AB to make such a difference, and it could have a different cause.

Anyway, back to the volume knob channel balance. No knob is perfect, each individual knob is different, and remember this is an Alps RK27 Blue Velvet knob. If you aren’t impressed, consider that this single part alone costs a whopping $40!? I’m not kidding: here it is at Mouser.

OK so here’s a table showing each of the clock volume knob positions, attenuation and channel balance. Obviously, there’s a margin of error in positioning the knob, so the numbers are all approximate. I’ve added the JDS Atom volume knob for comparison, which I think uses an Alps RK09. That’s a good potentiometer, but a cut below the RK27. Also, the Atom 2 which uses a hand-matched Alps RK09. You can see that the Atom 2 is as good as the Jotunheim.

ClockJot LevelJot DiffAtom LevelAtom DiffA2 LevelA2 Diff
05:00 (max)N/AMatchN/AMatchN/AMatch
04:00-1.3Match-0.8Match0Match
03:00-3.6Match-2.1Match0Match
02:00-6.0Match-5.3Match-2.25Match
01:00-10Match-8.8Match-6.25Match
12:00 (half)-16Match-14.3Match-17Match
11:00-20Match-18.0Match-19.5Match
10:00-25Match-23.4L +0.5-22Match
09:00-36L +0.5-33.8L +1.5-26R +0.3
08:00-48L +1.0-41.3L +1.0-40R +1.0
07:00 (above min)-74L +2.3-68.3L -8.0-60R +4.0

In summary:

  • Volume knob channel balance is matched to 0.5 dB or better for the top 3/4 of its range, from 09:00 to max.
  • At 09:00, which is -36 dB, the L is 0.5 dB louder than the R
  • At 08:00, which is -48 dB, the L is 1.0 dB louder than the R
  • At 07:00 (lowest non-zero), which is -74 dB, the L is 2.3 dB louder than the R

This is as good or better than any potentiometer I have measured.

Analog Input from Phone Headphone Jack

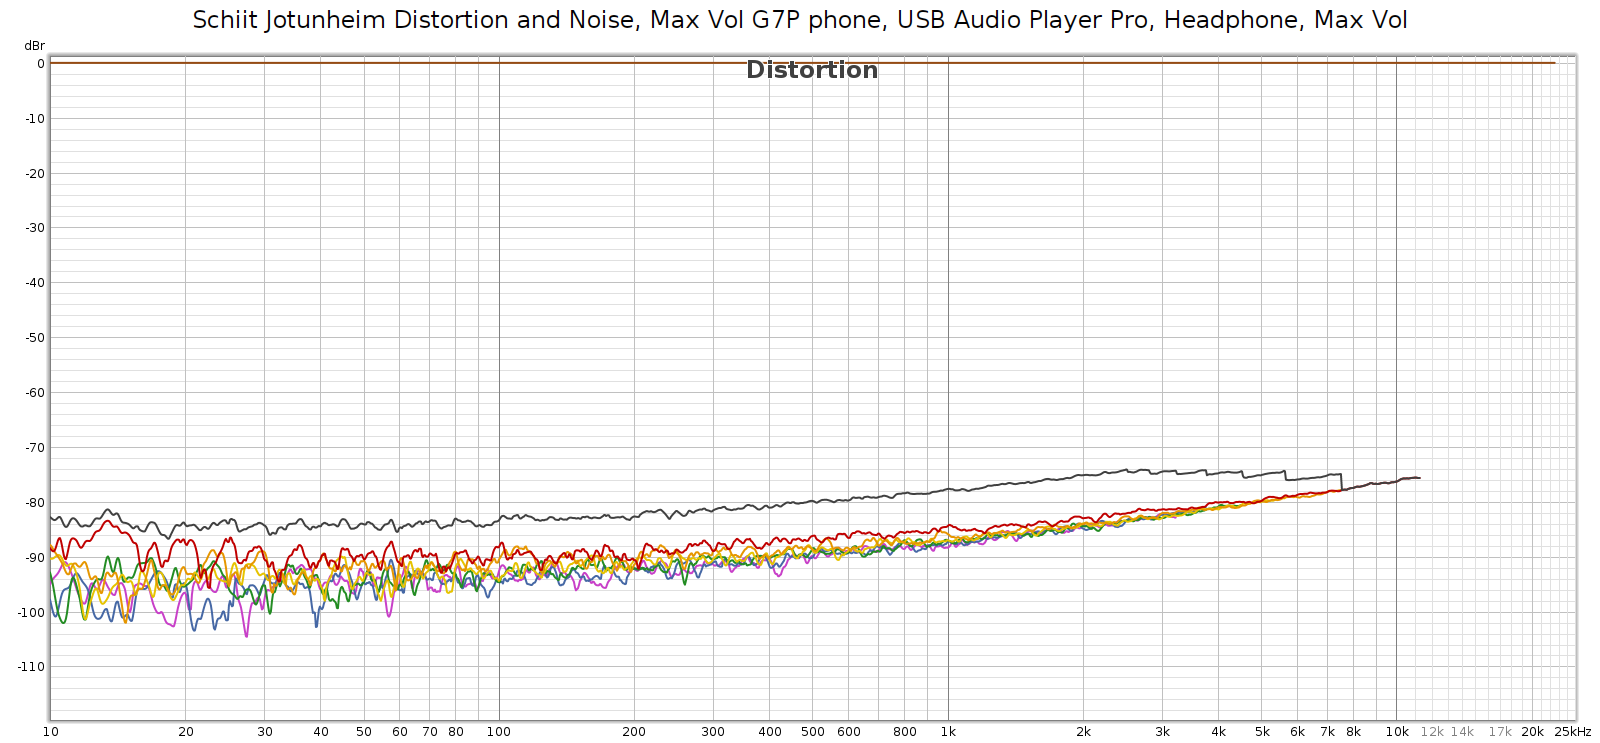
One way I plan to use the Jotunheim is to play music from my phone out its analog headphone jack. This can go wrong in several ways, so I measured it. I played an REW frequency sweep on my phone, using USB Audio Player Pro, connected its headphone jack (at max volume) to the Jotunheim’s single ended RCA inputs, recorded on the Tascam SS-R1 then imported into Room EQ Wizard for analysis.

TLDR; it’s super clean and should provide excellent sound quality.

Jotunheim on low gain, max volume:

We can see it’s super clean, though the SNR suffers a bit due to the phone’s low max output level, it’s still 70-80 dB. The phone’s output level is so low, the Jotunheim at max volume doesn’t trigger its unusual smile-shaped distortion curve.

Jotunheim on high gain, max volume:

This is just as clean, even cleaner. How can high gain be cleaner than low gain? It’s not an equal comparison – the overall level is much higher/louder. The phone’s max output is so low that the Jotunheim on high gain max volume doesn’t overload the Tascam recorder inputs.

Distortion: Balanced vs. Single Ended

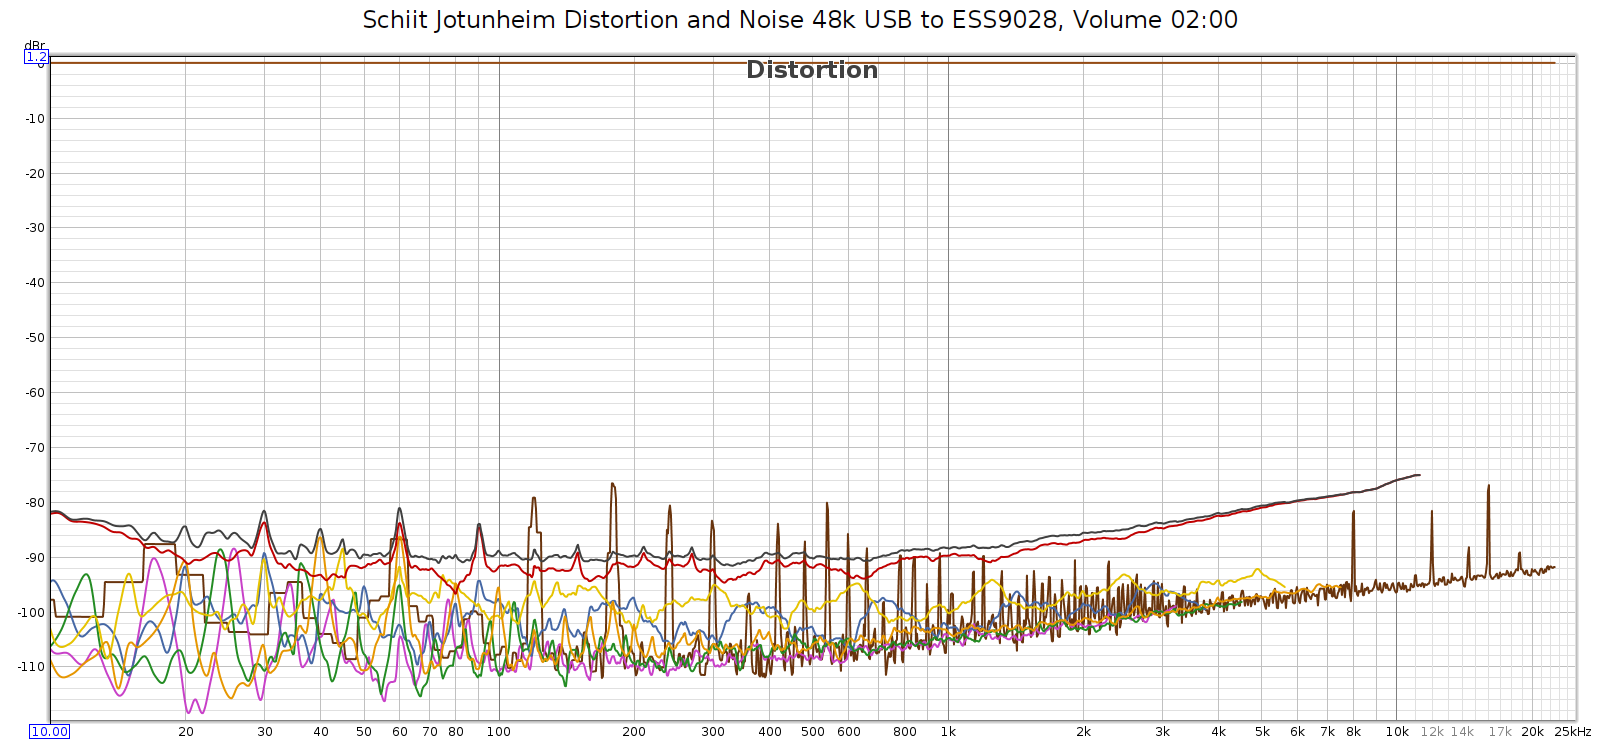
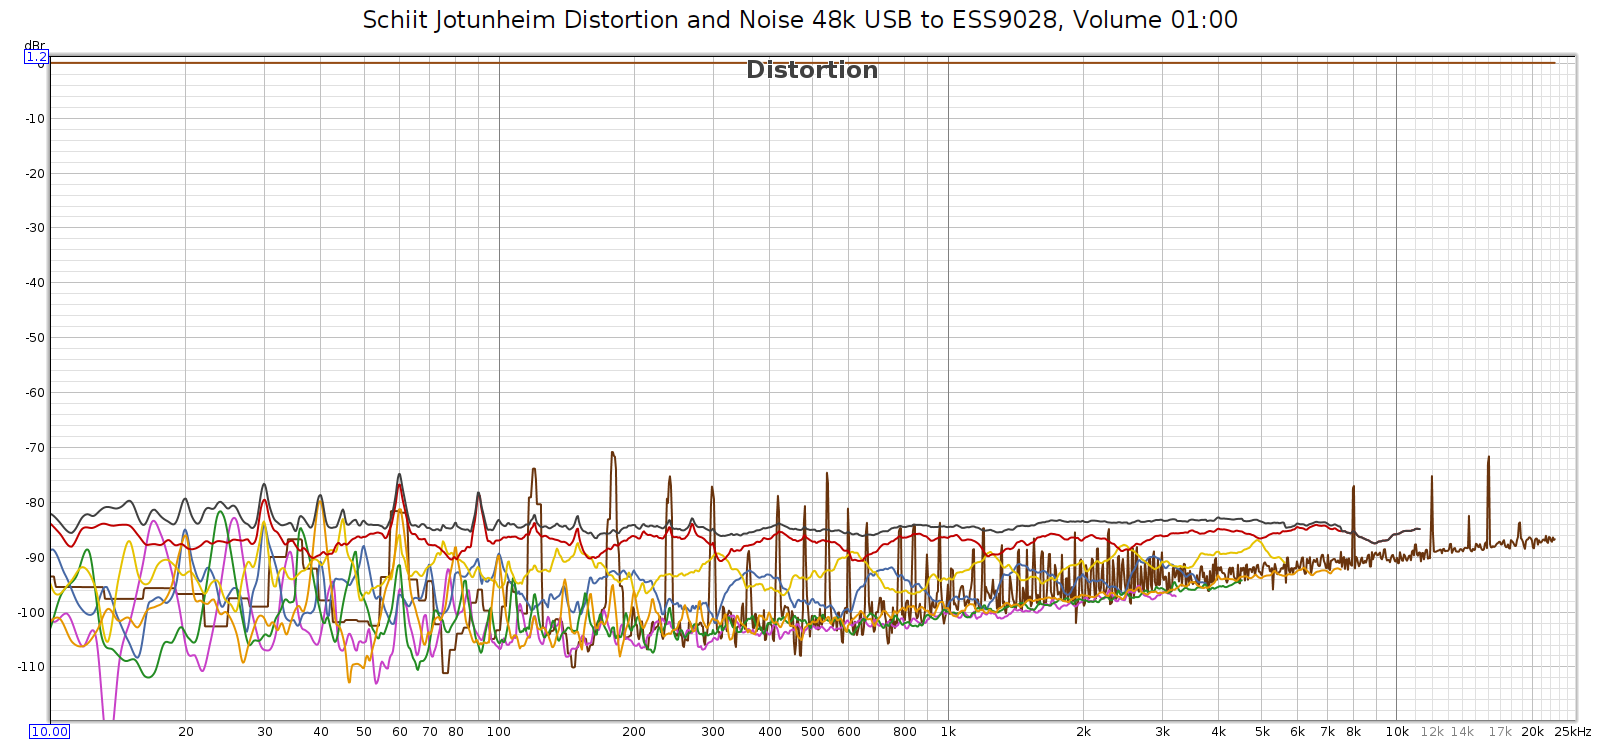
When I noticed elevated distortion from single ended line level RCA outputs at max volume, and discovered that it disappeared at half volume, I did some exploring to learn more about the relationship between knob position and distortion. Here are the graphs:

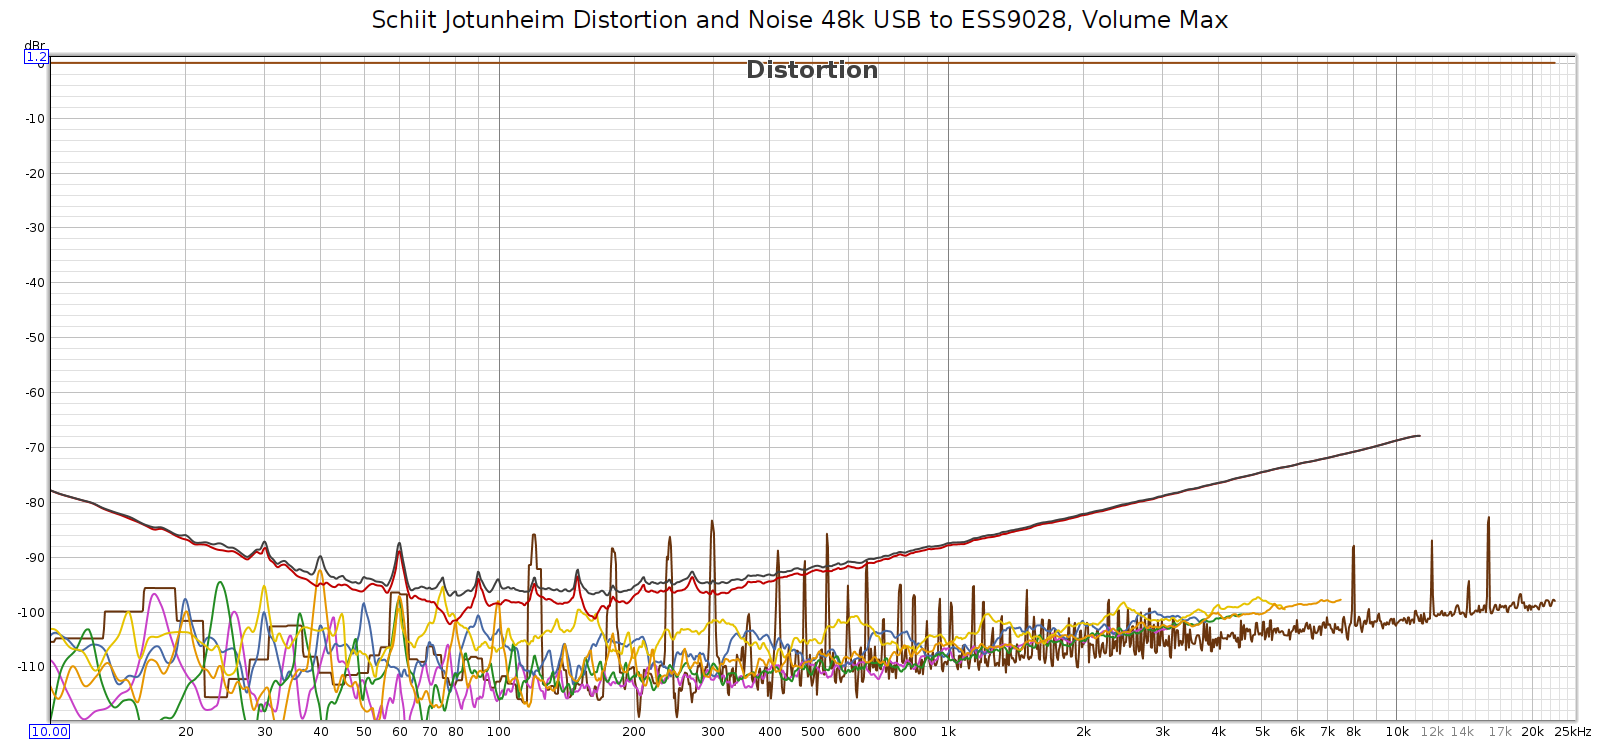
Once again, max volume (about 05:00 on the clock). The min at 200 Hz is about -96 dB, the peak at 10 kHz is -68 dB.

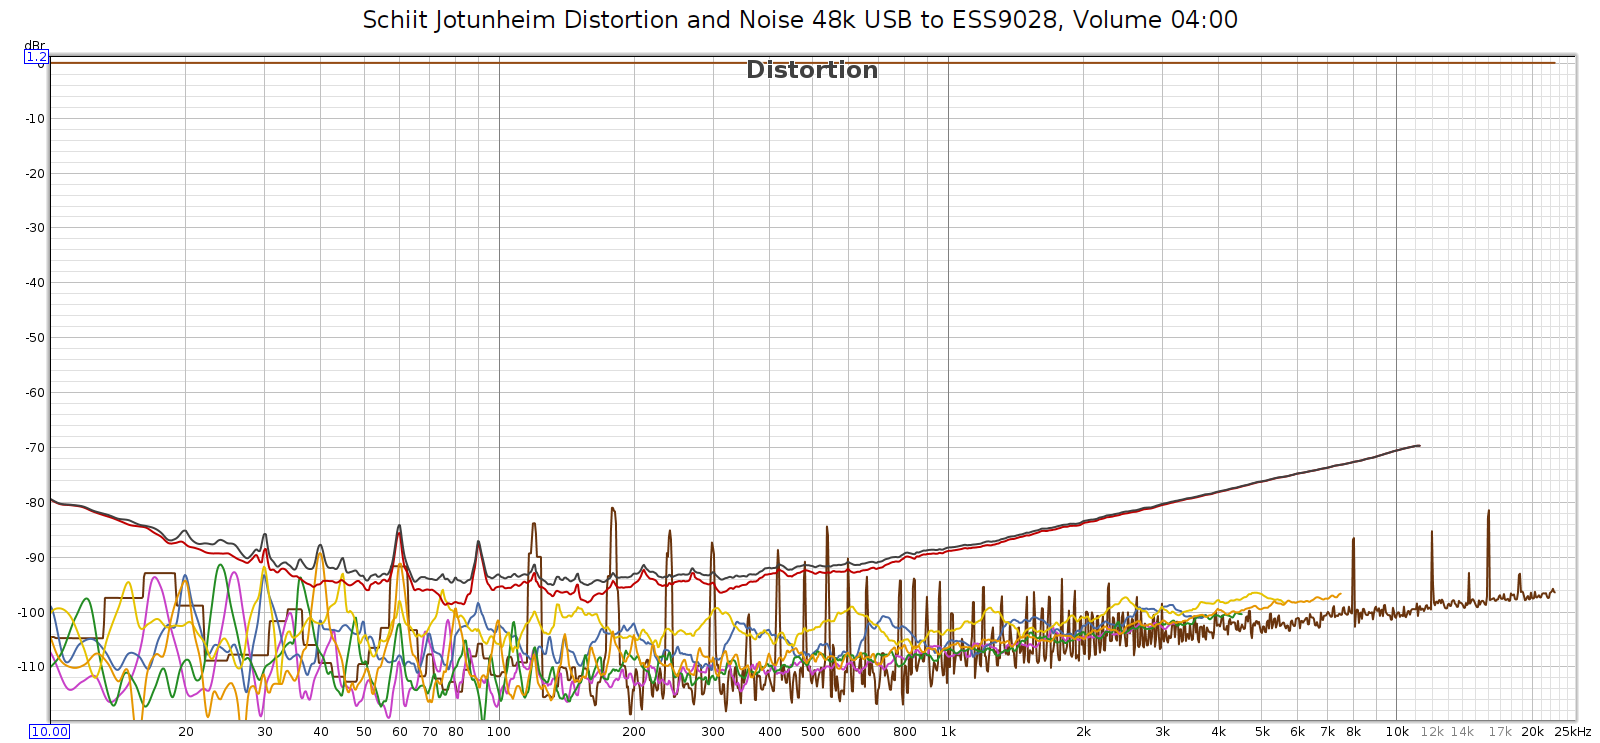
Here it is turned down just a bit to the 04:00 position: -92 @ 200, -70 @ 10k

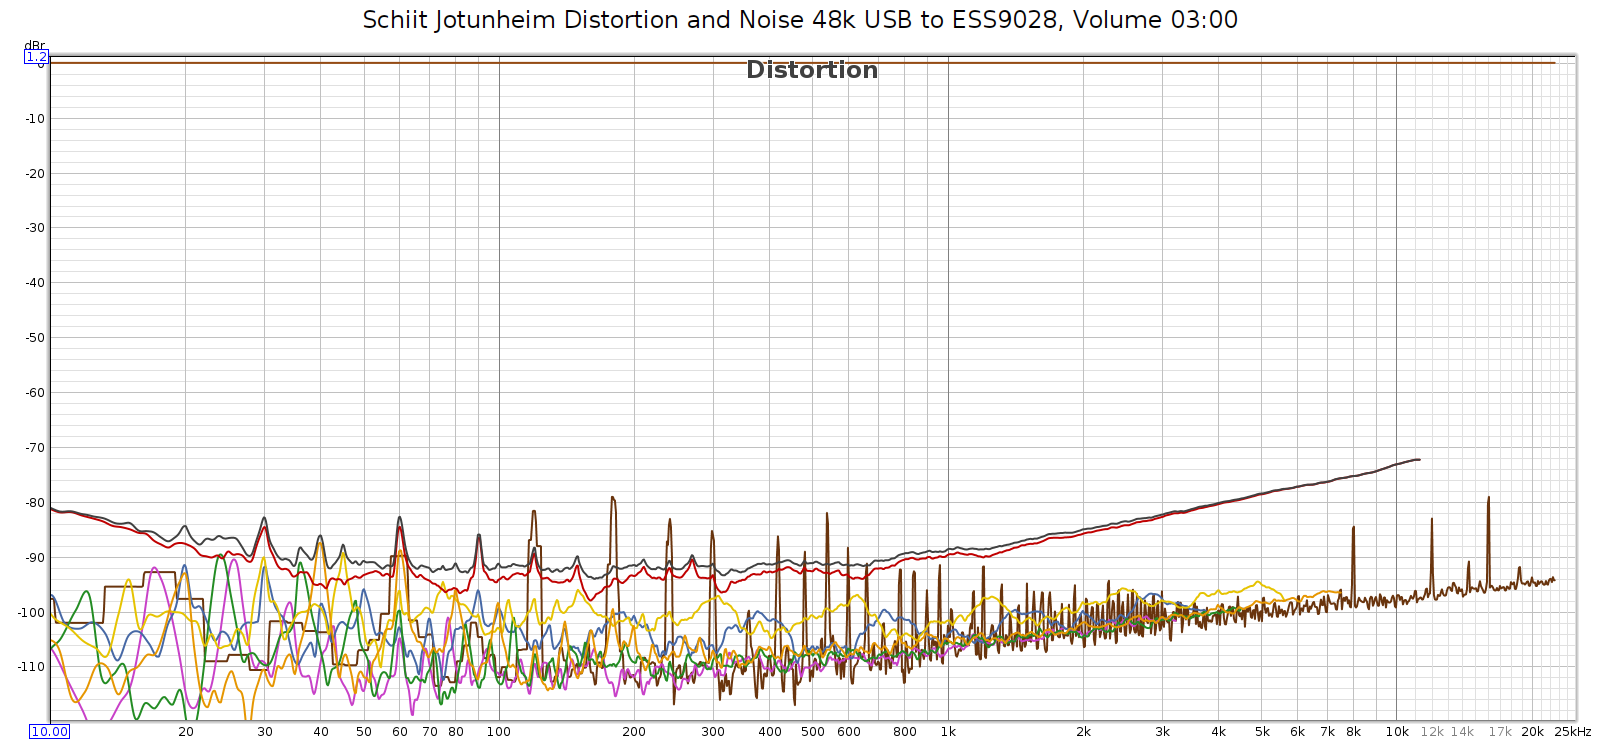
Here it is at the 03:00 position: -91 @ 200, -72 @ 10k

Here it is at the 02:00 position: -90 @ 200, -75 @ 10k. The smile is flattening.

Here it is at the 01:00 position: -84 dB @ 200, -84 dB @ 10k. The smile is gone.

Of course we expect distortion & noise to rise relative to the signal as we turn down the volume. But how much? Let’s quantify this. At the 01:00 position, the signal is attenuated about 10 dB from max. The minimum distortion max volume is -96 dB; the minimum distortion at 01:00 is -84 dB. So when we reduce the volume by 10 dB, distortion drops by 12 dB. Since this involves eyeballing the position of the volume knob, there’s a margin for error so call it 1:1 linear. The distortion profile looks normal / flat up to about the 02:00 position, at which point a smile (rising distortion in low & high frequencies) just starts to emerge.

Again, this is only on single ended outputs. The balanced outputs are clean all the way up to max volume. At least as high as I could measure them – the voltage of the Jotunheim’s balanced outputs goes so high it overloads my sound card and Tascam. So I had turn the volume down in order to measure it. Summary:

  • Single ended/unbalanced output is as clean as balanced at low to moderate levels.
  • At high levels (02:00  on volume knob with full scale input), unbalanced output has slightly elevated 2H distortion, up to -70 dB in the mid-treble.
  • This elevated distortion should be inaudible in most cases.

Conclusion

The Schiit Jotunheim is a nice piece of gear. It does a lot in a single box, with an internal power supply (no wall wart). And it does it well, with good to great measurements. It also sounds great subjectively. It has high parts and build quality, metal not plastic, the volume knob is silky smooth with just the right amount of friction, the metal switches are a pleasure to operate, having the solid “smack” of professional equipment.

It works seamlessly from Ubuntu Linux, from Windows 10, and from my phone, with both digital USB and analog inputs. It didn’t reveal firmware bugs nor shut off during testing, like some DACs from Topping and SMSL have done. I didn’t encounter any issues recognizing it or sending music to it, nor any glitches on long-term playing. And I didn’t have to install any drivers.

The Jotunheim is inherently balanced and performs best in this mode with excellent near SOTA measurements. Yet it also has unbalanced inputs and outputs that measure good enough, and it supports all combinations across its inputs & outputs.

Finally, the Jotunheim is made in the USA with good warranty and support. It reminds me of the amps that Headroom in Montana used to build 25 years ago, only even better engineered and built, with more functionality. Years ago a device with this functionality, build quality and engineering would have cost thousands of dollars.

A Cheap Audiophile Headphone System

A few years ago I blogged about this: http://mclements.net/blogWP/index.php/2016/09/13/a-cheap-audiophile-headphone-system/

Technology marches on so it needs an update.

Here’s a cheap audiophile quality sound system:

  • A DAC + headphone amp that accepts USB input.
  • A decent set of headphones.

How is this better than before? It’s less expensive and more flexible. A DAC accepting USB input can be used with any computer: laptop or desktop, mac, Windows or Linux. No drivers needed.

You can get separate DAC and amp, or (even better) a single device having DAC and headphone amp. Such a device often has line level outputs and can be used as a preamp too. Like the Schiit Asgard with the ESS9028 DAC card. Simplicity at its finest: a single box is all you need.

Even better, the Asgard accepts analog inputs too. If your phone has a headphone jack, you can set it to max volume and plug it into the Asgard’s line-level inputs. Then use the Asgard (and its volume control) to drive any headphone on the planet. If not, just use an OTG USB cable to plug your phone into the Asgard’s digital input. That should provide even better sound quality, as the Asgard’s DAC is probably better than the one in your phone.

Audio: How Much Data is That?

It’s easy to compute but I figured I’d save it here for reference

RatebPSBPSKB/secMins/GBCD ratioNotes
44.1-161,411,200176,400172.271011.00Redbook CD
44.1-242,116,800264,600258.4671.50
48-161,536,000192,000187.5931.09
48-242,304,000288,000281.25621.63Standard DVD
88.2-244,233,600529,200516.80333.00
96-244,608,000576,000562.5313.27Popular for modern classical music recordings
176.4-248,467,2001,058,4001,033.616.96.00
192-249,216,0001,152,0001,125.015.56.53

This represents actual data bits to represent the music – no overhead. If you want to know what bandwidth is needed to carry an SPDIF signal at a given rate, add extra for packet overhead.

The formula is simple:

bits per second = S * C * B
S = sample rate (samples per second)
C = channels (2 for stereo)
B = bits per sample

For example for CD we have

S = 44100
C = 2
B = 16
S * C * B = 1,411,200 bits per second

Note: most DACs internally oversample before D-A conversion. They typically oversample at the highest integer multiple of the source rate that is less than their max rate. For example the Cirrus/Wolfson WM8741 has a max rate of 192k, so CD and DVD are oversampled 4x to 176.4 and 192 respectively. This happens automatically within the DAC chip. Because of this, it’s usually pointless to oversample an audio signal before feeding it to a DAC – the DAC is going to do it anyway, so why waste processing power and bandwidth doing it yourself?

Keyboard Switches: Summary

Introduction

Touch typing on mechanical switches is faster, more confident and satisfying than on bubble dome switches, because mechanical switches are more reliable and give tactile and audible feedback as you type. Yet all mechanical switches are not created equal. They have a wide range of attributes. I’ll discuss these attributes, name a few switches and list my favorites.

Switch Makers

Back in the day it was IBM with their buckling spring switches, the classic of the 1980s. Alps was another big switch maker. After IBM stopped making buckling springs Unicomp bought IBM’s patent and carried that torch forward to this day. Cherry entered the picture, then Gateron and Keychron. We also have smaller volume boutique switch makers like Zeal PC. And many others…

Some of these makers have shared the same color coding of their switches by attribute. More on this later.

Switch Attributes

Switches have 3 basic attributes:

  • Sound: how loud is the switch?
    • Ranges from silent to loud
  • Tactility: whether the switch has a tactile “bump” during the keypress
    • Ranges from linear (none) to highly tactile
  • Weight: how much force does it take to press the key?
    • Ranges from light (40 grams) to heavy (70+ grams)

Switches have additional attributes like smoothness, but the above 3 are the primary attributes by which they are grouped.

All high quality mechanical switches are reliable and durable, meaning no missed or double strikes (common with cheap bubble dome switches), and last for 50 M or more actuations.

The most common switch size & shape is Cherry. Gateron, Keychron, Zeal PC and others copy this design – it’s become the standard. The bottom of the switch has flat copper pins that stick straight down to connect to the keyboard backplane (whether press-fit or soldered). The keystem sticks up with a + shaped male connector, and keycaps have a center stem with a female connector that plugs in. The switch housing has top & bottom halves held together with press-fit snaps. They can be separated, disassembled and reassembled.

Switch Colors

Most of the common switches have colors that indicate their attributes, and these colors are mostly standardized across makers.

ColorSoundTactilityWeightNotes
BrownQuietLightVery Lightalmost linear, tactile barely perceptible
BlueLoudModerateLightfeedback more audible than tactile, high-pitch click
GreenLoudModerateModeratefeedback more audible than tactile, high-pitch click
BlackSilentNone/LinearModerate
YellowSilentNone/LinearLightmoderate linear: not too heavy nor too light
RedSilentNone/LinearVery Light
Buckling SpringLoudHighHeavyExcellent tactile feel, low-pitch clicky sound
ClickiezLoudHighModerateexcellent tactile feel, thocky sound, similar to a VT320 terminal
Zilent V2SilentLight/ModerateModeratesilent yet tactile

My Favorite Things

I like switches with plenty of feedback, both tactile and audible, with moderate to heavy actuation force.

My 2 favorite switches are Zeal PC Clickiez and Buckling Springs. I like them about equally, though the Clickiez are more convenient since they are Cherry compatible. However, these switches are both loud enough that I can’t type notes during Zoom calls, and they obstruct music on open-back headphones.

I don’t like silent switches, but the least bad I’ve tried are Zeal PC Zilent V2. They make several versions having different weights; I use 67 gram. Linear switches are the most common choice for silent switches, but lacking any feedback, they are not as satisfying or confidence inspiring. The Zilent V2 gives decent tactile feedback and is just as silent as linear switches. They feel like what Cherry Browns strive for, yet utterly fail to become. If Brown switches became smoother, more tactile, and didn’t suck anymore, they would become Zilent V2.

Lubrication

The latest fad is to lubricate switches. More specifically, lubricate the interface between the switch stem and housing, and the top & bottom of spring where it connects to the stem and housing. It’s a tedious process, as you must acquire special greases or oils, open the switch housing, take apart the switch, use a tiny paintbrush to apply grease exactly where needed, not too much nor too little, and reassemble the switch. It can take 4 hours to lube the 80-100 switches of a normal keyboard.

I’ve tried this and I’m not a fan. My lube experiment was successful and the switches were quieter and smoother. But they also felt sluggish, ruining their feel. Perhaps lubing just the spring and not the keystems would be better. But the spring usually doesn’t contribute much sound. IMO, lubing makes mechanical switches sound and feel more like the cheap bubble domes that we are trying to get away from.

Padding

Switches can be padded in 2 ways: in the keystem, or in the keycap.

Keystem padding is a rubber insert fitted into the keystem (inside the switch) that protrudes just a bit on the top & bottom of the side rails. It damps the top & bottom, softening the sound & feel when the switch hits the top & bottom of the stroke. Keystem padding is applied by the switch maker inside the switch and usually cannot be added afterward.

Keycap padding is an o-ring fitted around the center stem of the keycap. It damps the bottom-out of the switch, which hits the o-ring before plastic meets plastic. Keycap padding can be added to almost any switch or keycap, though it can conflict with some stabilizers. Keycap padding is easy to apply and to remove, and a set of o-rings only costs about $10, so it’s an experiment worth trying. O-rings come in different hardness and thickness. I prefer 40A hardness which is soft. For thickness, 0.2 mm is “L” and 0.4 mm is “R”. Most of the time I go with “L” but which works best depends on the application.

Frugality and Conservation: a Mindset

I hate seeing stuff going into landfill when it could easily be repaired and put back into useful service. This is true whether it’s computers, stereo gear, appliances, cars, or pretty much anything. And it’s educational and fun to fix things of all kinds. Too many people do the equivalent of buying a new car when their brakes squeak.

Discarding and replacing phones, computers, appliances, cars or anything else when they could be repaired seems wasteful and wrong. It also signals manufacturers that they don’t need to build anything to last. It tells them that planned obsolescence and poor quality is OK because people aren’t going to keep things very long anyway.

Another dimension of this is sustainability and the environment. How much energy, resources and labor are we spending to create new stuff to replace old stuff that still had years of useful life yet was discarded prematurely? All that energy, resource and labor could be put to better use. Some people get a new car every 3-5 years, a new phone every 2 years, a new computer every 2-3 years, etc. This stuff lasts more than twice as long as that.

Yet another aspect of this is economics. How much money are people spending replacing stuff that doesn’t need replacing? What a waste. That money could be put to better use, whether spent or invested.