Brahms Symphony 3: High Def Recording Analysis

Introduction

I was listening on Qobuz to this recording of Ivan Fischer conducting the Budapest Festival Orchestra playing Brahms Symphony 3. It happens to be a 192k – 24 bit recording. This recording sounded a bit “off” but I couldn’t place exactly why. So I captured the bitstream and here’s what I found.

The Capture

First: this capture consists of a single brief section of the recording purely for educational use and is not distributed. This places it under “fair use” for copyright.

I captured the opening of the 1st movement, which starts with about 1 second of room silence then the orchestra starts at medium volume. When I opened the audio file in Audacity, I noticed the wave didn’t show any obvious change in amplitude when the orchestra started. It looked like this:

Perceptually, it was quiet for the first second before the orchestra played. But this audio file shows the room silence at only 30 dB below peak levels, which is much too loud.

The Solution

Aha! I thought, perhaps this is ultrasonic noise! A spectrum analysis showed this to be the case:

This is an obvious glaring flaw in this recording. We have supersonic noise peaking at 70-80 kHz, just below the 192 kHz Nyquist limit. It’s so loud, it’s at the same level as easily audible 4 kHz audio content!

I could easily fix this in 2 ways: apply a low pass filter or resample it at a lower rate. The first step of down-sampling would apply a low pass filter, and this recording didn’t need to be at 192 kHz anyway. So I resampled it to 96 kHz. The half-rate integer multiple keeps the resampling method computationally simpler and cleaner. I could have down-sampled 4:1 to 48 kHz, but 96 kHz would be sufficient, as most of the noise was above 48 kHz.

The Result

Here’s the resulting wave file:

The room silence opening is now at least 50 dB below peak, which is typical.

The spectrum analysis:

The supersonic noise has been eliminated.

It is a bit unnerving that a professional recording can get released with such a serious flaw. Yet I noticed that this recording on Presto Classical is available at most 96 kHz, not 192. Could it be this problem was introduced by Qobuz processing it for streaming? Probably not, as Qobuz says they stream whatever the studios give them, without changing it. Supersonic noise in that spectrum almost certainly didn’t come from the room or the mics. It was most likely introduced by an improper format conversion from the original DSD to 192 kHz PCM. I don’t know why it sounded “off” since the high frequency noise should have been inaudible. Perhaps it was interacting with passband frequencies, causing audible intermodulation distortion. Or perhaps it was the result of improper low pass filtering, which also caused aliasing in the passband. Whatever the root cause, it was fun and educational to explore, and shows that recording studios sometimes make mistakes.

Topping EX5 Review: DAC+ Preamp + Headphone Amp

Introduction

When it comes to audio, we are spoiled with an abundance of riches. DACs, amps, headphones have gotten so much better over the past 15 years, it’s hard to imagine that this was sometimes considered a “solved problem”. At the same time, prices have gotten incredibly low.

For example, 15 years ago if you wanted a DAC + headphone amp having studio reference quality, the Benchmark DAC or Grace M920 were two of your only options, both cost $1 – $2 kilobucks which would be about 50% more in today’s dollars. Back in ’99 I bought a Headroom Maxed out Home amplifier that cost $1000. It was the best headphone amp of its time, both in measurements and subjective listening. Today for $150 you can get amps having even cleaner measurements and more power. That’s only 1/10 of the inflation adjusted equivalent price.

Summary

TLDR: The Topping EX5 is functionally comparable to those Benchmark and Grace devices, and equal or superior in terms of measurements. It retails for $350, I bought it on sale for $300, which is about 1/10 of their equivalent price. This is my first piece of “Chi-Fi” (Chinese Hi-Fi) equipment. Here are my impressions having used it daily for a few weeks, including bench testing with Room EQ Wizard.

Good Stuff

  • Excellent measured performance
  • Great subjective sound quality: clean, detailed, neutral
  • Solid build quality
  • Low price

Bad Stuff

  • The manual has serious errors (mislabeled digital filters)
  • Factory support is poor to entirely lacking (no responses to support queries)
  • It has obvious software bugs (the display shows the wrong sampling rate)

Those last 2 are double-threat. I can live with software bugs if the company has great support, as they will fix the bugs. I can live with poor support if the device works seamlessly, as I won’t need support. But a buggy device combined with poor support is a “no-go” for me.

Overview

First, check out Amir’s detailed review & measurements on ASR. The EX5 is a well engineered device having excellent measured performance.

What is the EX5?

  • DAC supporting PCM and DSD formats
  • Select between 4 inputs
  • Volume control
  • Line-level preamp
  • Headphone amp

Inputs:

  • SPDIF Coax
  • SPDIF Toslink
  • USB
  • Bluetooth

Outputs:

  • Line: Balanced XLR and SE RCA
  • Headphone: Balanced 4-pin and SE 1/4″ plug

Key EX5 features

  • Compact all-in-one device: DAC, preamp, headphone amp
  • Reference quality audio: digital & analog
  • Internal power supply: no wall-wart
  • Digital volume control
    • Perfect channel balance at all levels
    • Preserves high SNR even at low volumes: 90 dB SNR @ 50 mV
  • User-selectable digital filters: choose from 7!
    • linear vs. minimum phase
    • sharp vs. slow attenuation


Case, Knobs & Quality

Overall the EX5 feels like a high quality piece of kit. The case is heavy & neat, the connectors feel solid, the display is evenly lit, the volume knob has a smooth clicky feel.

The volume knob is a rotary encoder that also serves as a push-button. I’ve seen rotary encoders start to fail in other equipment I own. After a few years their click action became glitchy, as you turn it up it sometimes turns down, etc. Cleaning the internal contacts with electrical spray helps but is temporary as the problem eventually recurs. I hope the EX5 rotary encoder does not suffer the same fate.

The display has 3 brightness levels and is always on. It has an auto-dim feature in which the display goes mostly dark after 30 seconds, showing only the selecting input. This is my preferred mode, as it hides the incorrect display of sample rate.

In use, the EX5 gets warm but not hot. Just a touch warmer than my JDS Atom amp. The EX5 case is solid metal with no vents on the bottom, sides or top. It feels like the solid metal case serves to dissipate its internal heat.

Volume Control

The EX5 has 2 gain modes: low (standard) and high, which is 10 dB louder. Its volume control has 100 steps. To assess how the steps interact with volume level, I measured the output level using white noise:

  • 100: max
  • 60: -20 dB
    • From 60 – 100, each step is 1/2 dB
  • 30: -50 dB
    • From 30 – 60, each step is 1 dB
  • 20: -68 dB

Low gain has plenty of volume for my HD-580 and LCD-2F headphones. I typically listen around setting 50-60 with high dynamic range music having low average levels. This is about 30 dB below max. So I’d be using lower levels for rock or modern music which is dynamically compressed having louder average levels.

Note: at low gain, 0 dB is 4.1 Vrms. Volume setting 50 is 30 dB quieter, which is 3.16% of that, or 130 mV. This drives the LCD-2F to 87.5 dB SPL for the loudest peaks of the music. But it’s really 6 dB quieter because my DSP for EQ drops the overall levels by 6 dB. So my typical listening puts the loudest musical peaks at around 82 dB SPL.

Wish List

The EX5 packs a lot of functionality in a compact box. Yet the challenge of single-box audio devices is they can work so well they leave me wanting just a bit more. Here’s what I wish the EX5 also did…

DSP

It would be great to have parametric EQ and crossfeed for headphones. Of course, it would take some creative thinking to do this with the EX5’s single knob/button. Without it, you must find a way to apply whatever DSP you want, upstream from the EX5.

Analog Input

The title speaks for itself. The EX5 has a great little built-in preamp / headphone amp and it would be really useful to have an analog input. Yet I understand why they didn’t do this. Since the EX5 has a digital volume control, they would have to significantly change the device in order to accept analog inputs.

Bugs / Problems

No device is perfect. Here are the issues I found with the EX5.

Sample Rate Display

The biggest problem I found with the EX5 is the display. When using SPDIF input over toslink or coax, the display always shows 44.1 (sometimes 48) regardless of the actual sample rate. Sometimes it shows the right sample rate, usually it does not and gets stuck at 44.1. For example, I measured the EX5 at 44.1, 48, 88.2, 96, 176.4 and 192. For the entire time the display showed 44.1 even when it was clearly operating at these other rates. As I type these words I’m listening to Sibelius Symphony #1 at 96 kHz yet the EX5 display is showing 44.1. One when I played 96k content the display showed 48.

This happens over digital coax or toslink from my Juli@ sound card, and over the toslink output of my Behringer DEQ2496. My other DACs (Oppo HA-1 and Corda Soul) show the proper sample rate from these devices.

I reported this to Topping on their support web site and got no reply. And tagged them on the ASR forum, no reply. There is essentially no factory support for this device.

I speculate that Topping designed this device to be plugged into Windows or Mac computers, and they rely on their custom device driver to set the displayed sample rate. In other words, the EX5 doesn’t show you the actual sample rate at which it is working, it shows you whatever rate the driver tells it to display, and defaults to 44.1 or 48.

Auto-Mute

The EX5 auto-mutes if the digital audio input has a quiet L channel. The delay depends on sample rate: about 5 secs at 192k, about 25 secs at 44.1k. This is not documented and could cause frustrating lost time chasing down ghosts if you don’t know about it.

Balanced – Not Really

The EX5 has balanced outputs, both line (XLR) and headphone (4-pin). The XLR line out has twice the voltage of the RCA (4.3 Vrms vs. 2.1), so it appears to be fully balanced (differentially signalled). But the headphone output has the same voltage output on either (5.9 Vpp with low gain, 18.3 Vpp on high), so it’s not fully balanced. The balanced headphone outputs probably use separate grounds for the L and R channels, as the balanced channel separation is higher (99 vs. 88 dB).

Note: the headphone output is given as Vpp, so multiply by 0.7 to get Vrms. Thus for low gain, 5.9 Vpp –> 4.1 Vrms and for high gain, 18.3 Vpp –> 12.6 Vrms.

Measurements

I measured the EX5 using Room EQ Wizard and my Juli@ PC sound card. This equipment is pretty basic so I can’t measure the full extent of the EX5 sound quality. But it does enable me to test some of the basics.

Here I will focus on frequency response and the digital filters. This is for 2 reasons:

  1. The EX5 manual is wrong
  2. This is easy to measure

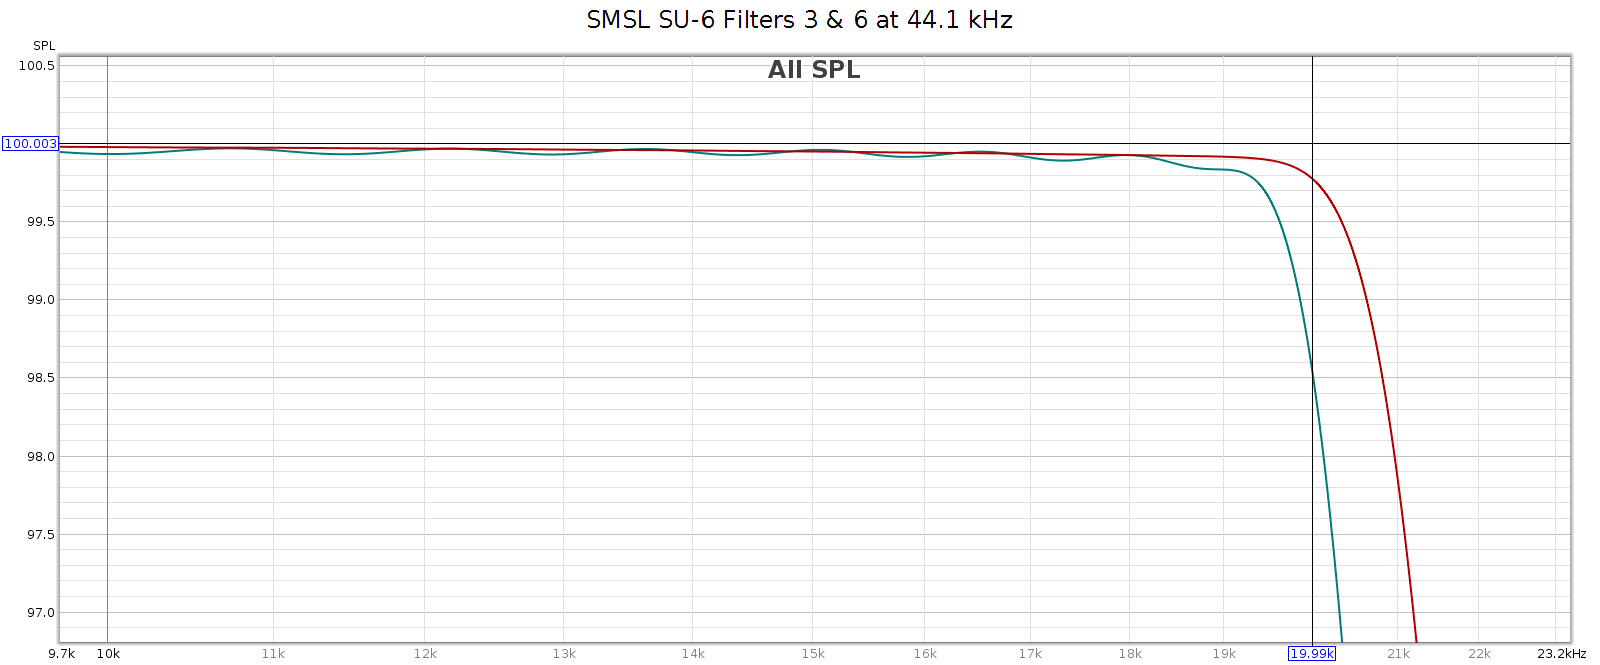
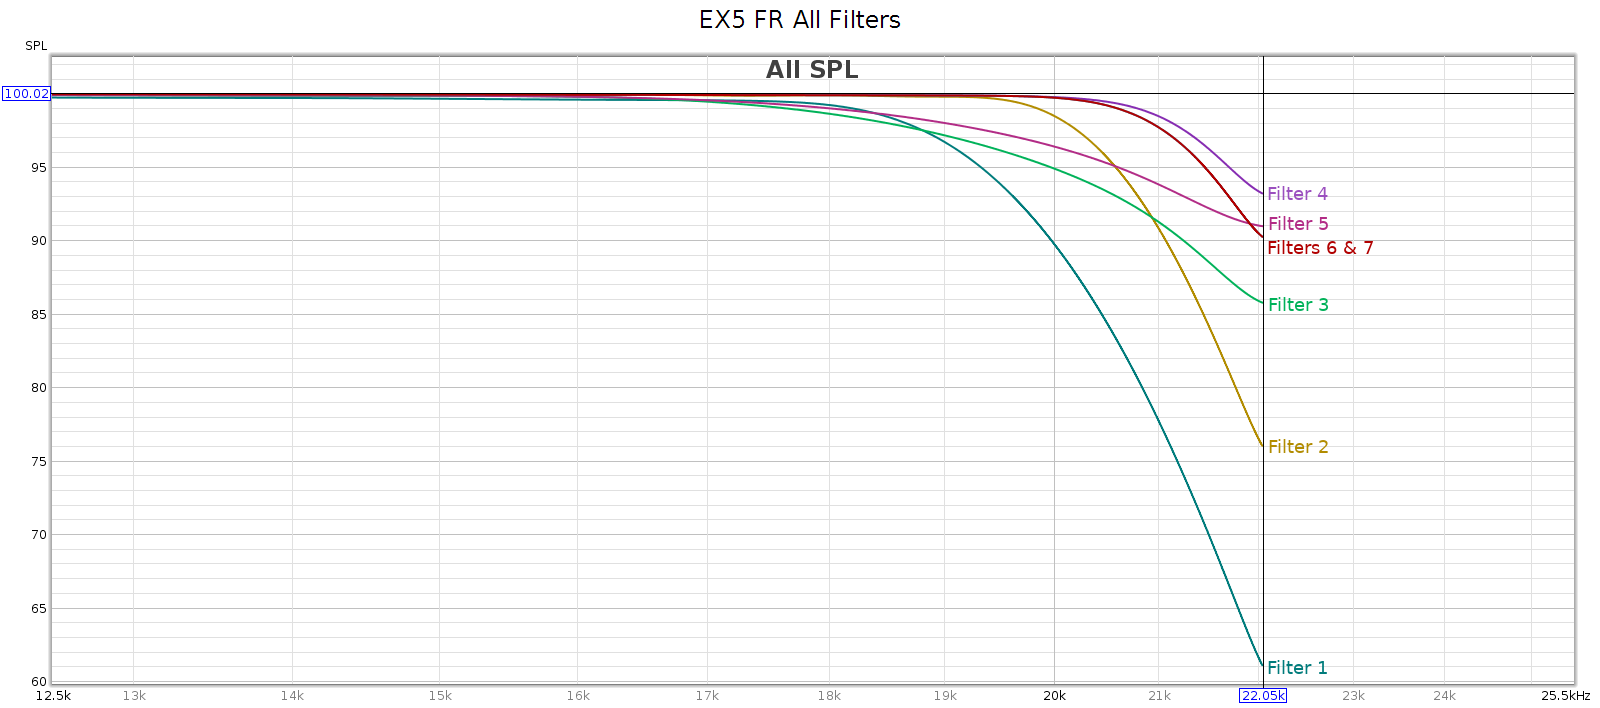
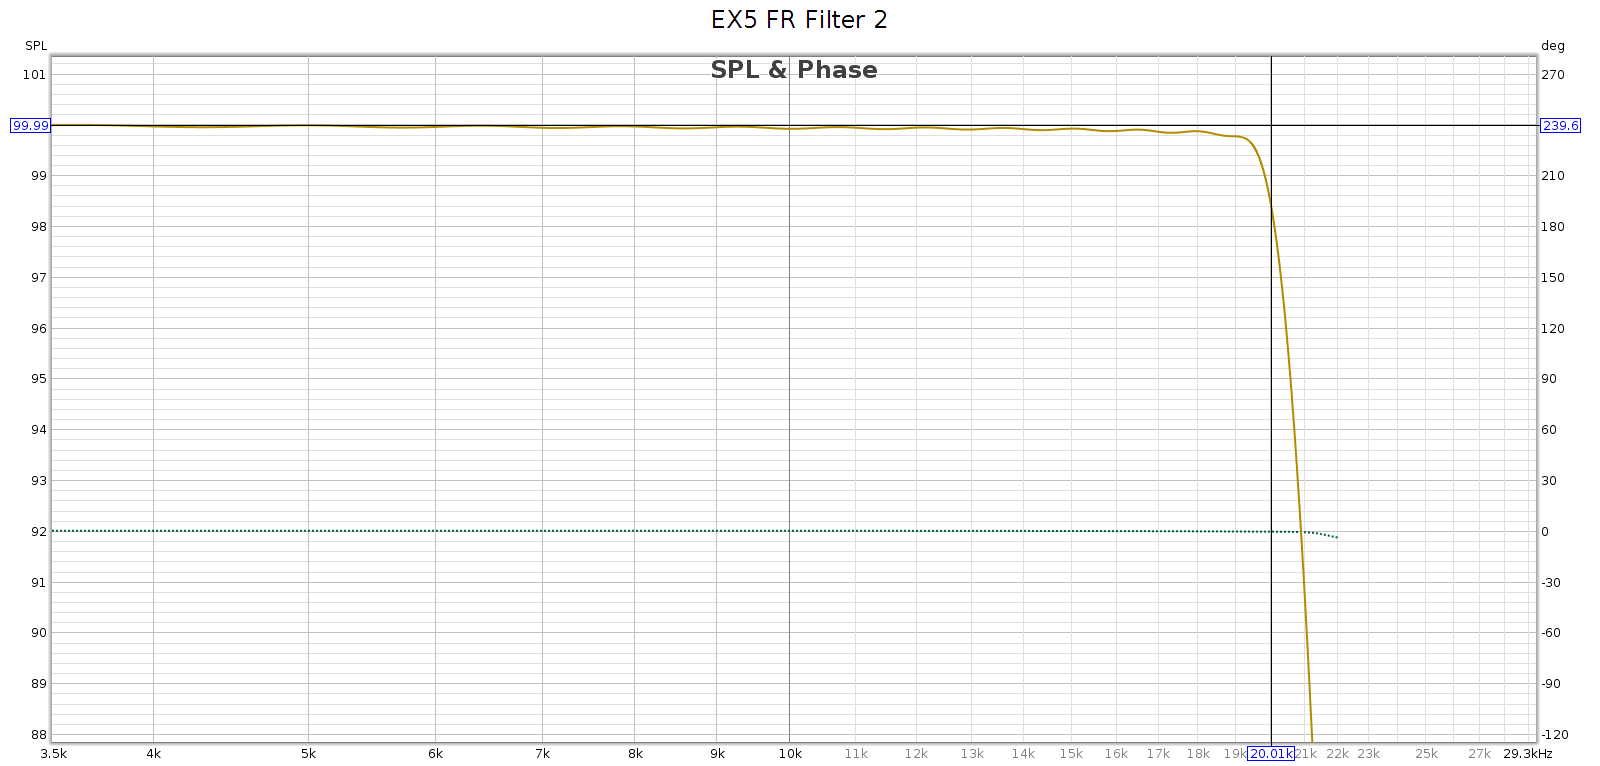
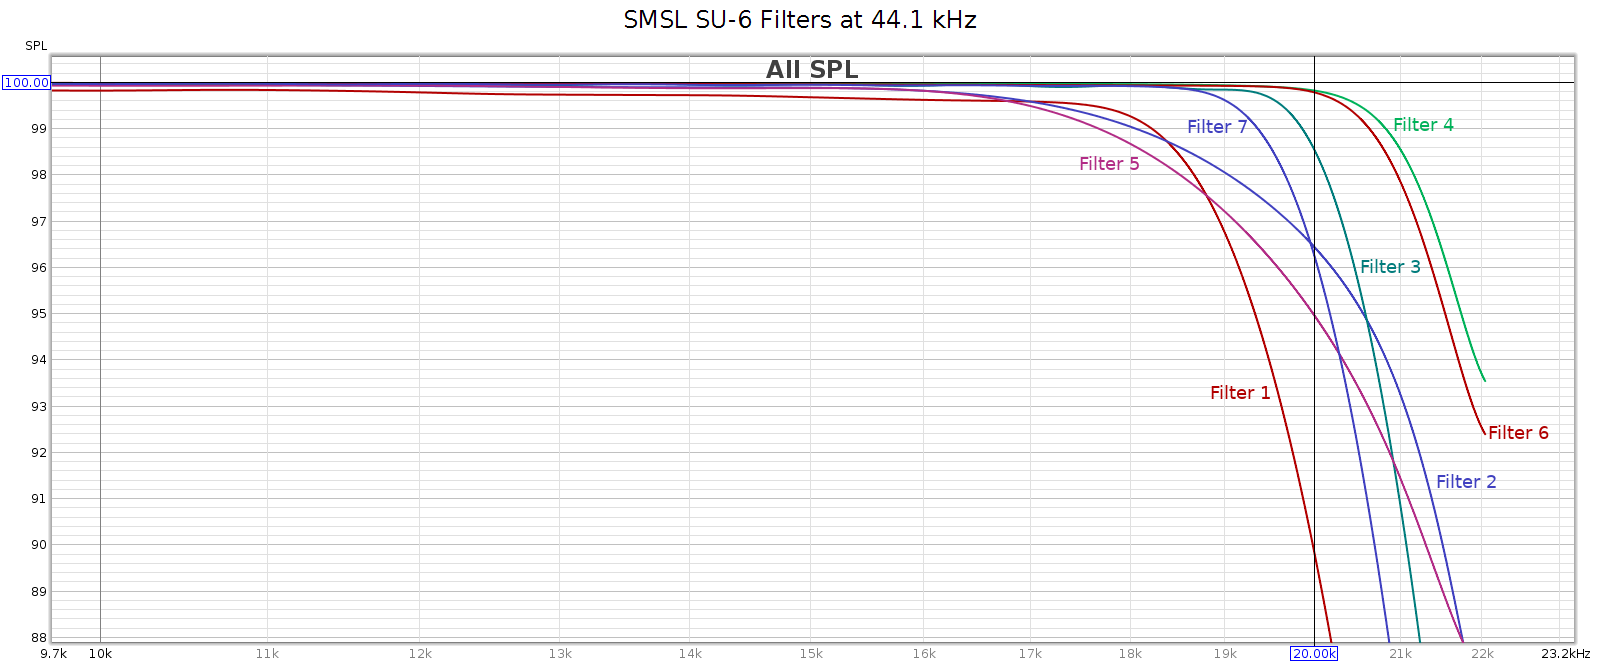
Here’s the frequency response of the EX5 digital filters at 44.1 kHz sampling:

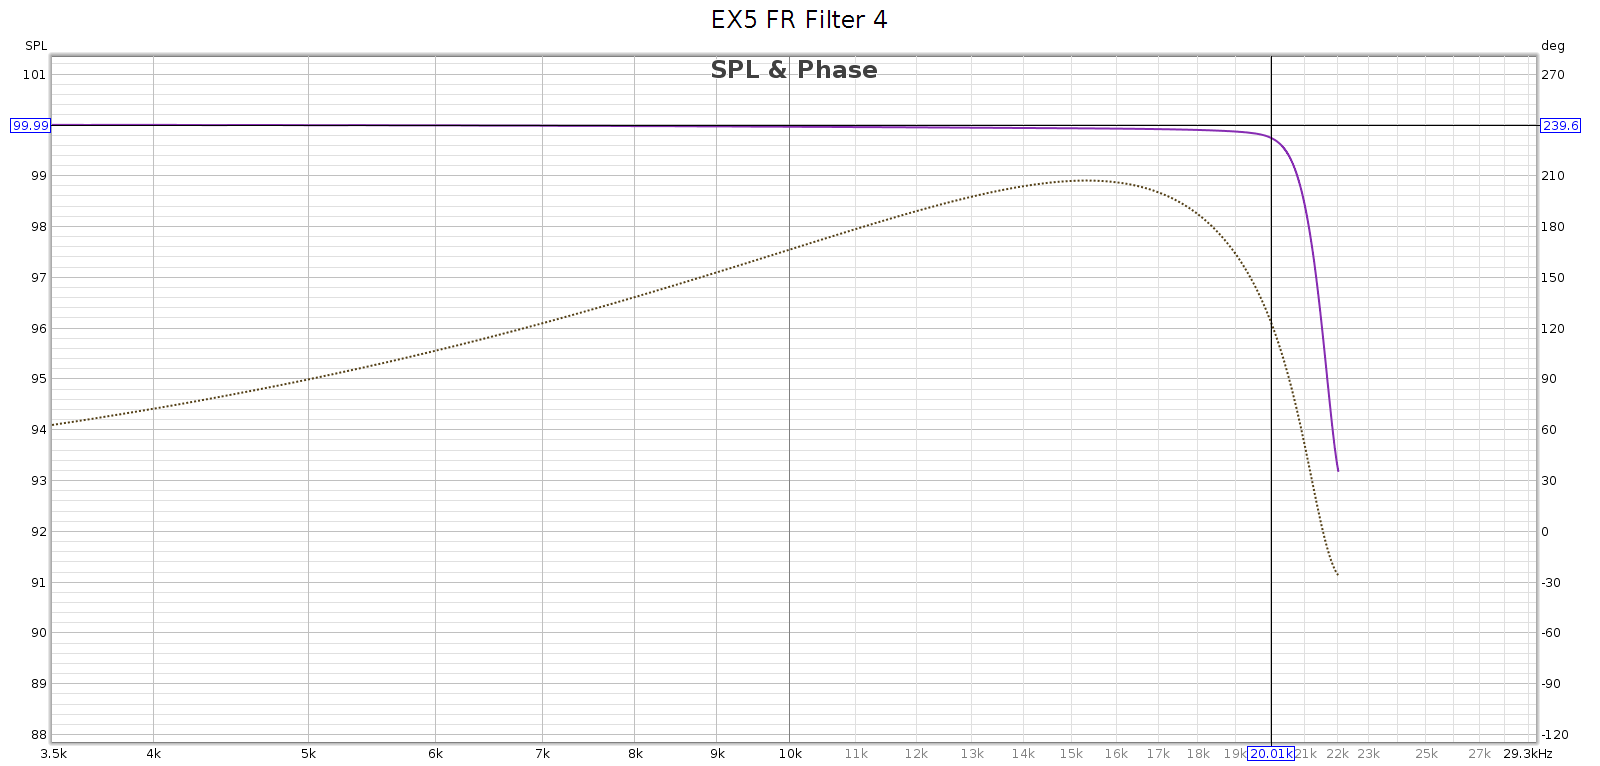
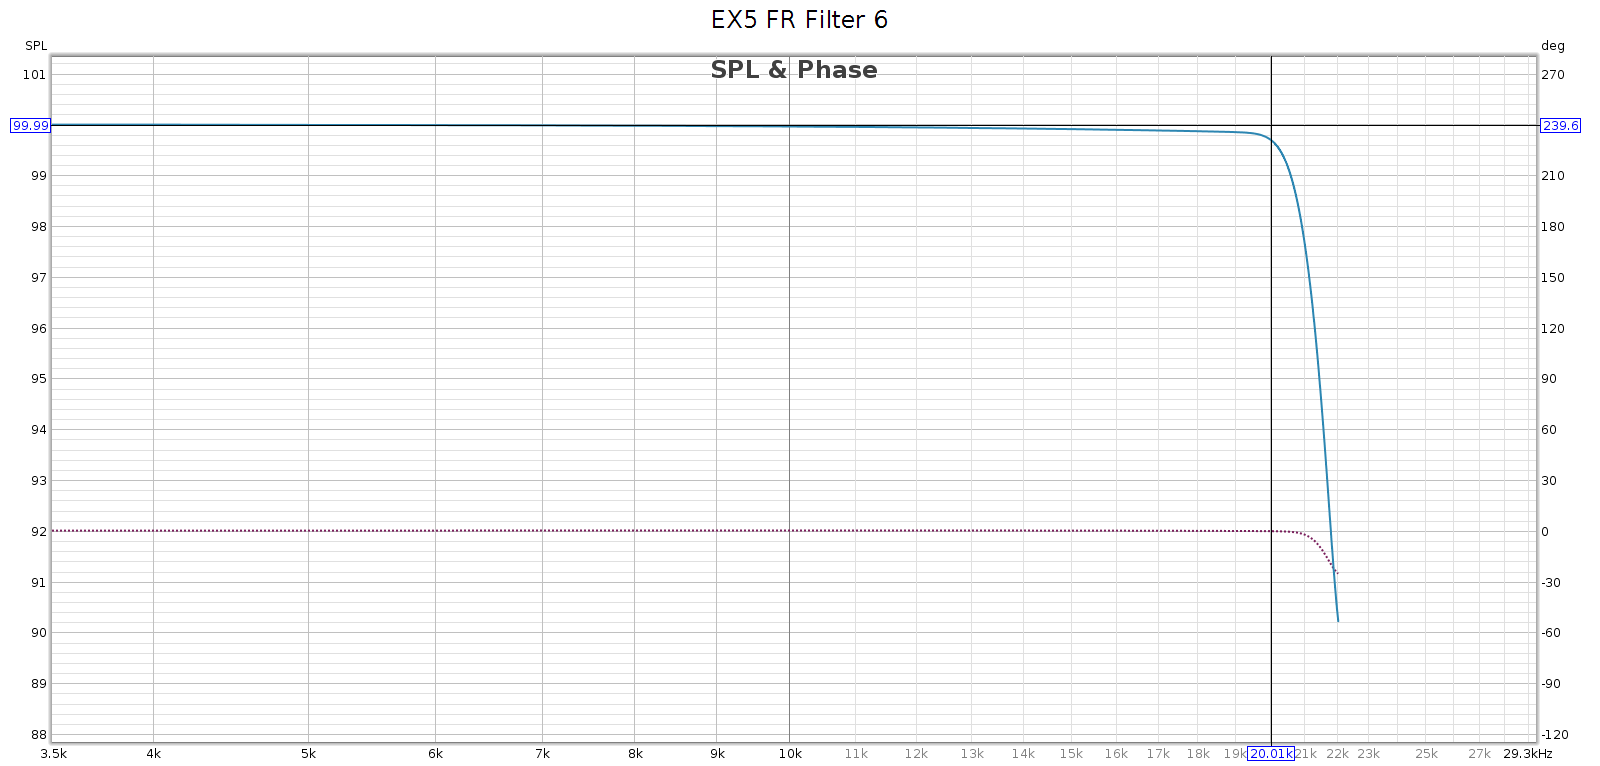
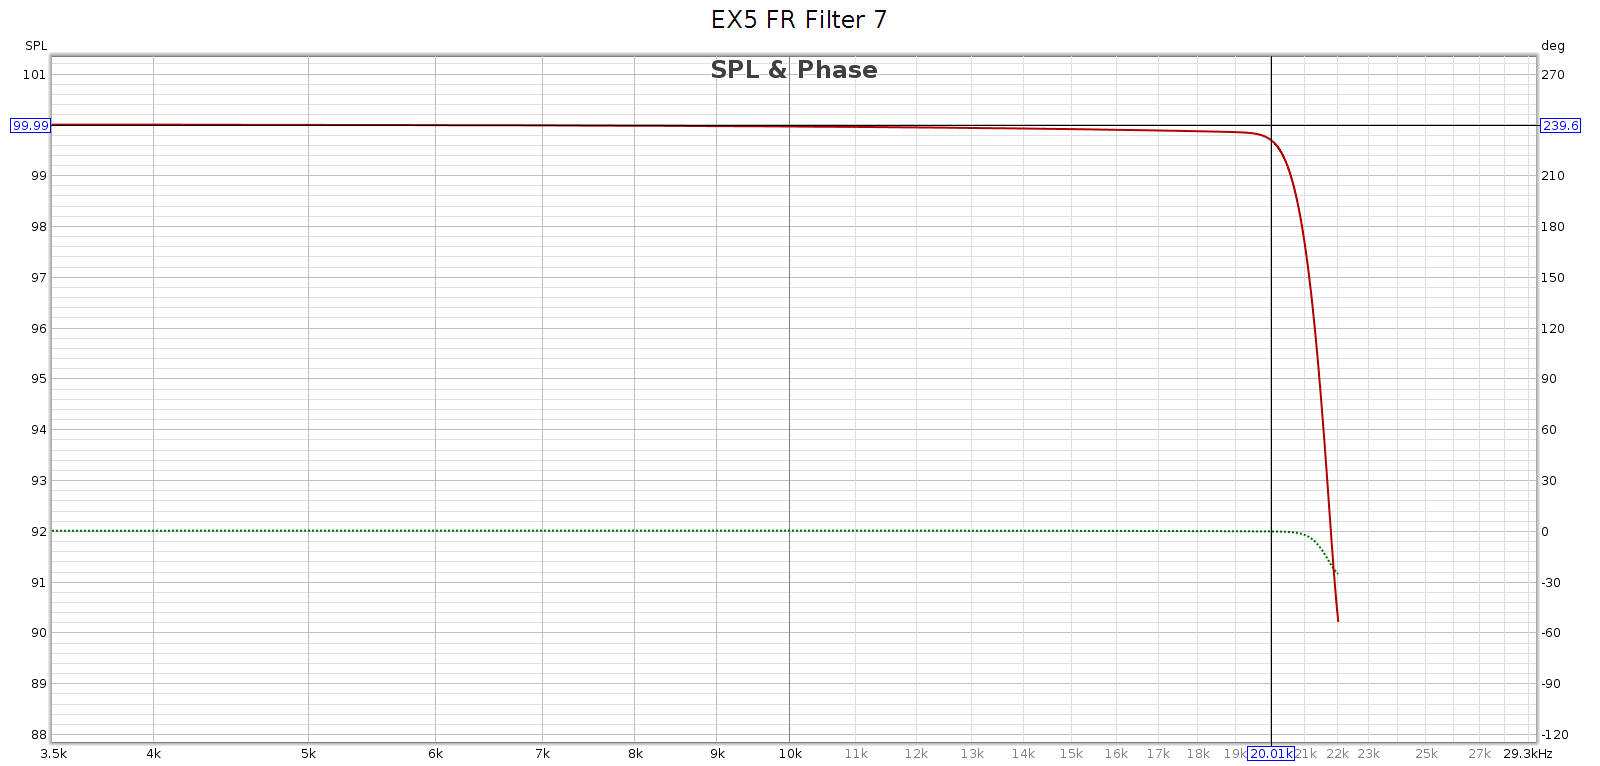
Filters 4, 6 and 7 are a bit lazy and don’t fully attenuate until 24.1 kHz. This is incorrect, yet benign.
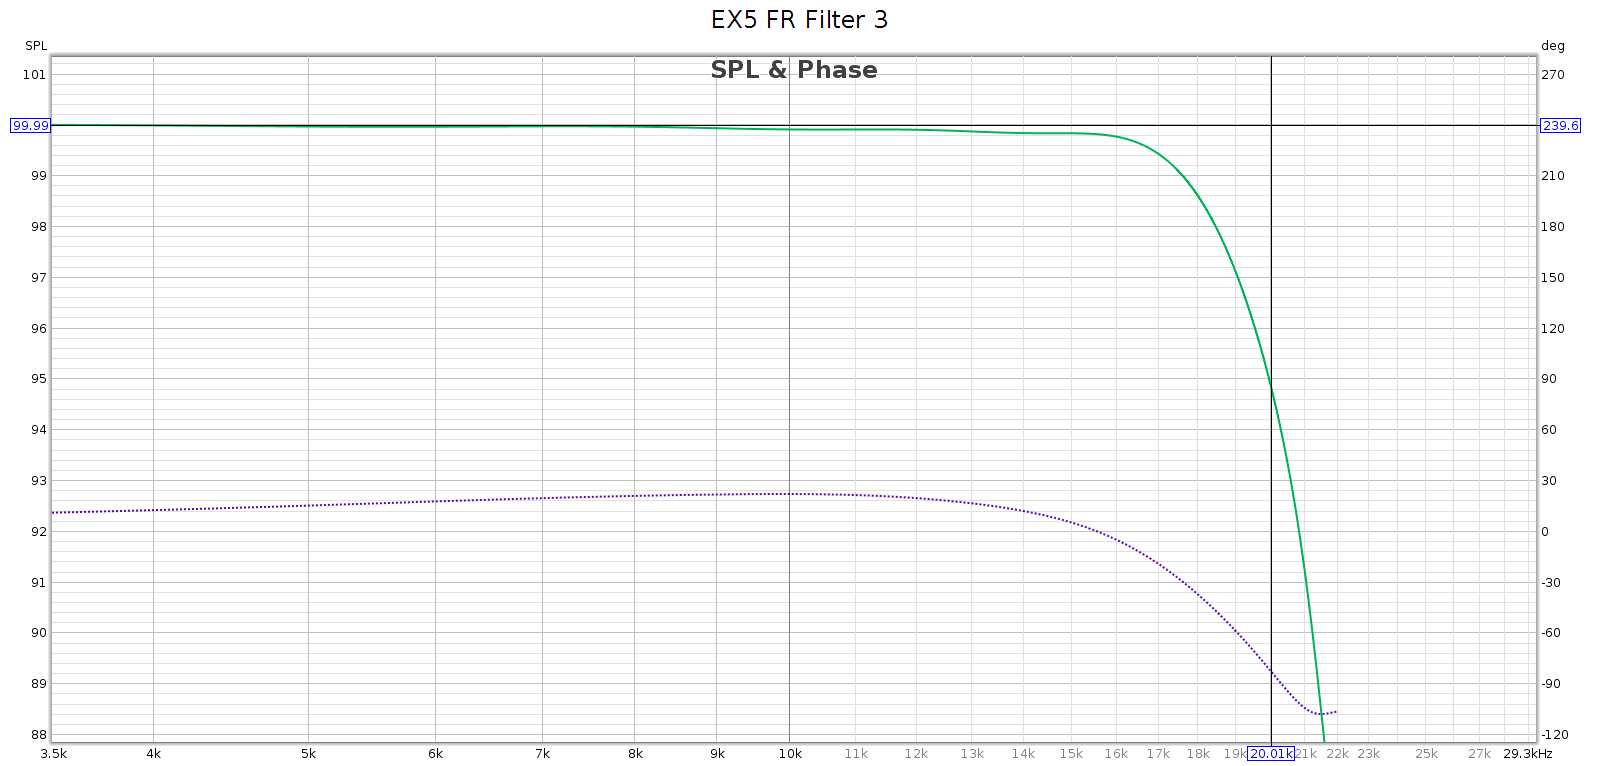
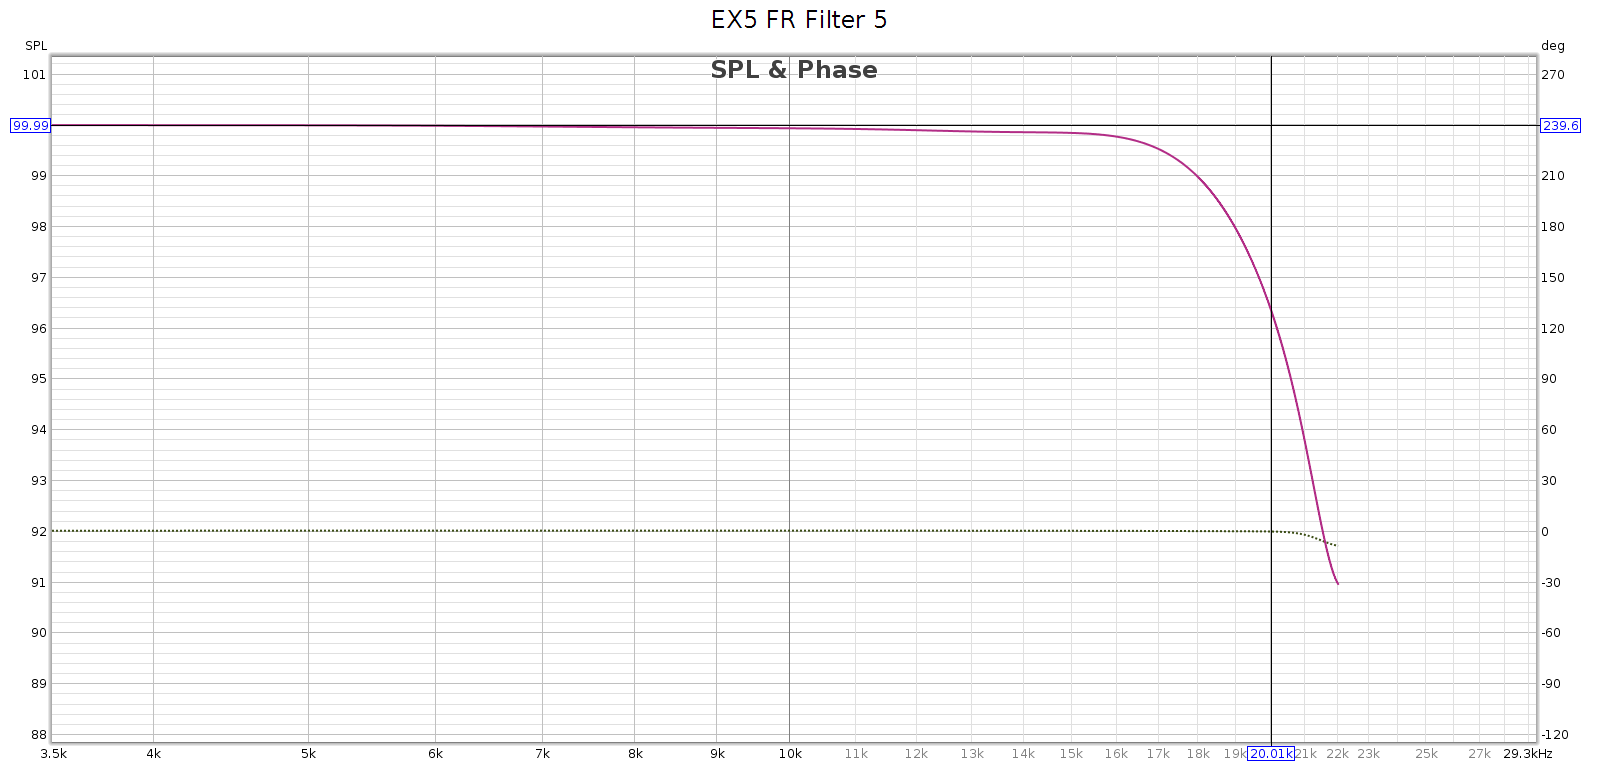
Filters 3 and 5 are very lazy and don’t fully attenuate until 28 kHz. This can be a problem.
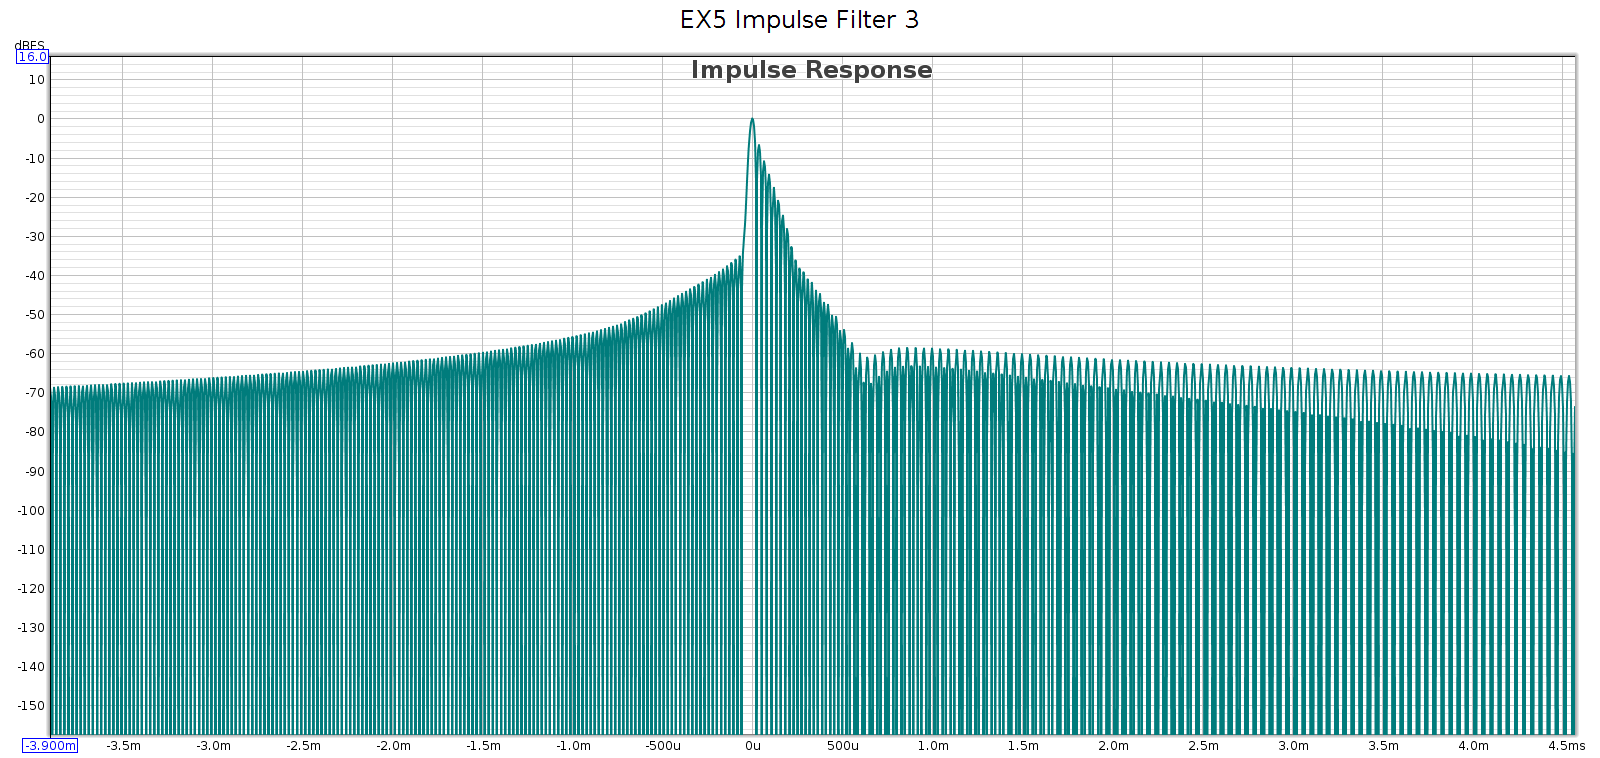
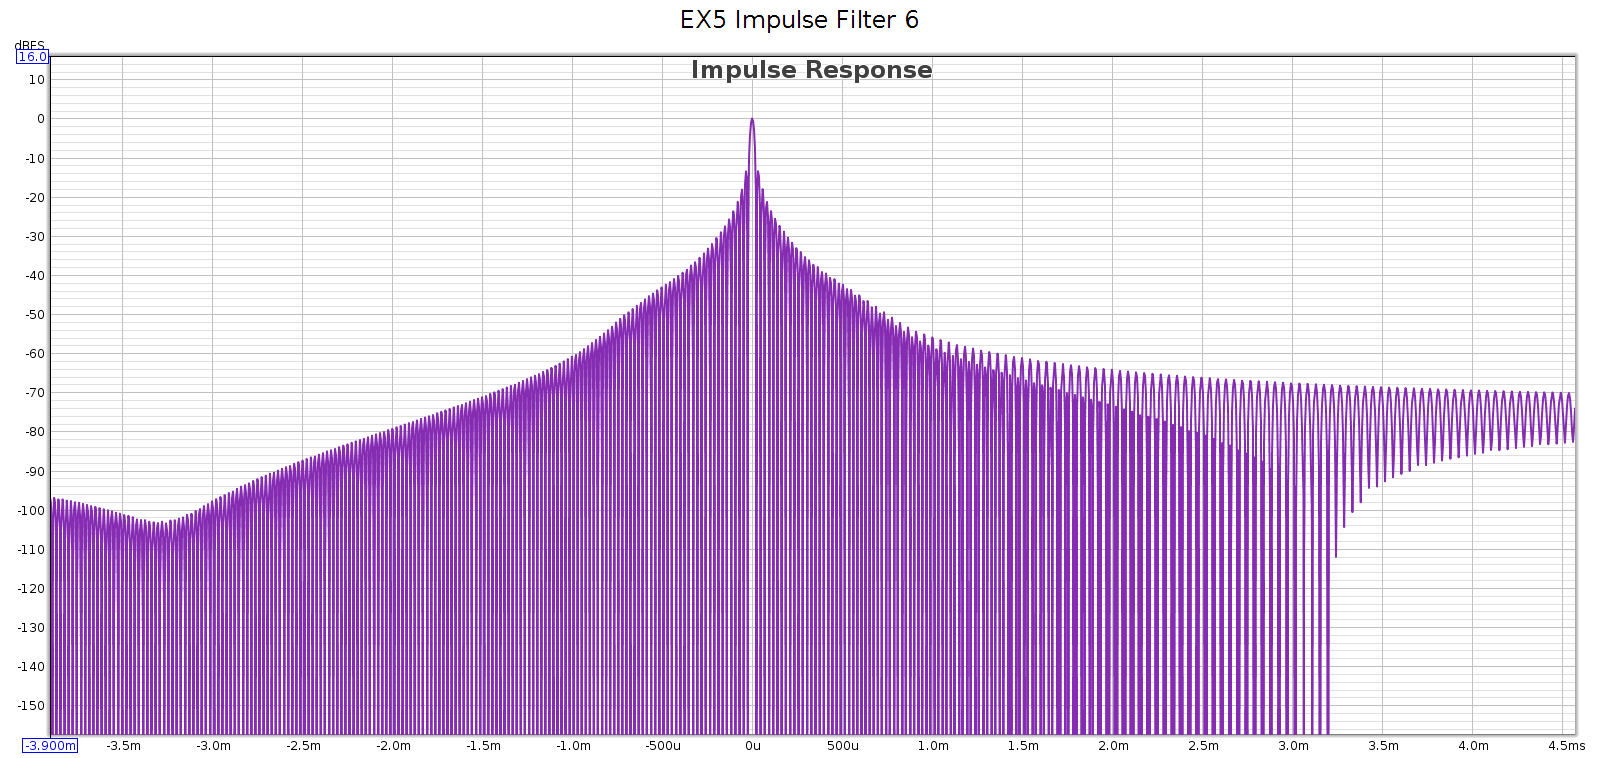
Filters 1, 3 and 4 are minimum phase.
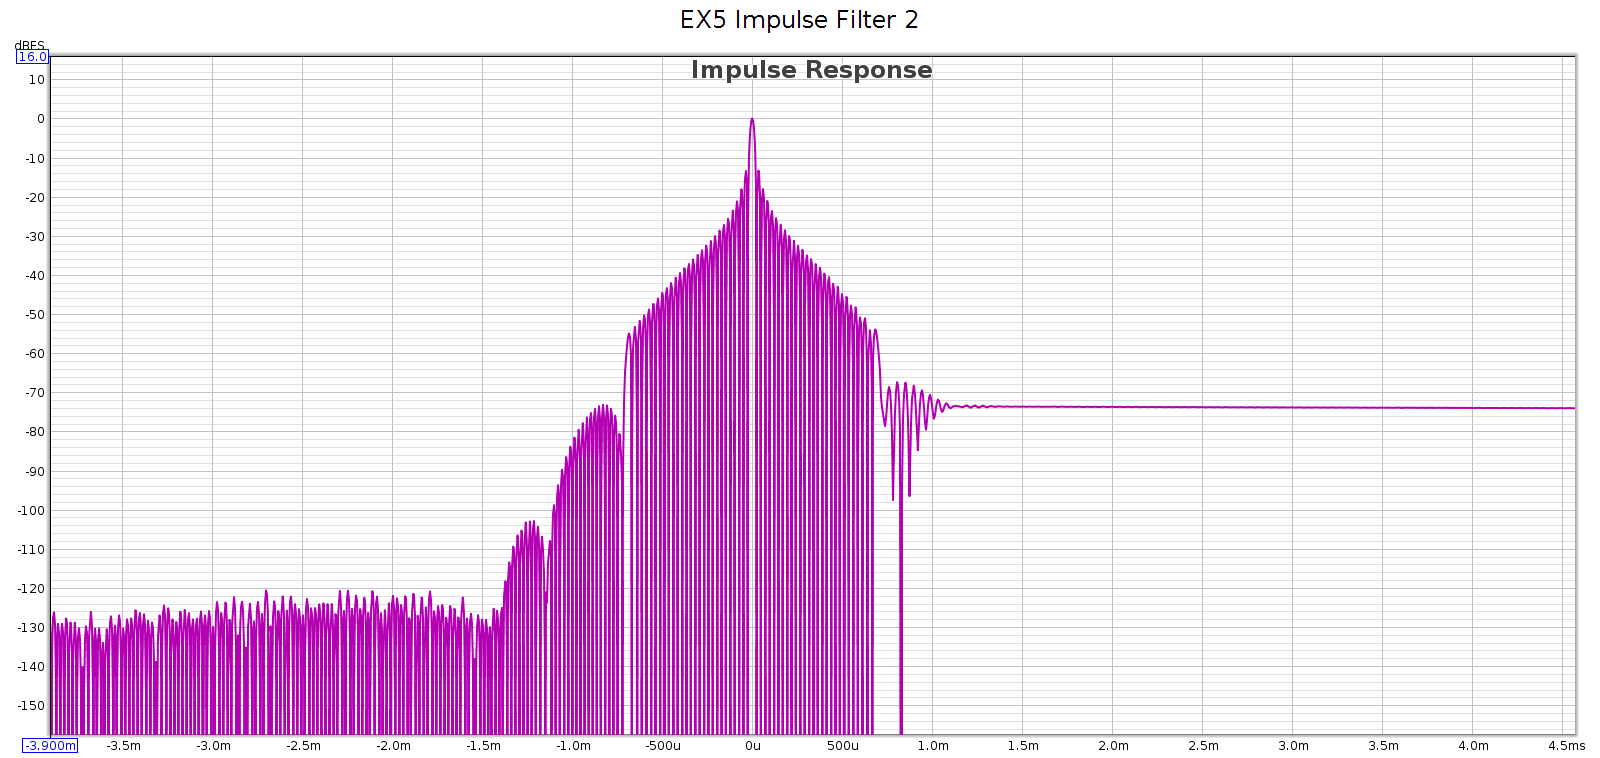
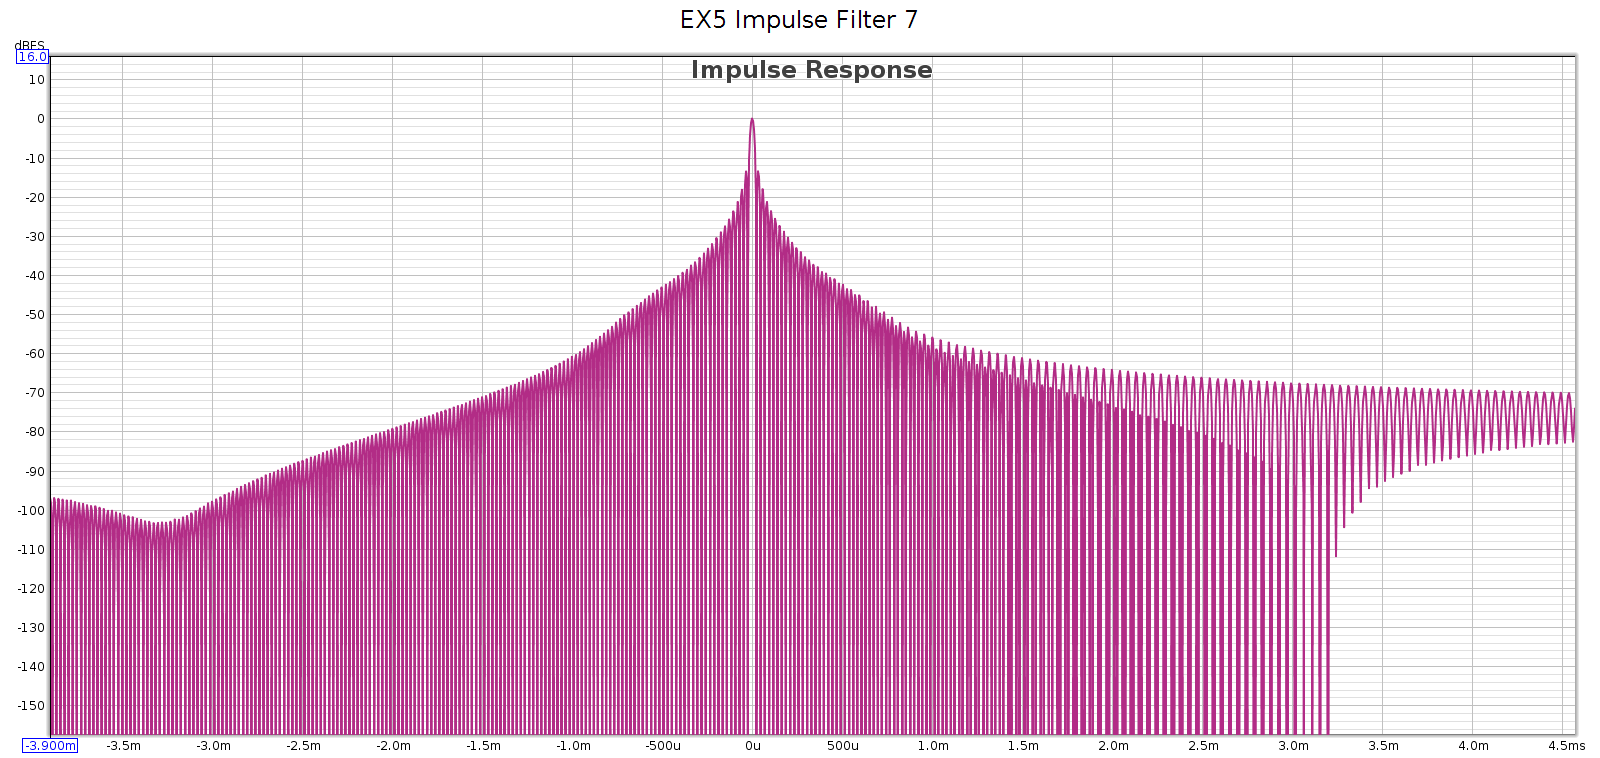
Filters 2, 5, 6, 7 are linear phase.
Filters 6 and 7 are identical in my measurements (both response & phase).

In summary:

  • Filter 2 is the most correct, but it is not perfect
    • Fully attenuated by Nyquist (surprisingly rare, but welcome)
    • Linear phase (flat phase vs. frequency)
    • It has a bit of ripple, not perfectly smooth
    • It has just a tad of passband attenuation: -1.5 dB @ 20 kHz
  • Filter 6/7 is as good as #2, with different tradeoffs
    • Fully attenuated by 24.1 kHz, thus any aliasing is above 20 kHz
    • Linear phase (flat phase vs. frequency)
    • No ripple – perfectly smooth response
    • No passband attenuation: -0.3 @ 20 kHz
  • Filter 4 is the best minimum phase filter
    • Fully attenuated by 24.1 kHz, thus any aliasing is above 20 kHz
    • Phase rises smoothly to +210* at 15 kHz, then drops to 0* at 21 kHz.
    • No ripple – perfectly smooth response
    • No passband attenuation: -0.2 @ 20 kHz

Put in reverse, why not use the other filters?

  • Filter #1 has significant passband attenuation: -10 dB @ 20 kHz
  • Filters #3 and #5 don’t attenuate until 28 kHz, thus leak high frequencies that can alias down to 16 kHz

How is the manual wrong? It gets 6 of the 7 filter descriptions wrong.

  • It labels #1 as fast rolloff apodizing, which is wrong
    • It rolls off slowly with significant passband attenuation, -10 dB @ 20 kHz
  • It labels #2 as slow rolloff minimum, which is wrong
    • It rolls of sharply with almost no passband attenuation
    • It is linear phase, not minimum phase
  • It labels #3 as fast rolloff minimum, which is wrong
    • It rolls off slowly with significant passband attenuation: -5 dB @ 20 kHz
  • It labels #4 as slow rolloff linear, which is wrong
    • It rolls off sharply with no passband attenuation
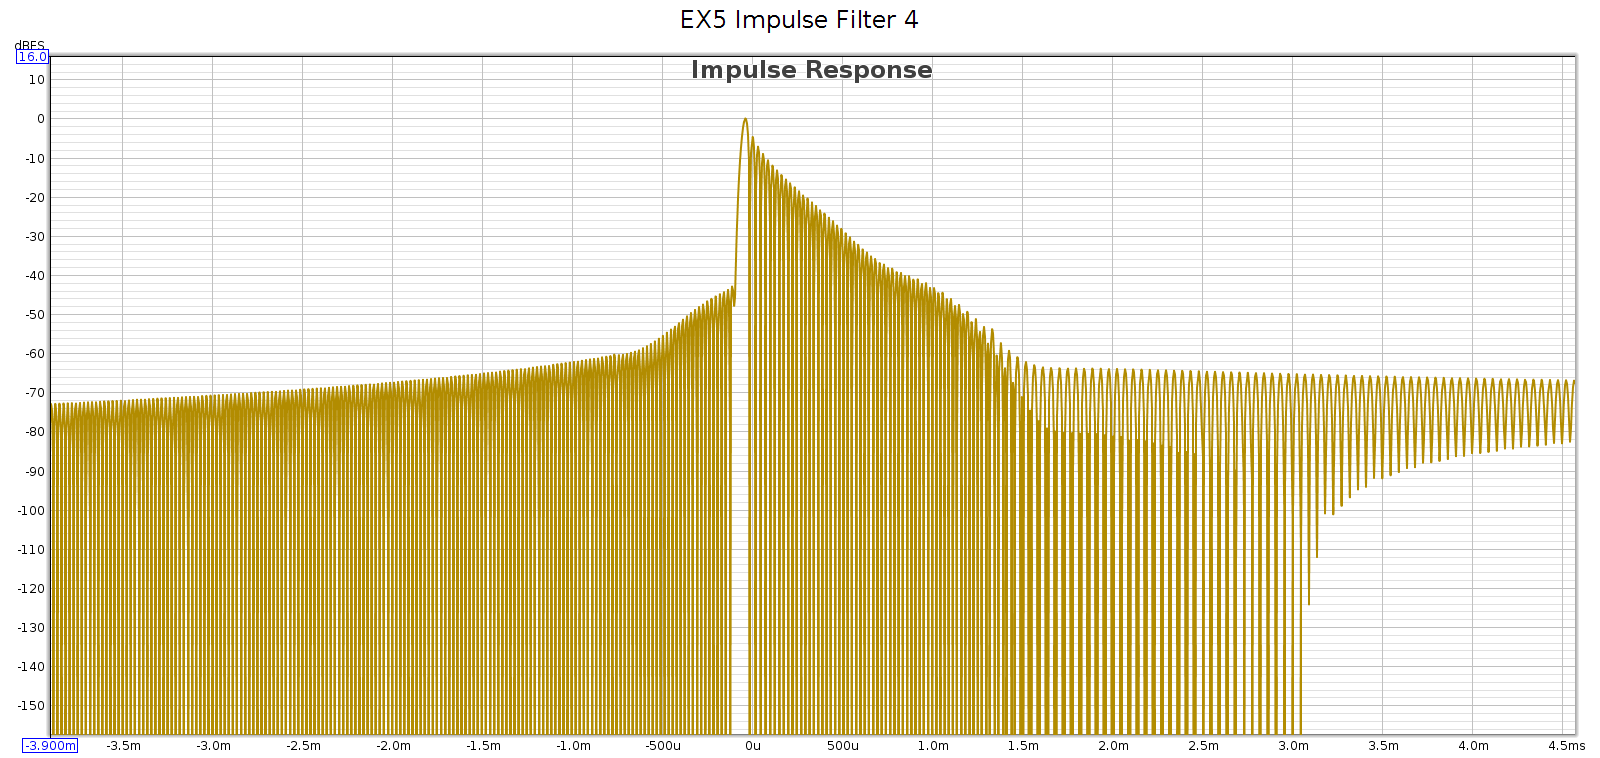
    • It is minimum phase, not linear phase
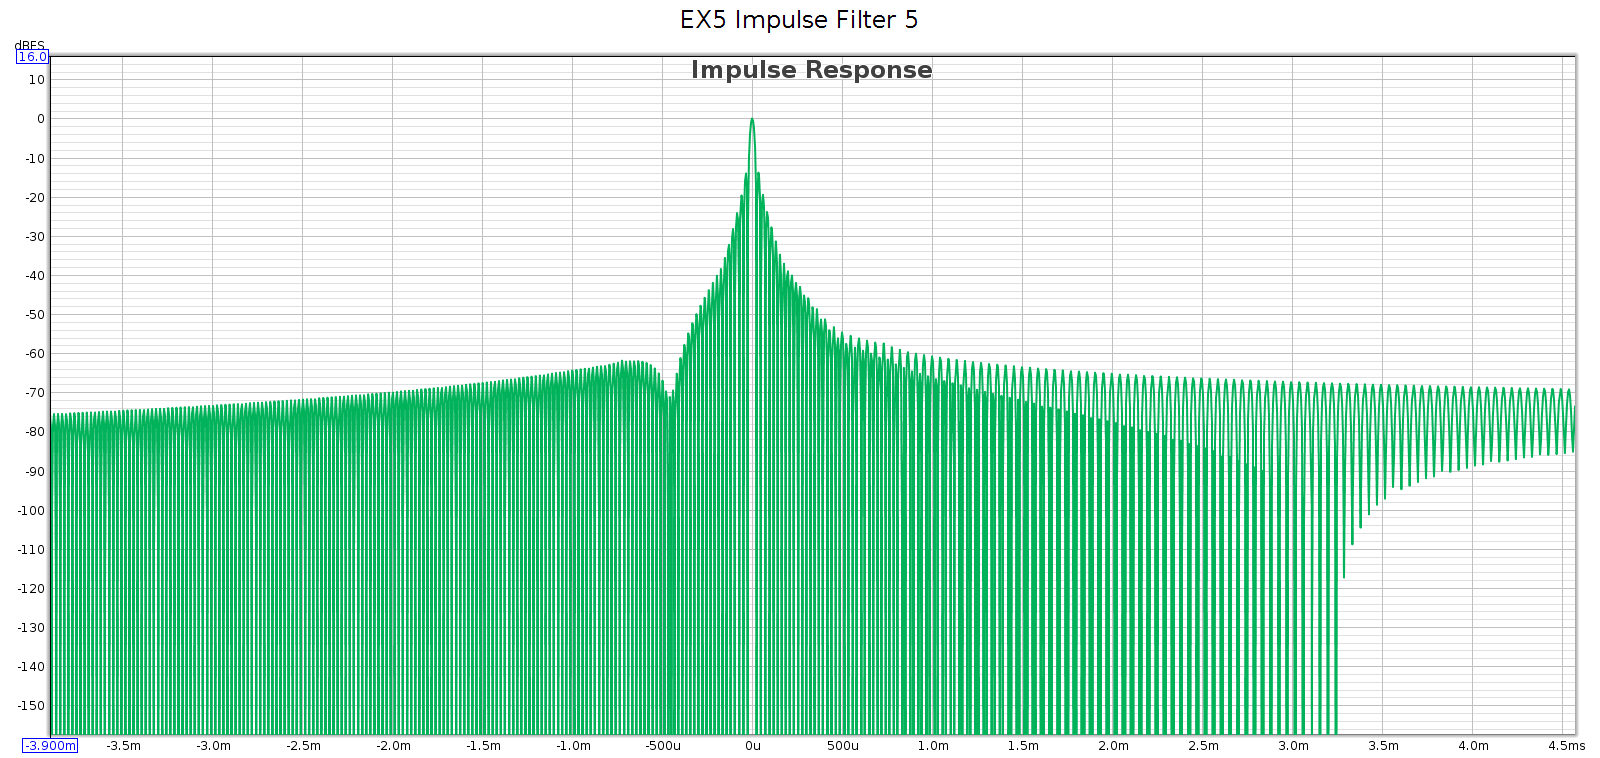
  • It labels #5 as fast rolloff linear, which is wrong
    • It rolls off slowly with significant passband attenuation: -3.6 dB @ 20 kHz
    • It does not fully attenuate until 28 kHz
  • It labels #6 as brick-wall, which is correct!
    • It has no passband attenuation, fully attenuates by 24.1 kHz, and is linear phase
  • It labels #7 as fast rolloff corrected minimum, which is wrong
    • This filter is identical to #6, and is linear phase

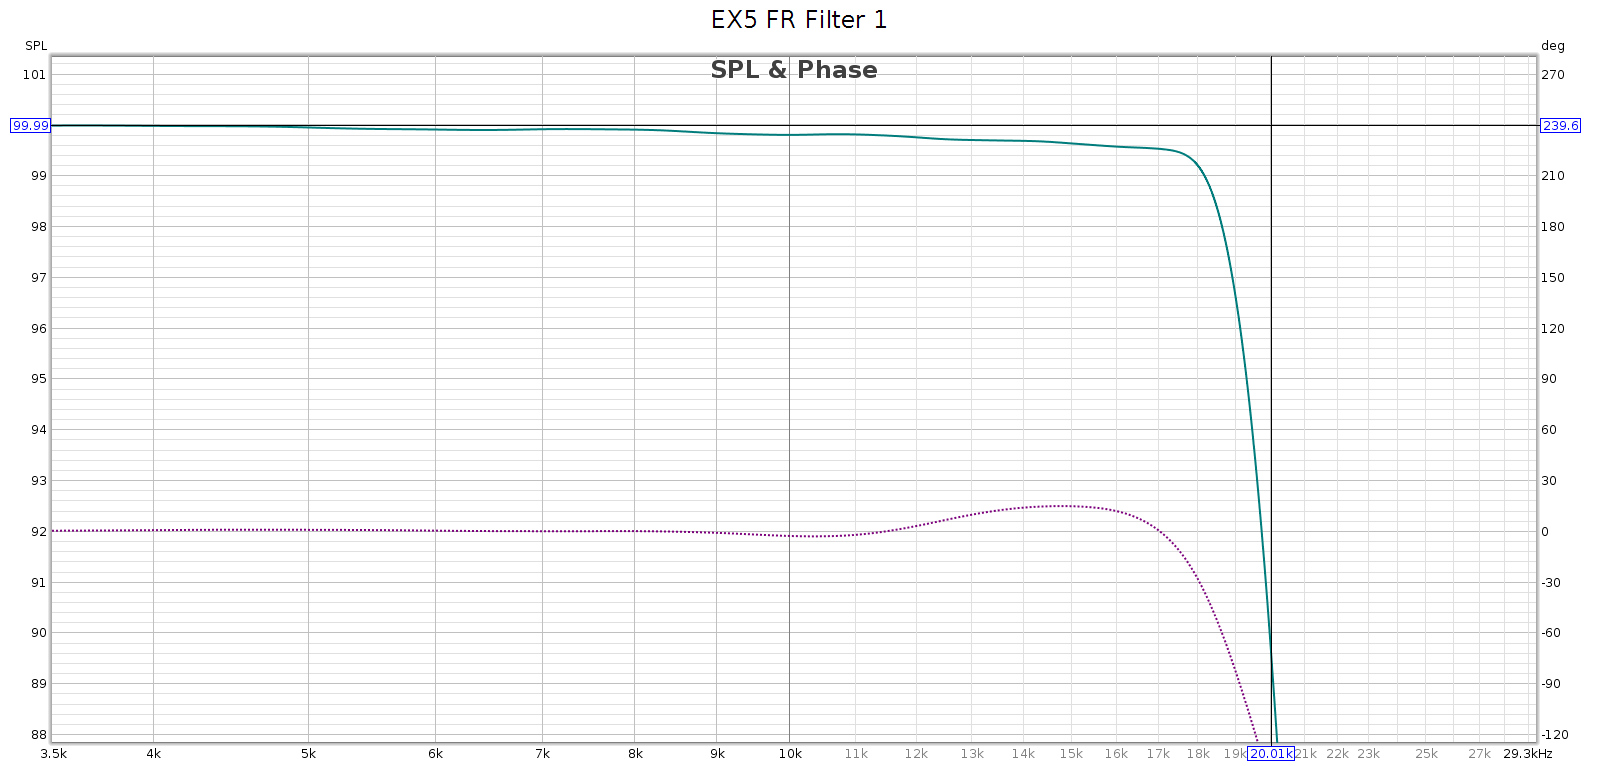
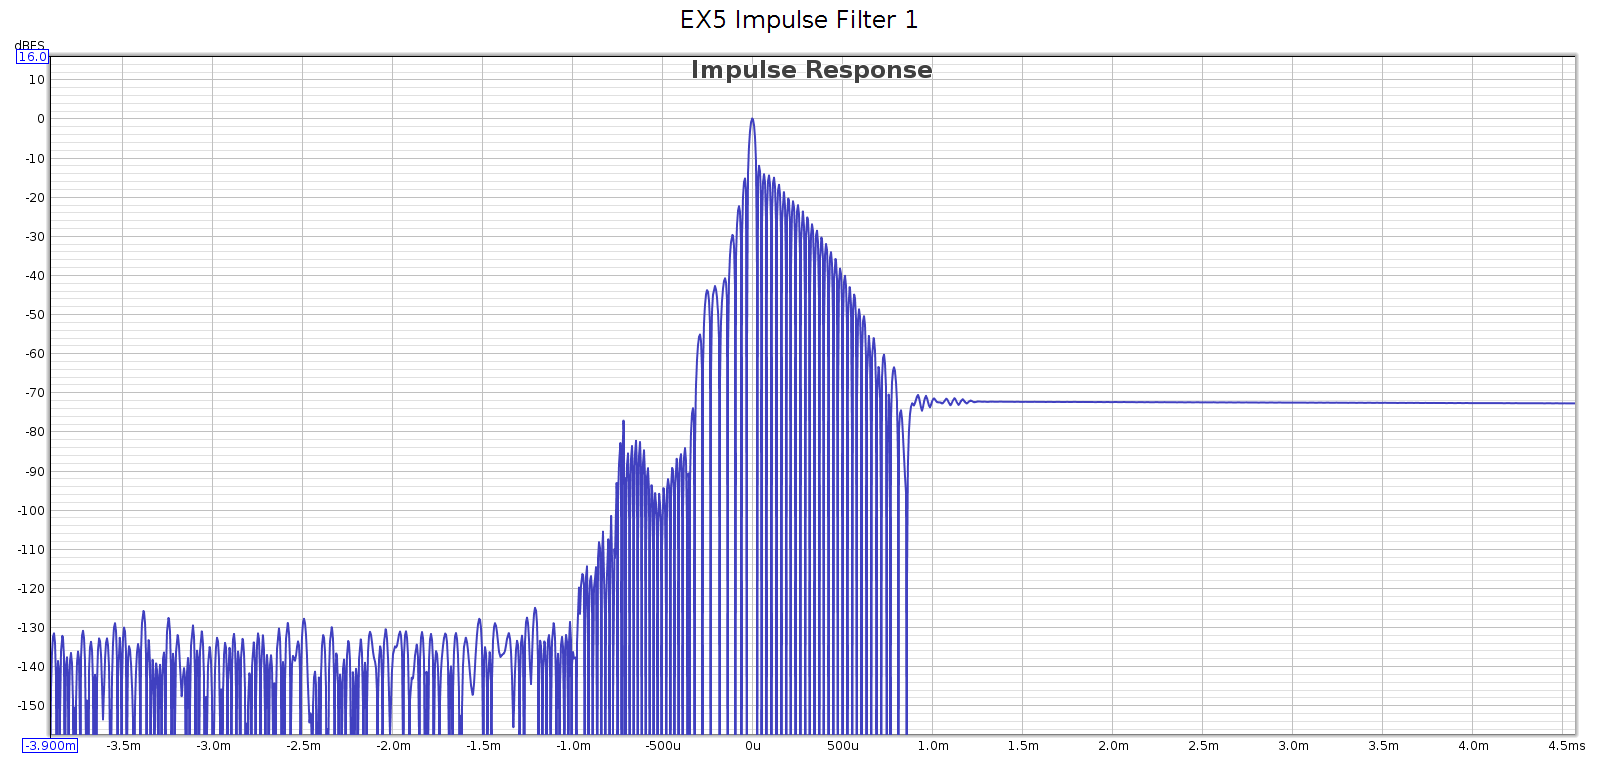
Measured at 44.1 kHz, here are the frequency response, phase, and impulse response of each of these filters. In each graph, the cursor marks the flat response corner @ 20 kHz. Below, note that the minimum phase filters have non-flat phase and asymmetric impulse response.

Filter 1

Filter 2

Filter 3

Filter 4

Filter 5

Filter 6

Filter 7

Comparison

The EX5 is such a great little device I couldn’t resist comparing it with my Corda Soul.

Frequency Response

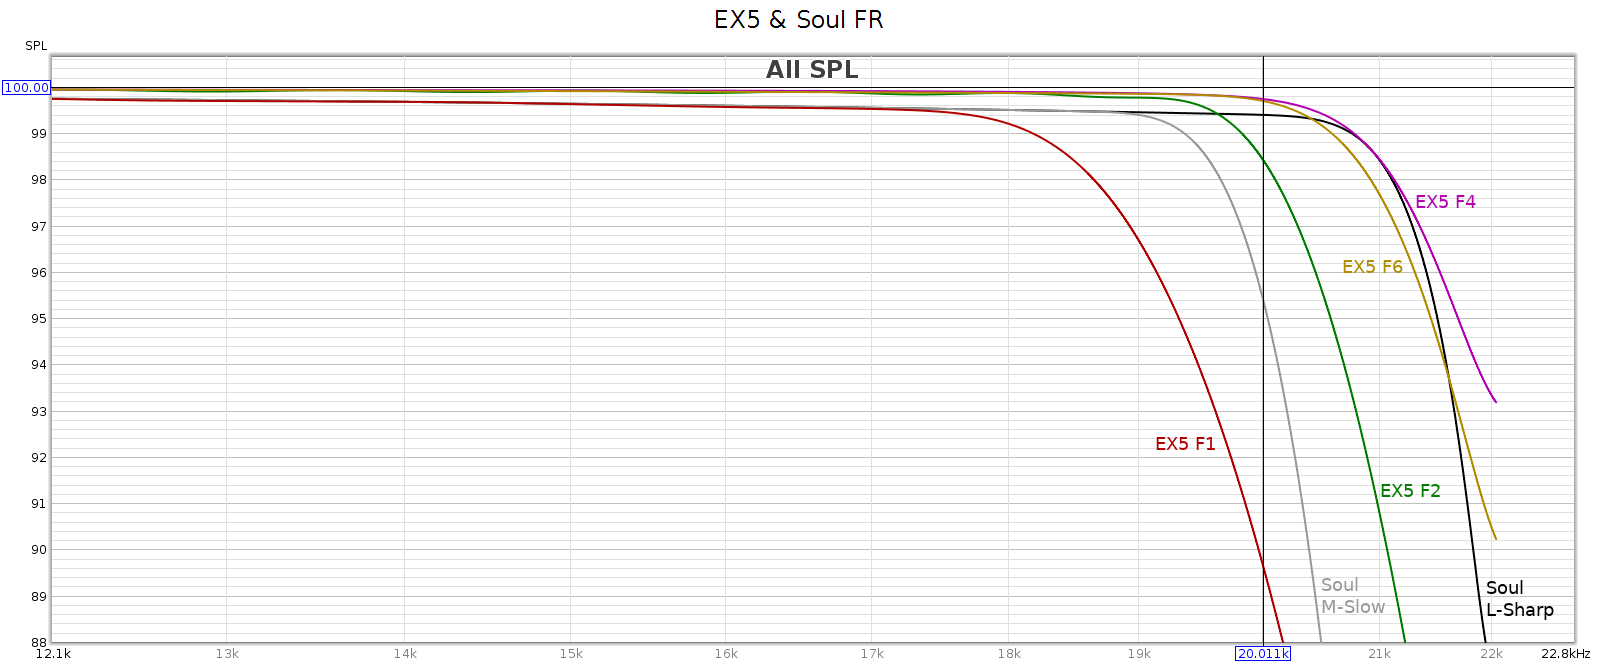
The Soul has 2 user-selectable filters. Here’s how they compare with the EX5:

The Soul’s linear phase filter (L-Sharp) is the best shown. It is the flattest in the passband, perfectly smooth with no ripples, and fully attenuates by 24.1 kHz faster than EX5 #6.

The Soul’s minimum phase filter (M-Slow) is between the EX5 #1 and #4.


The 2nd Amendment, Round 3

Round 1 was DC v Heller, in which the SCOTUS found that the 2nd amendment means what it says. It guarantees a civil right of the people, like the rest of the Bill of Rights.

Round 2 was MacDonald v Chicago, in which the SCOTUS incorporated the 2nd amendment, making it binding on states and local government. This gave it parity with the rest of the Bill of Rights.

Round 3 (New York Rifle & Pistol v Bruen) is happening today at the SCOTUS. It is about how much this civil right can be regulated for public safety, without infringing the civil rights of gun owners.

First, let’s cover the notion of whether public carry is covered by the 2nd amendment. The 2nd amendment says, “the right to keep and bear arms”. Keeping is in your house. Bearing is on your person in public. One of the material questions of this case (New York Rifle & Pistol v Bruen) is whether this means what it says, in simple plain language.

Update: Thu 6/23: The SCOTUS decision is released, and says yes, the 2nd amendment means what it says.

Most states have laws that require people to get a permit before they can carry firearms in public. This kind of regulation is entirely lawful and reasonable, as it protects the public from criminals, the insane, and others who cannot exercise this right responsibly, and would be a danger to others. The point of contention is that in New York, California, and a few other states, the permits are “may issue”. This means state or local authorities have discretion to grant, or deny, a permit for any reason, or for no reason. In other states, like WA, FL, AZ etc. the permit process is “shall issue”. This means they define disqualifying criteria in writing, local authorities have no discretion, every person “shall” be issued a permit unless a disqualifying criteria applies. Furthermore, some of the states (like NY) require a permit applicant to show “proper cause” why he wants to carry a gun in public.

The 2nd Amendment is a civil right, not a privilege. If we have to show “proper cause” to get permission to do something, and local authorities can deny it for any reason, then it is a privilege, not a right. The government cannot ask us to show “proper cause” before we can exercise our right to free speech, to worship the religion of our choice, to peaceably assemble, or any other civil right. The 2nd amendment is no exception.

The argument from the anti-gun perspective is that every locality must have the power to regulate public safety in the way they see best. This is true, yet their case does not follow. They do have the power to regulate this right, but they do not have the power to use regulation as a pretext to rescind it.

  1. No regulation can violate people’s civil rights, even if it achieves a public or social benefit. A local law allowing police to search anyone on the street without cause or suspicion might reduce crime. But local governments do not have the power to do this because it violates people’s civil rights.
  2. State and local governments do have the power to regulate the right for people to carry guns in public. But they must do it in a way that is consistent, treats everyone the same way, and preserves the civil rights of every-day law abiding people.

So how can New York, California and other states make their carry laws constitutional?

  1. Switch from “may issue” to “shall issue”. Local authorities do not have discretion, but follow written law.
  2. Eliminate “proper cause” as a requirement for public carry permits. It is inherently subjective and restrictive, weakening the right to carry into a mere privilege.
  3. Disqualifying criteria must be objective and define the exceptions, not the norm. Criminal or violent history, mental instability or insanity, under age, etc.
  4. Places designated as “sensitive” or “no carry” zones must be objective and define the exceptions, not the norm. Jails, courthouses, etc. Not the places that people go every day.
  5. Many states have requirements for training. These are constitutional, as long as the training is not burdensome and is accessible to any applicant.

New Bike Day!

Summary

I’ve been riding the same road bike for over 20 years. I decided it was finally time to get a new road bike. My research and prior experience led me to pick a Fezzari Empire.

20211025_121845.jpg

20211031_123620.jpg

The Old: Trek 2200

I bought this Trek 2200 back in 2000. Aluminum frame, Shimano 105, Rolf Vector wheels. The reason I’ve been riding it for so long is because it’s such a great bike. Over the years I’ve serviced (cleaned & repacked) every bearing (wheels, headset, bottom bracket), replaced the chain & rear cassette (wore out a couple), and of course gone through several sets of tires & brake pads. I’ve also had to rebuild the wheels due to failed spoke nipples. What’s most surprising about this bike is that everything else is still original: frame (of course), hubs, rims & bearings (serviced but never replaced), front chainrings, shifters/brake levers, even cables!

Early on, I installed a suspension seat post because this Al frame is so rigid you almost need a mouthpiece to ride it <g> This helped quite a bit, though it needs to be disassembled, cleaned and re-greased every year. I also replaced the original 12-25 cassette with an 11-28. Otherwise it’s bone stock. The bike weighs 21.5 lbs. ready to ride pedals and all.

Why?

Why get a new bike, especially if this one is so great?

  • Gearing: the Trek’s original lowest gear was 39-25 or 1.56:1, about 41.2 gear-inches. This always felt a bit high, even when my legs were 20 years younger. The front crank BCD doesn’t allow a smaller front chainring. The rear derailleur can take a max 28, so when the cassette wore out I replaced it with an 11-28, giving a 12% lower first gear, 1.39:1 or 36.7 gear inches. This helped but still I’d prefer a lower 1st gear, which is impossible with this bike. While keeping the same top gear (52-11, or something close to that).
  • Comfort: the Trek is so rigid I installed a suspension seatpost. I’d like a bike that is just as efficient yet naturally more compliant. And the Trek has racing geometry with a steep fork angle and short 38″ wheelbase. This is responsive yet twitchy. I love the handling of our Santana tandem, which is more stable and relaxed. It doesn’t slow us down in the twisty curves.
  • Performance: who doesn’t want higher performance? Better aerodynamics and lighter weight. And better brakes.

What?

Once I articulated the reasons why, I could now start to define what, or derive requirements:

  • Carbon frame: the ultimate for efficiency, compliance, and weight
  • Carbon wheels: enables deeper aero profile without adding weight
  • Disc brakes: necessary for carbon wheels
  • Mechanical shifting: because electronic is an expensive solution in search of a problem that doesn’t exist

Mechanical shifting was hard to get in bikes with carbon frames & wheels. So I had to consider the requirements as guidelines. I found the following bikes that meet most of these requirements.

CompanyModelPriceFrameWheelsGroupset
CanyonEnd CF SLX Disc 8 eTap$6000CarbonCarbon Reynolds AR41SRAM Force eTAP
TrekDomane SLR6$6800700 OCLVAeolus CarbonUltegra Manual
CannondaleSynapse Carbon$4400CarbonFulcrum AlloyUltegra Di2
GiantDefy Adv Pro 2$4550CarbonSLR-2 CarbonUltegra Manual
FezzariEmpire Elite$2900CarbonDT E1800 AlloyUltegra Manual
FezzariElite Race$4300CarbonVision SC40 CarbonSRAM Rival eTAP
FezzariCustom$4100CarbonVision Metron 40 CarbonUltegra Manual

Fezzari had the least expensive bikes, $1500 to $2500 less than comparable alternatives. The closest/best alternative was the Giant. Yet they were backordered for 6+ months and have only a 2 year warranty. Fezzari had a lifetime warranty and estimated delivery at 8-10 weeks. Fezzari didn’t have exactly what I wanted, but I called them and they could do the custom bike described in the last row of the table. Take the “Elite” model with Ultegra manual, and replace the Swiss DT E1800 alloy wheels with Vision Metron carbon (bottom row of the table). A full carbon bike with the same wheels Peter Sagan used in the Tour de France for $4100 is an unbeatable value.

Fezzari Experience

Past

7 years ago I bought a Fezzari mountain bike, their top of the line model called the Timp Peak. Carbon frame, 27.5″ Reynolds carbon wheels, dual suspension (Rock Shox Pike front, Fox CTD rear) with remote, SRAM XX1 groupset, carbon handlebars, hydraulic dropper seatpost. It cost about $6300, where comparable bikes from Trek and Cannondale were around $9k. I rode it on some big rides: Kokopelli’s trail (Bikerpelli), all around Boulder CO, the Oregon Trail Gravel Grinder, and local rides like Tiger Mountain. Over the years it has proven to be a fantastic bike. But nothing is perfect.

When it first arrived, some of the frame’s accessory attachment points had their thread barrels spinning freely inside the frame; they had delaminated. Defective frame, no way to fix it, I sent it back. Fezzari handled it well, paid shipping both ways and did some other minor mods to the bike for me. But it did cause a 5 week delay in getting the bike.

This is a fantastic bike: light (27 lbs. with heavy knobby tires, 25 lbs. with gravel tires), efficient, full suspension, totally rugged and durable. Yet it hasn’t been perfect. Here’s a summary of issues, excluding normal maintenance. Details here:

  • The brake levers (SRAM Guide) developed the “sticky brake lever” problem where the internal pistons expand and get stuck tight inside the lever cylinders. First, I disassembled them and ground them back down to size. But a few months later the problem recurred. Then I replace them with aftermarket metal pistons — problem fixed for good.
  • The rear hub’s internal freehub pawls sheared down and had to be replaced. This stranded me in the middle of the Moab desert. I got the pawl & driver rebuild set from Reynolds and did this.
  • The rear carbon rim delaminated and Reynolds replaced it under warranty. They sent me a replacement rim and I rebuilt the rear wheel. This actually turned out to be an upgrade as the new rim is nicer than the old one.
  • The rear hub shell distorted from the pawl pocket forces when climbing hills. Reynolds would not warranty this defect so I bought set of new DT350 hubs and rebuilt the wheels.

Observe that none of these problems are due to Fezzari. Their frame has been solid and has a lifetime warranty. And the overall setup: geometry, components, etc. all works together well. Over the years I’ve emailed Fezzari a few questions, they always are responsive and helpful. Because of this, I felt confident getting another bike from them.

Present

Pre-Order to Delivery

I placed my Fezzari Empire order on July 20. One difference I noted is that 7 years ago, there was no tax or shipping. This time there was, which added up to about $500. Even so, it was still a good deal so I paid a 20% deposit to reserve a bike when parts became available. I was skeptical of their 8-10 week delivery estimate, due to COVID related supply chain disruption, but it’s faster than any other bike company was offering, and it is refundable.

A month later Fezzari slipped the delivery estimate from mid-late-Sep to late-Sep-early-Oct.

On Oct 11, Fezzari called to say the frame and parts were in stock and they were ready to build my bike. This was 2 weeks after the original delivery date.

A few days later they called to say the Vision Metron 40 wheels did not fit the Ultegra parts for my bike, but they had SC40 wheels that did fit. What’s the difference between Metron 40 and SC 40? They’re mostly the same, both carbon rims with 40mm depth, bladed straight-pull spokes with brass nipples, and disc brakes.

Differences between Metron and SC:

  • Metron 40 wheelset is 30 grams lighter
  • Metron 40 has 3 fewer spokes on the front wheel (21/24 instead of 24/24)
    • Note: this probably accounts for the 30 grams
    • Note: I want that extra spoke more than the 30 gram weight savings
  • Metron 40 has preload adjustable hubs
  • Metron 40 is about $750 more expensive ($1800 vs. $1050)

However, the price Fezzari quoted me was only $200 cheaper. Why? They said the difference is based on the prices they pay, which are different from the retail prices.

Even with the price discrepancy it was still a great value, so I said OK.

On Oct 20, Fezzari said the bike is ready to ship, so I paid the rest of the invoice. They gave me a tracking #. My new bike was on its way!

Delivery and Inspection

After some FedEx delays, the bike arrived on 10/25, 1 day short of 14 weeks since I ordered it. That made it 4 weeks late. I didn’t think that was too bad, considering what’s been happening with supply chains and shipping lately.

I’m an experienced bike mechanic and wheel builder, so you know I checked it out from top to bottom.

Tires

It comes with Maxxis High Road 700×28 tires. They’re decent tires but too wide and heavy for my road bike preferences. But 700×28 is the tire size I use on our tandem, which needed a new set of tires. So I was going to install these new tires on the tandem and replace them with a new set of Continental GP5000 700×25 tires.

As I removed the tires from the Empire I noticed it was set up as tubeless. Fezzari does this optionally for customers who want it. I didn’t want it or ask for it. Tubeless is great for mountain bikes since you can run much lower pressures to get better traction. But it has no benefit on road bikes, where I prefer to run clinchers with latex inner tubes. This is simpler and cleaner with no sealant mess or hassles. I wonder if one reason the wheels were more expensive than expected is because they charged me for a tubeless setup that I never asked for?

Anyway, converting to clinchers with latex tubes was quick and easy, and the new tires were great on the tandem.

Front Wheel

As I reinstalled the front wheel, I heard a quiet rustling sound as it spun. Sounded like there was debris inside the carbon rim. I removed the wheel, tire, tube and rim strip, and tapped the side of the rim with the palm of my hand all around its circumference to locate it. Using needlenose pliers I fished a wad of scotch tape and a small rubber grommet out from inside the rim, through a spoke hole. I reinstalled the tire and wheel, it was dead quiet now, perfect and ready to ride.

Rear Hub

As I removed the rear wheel to replace the tire, I noticed that the through-axle was very loose, not even finger tight. As were the axle nuts. As I turned the axle nuts finger tight, the cassette locked up and would not freewheel! I loosened the nuts and it freewheeled normally. Something was wrong with this hub.

Long story short, the hub was improperly assembled without a critical part. It was missing the spacer that goes on the axle, between the hub bearing and the freehub/driver. This spacer bears the side load of the pressure from the axle nuts and through-axle, keeping the freehub/driver properly positioned. Without it, the pressure from the nuts squashed the driver body’s dust seal lip against the hub. There is no bearing here, as it shouldn’t make contact let alone bear a load.

Aha! I thought, this explains why the axle nuts and through-axle were so loose. Whoever assembled this bike must have noticed that the cassette would not freewheel when the nuts were tight, so instead of troubleshooting the problem, they just loosened everything up until it could spin. This of course is improper and unsafe. It leaves the wheel so loose on the hub that it wobbles, and could damage the wheel, hub, derailleur, and even the frame, possibly locking up the rear cassette and causing a crash.

I contacted Fezzari and explained the problem, with photos. They agreed that was the problem and said they would look for a matching part. Meanwhile I called Vision, who makes the wheel. They confirmed that the wheel should have this spacer and they had some in stock. So I got Vision in touch with Fezzari. The next day I called Vision to follow up. They had not yet mailed the part to me, and their HQ and factory is just a few miles up the road from me, so I drove up there and picked it up in person.

Wheel fixed and ready to ride!

Derailleurs

The front derailleur was mounted too high, with at least 5 mm of gap between its outer edge and the big chainring. Shimano recommends a 1-3 mm gap. The smaller the gap, the better it shifts. I repositioned the derailleur and set its angle, cable tension, stop points, etc. Incidentally, with bikes these days using internal cable routing, there’s no way to easily adjust the cable slack tension, like the threaded barrels that bikes of old had. Shimano took care of that with a clever design, an adjustable pivoting derailleur cable clamp. I noticed that the 2 mm hex adjust screws were all pretty loose, likely to shift during rides, so I applied blue lock-tite.

The rear derailleur was OK but not quite perfect. The outer (smallest cog) stop was a bit too far in, so the chain occasionally jumped trying to get to the next bigger cog. Easy fix, no problem.

Wheels/Rims

After the 1st shake-down ride (about 13 miles including a 16% climb) the wheels settled and weren’t perfectly true. This is normal. I put them on my truing stand and took about 15 minutes to get them perfect. If my experience with the carbon wheels on my MTB is any guide, they’ll go a thousand miles before they need it again.

Inaugural Ride

After all of the above, the bike was ready for a real ride. I rode the Flying Wheels 45 mile route with a couple of friends. This includes cruising on the flats, plenty of steep climbs, and a couple of fast (50 mph) downhills. The bike performed great. Comfortable, fast, nice wide gear ratios, perfect quick shifting, and the brakes are powerful with good modulation. The handling is stable and confident, though more quick and responsive than the term “endurance bike” led me to expect.

The stock seat is high quality but a bit too wide for me personally. I replaced it with the Origin8 Axion from my old road bike. Incidentally, I saved 34 grams doing so (314 vs. 280 grams).

The bike weighs 18.7 lbs. ready to ride with Shimano PD-ES600 pedals. That’s decently light for a full carbon bike with the disc brake Ultegra groupset.

Ride report: this is a fantastic bike and everything I wanted and expected. And it looks clean with full internal cable routing.

Conclusion

The Fezzari Empire is a fantastic bike having great value and one of the best warranties in the business. However, while Fezzari’s customer support is quite good, their quality and safety checks are inconsistent. If the bike has issues, they will take care of you. But it may be up to you to figure that out. So make sure you’re confident doing quality & safety checks when the bike arrives, or you know someone who can.
Keyboards: Cherry Blue vs. Buckling Springs

I’ve seen a lot of reviews of these keyboards, but they’re not that useful. They usually record what they sound like when typing and talk about how they look and feel. I’ll try to provide a bit more objective info here.

The keyboards I’m comparing are a Durgod with Cherry Blue switches, and a Unicomp Mini M with buckling springs. Both are 87-key layouts (tenkey-less). I find this more ergonomic, as it puts my right hand closer so I don’t have to stretch to reach the trackball. More on that here.

Sound

I recorded both keyboards with my Rode NT1A mics while typing the sentence, “Now is the time for every good man to come to the aid of his country.”

Here are the cherry blues

Here are the buckling springs

They sound quite different. Cherry blues go “click-tick-click-tick” with a thin high pitch while buckling springs go “clock-tock-clock-tock” with a thicker lower pitch. Perceptually, the buckling springs sound louder but the difference is belied by the recordings. According to the recording. peak levels for the buckling springs are only 0.3 dB louder than the cherry blues. Perceptually, it’s hard to compare relative loudness of sounds having such different frequency profiles.

Next, frequency spectrum analysis of these sounds:

Here are the cherry blues

Here are the buckling springs

If you look closely you can see differences that are consistent with subjective perceptions. The buckling springs have more energy at lower frequencies: 50-70 Hz, 310 Hz, and 750 Hz. They have less energy at high frequencies, as the cherry blues have bigger spikes at 1200 and 9500 Hz.

Compatibility

Like every other keyboard I’ve used, the Unicomp works on both Linux & Windows, and through my IOGear electronic KVM switch. However, it behaves differently with Numlock.

Most 87-key TKL keyboards don’t have Numlock, and they ignore the Numlock signal. Not the Unicomp. It supports Numlock! The ScrLk key becomes NumLk when you use Shift. It has 12 keys dedicated to the keypad: 7-9, u-o, j-l, m-.. It seems nice to have even though I would never use it. However, it can also cause problems.

Most computers’ system BIOS have a setting to set the Numlock state when the computer boots. By default, this is ON. This doesn’t work well with an 87-key like the Unicomp, because it changes important alphanumeric keys into numbers. So you may need to alter your BIOS to set the default state to OFF.

Furthermore, Linux enables Numlock when it boots and when you log in (even when you set the BIOS state to OFF). So you’ll have 2 more places you need to reverse the Numlock state. The Linux command “numlockx” is useful for this.

At first I thought this was an annoying bug in the keyboard firmware, as the Numlk got enabled every time I booted my Linux system, and every time the desktop timeout lock kicked in. But as sometimes happens, it turns out to be a feature. Once I figured out how to set the default state to OFF, this is no longer a problem.
Typing Speed

An accurate way to assess typing speed is to look at the keyclicks in the sound waveforms as I typed the same sentence. So here they are:

cherry blues

buckling springs

You can see from the clicks in the waveform that my typing speed was almost exactly the same: about 6.5 seconds to type that sentence (distance from first to last click).

The sentence has 68 characters and 16 words. For typing speed, nominal word length is taken to be 5 characters, so this sentence is only 13.6 nominal words. This amounts to 125 words per minute. That is, form the ratios 13.6/6.5 = X/60, then X = 13.6*60/6.5 = 125.5.

As typing speed is the same, one might assume the difference between these keyboards is purely subjective: which do you think feels or sounds better? Yet such is not the case. We must consider typing accuracy.

Typing Accuracy

Here, the Unicomp wins, and it’s not even close. And it’s not for what might perhaps be the most obvious reason: mechanical switch accuracy. Neither keyboard’s switches produce missed or double characters. The reason is more subtle. It’s about the key switch actuation force and the shape of the keycaps.

Key Actuation Pressure

Blues are not the heaviest cherry switches (greens are). Blues are heavier than the popular Browns, yet still much lighter than buckling springs. The difference is not subtle; it is big and obvious. The Cherry switches are so light, I find that they actuate with incidental finger movement. Just lightly resting my fingers on the keys to find the home keys, I sometimes accidentally press a key. And while typing, if my finger is even slightly misaligned from the exact center of the keycap, if my finger even slightly brushes the key next to it, that key also activates.

Thus, the cherry blues require more finger placement precision when typing, which means either (A) making more mistakes, or (B) slowing down. Because the buckling springs are a bit heavier, they are more forgiving. If your finger is slightly off the exact key center, and gently brushes a key next to it, they key doesn’t actuate. This enables faster typing.

Keycap Shape and Feel

The buckling spring keys feel like they are further apart from each other, slightly bigger spacing. Yet they measure the exact same dimensions, so I assumed this was just my imagination. But the feeling was so persistent that I took additional measurements, and discovered that the keycaps are the same overall size but they have slightly different shapes.

Here I’ll call them “Unicomp” and “Durgod” rather than “buckling spring” and “cherry blue” because we’re talking about the keyboard’s keycaps, not the switches.

Unicomp’s keycaps have slightly smaller top faces and slightly more taper to the base. In comparison, the Durgod keycaps (which are the same shape as the standard keycaps we get on any keyboard that uses cherry switches) are a bit more squarish: the top face is slightly bigger with slightly less taper to the base.

In millimeters, the Unicomp keycap tops measure 11×11, vs 12×12 for the Durgod. Of course, if the keycap tops are slightly smaller while the overall key spacing is the same, the gaps between keycap tops must be slightly larger. And this is true. That spacing measures 7 on the Unicomp, vs 6 for the Durgod.

Both keycaps top faces are curved so you can feel when your fingers are perfectly centered. But the key actuation force of the cherry blues is so light, I can’t actually feel that curvature because doing so incidentally presses the key. To avoid incidental presses, I must hover my fingers just above the keys instead of on them. This reduces the precision I can get by feel.

How does this affect the feel of the keyboard when typing? With the Unicomp you can tell if your fingers are slightly off the keycap center, and keep them centered as you type. I find I do this automatically, probably from all that time typing on original IBM keyboards all those years ago. In comparison, the Durgod keycaps feel the same whether you hit direct center or are slightly off.

Typing Accuracy: Conclusion

These two factors combine to make my typing less accurate with the Durgod keyboard. First, the cherry blue switches are so light, I get accidental strikes on adjacent keys when my fingers aren’t positioned exactly right. Second, the shape of the Durgod keycaps make it harder for me to tell when my fingers are perfectly centered.

In contrast, the Unicomp is more forgiving of sloppy finger positioning when typing, and the keycaps give better tactile feedback to improve that positioning by touch as you type.

Postscript: Cherry Greens

Greens are just like blues, but with a heavier spring / actuation force. Only slightly heavier, the difference is subtle. Many keyboards with blue switches use a green for the spacebar. As mentioned above, the (slightly) stronger force protects against accidental strikes and boosts accuracy. However, greens still feel lighter than buckling springs, and less tactile. Also quieter, but with a less satisfying higher pitched click.

I use greens (with o-rings) at work and buckling springs at home. I prefer the buckling springs but the greens are the best compromise I can find that won’t torture my co-workers with the noise.

Postscript: O-Rings

Installing small o-rings around the stem of each keycap is a popular mod. I’ve seen them available in 2 hardnesses and thicknesses:

  • Hardness: 40A (soft) or 50A (firm)
  • Thickness: 0.2 mm (thin) or 0.4 mm (thick

What the o-rings do:

  • They make the keyboard quieter, especially if you bottom-out the keys (which I always do).
  • They soften the bottom-out so it’s less jarring on your fingers.
  • They don’t make blues or greens less clicky or tactile.

I find these effects subtle and easy to exaggerate. They make a difference for sure, it’s just not a huge one. They are not necessarily “better” or “worse” — it’s just different and a matter of taste. O-rings are inexpensive, you can get a 200 pack for around $5 – $10. And they can easily be removed if you don’t like them. So if you’re curious then jump right in – there’s no real reason not to try them.

Audio Review & Measurements: Denon DRM540 Cassette Tape Deck

Introduction

Years ago, I owned and used a Denon DRM-740, one of their best cassette tape decks. It was about as transparent as a tape deck can be (not very) and I recorded a lot of material on it. Recently I bought this piece of retro 1990s audio gear on eBay as a little blast from the past. I was curious if I could restore it to its original specs and performance.

Description

The DRM-540 is a standard 2 head cassette tape deck with electronic transport controls, Dolby B and C, HX Pro, and fine bias adjustment. You can Google it for details.

This unit arrived with a dirty, scratched heavily used exterior. Cosmetically, I’d rate it 2 of 5. This belied its interior condition. The heads looked fresh, no scratches or grooves. The inside was clean and all the service adjustment pots turned smoothly. Mechanically, it worked.

Restoration

The first thing I did was physically clean the heads, capstan and rest of the tape area with Q-Tips and isopropyl alcohol. It had years of oxidation and gunk. Next, I demagnetized the heads and metal transport parts. Now it was ready to play tapes. I connected the deck’s input & output to my PC sound card (an ESI Juli@).

First: speed adjustment. I played my calibration tape, which has 3 kHz on side A, 8 kHz on side B. The deck ran about 2% slow. That’s WAY off. I opened the top to get access to the motor speed adjustment screw. For coarse adjustment, I played the 3 kHz tone and listened with my phone and Spectroid app. It was quick & easy to get it within 1%. Then I recorded tape playback with Audacity and did an FFT / Spectrum Analysis. Back and forth a few times. Eventually I got the speed within 0.3%. That’s about as close as I could get, given the resolution of the adjustment screw.

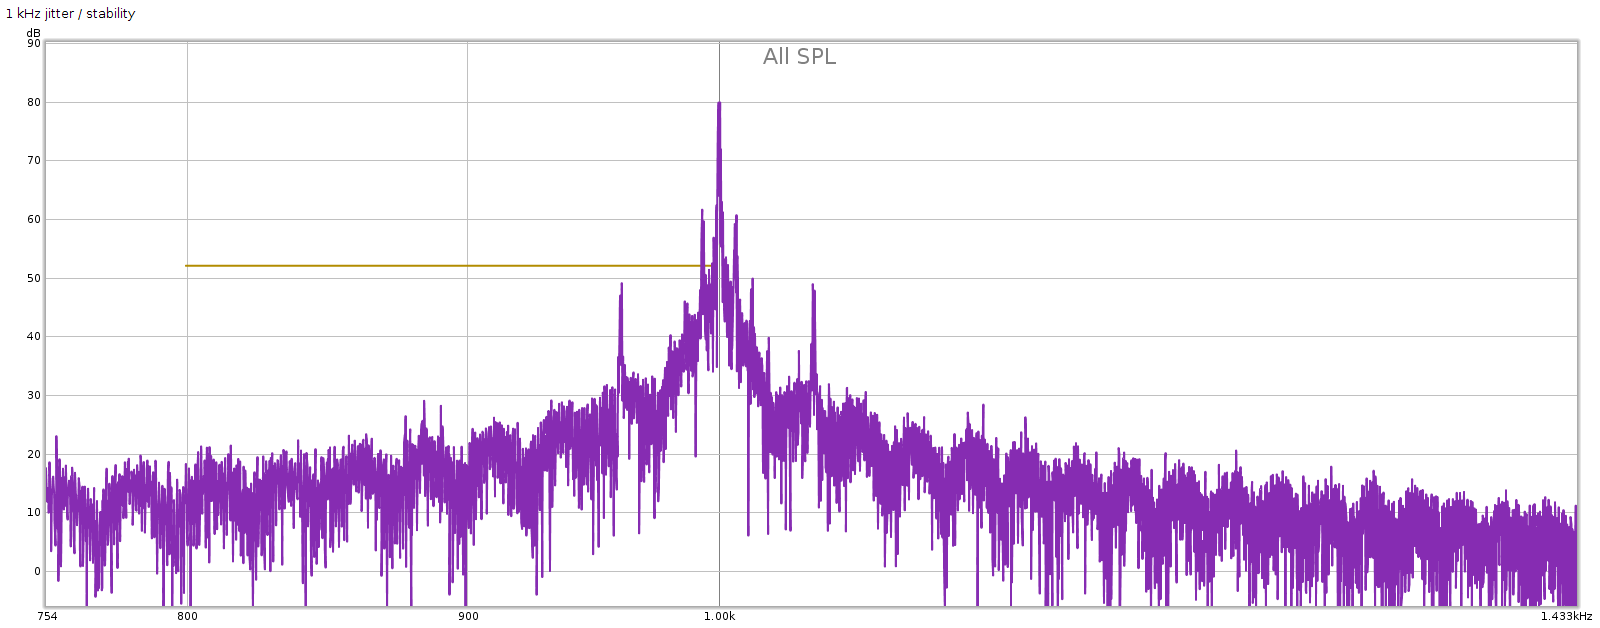
Here’s a closeup of the spectrum playing a 1 kHz tone. You can see sidebands near the center frequency, which show the frequency stability is imperfect. If this were a DAC we’d call that jitter:

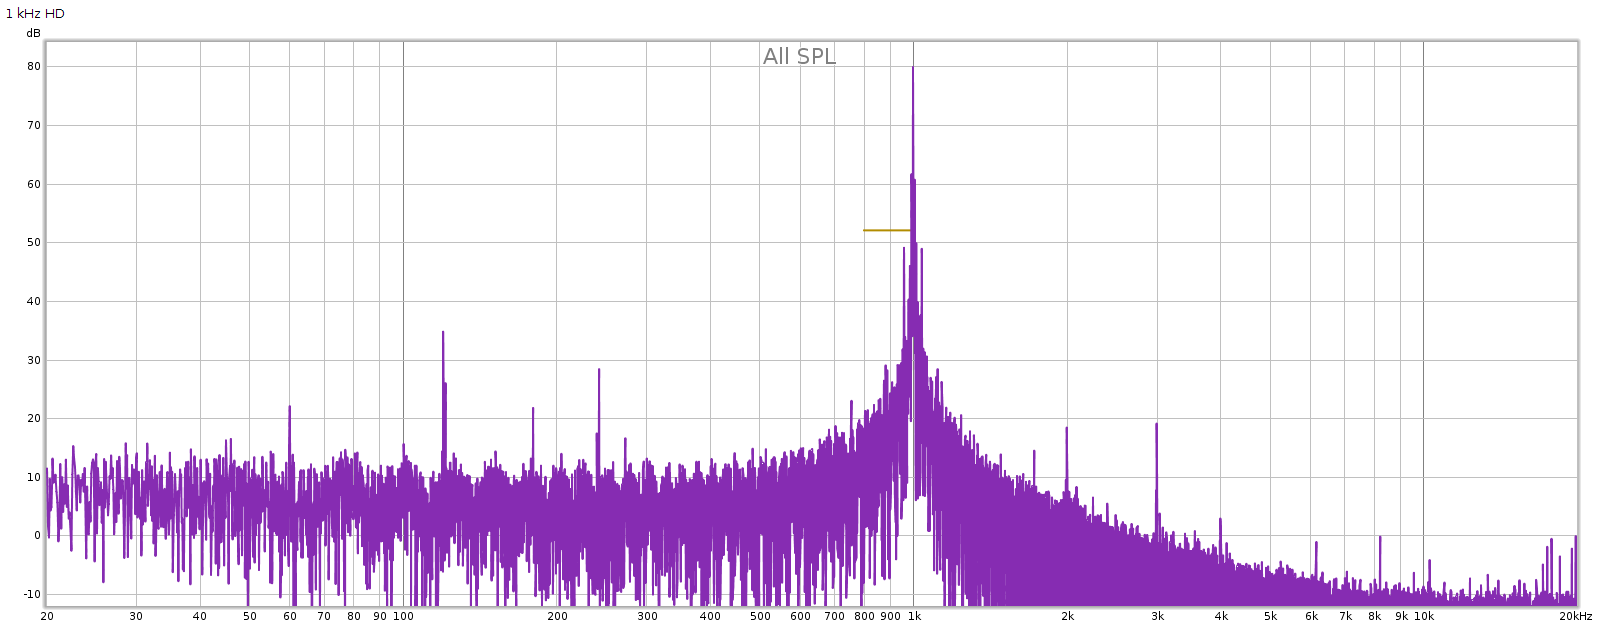
Here’s the full spectrum for that same tone. You can see the 2nd & 3rd distortion harmonics are just under -60 dB. Not bad for a cassette tape deck.

You might notice that harmonic distortion from this tone is lower than the power supply harmonics at 60, 120, 180 and 240 Hz. It looks like this deck could be improved by better filtering the power supply. The power supply doesn’t appear faulty, it’s just that there’s no reason to spend a fortune making a super clean power supply, since the device will be limited by cassette tape performance.

Next: azimuth adjustment. This is a screw next to the playback head that changes the angle of the head to align it with the tape as perfectly as possible. I don’t have a scope, so I played the 8 kHz tone into the sound card while recording in Audacity. Slowly turned the screw back & forth to maximize the output level, until the screw was in the middle of the range of maximum output. This changes the channel balance, so I turned those internal pots to equalize them, then readjusted the azimuth. I went back and forth a few times until it was as close as I could get. The azimuth ended up in a very different position from where it started, so it was quite a bit off.

Then I went back to 3 kHz and adjusted the internal playback gain pots to equalize the channel balance, then to 8 kHz, which had slightly different balance. Back and forth a few times to minimize and equalize the difference.

Next: recording. I played REW frequency sweeps on the PC and recorded them. I used BASF Reference Maxima II tape, one of the best back in the old days. The L-R channels weren’t equal when recording, so I adjusted the internal recording gain pots to equalize them.

Dolby B is ubiquitous, so that is what I used for all the following measurements.

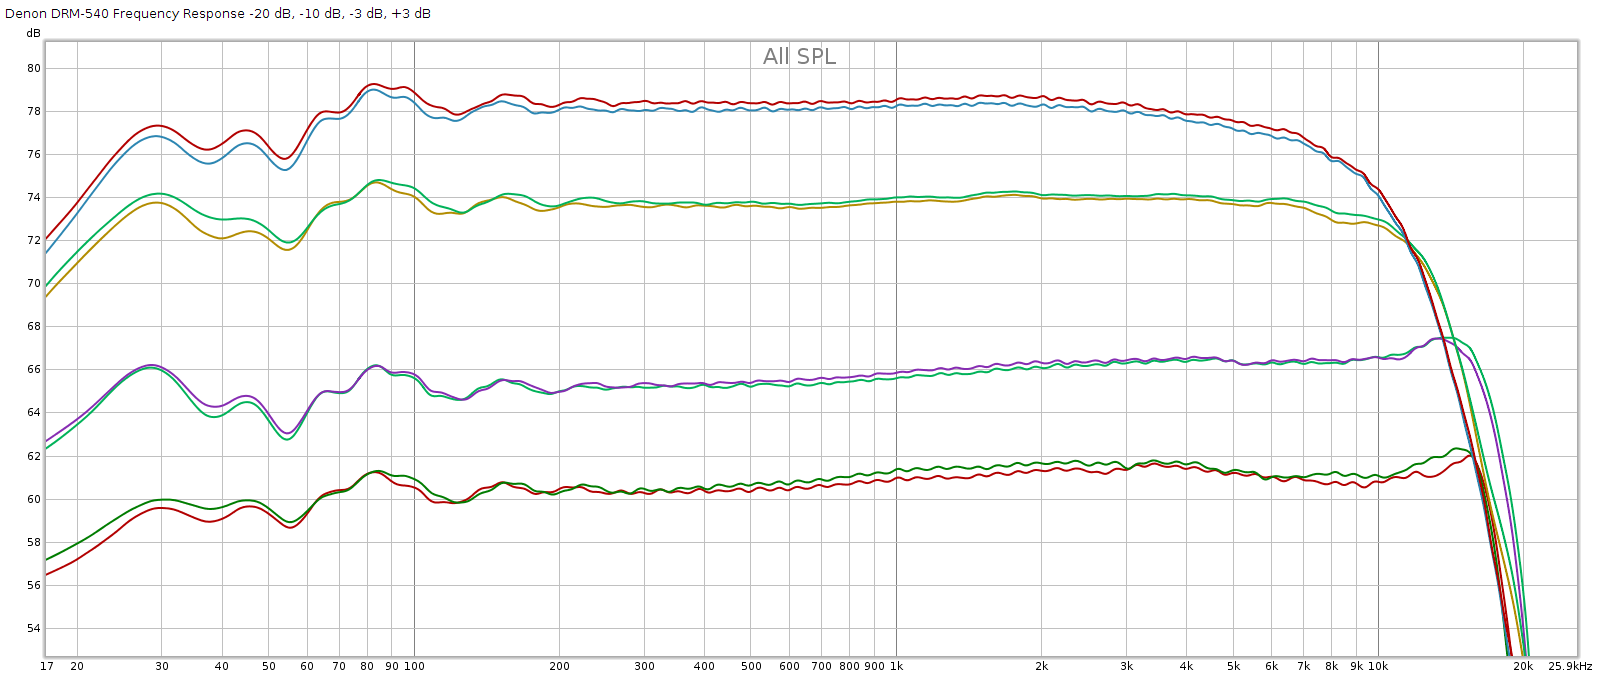
Here’s the frequency response measured at different recording levels: -20, -10, -3 and +3 dB. As expected the best (most linear) frequency response is at -20 dB, which is why that is the level used for its specifications. Frequency response tapers as we increase the level, yet it does so smoothly.

This deck meets or exceeds its specification, which is 20 Hz to 18 kHz, +/- 3 dB at -20 dB.

Next: bench testing: frequency response, distortion, SNR. I used the deck to record and play back the REW frequency sweeps and analyze them in REW. I did this at different settings: no Dolby, Dolby B and Dolby C. And I also did this while turning the external user-settable fine bias control to see whether it worked and how much impact it had.

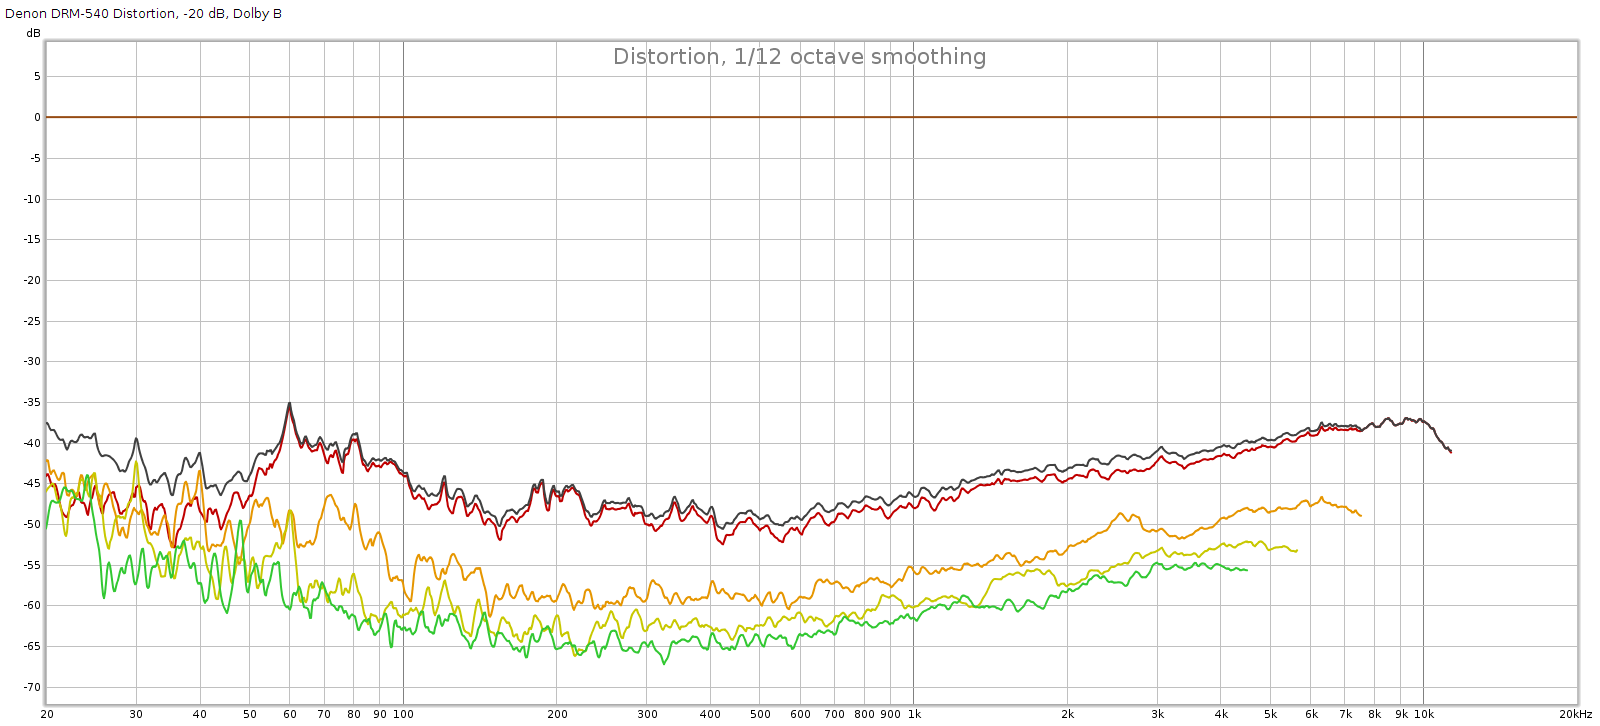
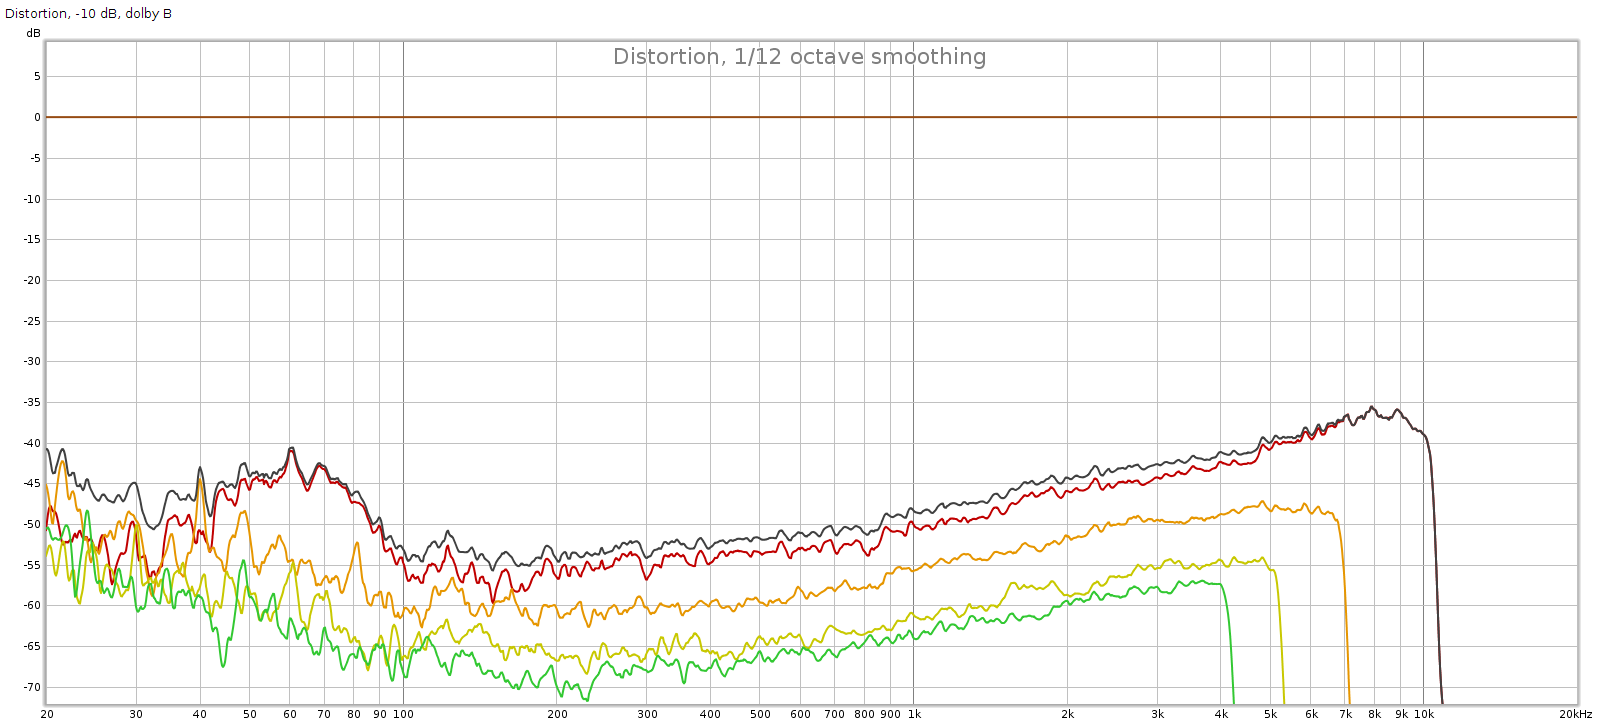
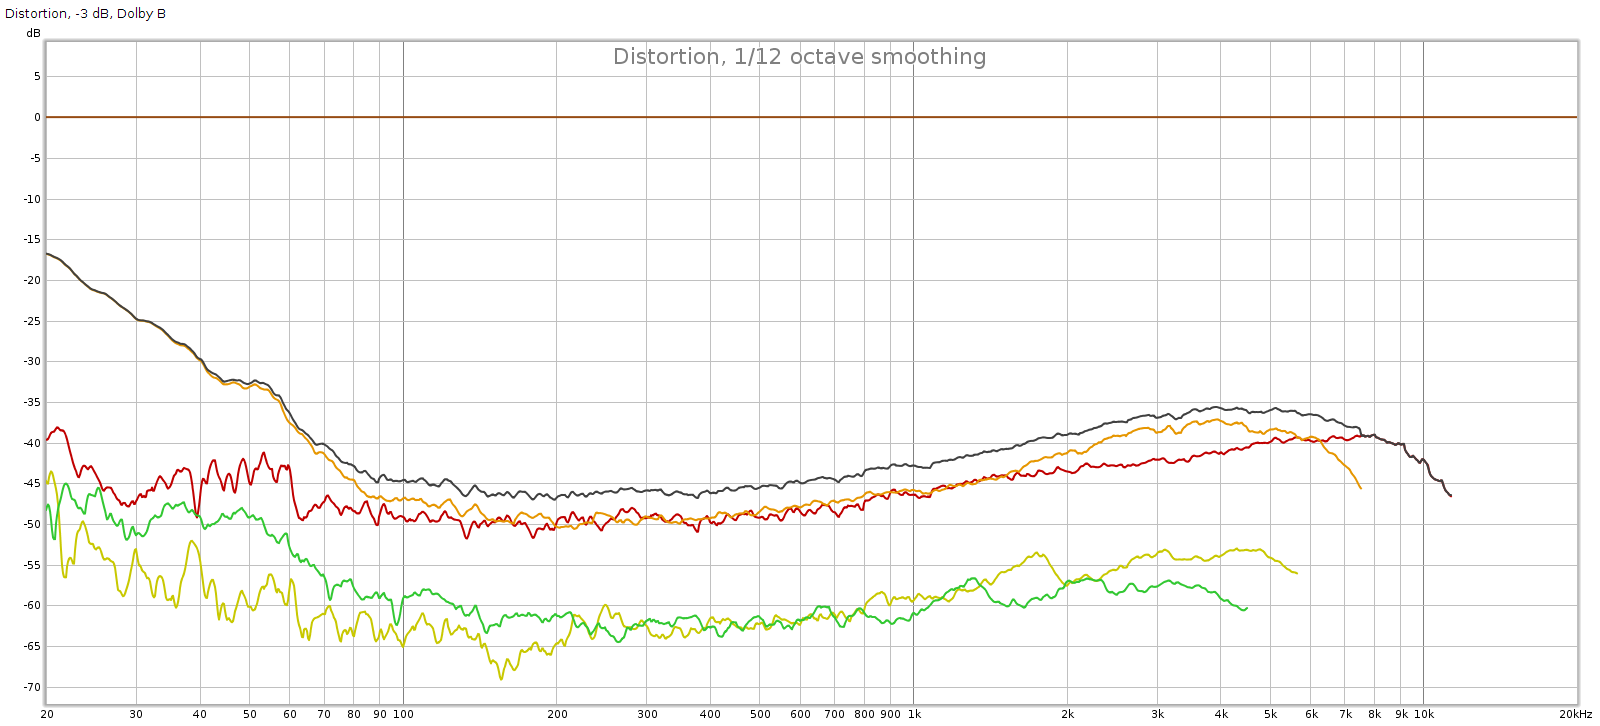
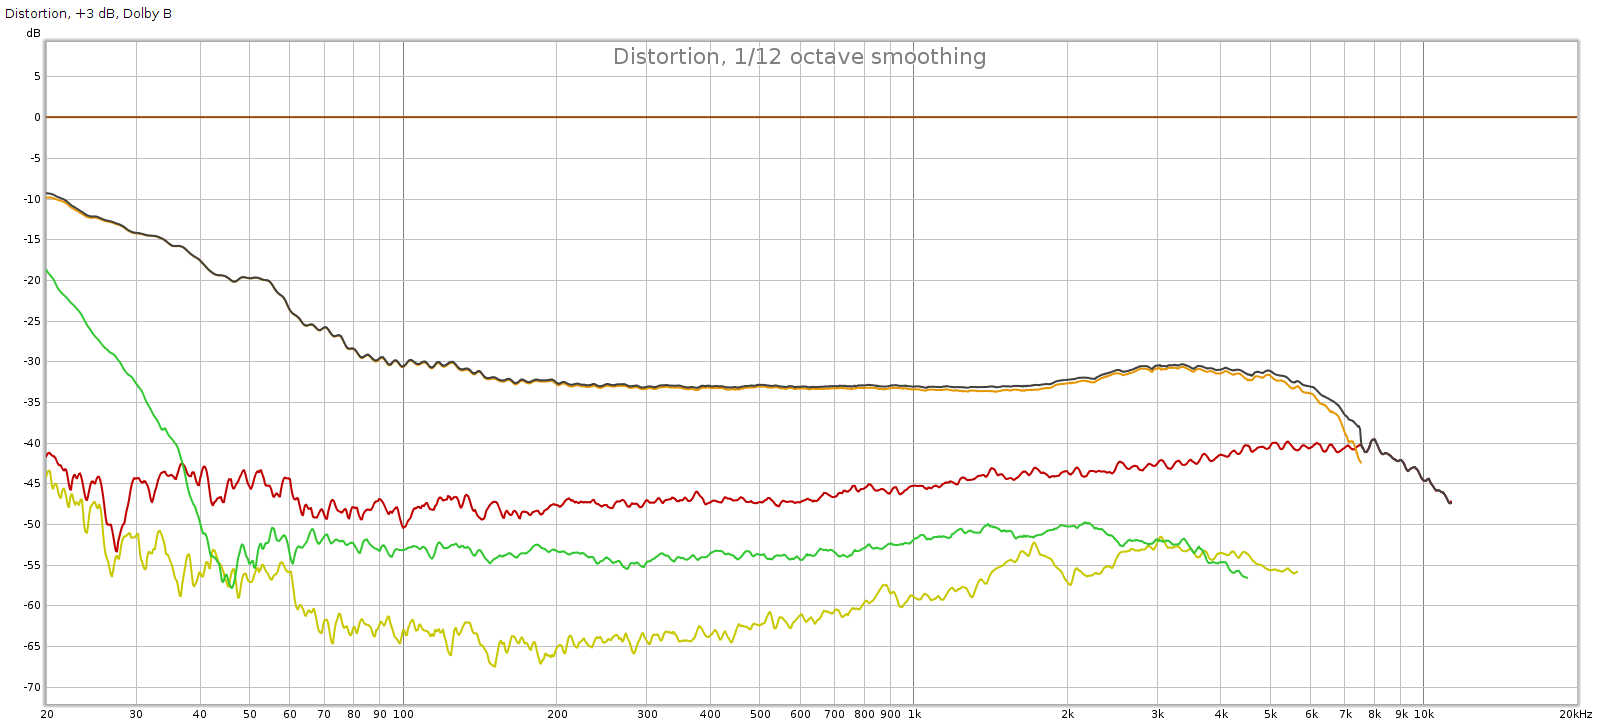
Here are some distortion graphs made at different recording levels. This is measured after recording and playback, so it includes total distortion from the deck itself, and from the tape used for recording. Thus it overstates the deck’s distortion and represents real-world results.

Distortion at -20 dB

Distortion at -10 dB

Distortion at -3 dB

Distortion at +3 dB

Above, we see what we’d expect from a new deck. Distortion rises at high at high levels due to saturation, and it rises at low levels due to noise. The sweet spot for lowest distortion is around -10 dB recording level.

Another problem this deck had was that the recording level lights didn’t match between recording and playback. That is, record something with the levels just reaching 0 dB but when you play it back the lights indicate higher (or lower). I fixed this by adjusting the internal input and output level pots. Now the lights match between recording & playback.

Also, the drive motor developed an occasional squeak. I used a syringe to apply a tiny amount of low viscosity oil to the motor driveshaft/bearing interfaces. This eliminated the squeak. Then I had to readjust the speed again.

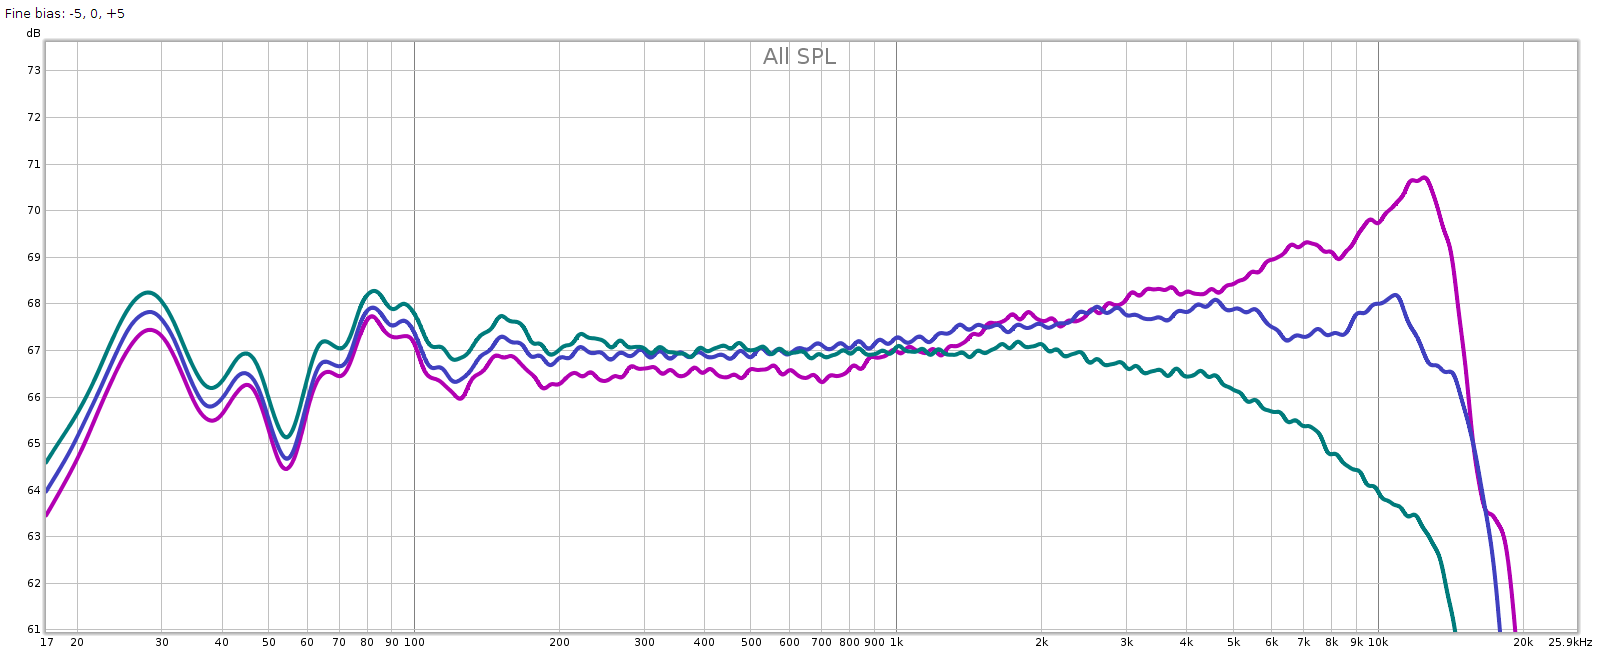
This deck has a fine bias knob on the front panel. The reason for this is that different types and brands of cassette tapes have different frequency response, so this enables you to fine tune the frequency response to each individual tape. I tested the effect of this knob, results below. Note that the graph uses 1 dB per division, so the frequency response is flatter than it looks.

The blue line is with the fine bias knob in its center position.
The magenta line is with the fine bias knob turned full left, CCW, the -5 position.
The green line is with the fine bias knob turned full right, CW, the +5 position.

The above graph shows that fine bias is like a tone control that tilts the frequency response like a see-saw whose center pivot is around 1 kHz.

Summary

Results: to my surprise, the deck performed on par with the specs from the manual.

  • Frequency response: 20 Hz to 18 kHz, +1 / – 3 dB
  • Distortion (with Dolby B)
    • At level -10 dB, THD at -50 to -55 dB (0.25%), with 2nd & 3rd harmonics at -60 dB
    • At level +3 dB, THD at -30 dB / 3%
  • Fine bias: -4 to +2 dB @ 10 kHz

Remember this is with a 20 year old blank tape that had been recorded on a few times. If anything, it understates the actual performance.

Finally, I did some subjective testing. Recorded a clean 96-24 digital album (Diana Krall & Tony Bennett), played it back and compared with the original. The differences are audible, but not as obvious as one would expect, given this vintage equipment and cassette tape limitations. It actually sounds pretty decent.

The original: http://mclements.net/audio/clip1-orig.flac
Recording: http://mclements.net/audio/clip1-rec.flac

The original is a high-res download resampled to 44-16 in Audacity.
The recording is the high-res download, played through my sound card, recorded on the DRM-540 in Dolby B with BASF Reference Maxima II tape, played back on the DRM-540 to the sound card’s analog inputs and recorded at 44-16.

Conclusion

Cassette tape is the vintage sound of the 1980s. It’s nowhere near as good and transparent as the modern digital equipment we have. We are so spoiled today! But, it’s not as terrible as its reputation and can sound pretty decent especially for casual listening, when the deck is clean and calibrated. And it was fun and educational to calibrate this deck, measure it and see the improvements.

Bicycle Tires and Efficiency / Rolling Resistance

Introduction

I’ve seen a lot of articles and videos about how “wider tires are faster”. This is incorrect. Yet like many commonly believed falsehoods, it springs from a thread of truth. It’s a misleading interpretation of how tires are tested for rolling resistance.

I’ll describe the testing and the truth of what it really means.

The Testing

This site has excellent info about bicycle tires: https://www.bicyclerollingresistance.com

Equal Pressure Testing

In many of the tests, wider tires have lower rolling resistance. However, in these tests they inflate the tires (both wide & skinny) to the same pressure. This is unrealistic and misleading, since nobody actually runs wide and skinny tires at the same pressure.

If you inflate a wide tire to the same operating pressure as a skinny tire:

  • You exceed the wide tire’s maximum pressure, which is unsafe.
  • The wide tire will be much more rigid and uncomfortable to ride, with poor traction.

If you inflate a skinny tire to the same operating pressure as a wide tire:

  • The skinny tire will be soft and sloppy, with poor traction.
  • You will get pinch flats when you hit bumps.

So equal pressure testing is purely a theoretical educational exercise, completely useless for pragmatic purposes.

Equal Comfort Testing

Often, the tests inflate the tires to pressures that give the same yield or squish measured in absolute terms. That is, under the same load, the wide tire and the skinny tire both flatten or squish by the same fixed distance (say, 5 mm). This should make the tires feel the same when riding, hence the name “equal comfort”.

When tested this way, tires of different widths tend to measure the same rolling resistance. That is, all else equal (same brand/make of tire, same load, etc.). So one could say that width doesn’t matter.

However, in order to make the yield distances the same, the skinny tire must be underinflated, and the wide tire overinflated, relative to each other. This is a variation of the same mistake that the equal pressure test makes: inflating the tires to pressures you would not actually use when riding.

So, like the equal pressure test, it is interesting and educational, but impractical.

Proportional Displacement Testing

Another way to test tires is to inflate them so that each tire yields or squishes a distance proportional to its width, under the same load. 15% is a typical value, so a skinny 23 mm tire squishes .15 * 23 = 3.45 mm, while a wide 32 mm tire squishes 4.8 mm.

Not coincidentally, the pressures that give this result are near or equal to each tire’s recommended operating pressures. This makes the test representative of actual real-world conditions. And not surprisingly, this testing shows that skinny tires have less rolling resistance than wide tires (all else equal).

But Wait, There’s More!

So when we inflate tires to the recommended pressures, what exactly are the characteristics that depend on tire width?

Wider tires…

  • Have more comfort
  • Have more traction
  • Have higher weight
  • Have higher rolling resistance

Another factor in rolling resistance is compliance: does the tire absorb uneven road surfaces, or does it transmit it through the wheel & frame? On rough surfaces, more compliance is not only smoother but also faster. So the ideal tire width and pressure depends on the surfaces (trails or roads) that you ride on.

Conclusion

Key take-aways for cyclists:

  • Articles & videos saying wide tires are faster, are incorrect and misleading.
  • However, while wide tires are slower on smooth surfaces, the penalty may be smaller than you think, which could make it worth paying for increased comfort and traction.
  • For maximum speed, choose the skinniest tire that provides the comfort and traction that you need, for the surfaces you ride on.

The Ideal Road Bike

What is the ideal road bike?

  • Efficient (fast)
    • If you don’t care about this, you might as well ride a mountain bike as they can traverse any kind of terrain, roads or trails.
  • Comfortable
    • Comfort = fun, especially on long rides.
  • Handling
    • If you’re going fast, it needs to be responsive and predictable in the turns.
  • Brakes
    • The faster you go, the more important this is

Requirements

  • Gearing: wide range
    • A wide range is essential: at least 1:4 from low to high
    • Examples
      • My ’99 Trek had low 39-25 = 1.56, high 52-12 = 4.33, range = 4.33/1.56 = 2.78:1
        • This is not enough. The high is about right but the low is much too high
      • Modern: low 34-34 (1:1), high 50-11 (4.54:1), range = 4.54/1.00 = 4.54:1
        • This is great – much lower 1st gear and roughly the same high gear.
    • Modern bikes offer much smaller front chainrings which solves this problem
    • How many gears is irrelevant: 8, 9, 10, 11, 12, whatever.
      • This is marketing bullshit.
      • It’s the range, not the number of gears, that matters.
    • Electronic shifting is irrelevant.
      • Mechanical cable shifting has been perfected for decades and works perfectly
      • Mechanical doesn’t need batteries, is lighter, cheaper, more reliable, simpler, and user serviceable
      • Electronic shifting is a solution in search of a problem
  • Frame: carbon
    • Must be both stiff (efficient) and comfortable.
    • Aluminum is stiff but uncomfortable, transmitting vibration to the rider which gets painful and fatiguing on long rides
    • Steel is comfortable but too heavy, and it is not as strong or durable as people think
    • Carbon fiber is the best frame material: the efficiency of aluminum with the comfort of steel, and very strong and durable
  • Wheels: carbon
    • Must be stiff (efficient), light, and aerodynamic
    • Aluminum allow rims cannot be both light & aerodynamic – choose your poison
      • When you make them deep enough for good aero, they get very heavy
    • Carbon rims give the best of all worlds, and good ones have lifetime warranty
    • BUT Carbon rims
      • should not use rim brakes – poor braking and can melt the rims
      • should not use alloy spoke nipples – need to use brass to avoid redox
      • Make sure the spokes are exposed so you can true them without unsealing the tire
  • Tires: clinchers with latex tubes
    • Clinchers with latex tubes are faster and more comfortable than tubeless
    • Use the narrowest tires that provide sufficient comfort
      • Much has been said that modern tires can be wide without increasing rolling resistance.
      • This is incorrect, misleading and mis-interpreted: wide tires are not faster.
      • All else equal, a narrower tire run at its recommended pressure has less rolling resistance.
      • All else equal, a wider tire run at its recommended pressure is more comfortable
    • Don’t use tubeless tires.
      • Tubeless is great on MTB, where they enable you to run lower pressures without getting pinch flats. These lower pressures increase traction.
      • On road bikes, tubeless tires are neither faster (rolling resistance) nor lighter than tubed tires
  • Brakes: hydraulic disc
    • Rim brakes are a bit lighter, but less effective and can’t be used with carbon wheels
    • Hydraulic brakes are better than mechanical: lighter touch and self-adjusting

Cessna 172 Rear Seat Removal

Why?

Removing the rear seat significantly increases the cargo space, which opens up new mission possibilities. For example, I can normally fit 1 bicycle in the back of the plane, but with the rear seat removed I can fit 2 bicycles. This makes it possible to take a friend and make cross-country trips to explore some of the best bicycling across the pacific northwest.

Regulations

For my 1980 172 (built in 1979), the POH equipment list does not mark the rear seat as required, so the airplane is airworthy with, or without, the rear seat. But can a pilot remove the rear seat himself? FAA regulations part 91 section 43 governs the maintenance pilots can perform. Appendix A, (c) says:

(c) Preventive maintenance. Preventive maintenance is limited to the following work, provided it does not involve complex assembly operations: 
...
(15) Replacing seats or seat parts with replacement parts approved for the aircraft, not involving disassembly of any primary structure or operating system.

The rear seat comes out with 4 simple bolts and nothing has to be disassembled. To get the rear seat out of the airplane one of the front seats has to be removed, then reinstalled. This can be done without any tools at all.

Conclusion: it is legal to fly the airplane without the rear seat, and it is legal for a pilot to remove and install it.

Of course, this changes the weight & balance. So the pilot removing/replacing the seat must note the removal/replacement in the airframe logs, citing the above paragraph as his authority and the maintenance manual as his reference. Also use the weight/arm info from the equipment list to make appropriate modifications to the empty weight/arm of the aircraft in his W&B computations for flights with the seat removed. And, of course, the pilot would have to be sure that at most only two people were in the plane when it is being operated.

How-To

So now that we know it’s legal, how do we actually do it? It turns out to be quick and easy.

Before you start it looks like this:

Step 1: remove one of the front seats

This makes room to remove the rear seat from the airplane, and you can reinstall it afterward. I removed the right / co-pilot seat.


Review: JDS Labs Subjective 3 Equalizer Kit

Summary

No Jedi’s training is complete until he constructs his own light saber. Audiophiles can benefit from this advice, as building audio gear is fun and educational, and improves our understanding and appreciation of this hobby. When it comes to building I’m very much an amateur, but I have some experience, having designed & built a passive attenuator and constructed a phono head amp in years past.

JDS Labs has a simple 3-band EQ they call the Subjective 3; they sell it as a product, and as a kit. The kit saves you $20 and gives you the fun & satisfaction of building it yourself. I couldn’t resist. Here’s a review.

My System

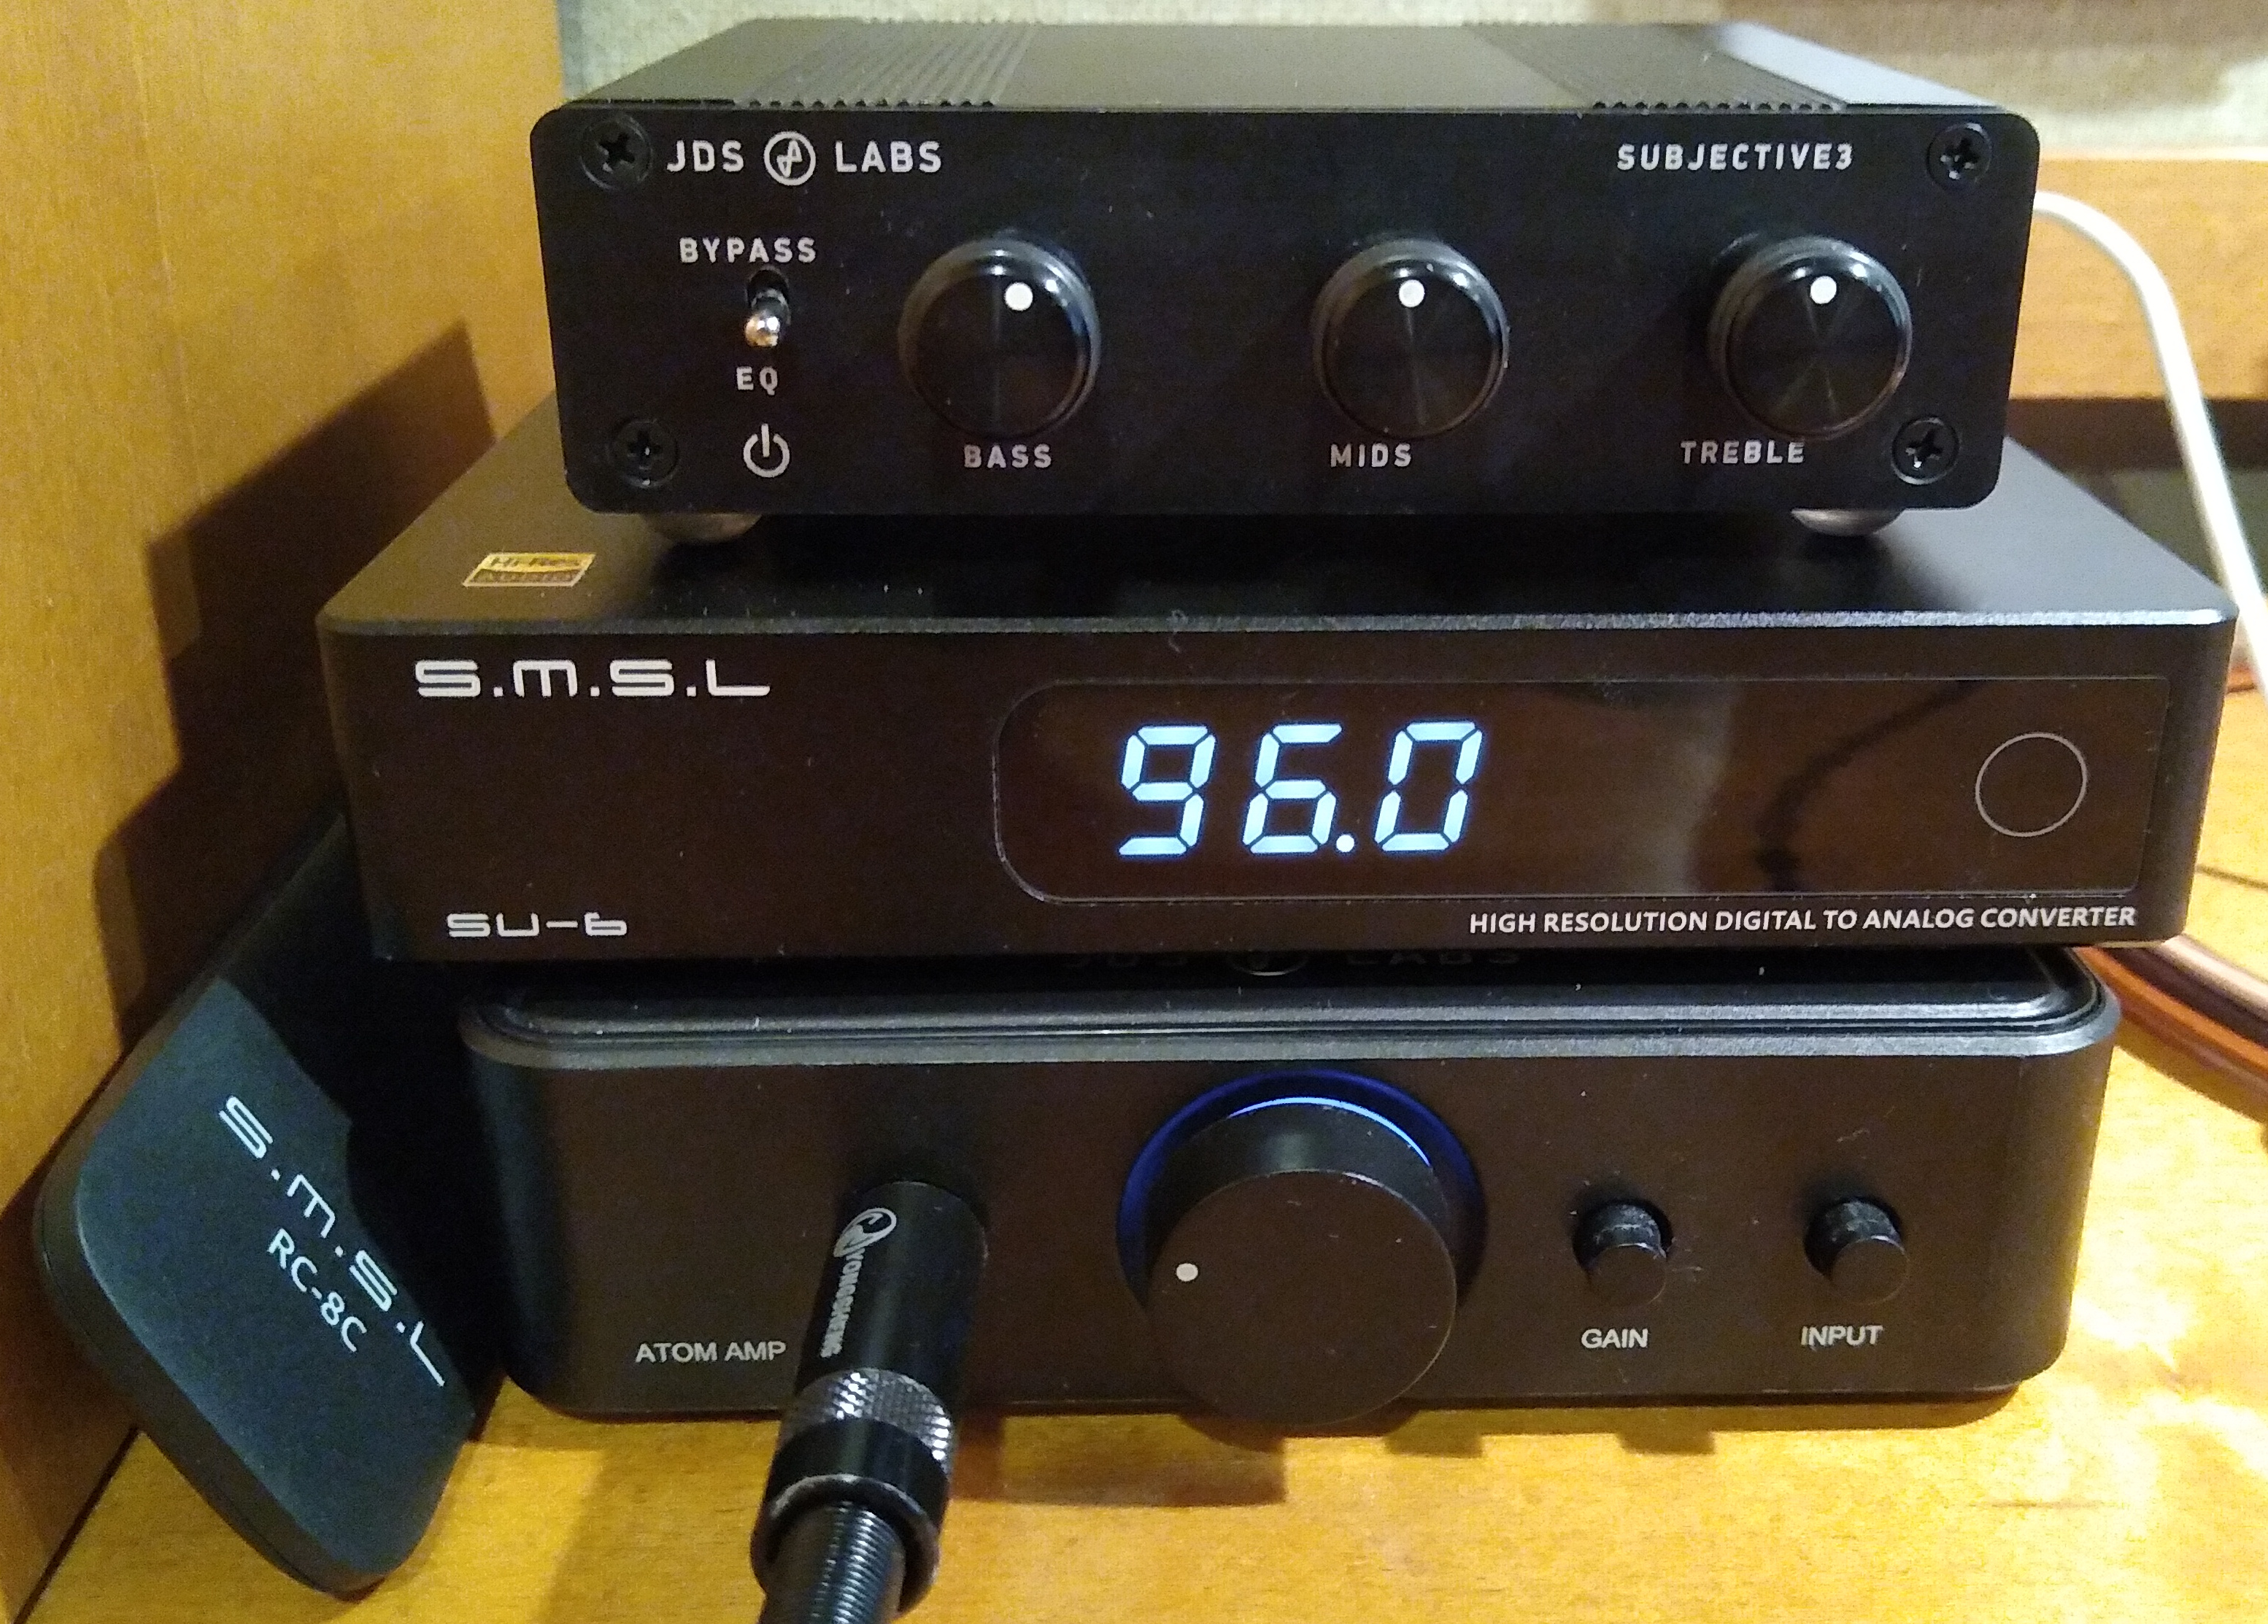
My desktop audio system is decent but not SOTA. My desktop PC (Ubuntu 18) is the player; it has an ESI Juli@ sound card, whose coax digital output goes to an SMSL SU-6 DAC, whose analog output goes to a JDS Atom amp. I listen on my 20+ year old Sennheiser HD580s, sometimes on Audeze LCD-2F.

Why not use DSP EQ like PulseEffects? I do in fact use this software. But sometimes I am capturing the audio stream to a file and want a bit-perfect copy without PulseEffects messing with it (resampling, applying DSP). And while the PulseEffects multi band parametric EQ is a precision tool for accommodating the response to rooms and headphones, sometimes all you need to do is tame an overly bright or dull recording, in which case a simple old fashioned 2 or 3 knob equalizer is simpler & easier to use.

JDS Subjective 3 Kit

I ordered the kit and it arrived in 2 days (that was the cheapest shipping available). JDS says it is simple and a good first kit for those who want to dip their toe in the DIY water. I agree with this assessment, with caveats that I’ll mention below.

Here’s how the kit arrives:It includes all parts including the power supply (not shown), and the parts are of high quality: Alps RK09 potentiometers, Vishay and WIMA capacitors.

Installing the Parts
Soldering

Assembly is straight-forward. The instructions simply say, “insert all capacitors, solder and trim”. This may sound daunting for noobs, but each part is bagged with a part number that is also printed on the circuit board where it plugs in. Find each number on the board and plug in the corresponding part.

The key here is to use a soldering iron with a very fine tip and relatively low power (12 W). Avoid cold solder joints. That is, heat up the parts to be joined until the solder melts when touching those parts — not the soldering iron tip itself. Use just enough solder to sink and seep through the hole, but not so much that it makes a glob.

Here’s what it looks like after installing the capacitors and power switch:

Position and Fit

Some of the parts soldered to the board must match holes in the case when assembled: knobs and switches. If they ride too high or low on the board, the case won’t fit. When I was checking this alignment, I noticed that the case is asymmetric. It looks symmetric at a glance and the asymmetry is subtle, so this would be worth mentioning in the instructions. A picture’s worth 1,000 words, and I reversed the faceplate and case to highlight the difference:

At first, I didn’t notice this and when I checked alignment, it looked like I needed to solder the power switch and potentiometers in a position slightly above resting flat on the board, in order for them to line up with the holes in the case. But it turns out this is not necessary. Solder them flat to the board and use the faceplate as your clue that the “long” distance is the bottom of the case.

Installation: Complete

Here’s the board with installation complete: two views of the top and one of the bottom:

The above photo shows 2 important things: fine soldering, and grounding.

Fine Soldering

Each potentiometer has 8 contacts, 6 of which are in a tight grid. Soldering these can be tricky for those wielding an iron for the first time. Start with the middle contacts and work your way outward. Hold the iron near vertical so it doesn’t accidentally contact other stuff on the board. Be careful to use just enough solder to fill the hole without forming a glob that could touch the nearby pins.

Grounding

In the above left you can see that one (but not both) of the signal grounds is wired to the frame. This is something I discovered years ago through trial & error troubleshooting pesky ground loops when I was building a passive attenuator, and also on a phono head amp that I built. If neither signal ground is connected to frame, you can get a ground loop causing a “hum”. Also, if both are connected to frame. But if only 1 is connected to frame and the other is not, it helps break ground loops.

Assembly: Complete

Here’s what the completed kit looks like up close, with my JDS Atom amp:It’s quite small, even smaller than the JDS Atom which itself is a small amp. Here’s what it looks like with the headphones (you can see the wooden headphone stand I made years ago):

Listening

I powered it up, no smoke — great! I played some music with the tone knobs in the center detent, switching back and forth between “EQ” and “Bypass”. There should be no difference in the sound. Indeed they were almost identical. But there seemed to be a very slight difference. In Bypass mode I heard just a hint of “grain” or “edge”, especially in the upper mids / lower treble where our hearing perception is most sensitive. This was the opposite of my expectation, which was that if there was any difference at all, bypass mode would be more transparent. I was playing a very high quality recording of 5 voice ensemble, which highlights midrange purity, revealing distortion quite well.

Our hearing perception is not reliable enough to trust, but it’s not wrong often enough to ignore. So I put the EQ in a loop with my Juli@ card and used REW to take some measurements. Maybe I’m just hearing things, it’s not really there. Or maybe I made a mistake in the build. Either way, measurements would give a helpful baseline.

Measurements
Baseline

My Juli@ card is the baseline and it is not perfect, so let’s look at its FR and distortion. I played 48 kHz sweeps in REW at digital -1 dB for this:Frequency response is flat with << 0.1 dB variation. The bump above 20 kHz seems to be an REW anomaly. It has a slight channel imbalance which at < 0.05 dB is immaterial. Distortion and noise are mostly -90 to -100 dB, which is the limit for 16-bit.

Subjective 3 EQ: Bypass

Against this baseline, let’s see what the Subjective 3 looks like. First, bypass mode:Frequency response is perfect, no difference from the loopback. But we have quite a bit of distortion and noise! At about -60 dB it is likely inaudible, but it is approaching thresholds where it might become audible under ideal worst-case conditions.

Subjective 3 EQ: Frequency Response

Now let’s flip the switch the EQ mode with all the knobs in their center detents.

Here are 3 measurements of the L channel. In between measurements, I rotated each of the tone control knobs several times through its full range then re-centered it to the detent for the measurement. This reveals how consistent it is.

Note: the Y scale is 0.5 dB per division in order to reveal small differences. Red is left, Green is right, just like a boat or airplane.Here are 3 measurements of the R channel, taken the same way:Each shows variations around 0.25 dB. I’m pretty happy with that, it’s about as good as analog potentiometers get. These differences in consistency should be inaudible. Here are the average responses of each, shown together.Channel balance is essentially perfect below 2 kHz, at which point it gradually increases to a max of about 0.25 dB at 20 kHz with the L being slightly stronger.

So the consistency of the knobs, and the L-R channel balance, are each within about 0.25 dB.

Subjective 3 EQ: THD+Noise

Now let’s see if that increased noise we measured in bypass mode, is also there with EQ enabled:Nope! That’s good news. In EQ mode, it doesn’t add any distortion or noise. Of course, no device is perfect. But whatever it does add is below the levels of my sound card and thus masked and inaudible. JDS Labs publishes a THD+N specification of .0022% which is about -93 dB. We have at least that here.

Subjective 3 EQ: Response Curves

Now let’s see what the tone control knobs actually do to frequency response. I measured each knob at its half-way positions, negative and positive. This is approximate, as I can only eyeball the half-way position. So in the graph below, the curves + and – variations aren’t quite the same, but the important thing is the shape of the curve which shows the frequencies each of the knobs changes:

Obviously, blue is bass, green is midrange, and red is treble. And of course I had to zoom out the Y-axis, which is now 2 dB per division in order to keep the curves on-scale. These curves match nicely to the documentation.

Conclusion

The JDS Labs Subjective 3 EQ is a nice little kit. It is inexpensive, uses high quality parts and is easy to build with clear instructions. It sounds and measures clean and transparent in EQ mode. It has good consistency and channel balance. The knobs have a lot of range; just turning from 12:00 (center detent) only “1 hour” to 11:00 or 1:00 makes a noticeable difference. This makes the knobs quite sensitive and the full range is far more than I’ll ever use.

The only real drawback is that bypass mode introduces a fair bit of distortion. At -60 dB it’s close to thresholds of inaudibility, but may become perceptible on certain kinds of well engineered recordings on very high quality playback gear. That said, this issue is unique to bypass mode; the S3 EQ is consistent and clean enough to simply leave powered on in EQ mode all the time.

Note: I contacted JDS Labs in case the distortion in bypass mode was due to a mistake I made in building or measuring this device. They confirmed that it is known, and they’re revising the board to fix this. As I write this update it is Feb 2022 and they just sent me the revised board and parts so I can build another one. I’ll report back soon…

The problem is fixed. The S3 in standby mode now measures the same as a loopback connector, as it should. No more added distortion. In active mode (turned on) it is the same as before. JDS will be shipping this revised version soon.

Here’s the new board. I couldn’t simply solder the 2nd relay into the board, because 2 pairs of pins had to be reversed. So I wired it individually in order to cross pins 4-5 and 8-9. That was tricky for someone with only moderate soldering skills like myself. In production boards, this relay can be soldered directly into the board just like the one next to it, much easier.